User Guide
Page 12
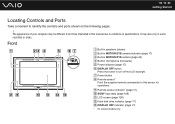
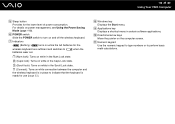
... Point the supplied remote commander to this button to identify the controls and ports shown on the following pages. ! I Remote sensor indicator* (page 17) J SONY logo lamp (page 109) K LCD screen (page 126) L Hard disk drive indicator (page 17) M DISPLAY OFF indicator (page 17) * On selected ...models only. n 12 N Getting Started Locating Controls and Ports Take a moment to turn off the LCD backlight. The appearance of your computer may also vary in microphone (monaural) E Power indicator (page 17) F DISPLAY OFF button Press this...
... Point the supplied remote commander to this button to identify the controls and ports shown on the following pages. ! I Remote sensor indicator* (page 17) J SONY logo lamp (page 109) K LCD screen (page 126) L Hard disk drive indicator (page 17) M DISPLAY OFF indicator (page 17) * On selected ...models only. n 12 N Getting Started Locating Controls and Ports Take a moment to turn off the LCD backlight. The appearance of your computer may also vary in microphone (monaural) E Power indicator (page 17) F DISPLAY OFF button Press this...

User Guide
Page 17
...* On selected models only. ✍ You can change the brightness of infrared signals from or written to a memory card. (Do not enter Sleep mode or turn off the computer when this indicator is on . See Setting Up Your Computer with the following indicator lights. n 17 N Getting Started About the Indicator Lights... Your computer is equipped with VAIO Central (page 109) and find out more in its help file. DISPLAY OFF Illuminates in orange when the LCD backlight is...
...* On selected models only. ✍ You can change the brightness of infrared signals from or written to a memory card. (Do not enter Sleep mode or turn off the computer when this indicator is on . See Setting Up Your Computer with the following indicator lights. n 17 N Getting Started About the Indicator Lights... Your computer is equipped with VAIO Central (page 109) and find out more in its help file. DISPLAY OFF Illuminates in orange when the LCD backlight is...
User Guide
Page 23
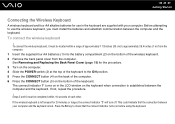
...procedure. ! Steps 5 and 6 must install the batteries and establish communication between the computer and the keyboard. This could indicate that the connect indicator turns on the bottom of the keyboard. If the wireless keyboard is lost. n 23 N Getting Started Connecting the Wireless Keyboard A wireless keyboard and four...other. See Removing and Replacing the Back Panel Cover (page 18) for 20 minutes or longer, the connect indicator will turn off. The connect indicator turns on in the keyboard are supplied with your computer and the keyboard is left unused for the procedure...
...procedure. ! Steps 5 and 6 must install the batteries and establish communication between the computer and the keyboard. This could indicate that the connect indicator turns on the bottom of the keyboard. If the wireless keyboard is lost. n 23 N Getting Started Connecting the Wireless Keyboard A wireless keyboard and four...other. See Removing and Replacing the Back Panel Cover (page 18) for 20 minutes or longer, the connect indicator will turn off. The connect indicator turns on in the keyboard are supplied with your computer and the keyboard is left unused for the procedure...

User Guide
Page 26
... are supplied with your computer and the mouse. n 26 N Getting Started Connecting the Wireless Mouse A wireless mouse and two AA alkaline batteries for the procedure. 3 Turn on the computer.
... are supplied with your computer and the mouse. n 26 N Getting Started Connecting the Wireless Mouse A wireless mouse and two AA alkaline batteries for the procedure. 3 Turn on the computer.

User Guide
Page 31
To shut down your computer 1 Turn off any peripherals connected to the computer. 2 Click Start, the arrow next to the Lock button, and Shut Down. 3 Respond to any prompts warning you to save documents or to consider other users and wait for the computer to shut down your computer properly, as described below. The power indicator light turns off automatically. n 31 N Getting Started Shutting Down Your Computer Safely To avoid losing unsaved data, be sure to turn off .
To shut down your computer 1 Turn off any peripherals connected to the computer. 2 Click Start, the arrow next to the Lock button, and Shut Down. 3 Respond to any prompts warning you to save documents or to consider other users and wait for the computer to shut down your computer properly, as described below. The power indicator light turns off automatically. n 31 N Getting Started Shutting Down Your Computer Safely To avoid losing unsaved data, be sure to turn off .
User Guide
Page 34
... the LCD screen. In such a case, you can change the assignments with the Fn key. The default tasks are as an example. n 34 N Using Your VAIO Computer A Function keys Perform certain tasks. The task associated with each function key varies among software applications except the following combinations with...
... the LCD screen. In such a case, you can change the assignments with the Fn key. The default tasks are as an example. n 34 N Using Your VAIO Computer A Function keys Perform certain tasks. The task associated with each function key varies among software applications except the following combinations with...
User Guide
Page 35
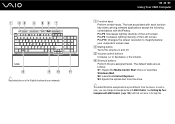
... Move the pointer on power management, see Using the Power Saving Mode (page 110). I Applications key Displays a shortcut menu in place to turn on while connection between the computer and the wireless keyboard is ready for the lower level of power consumption. when the (Num lock...): Turns on while in the Num Lock state. (Caps lock): Turns on while in the Caps Lock state. (Scroll lock): Turns on while in the Scroll Lock state. (Connect): Turns on and off the wireless keyboard. n 35 N Using Your VAIO Computer E Sleep button Provides for use...
... Move the pointer on power management, see Using the Power Saving Mode (page 110). I Applications key Displays a shortcut menu in place to turn on while connection between the computer and the wireless keyboard is ready for the lower level of power consumption. when the (Num lock...): Turns on while in the Num Lock state. (Caps lock): Turns on while in the Caps Lock state. (Scroll lock): Turns on while in the Scroll Lock state. (Connect): Turns on and off the wireless keyboard. n 35 N Using Your VAIO Computer E Sleep button Provides for use...
User Guide
Page 38
... wheel Rotate the central wheel to scroll up or down while sliding the mouse, then release the button to drop the item. n 38 N Using Your VAIO Computer A Left button Click or double-click the left button to select items. To drag and drop items, hold the left button down a page. Press...
... wheel Rotate the central wheel to scroll up or down while sliding the mouse, then release the button to drop the item. n 38 N Using Your VAIO Computer A Left button Click or double-click the left button to select items. To drag and drop items, hold the left button down a page. Press...

User Guide
Page 40
... video editing software. Note that the camera is ready for a video conference using the software. Turning on the computer activates the built-in MOTION EYE camera. The built-in MOTION EYE camera, respectively. n 40 N Using Your VAIO Computer Using the Built-in MOTION EYE Camera Your computer is equipped with a built-in...
... video editing software. Note that the camera is ready for a video conference using the software. Turning on the computer activates the built-in MOTION EYE camera. The built-in MOTION EYE camera, respectively. n 40 N Using Your VAIO Computer Using the Built-in MOTION EYE Camera Your computer is equipped with a built-in...

User Guide
Page 42
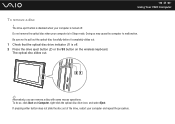
To insert a disc ! n 42 N Using Your VAIO Computer ✍ If you plan to the disc or slot. 1 Turn on the computer. 2 With the label side facing toward you launch any preinstalled disc operation program. Be sure to attach the 8cm disc adapter to ...
To insert a disc ! n 42 N Using Your VAIO Computer ✍ If you plan to the disc or slot. 1 Turn on the computer. 2 With the label side facing toward you launch any preinstalled disc operation program. Be sure to attach the 8cm disc adapter to ...
User Guide
Page 43
Do not remove the optical disc when your computer is turned off . 2 Press the drive eject button (2) or the S3 button on the wireless keyboard. Doing so may cause the computer to pull out the optical ... the drive, restart your computer is in Sleep mode. The drive eject button is disabled when your computer and repeat the procedure. n 43 N Using Your VAIO Computer To remove a disc ! To do so, click Start and Computer, right-click the optical disc drive icon, and select Eject. Be sure not to...
Do not remove the optical disc when your computer is turned off . 2 Press the drive eject button (2) or the S3 button on the wireless keyboard. Doing so may cause the computer to pull out the optical ... the drive, restart your computer is in Sleep mode. The drive eject button is disabled when your computer and repeat the procedure. n 43 N Using Your VAIO Computer To remove a disc ! To do so, click Start and Computer, right-click the optical disc drive icon, and select Eject. Be sure not to...
User Guide
Page 67
... place the computer into Sleep mode to open applications. L More button Press to view additional options that are available for your area. n 67 N Using Your VAIO Computer E Guide button Press to view the TV program guide for Media Center features. This button works the same as the Alt+Tab keys. H APPLICATION...
... place the computer into Sleep mode to open applications. L More button Press to view additional options that are available for your area. n 67 N Using Your VAIO Computer E Guide button Press to view the TV program guide for Media Center features. This button works the same as the Alt+Tab keys. H APPLICATION...
User Guide
Page 68
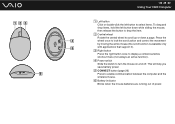
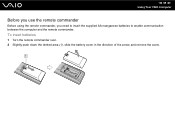
n 68 N Using Your VAIO Computer Before you use the remote commander Before using the remote commander, you need to insert the supplied AA manganese batteries to enable communication between the computer and the remote commander. To insert batteries 1 Turn the remote commander over. 2 Slightly push down the dented area (1), slide the battery cover in the direction of the arrow, and remove the cover.
n 68 N Using Your VAIO Computer Before you use the remote commander Before using the remote commander, you need to insert the supplied AA manganese batteries to enable communication between the computer and the remote commander. To insert batteries 1 Turn the remote commander over. 2 Slightly push down the dented area (1), slide the battery cover in the direction of the arrow, and remove the cover.
User Guide
Page 93
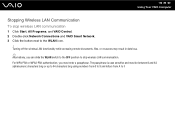
... standard, using the 2.4 or 5 GHz bandwidth, is used for the procedure. 1 Turn on -screen instructions. The Wireless LAN indicator lights up. 2 Click Start, All Programs, and VAIO Central. 3 Double-click Network Connections and VAIO Smart Network. ✍ For information on the VAIO Smart Network software, see the help file on the software. 4 Click the... back panel cover from the computer to specify the ad-hoc network settings and click Next. 9 Follow the on the WLAN switch. n 93 N Using Your VAIO Computer To communicate without an access point (ad-hoc) !
... standard, using the 2.4 or 5 GHz bandwidth, is used for the procedure. 1 Turn on -screen instructions. The Wireless LAN indicator lights up. 2 Click Start, All Programs, and VAIO Central. 3 Double-click Network Connections and VAIO Smart Network. ✍ For information on the VAIO Smart Network software, see the help file on the software. 4 Click the... back panel cover from the computer to specify the ad-hoc network settings and click Next. 9 Follow the on the WLAN switch. n 93 N Using Your VAIO Computer To communicate without an access point (ad-hoc) !
User Guide
Page 95
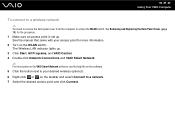
... access point for the procedure. 1 Make sure an access point is set up . 3 Click Start, All Programs, and VAIO Central. 4 Double-click Network Connections and VAIO Smart Network. ✍ For information on the VAIO Smart Network software, see the help file on the software. 5 Click the button next to access the WLAN switch...-click or on the WLAN switch. The Wireless LAN indicator lights up . See Removing and Replacing the Back Panel Cover (page 18) for more information. 2 Turn on the taskbar and select Connect to a network. 7 Select the desired access point and click Connect.
... access point for the procedure. 1 Make sure an access point is set up . 3 Click Start, All Programs, and VAIO Central. 4 Double-click Network Connections and VAIO Smart Network. ✍ For information on the VAIO Smart Network software, see the help file on the software. 5 Click the button next to access the WLAN switch...-click or on the WLAN switch. The Wireless LAN indicator lights up . See Removing and Replacing the Back Panel Cover (page 18) for more information. 2 Turn on the taskbar and select Connect to a network. 7 Select the desired access point and click Connect.
User Guide
Page 96
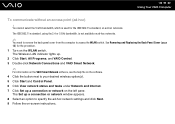
The passphrase is case sensitive and must enter a passphrase. n 96 N Using Your VAIO Computer Stopping Wireless LAN Communication To stop wireless LAN communication. Turning off the wireless LAN functionality while accessing remote documents, files, or resources may result in data loss. ✍ Alternatively, you must be between 8 and 63 ...PSK or WPA2-PSK authentication, you can slide the WLAN switch to the OFF position to stop wireless LAN communication 1 Click Start, All Programs, and VAIO Central. 2 Double-click Network Connections and VAIO Smart Network. 3 Click the button next to F.
The passphrase is case sensitive and must enter a passphrase. n 96 N Using Your VAIO Computer Stopping Wireless LAN Communication To stop wireless LAN communication. Turning off the wireless LAN functionality while accessing remote documents, files, or resources may result in data loss. ✍ Alternatively, you must be between 8 and 63 ...PSK or WPA2-PSK authentication, you can slide the WLAN switch to the OFF position to stop wireless LAN communication 1 Click Start, All Programs, and VAIO Central. 2 Double-click Network Connections and VAIO Smart Network. 3 Click the button next to F.
User Guide
Page 107
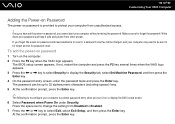
... password can be sent in for depot service for password reset. n 107 N Customizing Your VAIO Computer Adding the Power-on Password The power-on password is to configure your computer to prompt password entry when you turn it on or display the BIOS setup screen. 6 Select Password when Power On under Security.... Once you have set the power-on password, you forget the power-on the computer. 2 Press the F2 key when the VAIO logo appears. Press the space bar to...
... password can be sent in for depot service for password reset. n 107 N Customizing Your VAIO Computer Adding the Power-on Password The power-on password is to configure your computer to prompt password entry when you turn it on or display the BIOS setup screen. 6 Select Password when Power On under Security.... Once you have set the power-on password, you forget the power-on the computer. 2 Press the F2 key when the VAIO logo appears. Press the space bar to...
User Guide
Page 108
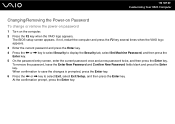
If not, restart the computer and press the F2 key several times when the VAIO logo appears. 3 Enter the current password and press the Enter key. 4 Press the < or , key to select Security to select Exit, select Exit Setup, and ... screen appears. To remove the password, leave the Enter New Password and Confirm New Password fields blank and press the Enter key. n 108 N Customizing Your VAIO Computer Changing/Removing the Power-on Password To change or remove the power-on password...
If not, restart the computer and press the F2 key several times when the VAIO logo appears. 3 Enter the current password and press the Enter key. 4 Press the < or , key to select Security to select Exit, select Exit Setup, and ... screen appears. To remove the password, leave the Enter New Password and Confirm New Password fields blank and press the Enter key. n 108 N Customizing Your VAIO Computer Changing/Removing the Power-on Password To change or remove the power-on password...

User Guide
Page 109
...4 Once finished, click OK. To use VAIO Central 1 Click Start, All Programs, and VAIO Central. n 109 N Customizing Your VAIO Computer Setting Up Your Computer with VAIO Central The VAIO Central utility allows you open VAIO Central as a standard user. The VAIO Central window appears. 2 Click the Categories ...it stay unlit by following these steps: 1 Click Start, All Programs, and VAIO Central. Changing the default SONY logo lamp activity The SONY logo lamp illuminates when you turn on -screen instructions. The VAIO Central window appears. 2 Click the Categories tab. 3 Double-click Display and...
...4 Once finished, click OK. To use VAIO Central 1 Click Start, All Programs, and VAIO Central. n 109 N Customizing Your VAIO Computer Setting Up Your Computer with VAIO Central The VAIO Central utility allows you open VAIO Central as a standard user. The VAIO Central window appears. 2 Click the Categories ...it stay unlit by following these steps: 1 Click Start, All Programs, and VAIO Central. Changing the default SONY logo lamp activity The SONY logo lamp illuminates when you turn on -screen instructions. The VAIO Central window appears. 2 Click the Categories tab. 3 Double-click Display and...

User Guide
Page 110
To save power while not working, you to turn off specific devices, your computer has a distinct power saving mode called Sleep mode. The green power indicator light is in this mode. n 110 N Customizing Your VAIO Computer Using the Power Saving Mode In addition to the normal operating mode, which allows you can turn off a specific device such as the LCD screen or the hard disk drive. Using Normal Mode This is the normal state of the computer when it is on in use.
To save power while not working, you to turn off specific devices, your computer has a distinct power saving mode called Sleep mode. The green power indicator light is in this mode. n 110 N Customizing Your VAIO Computer Using the Power Saving Mode In addition to the normal operating mode, which allows you can turn off a specific device such as the LCD screen or the hard disk drive. Using Normal Mode This is the normal state of the computer when it is on in use.


