
Operating Instructions
Page 1
4-109-584-11(1) Digital Printing System Operating Instructions GB UPX-C300 © 2006 Sony Corporation
4-109-584-11(1) Digital Printing System Operating Instructions GB UPX-C300 © 2006 Sony Corporation

Operating Instructions
Page 2
... can be determined by one or more of FCC Rules. For the UP-DX100 Printer and the DKC-C300X Digital Still Camera For the customers in the U.S.A. The term "IC:" before the radio certification number only signifies that interference will not occur...sony.com/ Declaration of the FCC Rules. All interface cables used in conjunction with the limits for help. If you have any other antenna or transmitter. Consult the dealer or experienced radio/TV technician for a Class B digital device, pursuant to radio communications. For the UP-DX100 Printer, DKC-C300X Digital Still Camera...
... can be determined by one or more of FCC Rules. For the UP-DX100 Printer and the DKC-C300X Digital Still Camera For the customers in the U.S.A. The term "IC:" before the radio certification number only signifies that interference will not occur...sony.com/ Declaration of the FCC Rules. All interface cables used in conjunction with the limits for help. If you have any other antenna or transmitter. Consult the dealer or experienced radio/TV technician for a Class B digital device, pursuant to radio communications. For the UP-DX100 Printer, DKC-C300X Digital Still Camera...
Operating Instructions
Page 3
...Guidelines in Supplement C to the following URL : http://www.compliance.sony.de/ For the UP-DX100 Printer, DKC-C300X Digital Still Camera, and the UPA-AC05 AC Power Adapter For the customers in separate service or guarantee documents. This equipment has very low levels of RF energy that may...Use the Power Cord (2-core mains lead)/Appliance Connector/Plug conforming to comply without testing of this manual. For the DKC-C300X Digital Still Camera For the customers in the U.S.A. For any other relevant provisions of the IC radio frequency (RF) Exposure rules. When using photo images ...
...Guidelines in Supplement C to the following URL : http://www.compliance.sony.de/ For the UP-DX100 Printer, DKC-C300X Digital Still Camera, and the UPA-AC05 AC Power Adapter For the customers in separate service or guarantee documents. This equipment has very low levels of RF energy that may...Use the Power Cord (2-core mains lead)/Appliance Connector/Plug conforming to comply without testing of this manual. For the DKC-C300X Digital Still Camera For the customers in the U.S.A. For any other relevant provisions of the IC radio frequency (RF) Exposure rules. When using photo images ...
Operating Instructions
Page 4
...Shooting and Printing 20 Taking a Picture 21 Printing the Last Picture Taken (From the Auto-Review Display 22 Printing a Picture Stored in the Camera's Built-In Memory 24 Reprinting a Picture Stored in the Printer's Memory (COPY PRINT 24 Viewing a Picture on the LCD 24 Deleting a ... 50 The "Basic Imaging Profile 50 Bluetooth Address 50 Passkey Authentication 51 Bluetooth Connection 51 Checking the Bluetooth Connection Statuses of the Camera (PROPERTY 52 Confirming the Bluetooth Address of the Printer 52 Changing the Passkey 52 Setting the Module Power 53 Giving Your Printer ...
...Shooting and Printing 20 Taking a Picture 21 Printing the Last Picture Taken (From the Auto-Review Display 22 Printing a Picture Stored in the Camera's Built-In Memory 24 Reprinting a Picture Stored in the Printer's Memory (COPY PRINT 24 Viewing a Picture on the LCD 24 Deleting a ... 50 The "Basic Imaging Profile 50 Bluetooth Address 50 Passkey Authentication 51 Bluetooth Connection 51 Checking the Bluetooth Connection Statuses of the Camera (PROPERTY 52 Confirming the Bluetooth Address of the Printer 52 Changing the Passkey 52 Setting the Module Power 53 Giving Your Printer ...
Operating Instructions
Page 5
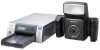
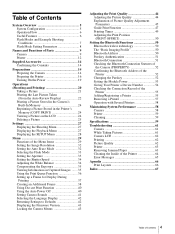
... of print paper are supported: UPC-X46 series, and UPC-X34 series. System Configuration You can print pictures with a digital camera, and then print them at the frame. System Overview The Sony UPX-C300 digital printing system is designed to allow you can finely adjust it manually while looking at high image quality and...
... of print paper are supported: UPC-X46 series, and UPC-X34 series. System Configuration You can print pictures with a digital camera, and then print them at the frame. System Overview The Sony UPX-C300 digital printing system is designed to allow you can finely adjust it manually while looking at high image quality and...

Operating Instructions
Page 6
...P 037 Auto-Review/ Playback STD P 037 0.00EV 1/250 F4.7 Print Preview Bluetooth 1. Press the AUTO FRAME button to five additional frame types. Sony UP-DX100 1 Print Shoot pictures while viewing the LCD to make sure the subject's face fits within the frame. If, for die cuts. Print queue... multiple pictures and print them one of the ID picture frames provided, you to adjust color and black & white print settings from the camera. The picture displayed during print preview is automatically laid out and printed. Color and black & white adjustments This system allows you can quickly...
...P 037 Auto-Review/ Playback STD P 037 0.00EV 1/250 F4.7 Print Preview Bluetooth 1. Press the AUTO FRAME button to five additional frame types. Sony UP-DX100 1 Print Shoot pictures while viewing the LCD to make sure the subject's face fits within the frame. If, for die cuts. Print queue... multiple pictures and print them one of the ID picture frames provided, you to adjust color and black & white print settings from the camera. The picture displayed during print preview is automatically laid out and printed. Color and black & white adjustments This system allows you can quickly...
Operating Instructions
Page 7
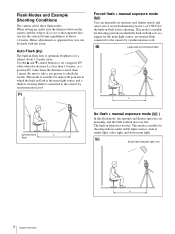
...the main light source and a shadow-clearing flash is more than 1.8 meter, or a positive EV value when the distance is connected to the camera by synchronization cord. Studio light (halogen light, etc.) L 7 System Overview Large-size synchronized flash L Synchronized L flash No flash + manual exposure...under stable light sources, such as studio light, video light, and fluorescent light. Be sure to take a test picture to the camera by synchronization cord. Minor adjustments to set manually, and the built-in flash before shooting. Forced flash + manual exposure mode () ...
...the main light source and a shadow-clearing flash is more than 1.8 meter, or a positive EV value when the distance is connected to the camera by synchronization cord. Studio light (halogen light, etc.) L 7 System Overview Large-size synchronized flash L Synchronized L flash No flash + manual exposure...under stable light sources, such as studio light, video light, and fluorescent light. Be sure to take a test picture to the camera by synchronization cord. Minor adjustments to set manually, and the built-in flash before shooting. Forced flash + manual exposure mode () ...

Operating Instructions
Page 8
Flash Mode Setting Parameters The flash mode is changed through zoom operations, the brightness of a captured image will not be affected as shown in the table below. Flash Mode Flash Control Controlled Flash Program with Zoom and EV without pre-flash Aperture Fixed (Open) Shutter Speed Fixed (1/250) White Balance Program Exposure Compensation +/-2.0EV by 1/4EV Step Forced Flash without pre-flash Exhibit Flash 7 steps (100/70/50/35/25/18/13%) without Preflash No Lighting F4.7 (F4.7 or F5.6) F4.7 (F4.7 or F5.6) 1/250 5500K -1.0EV to +2.0EV (1/2 to 1/1000 [s]) (Program, 3000 to ...
Flash Mode Setting Parameters The flash mode is changed through zoom operations, the brightness of a captured image will not be affected as shown in the table below. Flash Mode Flash Control Controlled Flash Program with Zoom and EV without pre-flash Aperture Fixed (Open) Shutter Speed Fixed (1/250) White Balance Program Exposure Compensation +/-2.0EV by 1/4EV Step Forced Flash without pre-flash Exhibit Flash 7 steps (100/70/50/35/25/18/13%) without Preflash No Lighting F4.7 (F4.7 or F5.6) F4.7 (F4.7 or F5.6) 1/250 5500K -1.0EV to +2.0EV (1/2 to 1/1000 [s]) (Program, 3000 to ...

Operating Instructions
Page 9
...-in JPEG format. 9 Names and Functions of Parts For details, see the pages in parentheses. B Tripod screw hole (16) Used to attach the camera to the FLASH MODE setting. C Lens (f=12.5 to 25.0 mm (1/2 to 1"), F-4.7 (W) to attach a commercially available lens filter (ø 52 mm). E Release button (21) Press this ...
...-in JPEG format. 9 Names and Functions of Parts For details, see the pages in parentheses. B Tripod screw hole (16) Used to attach the camera to the FLASH MODE setting. C Lens (f=12.5 to 25.0 mm (1/2 to 1"), F-4.7 (W) to attach a commercially available lens filter (ø 52 mm). E Release button (21) Press this ...

Operating Instructions
Page 10
... up or Bluetooth authentication is displayed, pressing this button automatically determines a face size to the camera ON or OFF. 10 Names and Functions of Parts Contact your nearest Sony dealer or Sony Service Center. E Standby lamp Indicates the camera's status. Rear 1 2 3 qf qd 4 qh qg qs qa 098 76 5 A LCD screen Use it to...
... up or Bluetooth authentication is displayed, pressing this button automatically determines a face size to the camera ON or OFF. 10 Names and Functions of Parts Contact your nearest Sony dealer or Sony Service Center. E Standby lamp Indicates the camera's status. Rear 1 2 3 qf qd 4 qh qg qs qa 098 76 5 A LCD screen Use it to...

Operating Instructions
Page 11
... display, press this button to print the image displayed on the LCD. W ( ): Zoom out of the face while maintaining a fixed camera position. L Mode switch You can switch between a single-picture display and a nine-picture multiple display. O DC IN Connects to the ...T: Nine-picture multiple display is toggled between the following two modes. : Shooting mode : Playback mode M Battery compartment lid (15) Insert four commercially available Sony AA NiMH (nickel-metal hydride) rechargeable batteries (type NHAA, max. 2700 mAh). T: Telephoto zoom. I b v V B control buttons When the mode ...
... display, press this button to print the image displayed on the LCD. W ( ): Zoom out of the face while maintaining a fixed camera position. L Mode switch You can switch between a single-picture display and a nine-picture multiple display. O DC IN Connects to the ...T: Nine-picture multiple display is toggled between the following two modes. : Shooting mode : Playback mode M Battery compartment lid (15) Insert four commercially available Sony AA NiMH (nickel-metal hydride) rechargeable batteries (type NHAA, max. 2700 mAh). T: Telephoto zoom. I b v V B control buttons When the mode ...

Operating Instructions
Page 12
D MENU button (29) Press this button to execute menu items selected while navigating menus and after exchanging the ribbon cartridge. PRINT lamp: Lights when printing is in progress, and flashes when the printer is in progress. 12 Names and Functions of Parts lamp: Lights when the paper or print cartridge runs out or the paper and print cartridge differ in menus. When you press this button to display menus or cancel changes made in size. E EXEC (Execute) button (24, 50) Press this button, the lamp lights and power is on, information such as a paper jam occurs. ALARM lamp: ...
D MENU button (29) Press this button to execute menu items selected while navigating menus and after exchanging the ribbon cartridge. PRINT lamp: Lights when printing is in progress, and flashes when the printer is in progress. 12 Names and Functions of Parts lamp: Lights when the paper or print cartridge runs out or the paper and print cartridge differ in menus. When you press this button to display menus or cancel changes made in size. E EXEC (Execute) button (24, 50) Press this button, the lamp lights and power is on, information such as a paper jam occurs. ALARM lamp: ...
Operating Instructions
Page 13
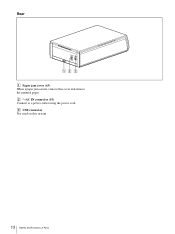
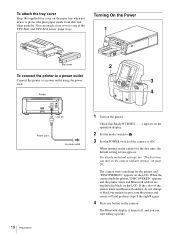
Rear - B -AC IN connector (19) Connect to a power outlet using the power cord. C USB connector Not used on this cover and remove the jammed paper. AC IN 12 3 A Paper jam cover (63) When a paper jam occurs, remove this system 13 Names and Functions of Parts
Rear - B -AC IN connector (19) Connect to a power outlet using the power cord. C USB connector Not used on this cover and remove the jammed paper. AC IN 12 3 A Paper jam cover (63) When a paper jam occurs, remove this system 13 Names and Functions of Parts

Operating Instructions
Page 14
... UPC-X34 series (1) Tray cover (1) UPA-AC05 AC power adaptor (1) Cleaning cassette (1) Warranty card (1) Operating Instructions (1) Quick Reference Guide (1) Preparations Preparing the Camera 1 Slide to open the external connector cover. 2 Connect the supplied UPA-AC05 AC power adaptor to the DC IN jack on the... camera, and connect the AC adaptor to a power outlet with your system. If the camera malfunctions, immediately disconnect the AC power adaptor from the power outlet to power outlet UPA-AC05 AC ...
... UPC-X34 series (1) Tray cover (1) UPA-AC05 AC power adaptor (1) Cleaning cassette (1) Warranty card (1) Operating Instructions (1) Quick Reference Guide (1) Preparations Preparing the Camera 1 Slide to open the external connector cover. 2 Connect the supplied UPA-AC05 AC power adaptor to the DC IN jack on the... camera, and connect the AC adaptor to a power outlet with your system. If the camera malfunctions, immediately disconnect the AC power adaptor from the power outlet to power outlet UPA-AC05 AC ...

Operating Instructions
Page 15
...To recharge the batteries, use four size AA Nickel Metal Hydride batteries available commercially. Use the following icons appear at the bottom right of the camera's LCD. Indicator (flashing) Power status The batteries are fully charged or close to open it. 2 Insert the four size AA batteries. The ... press down while sliding it to replace the batteries. When using an AC power supply The icon appears at the bottom right of the camera's LCD. Note Connecting the AC adapter while the batteries are fully discharged. Use these to get a general idea of batteries. Ready the...
...To recharge the batteries, use four size AA Nickel Metal Hydride batteries available commercially. Use the following icons appear at the bottom right of the camera's LCD. Indicator (flashing) Power status The batteries are fully charged or close to open it. 2 Insert the four size AA batteries. The ... press down while sliding it to replace the batteries. When using an AC power supply The icon appears at the bottom right of the camera's LCD. Note Connecting the AC adapter while the batteries are fully discharged. Use these to get a general idea of batteries. Ready the...

Operating Instructions
Page 16
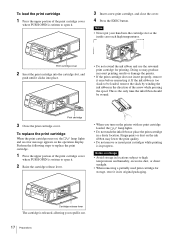
... tripod screw hole located on used print cartridges and print paper from the printer for the tripod securely. A print pack is loose, the camera may damage the printer. • Avoid touching the printing surface of the print paper and the ink ribbon of the print cartridge, and avoid... may produce incorrect printing results or damage the printer. • Only use sets of the camera. Note Tighten the screw for storage, store them only when necessary. Perform them in size. Camera Tripod Preparing the Printer Before using the printer for printing. Make sure that match in their ...
... tripod screw hole located on used print cartridges and print paper from the printer for the tripod securely. A print pack is loose, the camera may damage the printer. • Avoid touching the printing surface of the print paper and the ink ribbon of the print cartridge, and avoid... may produce incorrect printing results or damage the printer. • Only use sets of the camera. Note Tighten the screw for storage, store them only when necessary. Perform them in size. Camera Tripod Preparing the Printer Before using the printer for printing. Make sure that match in their ...
Operating Instructions
Page 17
Notes • Never put your hand into place. DIGITAL PHOTO PRINTER MENU EXEC PRINT ALARM Print cartridge cover 2 Insert the print cartridge into the cartridge slot, and push until it clicks into the cartridge slot as the inside can reach high temperatures. DIGITAL PHOTO PRINTER MENU EXEC PRINT ALARM Print cartridge 3 Close the print cartridge cover. Doing so may lower the print quality. • Do not remove or insert print cartridges while printing is the only time the ink ribbon should be loaded, remove the slack by winding the ink ribbon in progress. If the ink ribbon is ...
Notes • Never put your hand into place. DIGITAL PHOTO PRINTER MENU EXEC PRINT ALARM Print cartridge cover 2 Insert the print cartridge into the cartridge slot, and push until it clicks into the cartridge slot as the inside can reach high temperatures. DIGITAL PHOTO PRINTER MENU EXEC PRINT ALARM Print cartridge 3 Close the print cartridge cover. Doing so may lower the print quality. • Do not remove or insert print cartridges while printing is the only time the ink ribbon should be loaded, remove the slack by winding the ink ribbon in progress. If the ink ribbon is ...
Operating Instructions
Page 18
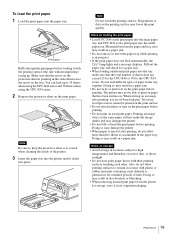
Notes on loading the print paper • Load UPC-X46 series print paper into the large paper tray and UPC-X34 series print paper into the tray, make the image darker and may not be printed on the print surface. • Do not attach stickers or tape on the print paper before loading it in a paper jam. Do not load different types of paper in a paper jam. • Do not write or print text on the print paper before printing. Doing so may damage the printer. • When paper is in the paper tray. Notes on storage • Avoid storage in locations subject to keep the ...
Notes on loading the print paper • Load UPC-X46 series print paper into the large paper tray and UPC-X34 series print paper into the tray, make the image darker and may not be printed on the print surface. • Do not attach stickers or tape on the print paper before loading it in a paper jam. Do not load different types of paper in a paper jam. • Do not write or print text on the print paper before printing. Doing so may damage the printer. • When paper is in the paper tray. Notes on storage • Avoid storage in locations subject to keep the ...
Operating Instructions
Page 19
... steps 1 through 3 again. 4 Press any of the UPC-X46, and UPC-X34 series' paper trays. The camera starts searching for the first time, the default setting screen appears. When turning on the camera for the printer, and "DISCOVERING" appears on default settings, see "The first time you can attach a tray cover.... 2 Set the mode switch to . 3 Set the POWER switch of the printer name and Bluetooth address do not change to power outlet 1 Turn on the camera. Check that Ready BT RSSI [- - - -] appears on page 20. To attach the tray cover Keep the supplied tray cover on the LCD. You can...
... steps 1 through 3 again. 4 Press any of the UPC-X46, and UPC-X34 series' paper trays. The camera starts searching for the first time, the default setting screen appears. When turning on the camera for the printer, and "DISCOVERING" appears on default settings, see "The first time you can attach a tray cover.... 2 Set the mode switch to . 3 Set the POWER switch of the printer name and Bluetooth address do not change to power outlet 1 Turn on the camera. Check that Ready BT RSSI [- - - -] appears on page 20. To attach the tray cover Keep the supplied tray cover on the LCD. You can...
Operating Instructions
Page 20
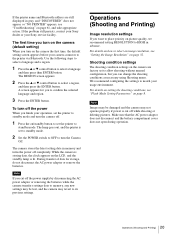
...battery compartment cover does not open during operation. 20 Operations (Shooting and Printing) If the problem still persists, contact your Sony dealer or your camera connects to its previous settings. During transfer of data for you cut off the power supply by disconnecting the AC power ...settings to select an image resolution, see "Setting the Image Resolution" on the camera the first time, the default setting screen appears before your Sony service facility. The first time you turn the camera off the power When you can change the shooting conditions as necessary using Shooting...
...battery compartment cover does not open during operation. 20 Operations (Shooting and Printing) If the problem still persists, contact your Sony dealer or your camera connects to its previous settings. During transfer of data for you cut off the power supply by disconnecting the AC power ...settings to select an image resolution, see "Setting the Image Resolution" on the camera the first time, the default setting screen appears before your Sony service facility. The first time you turn the camera off the power When you can change the shooting conditions as necessary using Shooting...