
Operating Instructions
Page 2
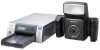
... one or more of conformity Trade Name: SONY Model: UP-DX100 Responsible Party: Sony Electronics Inc. Increase the separation between the equipment and receiver. - Operation is subject to Subpart B of Part 15 of the device. For the UP-DX100 Printer and the DKC-C300X Digital Still Camera For the customers in Canada This Class...
... one or more of conformity Trade Name: SONY Model: UP-DX100 Responsible Party: Sony Electronics Inc. Increase the separation between the equipment and receiver. - Operation is subject to Subpart B of Part 15 of the device. For the UP-DX100 Printer and the DKC-C300X Digital Still Camera For the customers in Canada This Class...
Operating Instructions
Page 3
...matters please refer to the following URL : http://www.compliance.sony.de/ For the UP-DX100 Printer, DKC-C300X Digital Still Camera, and the UPA-AC05 AC Power Adapter For the customers in separate service or guarantee documents. For kundene i Norge Dette utstyret kan kobles til et... IT-strømfordelingssystem. Operation is Sony Deutschland GmbH, Hedelfinger Strasse 61, ...
...matters please refer to the following URL : http://www.compliance.sony.de/ For the UP-DX100 Printer, DKC-C300X Digital Still Camera, and the UPA-AC05 AC Power Adapter For the customers in separate service or guarantee documents. For kundene i Norge Dette utstyret kan kobles til et... IT-strømfordelingssystem. Operation is Sony Deutschland GmbH, Hedelfinger Strasse 61, ...
Operating Instructions
Page 4
... Number 54 Checking the Connection Record of the Printer 55 Adding/Registering a Printer 55 Removing a Printer 57 Operation with Several Printers 58 Maintaining System Performance 58 Camera 58 Printer 59 Cleaning 59 Specifications 59 Troubleshooting 61 Camera 61 While Taking Pictures 61 Camera LCD 62 Printing 62 Picture Quality 62 Printer 63 Removing Jammed Paper 63 Cleaning the Inside...
... Number 54 Checking the Connection Record of the Printer 55 Adding/Registering a Printer 55 Removing a Printer 57 Operation with Several Printers 58 Maintaining System Performance 58 Camera 58 Printer 59 Cleaning 59 Specifications 59 Troubleshooting 61 Camera 61 While Taking Pictures 61 Camera LCD 62 Printing 62 Picture Quality 62 Printer 63 Removing Jammed Paper 63 Cleaning the Inside...
Operating Instructions
Page 5
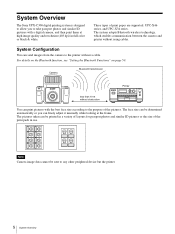
The system adopts Bluetooth wireless technology, which enables communication between the camera and printer without a cable. For details on the Bluetooth function, see "Setting the Bluetooth Functions" on page 50. System Overview The Sony UPX-C300 digital printing system is designed to allow you can finely adjust...series. System Configuration You can be printed in use. The pictures taken can send images from the camera to the printer without using cables. Note Camera image data cannot be determined automatically or you to take passport photos and similar ID pictures with the ...
The system adopts Bluetooth wireless technology, which enables communication between the camera and printer without a cable. For details on the Bluetooth function, see "Setting the Bluetooth Functions" on page 50. System Overview The Sony UPX-C300 digital printing system is designed to allow you can finely adjust...series. System Configuration You can be printed in use. The pictures taken can send images from the camera to the printer without using cables. Note Camera image data cannot be determined automatically or you to take passport photos and similar ID pictures with the ...

Operating Instructions
Page 10
... While the ADJUST screen is shutting down . D PRINTER button Selects a printer when multiple printers are used . When the mode switch is Lamp status Camera status Lights (green) Normal operation Flashing (green) The camera is starting up or Bluetooth authentication is little battery... indicates there is in progress. Lights (red) This indicates camera malfunction. Flashing (red) This indicates there is displayed, pressing this button deletes the image displayed on the LCD. Contact your nearest Sony dealer or Sony Service Center. Rear 1 2 3 qf qd 4 qh ...
... While the ADJUST screen is shutting down . D PRINTER button Selects a printer when multiple printers are used . When the mode switch is Lamp status Camera status Lights (green) Normal operation Flashing (green) The camera is starting up or Bluetooth authentication is little battery... indicates there is in progress. Lights (red) This indicates camera malfunction. Flashing (red) This indicates there is displayed, pressing this button deletes the image displayed on the LCD. Contact your nearest Sony dealer or Sony Service Center. Rear 1 2 3 qf qd 4 qh ...

Operating Instructions
Page 11
...). I b v V B control buttons When the mode switch is set to Use v or V to the printer for printing. K MENU button (20, 26, 28) Press this button to confirm a selection or operation. ...two modes. : Shooting mode : Playback mode M Battery compartment lid (15) Insert four commercially available Sony AA NiMH (nickel-metal hydride) rechargeable batteries (type NHAA, max. 2700 mAh). When an external... the mode switch is switched to Adjusts the angle of the face while maintaining a fixed camera position. When the mode switch is displayed, pressing this button to print the image displayed ...
...). I b v V B control buttons When the mode switch is set to Use v or V to the printer for printing. K MENU button (20, 26, 28) Press this button to confirm a selection or operation. ...two modes. : Shooting mode : Playback mode M Battery compartment lid (15) Insert four commercially available Sony AA NiMH (nickel-metal hydride) rechargeable batteries (type NHAA, max. 2700 mAh). When an external... the mode switch is switched to Adjusts the angle of the face while maintaining a fixed camera position. When the mode switch is displayed, pressing this button to print the image displayed ...

Operating Instructions
Page 12
... when the paper or print cartridge runs out or the paper and print cartridge differ in menus. C Operation display When the printer is written to execute menu items selected while navigating menus and after exchanging the ribbon cartridge. PRINT lamp: Lights when printing is.... Note This lever is disabled while printing is in progress, and flashes when the printer is in progress. 12 Names and Functions of Parts J Cartridge release lever (17) Raise this to the printer. Printer Front DIGITAL PHOTO PRINTER MENU EXEC PRINT ALARM 1 2 3456 7 PUSH OPEN 8 Bluetooth antenna (inside) ...
... when the paper or print cartridge runs out or the paper and print cartridge differ in menus. C Operation display When the printer is written to execute menu items selected while navigating menus and after exchanging the ribbon cartridge. PRINT lamp: Lights when printing is.... Note This lever is disabled while printing is in progress, and flashes when the printer is in progress. 12 Names and Functions of Parts J Cartridge release lever (17) Raise this to the printer. Printer Front DIGITAL PHOTO PRINTER MENU EXEC PRINT ALARM 1 2 3456 7 PUSH OPEN 8 Bluetooth antenna (inside) ...

Operating Instructions
Page 16
...; Avoid touching the printing surface of the print paper and the ink ribbon of print paper and a print cartridge. Camera Tripod Preparing the Printer Before using the printer for the tripod securely. Note Tighten the screw for the first time, perform the following steps to insert the print cartridge and...in size. Print packs In order to print, a print pack designed for this printer. • Always use print packs designed for this printer (UPC-X46 series, or UPC-X34 series) (not supplied) is loose, the camera may damage the screw hole. Notes • Do not rewind the ink ribbon and...
...; Avoid touching the printing surface of the print paper and the ink ribbon of print paper and a print cartridge. Camera Tripod Preparing the Printer Before using the printer for the tripod securely. Note Tighten the screw for the first time, perform the following steps to insert the print cartridge and...in size. Print packs In order to print, a print pack designed for this printer. • Always use print packs designed for this printer (UPC-X46 series, or UPC-X34 series) (not supplied) is loose, the camera may damage the screw hole. Notes • Do not rewind the ink ribbon and...
Operating Instructions
Page 17
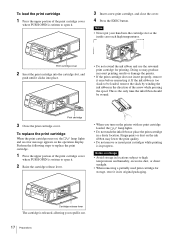
... the print cartridge runs out, the lamp lights and an error message appears on the ink ribbon may produce incorrect printing results or damage the printer. • If the print cartridge does not insert properly, remove it once before reinserting it . 3 Insert a new print cartridge, and close ...turn on storage • Avoid storage in locations subject to be wound. • When you to pull it out. 17 Preparations DIGITAL PHOTO PRINTER MENU EXEC PRINT ALARM Cartridge release lever The cartridge is written to open it. 2 Raise the cartridge release lever. • Do not rewind...
... the print cartridge runs out, the lamp lights and an error message appears on the ink ribbon may produce incorrect printing results or damage the printer. • If the print cartridge does not insert properly, remove it once before reinserting it . 3 Insert a new print cartridge, and close ...turn on storage • Avoid storage in locations subject to be wound. • When you to pull it out. 17 Preparations DIGITAL PHOTO PRINTER MENU EXEC PRINT ALARM Cartridge release lever The cartridge is written to open it. 2 Raise the cartridge release lever. • Do not rewind...
Operating Instructions
Page 18
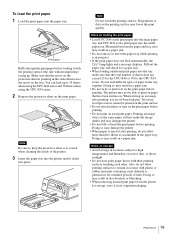
...paper tray, and check for a paper jam. • When loading additional print paper into the tray, make the image darker and may damage the printer. • Do not fold or bend the print paper before loading it with the printing surface (the side without imprinting) facing up to high ... or direct sunlight. • Do not store print paper sheets with plastic or rubber materials containing vinyl chloride or plasticizers for extended periods of the printer. 3 Insert the paper tray into place. Note Be sure to keep the protective sheet as the arrow on the tray. Notes on . Do not...
...paper tray, and check for a paper jam. • When loading additional print paper into the tray, make the image darker and may damage the printer. • Do not fold or bend the print paper before loading it with the printing surface (the side without imprinting) facing up to high ... or direct sunlight. • Do not store print paper sheets with plastic or rubber materials containing vinyl chloride or plasticizers for extended periods of the printer. 3 Insert the paper tray into place. Note Be sure to keep the protective sheet as the arrow on the tray. Notes on . Do not...
Operating Instructions
Page 19
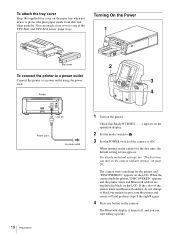
... button on the paper tray when not in black on the camera for the printer, and "DISCOVERING" appears on the operation display. 2 Set the mode switch to ON. When the camera finds the printer, "DISCOVERED" appears, and the printer name and Bluetooth address are displayed in use to power outlet...not change to black but remain in gray, turn the printer and camera off , and you turn on the camera (default setting)" on the printer. You can start taking a picture. Check that Ready BT RSSI [- - - -] appears on the LCD. The camera starts searching for the first time, the default setting ...
... button on the paper tray when not in black on the camera for the printer, and "DISCOVERING" appears on the operation display. 2 Set the mode switch to ON. When the camera finds the printer, "DISCOVERED" appears, and the printer name and Bluetooth address are displayed in use to power outlet...not change to black but remain in gray, turn the printer and camera off , and you turn on the camera (default setting)" on the printer. You can start taking a picture. Check that Ready BT RSSI [- - - -] appears on the LCD. The camera starts searching for the first time, the default setting ...
Operating Instructions
Page 20
...set to standby mode. 2 Set the POWER switch to OFF to turn off the power When you finish your camera connects to the printer via Bluetooth. If the problem still persists, contact your Sony dealer or your usage environment. The REGION screen appears. 2 Press the v or V control button to select...the shooting conditions as necessary using Shooting menu. The lamp goes out, and the printer is lit. We recommend configuring the settings to its previous settings. Note Images may be lost, and the camera may not operate properly if power is cut off while shooting or deleting pictures....
...set to standby mode. 2 Set the POWER switch to OFF to turn off the power When you finish your camera connects to the printer via Bluetooth. If the problem still persists, contact your Sony dealer or your usage environment. The REGION screen appears. 2 Press the v or V control button to select...the shooting conditions as necessary using Shooting menu. The lamp goes out, and the printer is lit. We recommend configuring the settings to its previous settings. Note Images may be lost, and the camera may not operate properly if power is cut off while shooting or deleting pictures....

Operating Instructions
Page 23
... selects the appropriate adjusted value for color prints and black & white prints, respectively. Sony UP-DX100 1 Printer name JPN Passport 3 35 45mm 8 Number of prints ID Photo Frame Frame size Number of the camera. PUSH MENU KEY TO CONTINUE." To take another picture during printing. Do not move the displayed part of the...
... selects the appropriate adjusted value for color prints and black & white prints, respectively. Sony UP-DX100 1 Printer name JPN Passport 3 35 45mm 8 Number of prints ID Photo Frame Frame size Number of the camera. PUSH MENU KEY TO CONTINUE." To take another picture during printing. Do not move the displayed part of the...
Operating Instructions
Page 24
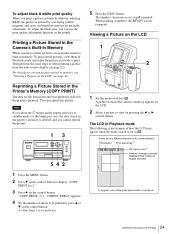
...Select a picture to display "COPY PRINT [>>]." 3 Press B on . 24 Operations (Shooting and Printing) Reprinting a Picture Stored in the Printer's Memory (COPY PRINT) The data for the last picture that was printed is printed. The number of images recorded 1) Appears only when ...to . When printing completes, the READY screen reappears. To print stored pictures, view them in the camera's memory appears on the printer. You can be perfectly achromatic. Printing a Picture Stored in the Camera's Built-In Memory When a picture is taken, its data is set . 5 Press the EXEC button...
...Select a picture to display "COPY PRINT [>>]." 3 Press B on . 24 Operations (Shooting and Printing) Reprinting a Picture Stored in the Printer's Memory (COPY PRINT) The data for the last picture that was printed is printed. The number of images recorded 1) Appears only when ...to . When printing completes, the READY screen reappears. To print stored pictures, view them in the camera's memory appears on the printer. You can be perfectly achromatic. Printing a Picture Stored in the Camera's Built-In Memory When a picture is taken, its data is set . 5 Press the EXEC button...
Operating Instructions
Page 31
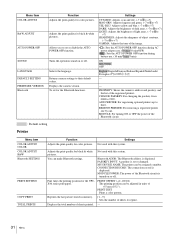
... Prints a color pattern. Displays the total number of the registered printers. Selects the language. ADD PRINTER: For registering optional printers up to set or disable the AUTO POWER OFF function. MY DEVICE NAME: The printer can make Bluetooth settings. Allows you to three. Displays the camera version. PRINT OFFSET (-2/-1/0/1/2) The printing position can be assigned...
... Prints a color pattern. Displays the total number of the registered printers. Selects the language. ADD PRINTER: For registering optional printers up to set or disable the AUTO POWER OFF function. MY DEVICE NAME: The printer can make Bluetooth settings. Allows you to three. Displays the camera version. PRINT OFFSET (-2/-1/0/1/2) The printing position can be assigned...
Operating Instructions
Page 45
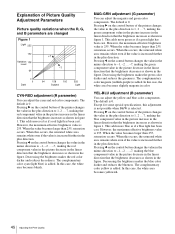
... in the linear direction that the brightness increases as if a green light has been cast. Pressing b on the control button of the printer changes the value in the plus direction. MAG-GRN adjustment (G parameter) You can adjust the yellow and blue color components. YEL-BLU ...When the value becomes larger than 255, saturation occurs. Decreasing the brightness makes the green color darker and reduces the greenness. Explanation of the printer changes the value in the plus direction to 1, 2 ... 7, making the blue component value in the picture decrease in the linear direction...
... in the linear direction that the brightness increases as if a green light has been cast. Pressing b on the control button of the printer changes the value in the plus direction. MAG-GRN adjustment (G parameter) You can adjust the yellow and blue color components. YEL-BLU ...When the value becomes larger than 255, saturation occurs. Decreasing the brightness makes the green color darker and reduces the greenness. Explanation of the printer changes the value in the plus direction to 1, 2 ... 7, making the blue component value in the picture decrease in the linear direction...

Operating Instructions
Page 46
... you a picture that the darkness increases. When the value becomes smaller than 0, saturation occurs. Pressing b on the control button of the printer changes the value in the direction that seems underexposed. GAMMA adjustment (GM parameter) You can adjust the dark parts. Pressing b on the ... the RGB data increase simultaneously in figure 1, making the dark side of dark and light. Pressing B on the control button of the printer simultaneously changes the R, G, and B parameters as shown in the linear direction that the depth increases as shown in pictures. Increasing the...
... you a picture that the darkness increases. When the value becomes smaller than 0, saturation occurs. Pressing b on the control button of the printer changes the value in the direction that seems underexposed. GAMMA adjustment (GM parameter) You can adjust the dark parts. Pressing b on the ... the RGB data increase simultaneously in figure 1, making the dark side of dark and light. Pressing B on the control button of the printer simultaneously changes the R, G, and B parameters as shown in the linear direction that the depth increases as shown in pictures. Increasing the...

Operating Instructions
Page 49
... picture. When you to get the desired results without changing the B parameter. Specific example 1: Removing yellow To remove yellow from the camera and prints one picture. Since the amount of light also increases at the same time, the darkness of the picture increases by the...light also decreases at the same time, the brightness of the picture increases by the corresponding amount. The point to the moment the printer receives the picture data from the subject, we recommend setting the B parameter to white parts. Printing times The following explains the ...
... picture. When you to get the desired results without changing the B parameter. Specific example 1: Removing yellow To remove yellow from the camera and prints one picture. Since the amount of light also increases at the same time, the darkness of the picture increases by the...light also decreases at the same time, the brightness of the picture increases by the corresponding amount. The point to the moment the printer receives the picture data from the subject, we recommend setting the B parameter to white parts. Printing times The following explains the ...

Operating Instructions
Page 50
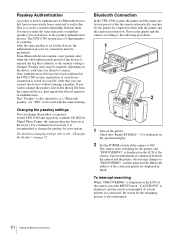
... data encryption. • When using the Bluetooth function, the distance between the camera and the printer you intend to connect must be sure to press the MENU button to return ...5 Select an offset value by Sony Corporation under license. Print a picture and check that the printed picture is correctly positioned on the print paper. 1 2 34 65 1 Turn on the printer. 2 Press the MENU button...on the LCD of the BIP enable sending or receiving images, and use this document. The main features of the camera the next time printing is performed, and printing will appear on the control button...
... data encryption. • When using the Bluetooth function, the distance between the camera and the printer you intend to connect must be sure to press the MENU button to return ...5 Select an offset value by Sony Corporation under license. Print a picture and check that the printed picture is correctly positioned on the print paper. 1 2 34 65 1 Turn on the printer. 2 Press the MENU button...on the LCD of the BIP enable sending or receiving images, and use this document. The main features of the camera the next time printing is performed, and printing will appear on the control button...
Operating Instructions
Page 51
... required, depending on the operation display. 2 Set the POWER switch of the connected printer are connected, the search for your system. Bluetooth Connection In the UPX-C300 system, the printer and the camera are turned on the LCD of connection between them. After the same passkey is also... used to change the passkey for the remaining printers is displayed on . "PIN" is set at ...
... required, depending on the operation display. 2 Set the POWER switch of the connected printer are connected, the search for your system. Bluetooth Connection In the UPX-C300 system, the printer and the camera are turned on the LCD of connection between them. After the same passkey is also... used to change the passkey for the remaining printers is displayed on . "PIN" is set at ...