Operating Instructions
Page 4
...the Power 19 Operations (Shooting and Printing 20 Taking a Picture 21 Printing the Last Picture Taken (From the Auto-Review Display 22 Printing a Picture Stored in the Camera's Built-In Memory 24 Reprinting a Picture Stored in the Printer's Memory (COPY PRINT 24 Viewing a Picture on the... 50 The "Basic Imaging Profile 50 Bluetooth Address 50 Passkey Authentication 51 Bluetooth Connection 51 Checking the Bluetooth Connection Statuses of the Camera (PROPERTY 52 Confirming the Bluetooth Address of the Printer 52 Changing the Passkey 52 Setting the Module Power 53 Giving Your Printer ...
...the Power 19 Operations (Shooting and Printing 20 Taking a Picture 21 Printing the Last Picture Taken (From the Auto-Review Display 22 Printing a Picture Stored in the Camera's Built-In Memory 24 Reprinting a Picture Stored in the Printer's Memory (COPY PRINT 24 Viewing a Picture on the... 50 The "Basic Imaging Profile 50 Bluetooth Address 50 Passkey Authentication 51 Bluetooth Connection 51 Checking the Bluetooth Connection Statuses of the Camera (PROPERTY 52 Confirming the Bluetooth Address of the Printer 52 Changing the Passkey 52 Setting the Module Power 53 Giving Your Printer ...

Operating Instructions
Page 6
Operation Flow This system allows you to adjust color and black & white print settings from the camera. The picture displayed during print preview is predetermined for die cuts. Review the photo and adjust the size of the ID picture frames provided, you simply wish to modify one after the other. Useful...prints. Print queue By enabling the print queue function, you can enable the die-cut print You can readjust the face size as necessary. Sony UP-DX100 1 Print Shoot pictures while viewing the LCD to print an extra 3 mm around all sides of the head and chin perfectly within...
Operation Flow This system allows you to adjust color and black & white print settings from the camera. The picture displayed during print preview is predetermined for die cuts. Review the photo and adjust the size of the ID picture frames provided, you simply wish to modify one after the other. Useful...prints. Print queue By enabling the print queue function, you can enable the die-cut print You can readjust the face size as necessary. Sony UP-DX100 1 Print Shoot pictures while viewing the LCD to print an extra 3 mm around all sides of the head and chin perfectly within...

Operating Instructions
Page 10
.../Black & white) button Delete During Auto Review mode or image playback, pressing this button automatically determines a face size to fit the frame. Contact your nearest Sony dealer or Sony Service Center. Flashing (red) This indicates there is in progress. When the mode switch is Lamp status Camera status Lights (orange) Normal operation Flashing (orange...
.../Black & white) button Delete During Auto Review mode or image playback, pressing this button automatically determines a face size to fit the frame. Contact your nearest Sony dealer or Sony Service Center. Flashing (red) This indicates there is in progress. When the mode switch is Lamp status Camera status Lights (orange) Normal operation Flashing (orange...

Operating Instructions
Page 11
... menu items. J ENTER button Press this button to the supplied AC power adaptor. During auto-review display or image playback, pressing this button to exit a menu or the layout preview screen. ... Parts W ( ): Zoom out of a zoomed in or out of the face while maintaining a fixed camera position. K MENU button (20, 26, 28) Press this button to the AC power adaptor or external... two modes. : Shooting mode : Playback mode M Battery compartment lid (15) Insert four commercially available Sony AA NiMH (nickel-metal hydride) rechargeable batteries (type NHAA, max. 2700 mAh). You can adjust the...
... menu items. J ENTER button Press this button to the supplied AC power adaptor. During auto-review display or image playback, pressing this button to exit a menu or the layout preview screen. ... Parts W ( ): Zoom out of a zoomed in or out of the face while maintaining a fixed camera position. K MENU button (20, 26, 28) Press this button to the AC power adaptor or external... two modes. : Shooting mode : Playback mode M Battery compartment lid (15) Insert four commercially available Sony AA NiMH (nickel-metal hydride) rechargeable batteries (type NHAA, max. 2700 mAh). You can adjust the...

Operating Instructions
Page 21
... to change the exposure compensation value, or when the release button is different from the auto-review display without switching the mode switch setting. Slowly press the release button halfway again. 3 Press...asking you to . The picture displayed on page 22. For this camera keeps the brightness of the surrounding areas. This feature is not in the auto-review display. 1 Press the button. W: Wide-angle zoom. 2 Press ...button halfway, the picture is known as the auto-review display. Taking a Picture 1 2, 3 1 Point the camera at the subject, and adjust the frame while monitoring the...
... to change the exposure compensation value, or when the release button is different from the auto-review display without switching the mode switch setting. Slowly press the release button halfway again. 3 Press...asking you to . The picture displayed on page 22. For this camera keeps the brightness of the surrounding areas. This feature is not in the auto-review display. 1 Press the button. W: Wide-angle zoom. 2 Press ...button halfway, the picture is known as the auto-review display. Taking a Picture 1 2, 3 1 Point the camera at the subject, and adjust the frame while monitoring the...
Operating Instructions
Page 22
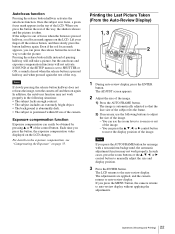
...in the top of the image. 1) Press the AUTO FRAME button. Each time you press the MENU button, the camera returns to auto-review display without applying the adjustments. 22 Operations (Shooting and Printing) Printing the Last Picture Taken (From the Auto...-Review Display) 1, 3 2 1 During auto-review display, press the ENTER button. The adjustments are applied, and the camera returns to take a picture, but the autofocus and exposure compensation functions will still take the ...
...in the top of the image. 1) Press the AUTO FRAME button. Each time you press the MENU button, the camera returns to auto-review display without applying the adjustments. 22 Operations (Shooting and Printing) Printing the Last Picture Taken (From the Auto...-Review Display) 1, 3 2 1 During auto-review display, press the ENTER button. The adjustments are applied, and the camera returns to take a picture, but the autofocus and exposure compensation functions will still take the ...

Operating Instructions
Page 23
...transmitted to send images. To remove the print preview screen, press the MENU button. 6 Specify the number of the camera. The printer checks the print pack then starts printing. Sony UP-DX100 1 Printer name JPN Passport 3 35 45mm 8 Number of prints ID Photo Frame Frame size Number of .... PUSH MENU KEY TO CONTINUE." For details on the LCD. When data transmission ends, the CANCEL button changes to turn off the auto-review display. To take more time to the printer, and "TRANSMITTING" and the progress bar appear on adjusting the print quality, see "Setting ...
...transmitted to send images. To remove the print preview screen, press the MENU button. 6 Specify the number of the camera. The printer checks the print pack then starts printing. Sony UP-DX100 1 Printer name JPN Passport 3 35 45mm 8 Number of prints ID Photo Frame Frame size Number of .... PUSH MENU KEY TO CONTINUE." For details on the LCD. When data transmission ends, the CANCEL button changes to turn off the auto-review display. To take more time to the printer, and "TRANSMITTING" and the progress bar appear on adjusting the print quality, see "Setting ...
Operating Instructions
Page 24
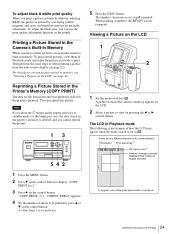
... an example of sheets to be set it to standby mode (so the lamp goes out), the data stored in the camera's memory appears on the LCD. 2 Select a picture to view by press v or V on the printer. The number... of images recorded 1) Appears only when print queue mode is stored in the camera's built-in memory, see "Viewing a Picture on the LCD" on viewing pictures stored in memory. For details on page 24.... & white print quality When you wish to print. A value from the auto-review display (on . 24 Operations (Shooting and Printing)
... an example of sheets to be set it to standby mode (so the lamp goes out), the data stored in the camera's memory appears on the LCD. 2 Select a picture to view by press v or V on the printer. The number... of images recorded 1) Appears only when print queue mode is stored in the camera's built-in memory, see "Viewing a Picture on the LCD" on viewing pictures stored in memory. For details on page 24.... & white print quality When you wish to print. A value from the auto-review display (on . 24 Operations (Shooting and Printing)

Operating Instructions
Page 50
..."Printing the Last Picture Taken (From the Auto-Review Display)" on the LCD of the "Basic Imaging ... The PRINT OFFSET screen appears. 5 Select an offset value by Sony Corporation under license. This omnidirectional communication system enables communication even if the... data encryption. • When using the Bluetooth function, the distance between the camera and the printer you do not return to display "PRINT SETTING [>>]" on the...The main features of the BIP enable sending or receiving images, and use this document. Bluetooth Address A 12-digit code consisting of the numerics 0-9 and the ...
..."Printing the Last Picture Taken (From the Auto-Review Display)" on the LCD of the "Basic Imaging ... The PRINT OFFSET screen appears. 5 Select an offset value by Sony Corporation under license. This omnidirectional communication system enables communication even if the... data encryption. • When using the Bluetooth function, the distance between the camera and the printer you do not return to display "PRINT SETTING [>>]" on the...The main features of the BIP enable sending or receiving images, and use this document. Bluetooth Address A 12-digit code consisting of the numerics 0-9 and the ...
Operating Instructions
Page 58
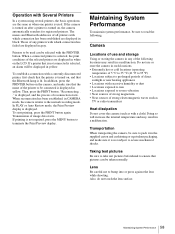
... of strong magnetism • Near sources of reconnection starts. If a printer that is not connected is displayed. In PLAY or Auto Review mode, the Print Preview display is selected, an alarm will increase the internal temperature and may result in the supplied carton and cushioning ...or equivalent packaging, and make sure that pictures can be displayed in CAMERA mode, the camera returns to ensure that the name of the following . Transmission of all printers with the PRINTER button. Lens Be careful ...
... of strong magnetism • Near sources of reconnection starts. If a printer that is not connected is displayed. In PLAY or Auto Review mode, the Print Preview display is selected, an alarm will increase the internal temperature and may result in the supplied carton and cushioning ...or equivalent packaging, and make sure that pictures can be displayed in CAMERA mode, the camera returns to ensure that the name of the following . Transmission of all printers with the PRINTER button. Lens Be careful ...

Operating Instructions
Page 62
...in the menu to , or . • The external flash is affecting the colors. Cause/Solution • The camera is enabled. tPictures can only be printed from auto-review display or Playback mode. • The print queue function is set to the printer. tPrint using the print queue ... and make sure nothing is blocking the lens. 62 Troubleshooting tHold the camera correctly and make sure nothing is blocking the flash. • The subject was blocking the flash. tContact your nearest Sony dealer. tMake sure the subject is being fed to or . tSet the white balance ...
...in the menu to , or . • The external flash is affecting the colors. Cause/Solution • The camera is enabled. tPictures can only be printed from auto-review display or Playback mode. • The print queue function is set to the printer. tPrint using the print queue ... and make sure nothing is blocking the lens. 62 Troubleshooting tHold the camera correctly and make sure nothing is blocking the flash. • The subject was blocking the flash. tContact your nearest Sony dealer. tMake sure the subject is being fed to or . tSet the white balance ...
Operating Instructions
Page 67
Index A AC power Camera 14 Printer 19 AC power adaptor 14 ALARM lamp 12 APERTURE 29 Aperture 33 AUTO ERASE 29 Auto erase mode 32 AUTO FRAME (automatic position matching) button 10 Auto power off 40 Autofocus function 9, 22 Auto-review 21, 22 B Basic Imaging Profile (BIP) 50 Battery compartment...I ID photo frame Setting up a frame for display during printing 37 Image Push Feature 50 Image resolution 20, 32 L LANGUAGE 31 LCD screen (camera) During layout preview 23 During playback 24 While taking pictures 21 LCD screen (printer) During printing 49 Lens 9 Locking menus 43 M Memory Deleting pictures...
Index A AC power Camera 14 Printer 19 AC power adaptor 14 ALARM lamp 12 APERTURE 29 Aperture 33 AUTO ERASE 29 Auto erase mode 32 AUTO FRAME (automatic position matching) button 10 Auto power off 40 Autofocus function 9, 22 Auto-review 21, 22 B Basic Imaging Profile (BIP) 50 Battery compartment...I ID photo frame Setting up a frame for display during printing 37 Image Push Feature 50 Image resolution 20, 32 L LANGUAGE 31 LCD screen (camera) During layout preview 23 During playback 24 While taking pictures 21 LCD screen (printer) During printing 49 Lens 9 Locking menus 43 M Memory Deleting pictures...
Operating Instructions
Page 68
...in memory 24 Printing the last picture taken 22 Reprinting pictures from the printer's memory 24 Printing time 49 PROPERTY 30, 52 Q Quick Review mode 58 R Recording capacity 59 Release button 9 Removing jammed paper 63 Reprinting (from the printer's memory) 24 Setting the number of sheets...menu 30 Shooting condition 8, 20 Factory settings 20 Shooting environments 7 SHUTTER 29 Shutter speed 34 Size (print layout) 37, 66 Sound (camera) 41 Standby lamp (camera) 10 Standby mode 20 Supplied accessories 14 System configuration 5 T Taking pictures 21 LCD screen 21 Total number of pictures in memory 24 ...
...in memory 24 Printing the last picture taken 22 Reprinting pictures from the printer's memory 24 Printing time 49 PROPERTY 30, 52 Q Quick Review mode 58 R Recording capacity 59 Release button 9 Removing jammed paper 63 Reprinting (from the printer's memory) 24 Setting the number of sheets...menu 30 Shooting condition 8, 20 Factory settings 20 Shooting environments 7 SHUTTER 29 Shutter speed 34 Size (print layout) 37, 66 Sound (camera) 41 Standby lamp (camera) 10 Standby mode 20 Supplied accessories 14 System configuration 5 T Taking pictures 21 LCD screen 21 Total number of pictures in memory 24 ...

