Operating Instructions
Page 2
... comply with the instruction manual, may be shielded in Europe The manufacturer of the unit, operate the disconnect device to qualified personnel only. This apparatus shall not be used to connect peripherals must be required to the addresses given in the residential area. Owner's Record The model and serial numbers are located at his own expense. When installing the unit, incorporate a readily accessible disconnect device...
... comply with the instruction manual, may be shielded in Europe The manufacturer of the unit, operate the disconnect device to qualified personnel only. This apparatus shall not be used to connect peripherals must be required to the addresses given in the residential area. Owner's Record The model and serial numbers are located at his own expense. When installing the unit, incorporate a readily accessible disconnect device...
Operating Instructions
Page 3
... Printer 6 Connections 7 USB Port Connection 7 Installing the Printer Driver 7 Operation Before Printing 8 Notes on Handling the Ink Ribbon and Paper ....8 Loading the Ink Ribbon and Paper 9 Replacing the Ink Ribbon and Paper 12 Printing 13 Removing Scraps 14 Miscellaneous Precautions 16 Safety 16 Installation 16 Transportation 16 Cleaning 16 Cleaning the Internals of the Printer 16 Ink Ribbon and Paper 19 Specifications 20 About the Self-Laminating Color Printing Pack (2UPC-R810 20 Troubleshooting 21 Explanation of Indicators 22 If a Paper Jam...
... Printer 6 Connections 7 USB Port Connection 7 Installing the Printer Driver 7 Operation Before Printing 8 Notes on Handling the Ink Ribbon and Paper ....8 Loading the Ink Ribbon and Paper 9 Replacing the Ink Ribbon and Paper 12 Printing 13 Removing Scraps 14 Miscellaneous Precautions 16 Safety 16 Installation 16 Transportation 16 Cleaning 16 Cleaning the Internals of the Printer 16 Ink Ribbon and Paper 19 Specifications 20 About the Self-Laminating Color Printing Pack (2UPC-R810 20 Troubleshooting 21 Explanation of Indicators 22 If a Paper Jam...
Operating Instructions
Page 4
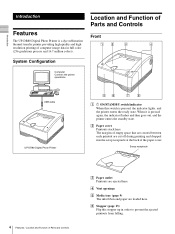
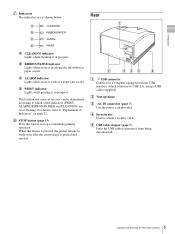
... ejected here. Introduction Introduction Features The UP-DR80 Digital Photo Printer is a dye sublimation thermal transfer printer providing high quality and high resolution printing of Parts and Controls Front System Configuration Computer Controls the printer operations. D Vent openings E Media tray (page 9) The ink ribbon and paper are loaded here. F Stopper (page 13) Flip this switch is pressed again, the indicator flashes and then goes out, and the printer enters the standby state.
... ejected here. Introduction Introduction Features The UP-DR80 Digital Photo Printer is a dye sublimation thermal transfer printer providing high quality and high resolution printing of Parts and Controls Front System Configuration Computer Controls the printer operations. D Vent openings E Media tray (page 9) The ink ribbon and paper are loaded here. F Stopper (page 13) Flip this switch is pressed again, the indicator flashes and then goes out, and the printer enters the standby state.
Operating Instructions
Page 5
... the indicators (PRINT, ALARM, RIBBON/PAPAER and CLEANING) are as a paper jam occurs. H STOP button (page 13) Press this button is in progress. C ALARM indicator Lights when an error such as shown below: Rear A CLEANING indicator Lights while cleaning is printed and ejected. B RIBBON/PAPER indicator Lights when an error involving the ink ribbon or paper occurs. E USB cable stopper (page 7) Fixes the USB cable to attach a security cable. B Vent openings C ~AC IN connector (page 7) Use the power cord provided...
... the indicators (PRINT, ALARM, RIBBON/PAPAER and CLEANING) are as a paper jam occurs. H STOP button (page 13) Press this button is in progress. C ALARM indicator Lights when an error such as shown below: Rear A CLEANING indicator Lights while cleaning is printed and ejected. B RIBBON/PAPER indicator Lights when an error involving the ink ribbon or paper occurs. E USB cable stopper (page 7) Fixes the USB cable to attach a security cable. B Vent openings C ~AC IN connector (page 7) Use the power cord provided...
Operating Instructions
Page 7
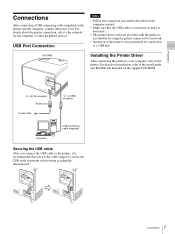
... Installing the Printer Driver After connecting the printer to the printer and the computer, connect the power cord. USB Port Connection Notes • Follow the connection procedures described in the computer manual. • Make sure that the USB cable is connected securely at both ends. • The printer driver software provided with the printer is not suitable for using the printer connected to a network. • Operation of the printer is recommended that you connect the USB cable to a USB hub. Preparation Connections...
... Installing the Printer Driver After connecting the printer to the printer and the computer, connect the power cord. USB Port Connection Notes • Follow the connection procedures described in the computer manual. • Make sure that the USB cable is connected securely at both ends. • The printer driver software provided with the printer is not suitable for using the printer connected to a network. • Operation of the printer is recommended that you connect the USB cable to a USB hub. Preparation Connections...
Operating Instructions
Page 8
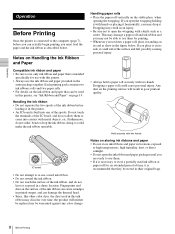
... ink ribbon and you open the ink ribbon and paper packages until you set down a paper roll, place it standing on the printing surface will neither be replaced nor be stored in their original bags. 8 Before Printing Furthermore, do not leave it exposed in a dusty location. Dropping a paper roll could make the ink ribbon unusable. Operation Operation Before Printing Once the printer is connected to the computer (page 7), before loading...
... ink ribbon and you open the ink ribbon and paper packages until you set down a paper roll, place it standing on the printing surface will neither be replaced nor be stored in their original bags. 8 Before Printing Furthermore, do not leave it exposed in a dusty location. Dropping a paper roll could make the ink ribbon unusable. Operation Operation Before Printing Once the printer is connected to the computer (page 7), before loading...
Operating Instructions
Page 9
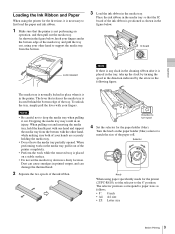
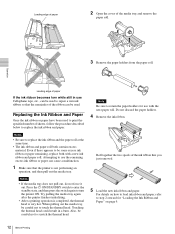
... an operation, and then pull out the media tray. Direction to turn spool 4 Set the selector for the printer (2UPC-R810), set the media tray down in the printer. IC board Lock released Note If there is any slack in the cleaning ribbon after it out of the ink ribbon. Operation Loading the Ink Ribbon and Paper When using the printer for the first time, it out. Dropping the media tray may...
... an operation, and then pull out the media tray. Direction to turn spool 4 Set the selector for the printer (2UPC-R810), set the media tray down in the printer. IC board Lock released Note If there is any slack in the cleaning ribbon after it out of the ink ribbon. Operation Loading the Ink Ribbon and Paper When using the printer for the first time, it out. Dropping the media tray may...
Operating Instructions
Page 10
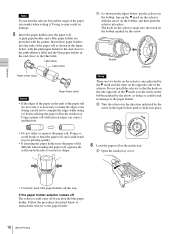
... the media tray. 1 Open the media tray cover. • Correctly insert the paper holders all the way. Label (blue) Label (pink) Paper holder (blue) Paper holder (pink) Notes • If the edges of the paper on the ends of the paper roll are not even, it is difficult when loading the paper roll, squeeze the roll from both sides to the blue label. Using a paper roll...
... the media tray. 1 Open the media tray cover. • Correctly insert the paper holders all the way. Label (blue) Label (pink) Paper holder (blue) Paper holder (pink) Notes • If the edges of the paper on the ends of the paper roll are not even, it is difficult when loading the paper roll, squeeze the roll from both sides to the blue label. Using a paper roll...
Operating Instructions
Page 11
... can load the paper roll in the printer can leave adhesive on the ink ribbon, malfunctions may occur. 11 Before Printing If the labels are not peeled off the adhesive labels from the bottom. Always use two hands when carrying the media tray, supporting the media tray from the paper roll in until it clicks into place. Blue Note Be certain to remove...
... can load the paper roll in the printer can leave adhesive on the ink ribbon, malfunctions may occur. 11 Before Printing If the labels are not peeled off the adhesive labels from the bottom. Always use two hands when carrying the media tray, supporting the media tray from the paper roll in until it clicks into place. Blue Note Be certain to remove...
Operating Instructions
Page 12
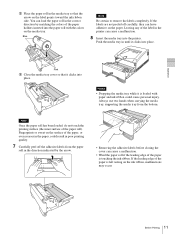
... can cause a malfunction. 1 Make sure that you just removed. 5 Load the new ink ribbon and paper. Even if there appears to be used to print the specified number of sheets, follow the procedure described below to repair a torn ink ribbon so that the remainder of paper If the ink ribbon becomes torn while still in a burn. Notes • If the media tray does not pull out...
... can cause a malfunction. 1 Make sure that you just removed. 5 Load the new ink ribbon and paper. Even if there appears to be used to print the specified number of sheets, follow the procedure described below to repair a torn ink ribbon so that the remainder of paper If the ink ribbon becomes torn while still in a burn. Notes • If the media tray does not pull out...
Operating Instructions
Page 13
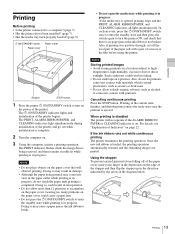
... the ink ribbon runs out while continuous printing The printer terminates the printing operation. Operation Printing Before printing • Is the printer connected to a computer? (page 7) • Has the printer driver been installed? (page 7) • Has the media tray been properly loaded? (page 9) 1 ON/STANDBY switch Paper cover Paper outlet Stopper STOP button 1 Press the printer 1 ON/STANDBY switch to turn the printer ON, and check that will not operate if the ALARM, RIBBON/ PAPER or CLEANING indicator is on. Notes Storing printed images •...
... the ink ribbon runs out while continuous printing The printer terminates the printing operation. Operation Printing Before printing • Is the printer connected to a computer? (page 7) • Has the printer driver been installed? (page 7) • Has the media tray been properly loaded? (page 9) 1 ON/STANDBY switch Paper cover Paper outlet Stopper STOP button 1 Press the printer 1 ON/STANDBY switch to turn the printer ON, and check that will not operate if the ALARM, RIBBON/ PAPER or CLEANING indicator is on. Notes Storing printed images •...
Operating Instructions
Page 14
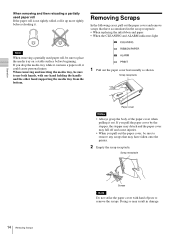
... you pull out the paper cover, be sure to remove the scraps. If you pull the paper cover by the stopper, the stopper may detach and the paper cover may result in the scrap receptacle. • When replacing the ink ribbon and paper • When the CLEANING and ALARM indicators light Note When removing a partially used paper roll If the paper roll is not tightly rolled...
... you pull out the paper cover, be sure to remove the scraps. If you pull the paper cover by the stopper, the stopper may detach and the paper cover may result in the scrap receptacle. • When replacing the ink ribbon and paper • When the CLEANING and ALARM indicators light Note When removing a partially used paper roll If the paper roll is not tightly rolled...
Operating Instructions
Page 16
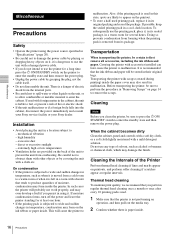
... unit with a damaged power cable. • If you clean the printer, be certain to remove the scraps. high humidity - direct or excessive sunlight - extremely high or low temperatures • Ventilation holes are likely to appear on the printout. • To store a half-used in this state, spots are provided on page 14 to first remove all accessories, including the ink ribbon and paper...
... unit with a damaged power cable. • If you clean the printer, be certain to remove the scraps. high humidity - direct or excessive sunlight - extremely high or low temperatures • Ventilation holes are likely to appear on the printout. • To store a half-used in this state, spots are provided on page 14 to first remove all accessories, including the ink ribbon and paper...
Operating Instructions
Page 17
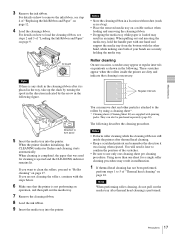
... and support the media tray from the bottom with the steps below. 6 Make sure that cleaning is placed in the tray, take up the slack by turning the spool in the direction indicated by using a cleaning sheet*. * Cleaning sheets (Cleaning Sheet 80) are dirty and indicate that the printer is not performing an operation, and then pull out the media tray. 7 Remove the cleaning ribbon. 8 Load the ink ribbon. 9 Insert the media tray into the printer. Roller cleaning...
... and support the media tray from the bottom with the steps below. 6 Make sure that cleaning is placed in the tray, take up the slack by turning the spool in the direction indicated by using a cleaning sheet*. * Cleaning sheets (Cleaning Sheet 80) are dirty and indicate that the printer is not performing an operation, and then pull out the media tray. 7 Remove the cleaning ribbon. 8 Load the ink ribbon. 9 Insert the media tray into the printer. Roller cleaning...
Operating Instructions
Page 18
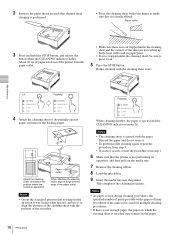
... the cleaning sheet starts. This completes the cleaning procedure. Paper outlet Miscellaneous 3 Press and hold the STOP button, and release the button when the CLEANING indicator flashes. When attaching the cleaning sheet, align its edge with the position of the printer from step 1. 6 Make sure that the printer is not performing an operation, and then pull out the media tray. 7 Remove the cleaning ribbon. 8 Load the ink ribbon. 9 Insert the media tray into the printer...
... the cleaning sheet starts. This completes the cleaning procedure. Paper outlet Miscellaneous 3 Press and hold the STOP button, and release the button when the CLEANING indicator flashes. When attaching the cleaning sheet, align its edge with the position of the printer from step 1. 6 Make sure that the printer is not performing an operation, and then pull out the media tray. 7 Remove the cleaning ribbon. 8 Load the ink ribbon. 9 Insert the media tray into the printer...
Operating Instructions
Page 19
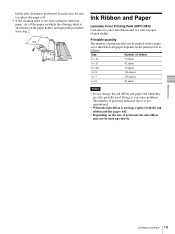
... the cleaning sheet is attached from the paper holder, and repeat the procedure from step 2. Size Number of printouts, the ink ribbon may not be used . Printable quantity The number of printouts that can cause problems. The number of printouts indicated above is not quarantined. • When the ink ribbon is performed. Ink Ribbon and Paper Laminate Color Printing Pack 2UPC-R810 Contains two color ink ribbons...
... the cleaning sheet is attached from the paper holder, and repeat the procedure from step 2. Size Number of printouts, the ink ribbon may not be used . Printable quantity The number of printouts that can cause problems. The number of printouts indicated above is not quarantined. • When the ink ribbon is performed. Ink Ribbon and Paper Laminate Color Printing Pack 2UPC-R810 Contains two color ink ribbons...
Operating Instructions
Page 20
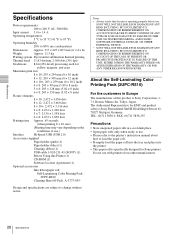
... size) (Printing time may vary depending on the conditions of this Printer (1) CD-ROM (1) Software License Agreement (1) Optional accessories Ink ribbon/paper roll Self-Laminating Color Printing Pack 2UPC-R810 Cleaning Sheet 80 Pack A-1737-055- About the Self-Laminating Color Printing Pack (2UPC-R810) For the customers in a cool dark place. • Open paper rolls only when ready to use with printers from other manufacturers. 20 Specifications...
... size) (Printing time may vary depending on the conditions of this Printer (1) CD-ROM (1) Software License Agreement (1) Optional accessories Ink ribbon/paper roll Self-Laminating Color Printing Pack 2UPC-R810 Cleaning Sheet 80 Pack A-1737-055- About the Self-Laminating Color Printing Pack (2UPC-R810) For the customers in a cool dark place. • Open paper rolls only when ready to use with printers from other manufacturers. 20 Specifications...
Operating Instructions
Page 21
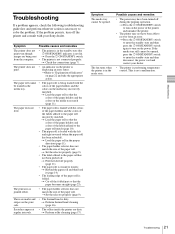
... control. This is in the media tray. • The paper roll is loaded with the colors of the paper holders and the colors on the power. If the problem persists, turn off properly (page 11). • The paper roll is loaded with your dealer. • The printer is displaying an error status. Symptom Possible causes and remedies The printer does not print even though images are being loaded with the colors of the paper...
... control. This is in the media tray. • The paper roll is loaded with the colors of the paper holders and the colors on the power. If the problem persists, turn off properly (page 11). • The paper roll is loaded with your dealer. • The printer is displaying an error status. Symptom Possible causes and remedies The printer does not print even though images are being loaded with the colors of the paper...
Operating Instructions
Page 22
... the printer when they are on or flashing are blocking the paper outlet. • The paper cover is the wrong size. t Load a paper roll (page 10). • An ink ribbon has not been loaded. tLoad an ink ribbon (page 9). • The ink ribbon has been used up. One of Indicators tClose the media tray properly. • A paper jam has occurred in progress. tCheck the ink ribbon and paper roll. • A paper eject error...
... the printer when they are on or flashing are blocking the paper outlet. • The paper cover is the wrong size. t Load a paper roll (page 10). • An ink ribbon has not been loaded. tLoad an ink ribbon (page 9). • The ink ribbon has been used up. One of Indicators tClose the media tray properly. • A paper jam has occurred in progress. tCheck the ink ribbon and paper roll. • A paper eject error...
Operating Instructions
Page 23
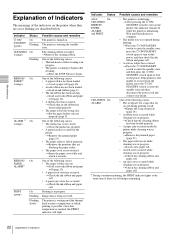
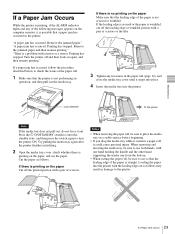
... printer: "A paper jam has occurred. Loading the paper into the printer. Printing has stopped. Try pulling the media tray again after the printer finishes initializing. 2 Open the media tray cover, check whether there is a problem with a motor or a sensor. Printing has stopped. Press the 1 ON/STANDBY switch to enter the standby state, and then press the switch again to cut the paper. "A paper jam has occurred. "There is printing on the paper, and cut so that a paper jam...
... printer: "A paper jam has occurred. Loading the paper into the printer. Printing has stopped. Try pulling the media tray again after the printer finishes initializing. 2 Open the media tray cover, check whether there is a problem with a motor or a sensor. Printing has stopped. Press the 1 ON/STANDBY switch to enter the standby state, and then press the switch again to cut the paper. "A paper jam has occurred. "There is printing on the paper, and cut so that a paper jam...


