
Operating Instructions
Page 2
... the inside. Risk of important operating and maintenance (servicing) instructions in the literature accompanying the appliance. For the customers in this manual could void your authority to rain or moisture. This equipment generates, uses, and can radiate radio frequency energy and, if not installed and used to connect peripherals must be required to these number in a commercial environment. For any...
... the inside. Risk of important operating and maintenance (servicing) instructions in the literature accompanying the appliance. For the customers in this manual could void your authority to rain or moisture. This equipment generates, uses, and can radiate radio frequency energy and, if not installed and used to connect peripherals must be required to these number in a commercial environment. For any...
Operating Instructions
Page 3
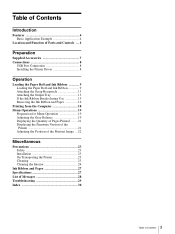
... of Parts and Controls .... 4 Preparation Supplied Accessories 7 Connections 8 USB Port Connection 8 Installing the Printer Driver 8 Operation Loading the Paper Roll and Ink Ribbon 9 Loading the Paper Roll and Ink Ribbon 9 Attaching the Scrap Receptacle 13 Attaching the Output Tray 13 If the Ink Ribbon Breaks during Use 15 Removing the Ink Ribbon and Paper 16 Printing from the Computer 18 Menu Operations 19 Preparation for Menu Operation 19 Adjusting the Gray Balance 19 Displaying the Quantity of Pages Printed ........ 21 Displaying the Firmware Version...
... of Parts and Controls .... 4 Preparation Supplied Accessories 7 Connections 8 USB Port Connection 8 Installing the Printer Driver 8 Operation Loading the Paper Roll and Ink Ribbon 9 Loading the Paper Roll and Ink Ribbon 9 Attaching the Scrap Receptacle 13 Attaching the Output Tray 13 If the Ink Ribbon Breaks during Use 15 Removing the Ink Ribbon and Paper 16 Printing from the Computer 18 Menu Operations 19 Preparation for Menu Operation 19 Adjusting the Gray Balance 19 Displaying the Quantity of Pages Printed ........ 21 Displaying the Firmware Version...

Operating Instructions
Page 4
... colors). Front Computer: provides image data for printing and printer control signals Output tray removed UP-DR200 Digital Photo Printer 4 Features / Location and Function of ink ribbon remaining. Messages are displayed when an error or warning condition occurs. Introduction Introduction Features The UP-DR200 Digital Photo Printer is initialized, or when an error occurs. B LCD (liquid crystal display) (page 18, 21, 28) Displays the number of pages printed, or the amount of Parts and Controls A ALARM indicator (page...
... colors). Front Computer: provides image data for printing and printer control signals Output tray removed UP-DR200 Digital Photo Printer 4 Features / Location and Function of ink ribbon remaining. Messages are displayed when an error or warning condition occurs. Introduction Introduction Features The UP-DR200 Digital Photo Printer is initialized, or when an error occurs. B LCD (liquid crystal display) (page 18, 21, 28) Displays the number of pages printed, or the amount of Parts and Controls A ALARM indicator (page...
Operating Instructions
Page 5
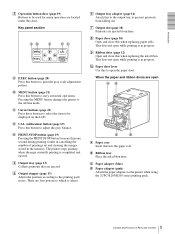
... use. E PRINT STOP button (page 19) Pressing the PRINT STOP button for menu operation are located under this when replacing paper rolls. The printer stops printing when the page currently printing is in cancelling the number of Parts and Controls E Output stopper (page 13) Adjust the position according to open while printing is completed and ejected. C Paper adapter (blue) D Paper adapter (pink) Attach the paper adapters to the printer when using the 2UPC-R203/R205 series printing pack. 5 Location and Function of printings set and clearing the images...
... use. E PRINT STOP button (page 19) Pressing the PRINT STOP button for menu operation are located under this when replacing paper rolls. The printer stops printing when the page currently printing is in cancelling the number of Parts and Controls E Output stopper (page 13) Adjust the position according to open while printing is completed and ejected. C Paper adapter (blue) D Paper adapter (pink) Attach the paper adapters to the printer when using the 2UPC-R203/R205 series printing pack. 5 Location and Function of printings set and clearing the images...
Operating Instructions
Page 7
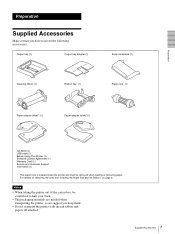
... Supplied Accessories Make certain you have received the following accessories: Output tray (1) Output tray adapter (1) Scrap receptacle (1) Cleaning ribbon (1) Ribbon tray* (1) Paper core* (1) Paper adapter (blue)* (1) Paper adapter (pink)* (1) CD-ROM (1) USB cable (1) Before Using This Printer (1) Software License Agreement (1) Warranty Card (1) Service and Customer Support Information (1) * The paper core is located inside the printer and must be careful not to hurt your back. • The packaging materials are needed when transporting...
... Supplied Accessories Make certain you have received the following accessories: Output tray (1) Output tray adapter (1) Scrap receptacle (1) Cleaning ribbon (1) Ribbon tray* (1) Paper core* (1) Paper adapter (blue)* (1) Paper adapter (pink)* (1) CD-ROM (1) USB cable (1) Before Using This Printer (1) Software License Agreement (1) Warranty Card (1) Service and Customer Support Information (1) * The paper core is located inside the printer and must be careful not to hurt your back. • The packaging materials are needed when transporting...
Operating Instructions
Page 8
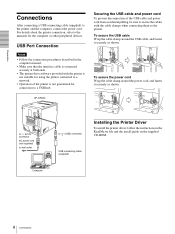
... using the printer connected to a network. • Operation of the printer is not guaranteed for the computer or other peripheral devices. To secure the power cord Wrap the cable clamp around the USB cable, and fasten it securely as shown. USB Port Connection Notes • Follow the connection procedures described in the ReadMe.txt file and the install guide on the supplied CD-ROM. to the manuals for connection...
... using the printer connected to a network. • Operation of the printer is not guaranteed for the computer or other peripheral devices. To secure the power cord Wrap the cable clamp around the USB cable, and fasten it securely as shown. USB Port Connection Notes • Follow the connection procedures described in the ReadMe.txt file and the install guide on the supplied CD-ROM. to the manuals for connection...

Operating Instructions
Page 9
... printer is powered on page 16. Operation Operation • Hold the paper roll with both hands. • Do not detach the black and white spools of the ink ribbon until you use , the above print capacities are not guaranteed. • When setting the paper roll down, place it has only been partially used up one paper roll, clean the thermal head and rollers before loading a new paper roll and ink ribbon. Use...
... printer is powered on page 16. Operation Operation • Hold the paper roll with both hands. • Do not detach the black and white spools of the ink ribbon until you use , the above print capacities are not guaranteed. • When setting the paper roll down, place it has only been partially used up one paper roll, clean the thermal head and rollers before loading a new paper roll and ink ribbon. Use...
Operating Instructions
Page 10
...-R205 series Printing Pack Attach the blue paper adapter to the left side of the paper on the roll are not aligned before inserting the paper core, be sure to use scissors to cut off the damaged portion, as a result of printouts. Not doing so may result in the opening of the printer before printing (page 24). Be sure to remove the output tray and...
...-R205 series Printing Pack Attach the blue paper adapter to the left side of the paper on the roll are not aligned before inserting the paper core, be sure to use scissors to cut off the damaged portion, as a result of printouts. Not doing so may result in the opening of the printer before printing (page 24). Be sure to remove the output tray and...

Operating Instructions
Page 11
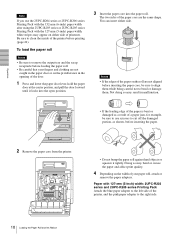
...-mm (6-inch) width: 2UPC-R204 series and 2UPC-R206 series Printing Pack Remove the blue and pink paper adapters from sliding off, hold both sides of the paper core when loading it into the printer. 6 Remove the seal affixed to remove the seal completely. (When the factory is shipped, the paper adapter is attached.) 5 Load the paper roll into place. Operation blue pink Press the portions...
...-mm (6-inch) width: 2UPC-R204 series and 2UPC-R206 series Printing Pack Remove the blue and pink paper adapters from sliding off, hold both sides of the paper core when loading it into the printer. 6 Remove the seal affixed to remove the seal completely. (When the factory is shipped, the paper adapter is attached.) 5 Load the paper roll into place. Operation blue pink Press the portions...

Operating Instructions
Page 15
...Operation To remove the output tray Hold the output tray on both sides, and 1 raise the tray while 2 pulling it toward you hold the center of the white spool to feed spool's ribbon end, and attach it into the printer. 1 If the Ink Ribbon Breaks during Use The remaining ribbon can be used after repairing it with adhesive tape. 1 Open..., and then attach the other part, your fingers may get caught while inserting the tray and injuries may be lost. 3 Remove any slack. 15 Loading the Paper Roll and Ink Ribbon the ribbon on the black spool. Wind the black spool to the ribbon out. ...
...Operation To remove the output tray Hold the output tray on both sides, and 1 raise the tray while 2 pulling it toward you hold the center of the white spool to feed spool's ribbon end, and attach it into the printer. 1 If the Ink Ribbon Breaks during Use The remaining ribbon can be used after repairing it with adhesive tape. 1 Open..., and then attach the other part, your fingers may get caught while inserting the tray and injuries may be lost. 3 Remove any slack. 15 Loading the Paper Roll and Ink Ribbon the ribbon on the black spool. Wind the black spool to the ribbon out. ...

Operating Instructions
Page 17
... the printer, and close the ribbon door. 7 Load the paper roll supplied with the ink ribbon loaded in step 5, and close the paper door. After removing the ink ribbon, attach the black spool to open position. 2 Remove the paper roll. 3 Wind the paper roll tightly, and attach a piece of sheets is reusable. Note The ribbon tray is used ink ribbon and paper with new printing packs only when the predetermined number...
... the printer, and close the ribbon door. 7 Load the paper roll supplied with the ink ribbon loaded in step 5, and close the paper door. After removing the ink ribbon, attach the black spool to open position. 2 Remove the paper roll. 3 Wind the paper roll tightly, and attach a piece of sheets is reusable. Note The ribbon tray is used ink ribbon and paper with new printing packs only when the predetermined number...
Operating Instructions
Page 18
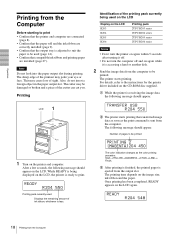
... insert a foreign object in the paper output slot. The cutter may be printed 1 Turn on again while it is accessing a hard or another disk. 2 Send the image data from the output slot. Number of pages to be damaged or broken and a piece of the cutter can cut you. The printing time depends on the LCD. The color indication changes as the print command is sent from the...
... insert a foreign object in the paper output slot. The cutter may be printed 1 Turn on again while it is accessing a hard or another disk. 2 Send the image data from the output slot. Number of pages to be damaged or broken and a piece of the cutter can cut you. The printing time depends on the LCD. The color indication changes as the print command is sent from the...

Operating Instructions
Page 19
... sheets can be stored in the output tray in printouts. However, this number can vary greatly depending on page 28. Memory capacity Image data transferred from the printer. If the printer does not print When an error message is completed and ejected. The door opens, revealing the operation buttons. 2 Carry out the operation using the menu. • Adjustment of the gray balance • Display of the total quantity of pages printed • Display of the firmware...
... sheets can be stored in the output tray in printouts. However, this number can vary greatly depending on page 28. Memory capacity Image data transferred from the printer. If the printer does not print When an error message is completed and ejected. The door opens, revealing the operation buttons. 2 Carry out the operation using the menu. • Adjustment of the gray balance • Display of the total quantity of pages printed • Display of the firmware...

Operating Instructions
Page 21
... the MENU button after confirming. The printer returns to use the printer can be displayed. Total number of printings since you want to the on the information display. The printer is displayed on -line mode. Also, the total number of the printer 3 Press the MENU button after confirming. The printer returns to be displayed. 2 1,3 2 1,3 Operation 1 Press the MENU button. Displaying the Firmware Version of the Printer The version of the firmware of printings made so far since turning...
... the MENU button after confirming. The printer returns to use the printer can be displayed. Total number of printings since you want to the on the information display. The printer is displayed on -line mode. Also, the total number of the printer 3 Press the MENU button after confirming. The printer returns to be displayed. 2 1,3 2 1,3 Operation 1 Press the MENU button. Displaying the Firmware Version of the Printer The version of the firmware of printings made so far since turning...
Operating Instructions
Page 23
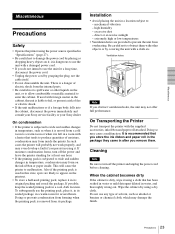
Miscellaneous Miscellaneous Precautions Safety • Operate the printer using the power source specified in "Specifications" (page 27). • Be careful not to turn off the printer and unplug the power cord before cleaning. If moisture condensation forms, turn off the power and leave the printer standing for several hours. If possible, keep the sealed printing pack in water, and thoroughly wrung out. direct or excessive sunlight - Wipe...
Miscellaneous Miscellaneous Precautions Safety • Operate the printer using the power source specified in "Specifications" (page 27). • Be careful not to turn off the printer and unplug the power cord before cleaning. If moisture condensation forms, turn off the power and leave the printer standing for several hours. If possible, keep the sealed printing pack in water, and thoroughly wrung out. direct or excessive sunlight - Wipe...
Operating Instructions
Page 24
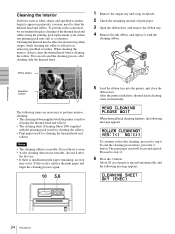
... following message appears. About 20 cm of paper is reusable. Cleaning the thermal head is effective in removing white stripes, while cleaning the rollers is insufficient print paper remaining, an error may need to appear in not reusable, discard it after cleaning only the thermal head. 1 Remove the output tray and scrap receptacle. 2 Check the remaining amount of the thermal head and rollers using the printing pack replacement cycle (when one printing pack...
... following message appears. About 20 cm of paper is reusable. Cleaning the thermal head is effective in removing white stripes, while cleaning the rollers is insufficient print paper remaining, an error may need to appear in not reusable, discard it after cleaning only the thermal head. 1 Remove the output tray and scrap receptacle. 2 Check the remaining amount of the thermal head and rollers using the printing pack replacement cycle (when one printing pack...

Operating Instructions
Page 27
... power) Interface Hi-Speed USB (USB2.0) 27 Ink Ribbon and Paper / Specifications Each printing pack contains two sets of the ink ribbon and paper roll combination. Ink ribbon for printing: 2 rolls 2KG-size print paper: 2 rolls Cleaning sheet: 2 sheets Printing capacity The number of sheets. Be sure to print the following number of sheets that can be guaranteed if you to use .) Input connector AC IN (for printing: 2 rolls King-size print paper: 2 rolls Cleaning sheet: 2 sheets 2UPC-R205 series Self-Laminating Color Printing...
... power) Interface Hi-Speed USB (USB2.0) 27 Ink Ribbon and Paper / Specifications Each printing pack contains two sets of the ink ribbon and paper roll combination. Ink ribbon for printing: 2 rolls 2KG-size print paper: 2 rolls Cleaning sheet: 2 sheets Printing capacity The number of sheets. Be sure to print the following number of sheets that can be guaranteed if you to use .) Input connector AC IN (for printing: 2 rolls King-size print paper: 2 rolls Cleaning sheet: 2 sheets 2UPC-R205 series Self-Laminating Color Printing...

Operating Instructions
Page 28
... to change without notice. tLoad the compatible ink ribbon and paper roll taken from the same package. (page 27) REMOVE PAPER A paper jam has occurred while cleaning the rollers. Miscellaneous Accessories supplied Output tray (1) Output tray adapter (1) Scrap receptacle (1) Cleaning ribbon (1) Ribbon tray (1) Paper core (1) Paper adapter (blue) (1) Paper adapter (pink) (1) USB cable (1-790-081-71(Sony)) (1) CD-ROM (1) Software License Agreement (1) Before Using This Printer (1) Warranty Card (1) Service and Customer Support Info. (1) Optional accessories Self-Laminating Color Printing Pack...
... to change without notice. tLoad the compatible ink ribbon and paper roll taken from the same package. (page 27) REMOVE PAPER A paper jam has occurred while cleaning the rollers. Miscellaneous Accessories supplied Output tray (1) Output tray adapter (1) Scrap receptacle (1) Cleaning ribbon (1) Ribbon tray (1) Paper core (1) Paper adapter (blue) (1) Paper adapter (pink) (1) USB cable (1-790-081-71(Sony)) (1) CD-ROM (1) Software License Agreement (1) Before Using This Printer (1) Warranty Card (1) Service and Customer Support Info. (1) Optional accessories Self-Laminating Color Printing Pack...
Operating Instructions
Page 29
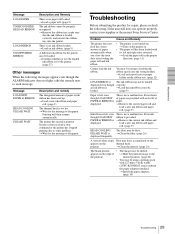
... in the proper direction. (page 11) Cannot load the ink ribbon. A vertical white stripe Dust may have accumulated on the appears on the edge of tShift the printout image to disappear. appears on the thermal head. tLoad a new ink ribbon and paper roll. (page 9) The thermal head is provided. Printing will then resume automatically. Problem Cause and Remedy The printer does not feed the correct...
... in the proper direction. (page 11) Cannot load the ink ribbon. A vertical white stripe Dust may have accumulated on the appears on the edge of tShift the printout image to disappear. appears on the thermal head. tLoad a new ink ribbon and paper roll. (page 9) The thermal head is provided. Printing will then resume automatically. Problem Cause and Remedy The printer does not feed the correct...

Operating Instructions
Page 30
... image 22 displaying the firmware version of the printer 21 displaying the quantity of pages printed 21 prepration 19 Messages 28 O Operation 9 P Paper and ink ribbon loading 9 removing 16 Part Names and Functions Front 4 Operation button door 5 Rear 6 Precautions condensation 23 Installation 23 on transportation 23 Safety 23 Preparation 7 Printer driver installing 8 Printing 18 Printing pack 2UPC-R203 series 27 2UPC-R204 series 27 2UPC-R205 series 27 2UPC-R206 series 27 printing capacity 27 S Specifications 27 T Troubleshooting 29 U USB port connection...
... image 22 displaying the firmware version of the printer 21 displaying the quantity of pages printed 21 prepration 19 Messages 28 O Operation 9 P Paper and ink ribbon loading 9 removing 16 Part Names and Functions Front 4 Operation button door 5 Rear 6 Precautions condensation 23 Installation 23 on transportation 23 Safety 23 Preparation 7 Printer driver installing 8 Printing 18 Printing pack 2UPC-R203 series 27 2UPC-R204 series 27 2UPC-R205 series 27 2UPC-R206 series 27 printing capacity 27 S Specifications 27 T Troubleshooting 29 U USB port connection...


