
Operating Instructions / Mode d’emploi
Page 1
3-203-973-11(1) Digital Photo Printer Operating Instructions Page 2 GB Mode d'emploi Page 37 FR UP-DP10 © 2000 Sony Corporation
3-203-973-11(1) Digital Photo Printer Operating Instructions Page 2 GB Mode d'emploi Page 37 FR UP-DP10 © 2000 Sony Corporation

Operating Instructions / Mode d’emploi
Page 3
...Packing List 4 Requirements 5 Names of Parts 6 Setup and Connection 7 Attaching the Stands to the Printer 7 Connecting the Printer to a Computer 7 Connecting the Power Supply 8 Turning the Power On/Off 8 Installing the Printer Driver 9 With Windows 98 9 With Windows 95 12 With the Macintosh OS 13 GB English ... the Ink Ribbon Cartridge and Printing Paper ......... 16 Removing the Ink Ribbon Cartridge and the Printing Paper 19 Making Printer Setting from your Computer 20 With Windows 20 With the Macintosh 25 Miscellaneous 31 Maintaining the Performance of the...
...Packing List 4 Requirements 5 Names of Parts 6 Setup and Connection 7 Attaching the Stands to the Printer 7 Connecting the Printer to a Computer 7 Connecting the Power Supply 8 Turning the Power On/Off 8 Installing the Printer Driver 9 With Windows 98 9 With Windows 95 12 With the Macintosh OS 13 GB English ... the Ink Ribbon Cartridge and Printing Paper ......... 16 Removing the Ink Ribbon Cartridge and the Printing Paper 19 Making Printer Setting from your Computer 20 With Windows 20 With the Macintosh 25 Miscellaneous 31 Maintaining the Performance of the...

Operating Instructions / Mode d’emploi
Page 4
..., it can operate either in a vertical position or in case it light and easy to handle. You can select from the printer. The printer can be easily cleared simply by this manual) (1) Software license agreement (1) Warranty (1) Notes • We recommend saving the box... and the packing materials in a horizontal position. Introduction What the Digital Photo Printer Can Do High-quality Photo Printing The sublimation printing process used for printing 10 sheets) (1) Print paper (5 sheets each of UPC-10P23 and...
..., it can operate either in a vertical position or in case it light and easy to handle. You can select from the printer. The printer can be easily cleared simply by this manual) (1) Software license agreement (1) Warranty (1) Notes • We recommend saving the box... and the packing materials in a horizontal position. Introduction What the Digital Photo Printer Can Do High-quality Photo Printing The sublimation printing process used for printing 10 sheets) (1) Print paper (5 sheets each of UPC-10P23 and...

Operating Instructions / Mode d’emploi
Page 5
...driver from your computer for the appropriate type of hard disk space • A printer port* *Please see the user's manual provided with a male type A connector and a male type B connector. (Refer to use the UP-DP10. Note When using a Macintosh • A Power Macintosh computer running Mac OS ...8.6 or later, and which Microsoft Windows 98 or Windows 95 runs normally • At least 32MB of RAM • At least 30MB of printer cable. In this page.) < ...
...driver from your computer for the appropriate type of hard disk space • A printer port* *Please see the user's manual provided with a male type A connector and a male type B connector. (Refer to use the UP-DP10. Note When using a Macintosh • A Power Macintosh computer running Mac OS ...8.6 or later, and which Microsoft Windows 98 or Windows 95 runs normally • At least 32MB of RAM • At least 30MB of printer cable. In this page.) < ...
Operating Instructions / Mode d’emploi
Page 6
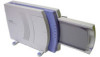
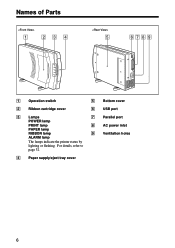
Names of Parts 1 234 5 6789 1 Operation switch 5 Bottom cover 2 Ribbon cartridge cover 6 USB port 3 Lamps 7 Parallel port POWER lamp PRINT lamp 8 AC power inlet PAPER lamp RIBBON lamp 9 Ventilation holes ALARM lamp The lamps indicate the printer status by lighting or flashing. For details, refer to page 32. 4 Paper supply/eject tray cover 6
Names of Parts 1 234 5 6789 1 Operation switch 5 Bottom cover 2 Ribbon cartridge cover 6 USB port 3 Lamps 7 Parallel port POWER lamp PRINT lamp 8 AC power inlet PAPER lamp RIBBON lamp 9 Ventilation holes ALARM lamp The lamps indicate the printer status by lighting or flashing. For details, refer to page 32. 4 Paper supply/eject tray cover 6

Operating Instructions / Mode d’emploi
Page 7
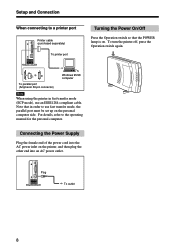
... core. • Make sure that you insert the cable connectors all of cable or the other. The mounting of the stands depends on whether the printer is made through a network. • Proper operation can be connected using one type of the way when making the connections. • The driver... provided with a Macintosh that does not have a USB port as a standard feature.) 7 Setup and Connection Attaching the Stands to the Printer The stands can not be assured when USB connection is going to be used in the vertical position or the horizontal position. (Refer to the...
... core. • Make sure that you insert the cable connectors all of cable or the other. The mounting of the stands depends on whether the printer is made through a network. • Proper operation can be connected using one type of the way when making the connections. • The driver... provided with a Macintosh that does not have a USB port as a standard feature.) 7 Setup and Connection Attaching the Stands to the Printer The stands can not be assured when USB connection is going to be used in the vertical position or the horizontal position. (Refer to the...
Operating Instructions / Mode d’emploi
Page 8
... mode (ECP mode), use fast transfer mode, the parallel port must be set up on the printer, and then plug the other end into the AC power inlet on the personal computer side. To turn the printer off, press the Operation switch again. To parallel port (Amphenol 36-pin connector) Windows 95.../98 computer Note When using the printer in order to use an IEEE1284-compliant cable. Plug To outlet 8 Connecting the Power Supply Plug the female end of the power cord into an ...
... mode (ECP mode), use fast transfer mode, the parallel port must be set up on the printer, and then plug the other end into the AC power inlet on the personal computer side. To turn the printer off, press the Operation switch again. To parallel port (Amphenol 36-pin connector) Windows 95.../98 computer Note When using the printer in order to use an IEEE1284-compliant cable. Plug To outlet 8 Connecting the Power Supply Plug the female end of the power cord into an ...

Operating Instructions / Mode d’emploi
Page 9
... when Windows 98 starts up , the "Add New Hardware Wizard" window appears. 4 Place the "Printer Software UP-DP10" CD- Once Windows 98 starts up , install the printer by a USB Cable 1 Turn the printer on . The window changes as shown below . The window changes as shown below . 6 Click ...[Next]. The window changes as shown below . Before installing the printer driver, turn the computer on first, and then turn the computer and the printer off, and then connect the printer to print on the UP-DP10, using the Print function of typical application software.
... when Windows 98 starts up , the "Add New Hardware Wizard" window appears. 4 Place the "Printer Software UP-DP10" CD- Once Windows 98 starts up , install the printer by a USB Cable 1 Turn the printer on . The window changes as shown below . The window changes as shown below . 6 Click ...[Next]. The window changes as shown below . Before installing the printer driver, turn the computer on first, and then turn the computer and the printer off, and then connect the printer to print on the UP-DP10, using the Print function of typical application software.

Operating Instructions / Mode d’emploi
Page 10
..., and then click [Next]. The window changes as shown below . 10 Select the [Specify a location] option, click [Browse], specify the [Win98\English] folder in the [Printer name] field. Installation is now complete. 10 The window changes as shown below . 11Click [Next]. Then, click [Finish]. The window changes as shown below . 13Click...]. The window changes as shown below . 12 If necessary, you can type a name for your device], and then click [Next]. The wizard ends. Installing the Printer Driver 7 Click [Finish].
..., and then click [Next]. The window changes as shown below . 10 Select the [Specify a location] option, click [Browse], specify the [Win98\English] folder in the [Printer name] field. Installation is now complete. 10 The window changes as shown below . 11Click [Next]. Then, click [Finish]. The window changes as shown below . 13Click...]. The window changes as shown below . 12 If necessary, you can type a name for your device], and then click [Next]. The wizard ends. Installing the Printer Driver 7 Click [Finish].

Operating Instructions / Mode d’emploi
Page 11
... [Next]. The window changes as shown below . 6 Click [Next]. The window changes as shown below . 11 Once Windows 98 starts up , install the printer by a Printer Cable 1 Turn the printer on first, and then turn the computer on. ROM in the CD-ROM drive. 5 Select the [Specify a location] option, click [Browse], specify the... for the best driver for your device], and then click [Next]. The window changes as shown below . The window changes as shown below . 4 Place the "Printer Software UP-DP10" CD-
... [Next]. The window changes as shown below . 6 Click [Next]. The window changes as shown below . 11 Once Windows 98 starts up , install the printer by a Printer Cable 1 Turn the printer on first, and then turn the computer on. ROM in the CD-ROM drive. 5 Select the [Specify a location] option, click [Browse], specify the... for the best driver for your device], and then click [Next]. The window changes as shown below . The window changes as shown below . 4 Place the "Printer Software UP-DP10" CD-

Operating Instructions / Mode d’emploi
Page 12
... using the Print function of typical application software. Before installing the printer driver, turn the computer on the UP-DP10, using . The wizard ends. The "printer driver" is the software that is the case, refer to your Windows 95 operating manual for the printer in the CD-ROM that is provided with a USB cable...
... using the Print function of typical application software. Before installing the printer driver, turn the computer on the UP-DP10, using . The wizard ends. The "printer driver" is the software that is the case, refer to your Windows 95 operating manual for the printer in the CD-ROM that is provided with a USB cable...

Operating Instructions / Mode d’emploi
Page 13
... 5 Click [Browse], specify the [Win95\English] folder in the CD-ROM that is provided with the printer. 1 Place the "PRINTER SOFTWARE UP- The window changes as shown below . 6 Click [Finish]. The "PRINTER SOFTWARE" icon appears on the desktop. 2 Double-click the "Driver" icon to open the folder. 3 ...Double-click the "Chooser" icon to open the folder. 4 Double-click the "UP-DP10 Install-E" icon to start installation. 5 Follow the instructions ...
... 5 Click [Browse], specify the [Win95\English] folder in the CD-ROM that is provided with the printer. 1 Place the "PRINTER SOFTWARE UP- The window changes as shown below . 6 Click [Finish]. The "PRINTER SOFTWARE" icon appears on the desktop. 2 Double-click the "Driver" icon to open the folder. 3 ...Double-click the "Chooser" icon to open the folder. 4 Double-click the "UP-DP10 Install-E" icon to start installation. 5 Follow the instructions ...

Operating Instructions / Mode d’emploi
Page 14
...with a digital camera that has a 2:3 aspect ratio (V:H) are printed on these sheets and the border is designed to allow you to prepare a Sony Print Pack (printing paper and an ink ribbon cartridge, sold as a set). The following table lists the types of sheets Features UPC10P23 Photocards 100...100 × 152 mm after cutting) 25 sheets These sheets produce prints that has a 3:4 aspect ratio (V:H) are printed on the paper in the printer driver, each of the sheets in the Print Pack. • If photos taken with a digital camera that have no perforations, and are backed ...
...with a digital camera that has a 2:3 aspect ratio (V:H) are printed on these sheets and the border is designed to allow you to prepare a Sony Print Pack (printing paper and an ink ribbon cartridge, sold as a set). The following table lists the types of sheets Features UPC10P23 Photocards 100...100 × 152 mm after cutting) 25 sheets These sheets produce prints that has a 3:4 aspect ratio (V:H) are printed on the paper in the printer driver, each of the sheets in the Print Pack. • If photos taken with a digital camera that have no perforations, and are backed ...

Operating Instructions / Mode d’emploi
Page 15
... the paper by following the procedure described in "If the Paper Jams" (page 33). • If the ink ribbon breaks, you turn off the printer, the image that share the same product number together. Notes on the printing surfaces will harm image quality. • If you will be lost. •...; Ink ribbon cartridges cannot be re-used. • If a paper jam occurs, do not turn off the printer. Dust on Storing Ink Ribbon Cartridges and Paper • Do not keep partially used ink ribbon cartridge or unused, opened paper in dusty locations. Using...
... the paper by following the procedure described in "If the Paper Jams" (page 33). • If the ink ribbon breaks, you turn off the printer, the image that share the same product number together. Notes on the printing surfaces will harm image quality. • If you will be lost. •...; Ink ribbon cartridges cannot be re-used. • If a paper jam occurs, do not turn off the printer. Dust on Storing Ink Ribbon Cartridges and Paper • Do not keep partially used ink ribbon cartridge or unused, opened paper in dusty locations. Using...
Operating Instructions / Mode d’emploi
Page 16
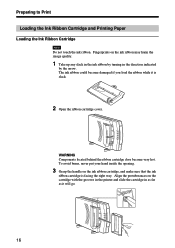
... it will go. 16 To avoid burns, never put your hand inside the opening. 3 Grasp the handle on the cartridge with the grooves in the printer and slide the cartridge in the direction indicated by turning in as far as it is facing the right way. The ink ribbon could become...
... it will go. 16 To avoid burns, never put your hand inside the opening. 3 Grasp the handle on the cartridge with the grooves in the printer and slide the cartridge in the direction indicated by turning in as far as it is facing the right way. The ink ribbon could become...

Operating Instructions / Mode d’emploi
Page 18
The printer is now ready to Print" (page 14). To print, first read "Preparing to print. Preparing to Print Notes ...that is complete, use paper that the PAPER lamp has turned off. Once printer setup is significantly curled. • When outputting multiple sheets of paper to the eject surface of the printer. Stopper Notes • Do not allow more than 10 sheets of paper to... accumulate on the tray with the grooves in the printer, slide the tray in the tray, make sure that all of the paper is completely inside of the tray. ...
The printer is now ready to Print" (page 14). To print, first read "Preparing to print. Preparing to Print Notes ...that is complete, use paper that the PAPER lamp has turned off. Once printer setup is significantly curled. • When outputting multiple sheets of paper to the eject surface of the printer. Stopper Notes • Do not allow more than 10 sheets of paper to... accumulate on the tray with the grooves in the printer, slide the tray in the tray, make sure that all of the paper is completely inside of the tray. ...

Operating Instructions / Mode d’emploi
Page 19
Removing the printing paper 1 Pull the paper supply/eject tray out of the printer. 2 Lift the metal plate at the bottom of the paper supply/eject tray, and then pull out the printing paper. 19 Removing the Ink Ribbon Cartridge and the Printing Paper Removing the ink ribbon cartridge 1 Open the ribbon cartridge cover. 2 Grasp the handle and pull the cartridge out.
Removing the printing paper 1 Pull the paper supply/eject tray out of the printer. 2 Lift the metal plate at the bottom of the paper supply/eject tray, and then pull out the printing paper. 19 Removing the Ink Ribbon Cartridge and the Printing Paper Removing the ink ribbon cartridge 1 Open the ribbon cartridge cover. 2 Grasp the handle and pull the cartridge out.
Operating Instructions / Mode d’emploi
Page 20
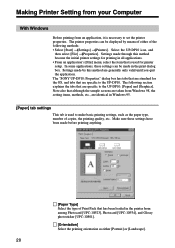
... of either [Portrait] or [Landscape]. 20 The following methods: • Select [Start] t[Settings] t[Printers]. Select the UP-DP10 icon, and then select [File] t[Properties]. Making Printer Setting from your Computer With Windows Before printing from among Photocard [UPC-10P23], Photocard [UPC-10P34], and... following section explains the tabs that are generally only valid until you quit the application. The "SONY UP-DP10: Properties" dialog box has tabs that is necessary to the UP-DP10: [Paper] and [Graphics]. Settings made in all applications. • From an application's ...
... of either [Portrait] or [Landscape]. 20 The following methods: • Select [Start] t[Settings] t[Printers]. Select the UP-DP10 icon, and then select [File] t[Properties]. Making Printer Setting from your Computer With Windows Before printing from among Photocard [UPC-10P23], Photocard [UPC-10P34], and... following section explains the tabs that are generally only valid until you quit the application. The "SONY UP-DP10: Properties" dialog box has tabs that is necessary to the UP-DP10: [Paper] and [Graphics]. Settings made in all applications. • From an application's ...

Operating Instructions / Mode d’emploi
Page 21
... for this ratio. < [Border] If this checkbox is selected, prints are produced with a matte finish. < [About...] Clicking this button displays the version information for the printer driver. < [Restore Defaults] Clicking this item to select one image is printed on each sheet. • If [16 up] is selected, then 16 identical thumbnail...
... for this ratio. < [Border] If this checkbox is selected, prints are produced with a matte finish. < [About...] Clicking this button displays the version information for the printer driver. < [Restore Defaults] Clicking this item to select one image is printed on each sheet. • If [16 up] is selected, then 16 identical thumbnail...

Operating Instructions / Mode d’emploi
Page 22
... suited for digital camera images is performed on the image. • Optimal processing can be made underneath change, depending on which choice is selected. Making Printer Setting from a digital camera in order to correct the intensity and the saturation. • If you click the [Use Digital Camera Correction] checkbox so that...
... suited for digital camera images is performed on the image. • Optimal processing can be made underneath change, depending on which choice is selected. Making Printer Setting from a digital camera in order to correct the intensity and the saturation. • If you click the [Use Digital Camera Correction] checkbox so that...


