
Operating Instructions
Page 2
... is intended to alert the user to come. For customers in the sun or under direct sunlight. For more information regarding recycling of this Sony Handycam. "Memory Stick" THIS DEVICE COMPLIES WITH PART 15 OF THE FCC RULES. WARNING To prevent fire or shock hazard, do not expose... the unit to use. Caution: Do not handle damaged or leaking Lithium-Ion batteries. Congratulations on your used rechargeable batteries to persons. Your Handycam is loaded with superior picture and sound quality. You can capture...
... is intended to alert the user to come. For customers in the sun or under direct sunlight. For more information regarding recycling of this Sony Handycam. "Memory Stick" THIS DEVICE COMPLIES WITH PART 15 OF THE FCC RULES. WARNING To prevent fire or shock hazard, do not expose... the unit to use. Caution: Do not handle damaged or leaking Lithium-Ion batteries. Congratulations on your used rechargeable batteries to persons. Your Handycam is loaded with superior picture and sound quality. You can capture...
Operating Instructions
Page 3
...the following two conditions: (1) This device may not cause harmful interference, and (2)this equipment. This equipment generates, uses, and can be used in order to comply with the instructions, may cause undesired operation. Reorient or relocate the receiving antenna. - ... This equipment has been tested and found to Part 15 of Conformity Trade Name: SONY Model No.: DCR-TRV740, DCR- Declaration of the FCC Rules. TRV840 Responsible Party: Sony Electronics Inc. Increase the separation between the equipment and receiver. - Regulatory Information Declaration ...
...the following two conditions: (1) This device may not cause harmful interference, and (2)this equipment. This equipment generates, uses, and can be used in order to comply with the instructions, may cause undesired operation. Reorient or relocate the receiving antenna. - ... This equipment has been tested and found to Part 15 of Conformity Trade Name: SONY Model No.: DCR-TRV740, DCR- Declaration of the FCC Rules. TRV840 Responsible Party: Sony Electronics Inc. Increase the separation between the equipment and receiver. - Regulatory Information Declaration ...
Operating Instructions
Page 4
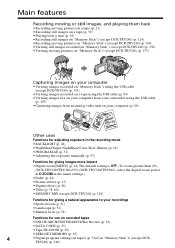
...on your computer •Viewing images recorded on "Memory Stick"s using the USB cable (except DCR-TRV240) (p. 155) •Viewing images recorded on a tape using the USB cable (p. 94) •Viewing images live on your computer from your camcorder using the USB cable (p. 103) •Capturing images from an ...impact •Digital zoom [MENU] (p. 24) The default setting is OFF. (To zoom greater than 25×, (DCR-TRV240/TRV340)/15× (DCR-TRV740/TRV840), select the digital zoom power in D ZOOM in the menu settings.) •Fader (p. 44) •Picture effects (p. 47) •Digital effects ...
...on your computer •Viewing images recorded on "Memory Stick"s using the USB cable (except DCR-TRV240) (p. 155) •Viewing images recorded on a tape using the USB cable (p. 94) •Viewing images live on your computer from your camcorder using the USB cable (p. 103) •Capturing images from an ...impact •Digital zoom [MENU] (p. 24) The default setting is OFF. (To zoom greater than 25×, (DCR-TRV240/TRV340)/15× (DCR-TRV740/TRV840), select the digital zoom power in D ZOOM in the menu settings.) •Fader (p. 44) •Picture effects (p. 47) •Digital effects ...

Operating Instructions
Page 6
... video or TV programs ....... 89 Inserting a scene from an analog video unit on your computer (Windows users only 94 Customizing Your Camcorder Changing the menu settings 105 6 Insert Editing 92 Viewing images recorded on a tape on a tape - ZERO SET MEMORY 67 Searching... a photo - NightShot/Super NightShot/ Color Slow Shutter 29 Self-timer recording (except DCR-TRV240 31 Checking recordings - Digital effect 48 Using the PROGRAM AE function .... 51 Adjusting the exposure manually ...... 53 Focusing manually 54 Interval recording 55 Frame by date - Frame recording...
... video or TV programs ....... 89 Inserting a scene from an analog video unit on your computer (Windows users only 94 Customizing Your Camcorder Changing the menu settings 105 6 Insert Editing 92 Viewing images recorded on a tape on a tape - ZERO SET MEMORY 67 Searching... a photo - NightShot/Super NightShot/ Color Slow Shutter 29 Self-timer recording (except DCR-TRV240 31 Checking recordings - Digital effect 48 Using the PROGRAM AE function .... 51 Adjusting the exposure manually ...... 53 Focusing manually 54 Interval recording 55 Frame by date - Frame recording...
Operating Instructions
Page 7
...on an image - Image protection 170 Deleting images - MPEG movie playback 153 Viewing images recorded on "Memory Stick"s on your camcorder abroad .......... 193 Maintenance information and precautions 194 Specifications 199 Quick Reference Identifying parts and controls 201 Index 209 7 MEMORY MIX ... 178 Self-diagnosis display 184 Warning indicators and messages .... 185 Additional Information Digital8 system, recording and playback 187 About the "InfoLITHIUM" battery pack 189 About i.LINK 191 Using your computer 155 Copying images recorded on "Memory Stick"s to tape 164 ...
...on an image - Image protection 170 Deleting images - MPEG movie playback 153 Viewing images recorded on "Memory Stick"s on your camcorder abroad .......... 193 Maintenance information and precautions 194 Specifications 199 Quick Reference Identifying parts and controls 201 Index 209 7 MEMORY MIX ... 178 Self-diagnosis display 184 Warning indicators and messages .... 185 Additional Information Digital8 system, recording and playback 187 About the "InfoLITHIUM" battery pack 189 About i.LINK 191 Using your computer 155 Copying images recorded on "Memory Stick"s to tape 164 ...

Operating Instructions
Page 8
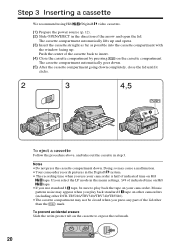
... chapter introduces you to insert the cassette. 3 Close the cassette compartment by pressing on the cassette compartment. Connecting the power cord (p. 17) Use the battery pack when using your camcorder. Connect the plug with the window facing up . After the cassette compartment goes down completely, close the lid until it clicks. Push the...
... chapter introduces you to insert the cassette. 3 Close the cassette compartment by pressing on the cassette compartment. Connecting the power cord (p. 17) Use the battery pack when using your camcorder. Connect the plug with the window facing up . After the cassette compartment goes down completely, close the lid until it clicks. Push the...

Operating Instructions
Page 9
... off. If you purchase your eye against the eyecup. REW 3 Press N to rewind the tape. Viewfinder When the LCD panel is closed, use the viewfinder with your camcorder, the clock setting is black and white. Monitoring the playback picture on the LCD screen. 4 Press START/STOP. V POWER CAM M Note Do not pick up your...
... off. If you purchase your eye against the eyecup. REW 3 Press N to rewind the tape. Viewfinder When the LCD panel is closed, use the viewfinder with your camcorder, the clock setting is black and white. Monitoring the playback picture on the LCD screen. 4 Press START/STOP. V POWER CAM M Note Do not pick up your...
Operating Instructions
Page 10
...name is being carried out. Digital zoom 700× LCD Screen 6.2 cm (2.5 type) TRV340 z z 700× 6.2 cm (2.5 type) TRV740 z z 420× 6.2 cm (2.5 type) TRV840 z z 420× 8.8 cm (3.5 type) z Provided - Before using your camcorder With your camcorder plays back tapes recorded in the Hi8 /standard 8...not mix pictures recorded in the Hi8 /standard 8 (analog) system. You, however, cannot use Hi8 /Digital8 video cassettes. Note on the POWER switch) - To view your camcorder. Unauthorized recording of such materials may be contrary to 70 for playback in the text, ...
...name is being carried out. Digital zoom 700× LCD Screen 6.2 cm (2.5 type) TRV340 z z 700× 6.2 cm (2.5 type) TRV740 z z 420× 6.2 cm (2.5 type) TRV840 z z 420× 8.8 cm (3.5 type) z Provided - Before using your camcorder With your camcorder plays back tapes recorded in the Hi8 /standard 8...not mix pictures recorded in the Hi8 /standard 8 (analog) system. You, however, cannot use Hi8 /Digital8 video cassettes. Note on the POWER switch) - To view your camcorder. Unauthorized recording of such materials may be contrary to 70 for playback in the text, ...
Operating Instructions
Page 11
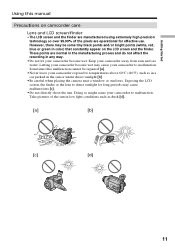
...or bright points (white, red, blue or green in color) that constantly appear on camcorder care Lens and LCD screen/finder • The LCD screen and the finder are manufactured using extremely high-precision technology so over 99.99% of the sun in low light conditions ... such as dusk [d]. [a] [b] [c] [d] 11 Letting your camcorder to malfunction. Exposing the LCD screen, the finder or the lens to malfunction. Keep your camcorder to direct sunlight for effective use. Sometimes this manual Precautions on the LCD screen and the finder. These points are normal in the manufacturing...
...or bright points (white, red, blue or green in color) that constantly appear on camcorder care Lens and LCD screen/finder • The LCD screen and the finder are manufactured using extremely high-precision technology so over 99.99% of the sun in low light conditions ... such as dusk [d]. [a] [b] [c] [d] 11 Letting your camcorder to malfunction. Exposing the LCD screen, the finder or the lens to malfunction. Keep your camcorder to direct sunlight for effective use. Sometimes this manual Precautions on the LCD screen and the finder. These points are normal in the manufacturing...
Operating Instructions
Page 13
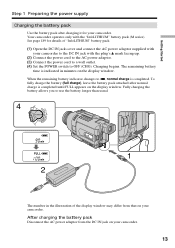
...(1) Open the DC IN jack cover and connect the AC power adaptor supplied with your camcorder. Getting Started OFCFR(CHG) E ERMAORY CAM M Step 1 Preparing the power supply Charging the battery pack Use the battery pack after normal charge is completed until FULL appears on the display window. ...Charging begins. Fully charging the battery allows you to use the battery longer than usual. 4 V POWER 1 2 The number in minutes on your camcorder to the DC IN jack with the "InfoLITHIUM" battery pack (M series). After charging the battery ...
...(1) Open the DC IN jack cover and connect the AC power adaptor supplied with your camcorder. Getting Started OFCFR(CHG) E ERMAORY CAM M Step 1 Preparing the power supply Charging the battery pack Use the battery pack after normal charge is completed until FULL appears on the display window. ...Charging begins. Fully charging the battery allows you to use the battery longer than usual. 4 V POWER 1 2 The number in minutes on your camcorder to the DC IN jack with the "InfoLITHIUM" battery pack (M series). After charging the battery ...

Operating Instructions
Page 14
When the battery pack is charged fully The LCD backlight of the AC power adaptor. If any trouble occurs with this unit, disconnect the plug from ... - Your camcorder operates only with the battery pack. "InfoLITHIUM" M series battery packs have the mark. While charging the battery pack No indicator appears or the indicator flashes in the display window in the display window roughly indicates the recording time when recording using the viewfinder....This may go off . Something is wrong with the "InfoLITHIUM" battery. min" appears in an ambient temperature of Sony Corporation. 14
When the battery pack is charged fully The LCD backlight of the AC power adaptor. If any trouble occurs with this unit, disconnect the plug from ... - Your camcorder operates only with the battery pack. "InfoLITHIUM" M series battery packs have the mark. While charging the battery pack No indicator appears or the indicator flashes in the display window in the display window roughly indicates the recording time when recording using the viewfinder....This may go off . Something is wrong with the "InfoLITHIUM" battery. min" appears in an ambient temperature of Sony Corporation. 14
Operating Instructions
Page 16
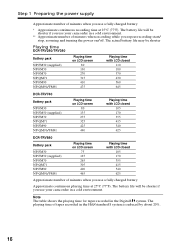
...176;F). The battery life will be shorter if you use your camcorder in a cold environment. ** Approximate number of minutes when recording while you repeat recording start/ stop, zooming and turning the power on LCD screen 75 125 265 305 400 465 Playing time with LCD closed 105 170 355 415 540 625 DCR-TRV840... 370 430 560 645 DCR-TRV740 Battery pack NP-FM30 NP-FM50 (supplied) NP-FM70 NP-QM71 NP-FM90 NP-QM91/FM91 Playing time on LCD screen 80 135 275 325 425 490 Playing time with LCD closed 105 170 355 415 540 625 Approximate number of tapes recorded in the Digital8 system.
...176;F). The battery life will be shorter if you use your camcorder in a cold environment. ** Approximate number of minutes when recording while you repeat recording start/ stop, zooming and turning the power on LCD screen 75 125 265 305 400 465 Playing time with LCD closed 105 170 355 415 540 625 DCR-TRV840... 370 430 560 645 DCR-TRV740 Battery pack NP-FM30 NP-FM50 (supplied) NP-FM70 NP-QM71 NP-FM90 NP-QM91/FM91 Playing time on LCD screen 80 135 275 325 425 490 Playing time with LCD closed 105 170 355 415 540 625 Approximate number of tapes recorded in the Digital8 system.

Operating Instructions
Page 17
Using a car battery Use Sony Car Battery Adaptor (optional). 17 Getting Started Step 1 Preparing the power supply Connecting to a wall outlet When you power it from a wall outlet using the AC power adaptor. (1) Open the DC IN jack cover, and connect the AC power adaptor to the DC IN jack on your camcorder...not disconnected from the AC power source (house current) as long as it is connected to your camcorder for a long time, we recommend that the battery pack cannot supply any power if the power ... outlet. This means that you use your camcorder. •The DC IN jack has "source priority".
Using a car battery Use Sony Car Battery Adaptor (optional). 17 Getting Started Step 1 Preparing the power supply Connecting to a wall outlet When you power it from a wall outlet using the AC power adaptor. (1) Open the DC IN jack cover, and connect the AC power adaptor to the DC IN jack on your camcorder...not disconnected from the AC power source (house current) as long as it is connected to your camcorder for a long time, we recommend that the battery pack cannot supply any power if the power ... outlet. This means that you use your camcorder. •The DC IN jack has "source priority".

Operating Instructions
Page 18
... then press MENU to display the menu settings. (2) Turn the SEL/PUSH EXEC dial to select CLOCK SET in your camcorder for the first time. If you do not use your camcorder for about half a year, the date and time settings may be displayed each time that you set the date and time... 2 Setting the date and time Set the date and time settings when you set the POWER switch to CAMERA/MEMORY (except DCR-TRV240) unless you use your camcorder will be cleared from memory (bars may appear) because the built-in rechargeable battery installed in , then press the dial. (3) Turn the SEL/PUSH...
... then press MENU to display the menu settings. (2) Turn the SEL/PUSH EXEC dial to select CLOCK SET in your camcorder for the first time. If you do not use your camcorder for about half a year, the date and time settings may be displayed each time that you set the date and time... 2 Setting the date and time Set the date and time settings when you set the POWER switch to CAMERA/MEMORY (except DCR-TRV240) unless you use your camcorder will be cleared from memory (bars may appear) because the built-in rechargeable battery installed in , then press the dial. (3) Turn the SEL/PUSH...
Operating Instructions
Page 20
... pattern noise may not be closed when you use standard 8 tape, be sure to play back standard 8 tape on Hi8 tape. •If you use your camcorder. Doing so may cause a malfunction. •Your camcorder records pictures in the Digital8 system. • The recording time when you... press any part of the lid other DCR-TRV240/TRV340/TRV740/TRV840). •The cassette compartment may appear...
... pattern noise may not be closed when you use standard 8 tape, be sure to play back standard 8 tape on Hi8 tape. •If you use your camcorder. Doing so may cause a malfunction. •Your camcorder records pictures in the Digital8 system. • The recording time when you... press any part of the lid other DCR-TRV240/TRV340/TRV740/TRV840). •The cassette compartment may appear...

Operating Instructions
Page 23
.... 180° 90° When closing the LCD panel, set it vertically until it clicks, and swing it into the camcorder body. When recording with the LCD panel opened up to see. Even if you use the LCD screen outdoors in direct sunlight The LCD screen may be difficult to 90 degrees. Note ...When using the LCD screen except in the menu settings (p. 105). When you...
.... 180° 90° When closing the LCD panel, set it vertically until it clicks, and swing it into the camcorder body. When recording with the LCD panel opened up to see. Even if you use the LCD screen outdoors in direct sunlight The LCD screen may be difficult to 90 degrees. Note ...When using the LCD screen except in the menu settings (p. 105). When you...

Operating Instructions
Page 24
...side: for wide-angle (subject appears farther away) W T WT W T To use the digital zoom. 24 Notes on digital zoom • Digital zoom starts to function when zoom exceeds 25× (DCR-TRV240/TRV340)/15× (DCR-TRV740/TRV840). • The picture quality deteriorates as the default setting. W T The ...When the POWER switch is set to MEMORY (except DCR-TRV240) You cannot use zoom greater than 25× (DCR-TRV240/TRV340)/15× (DCR-TRV740/TRV840) Zoom greater than 25× (DCR-TRV240/TRV340)/15× (DCR-TRV740/TRV840) is at least about 80 cm (about 2 feet 5/8 inch) ...
...side: for wide-angle (subject appears farther away) W T WT W T To use the digital zoom. 24 Notes on digital zoom • Digital zoom starts to function when zoom exceeds 25× (DCR-TRV240/TRV340)/15× (DCR-TRV740/TRV840). • The picture quality deteriorates as the default setting. W T The ...When the POWER switch is set to MEMORY (except DCR-TRV240) You cannot use zoom greater than 25× (DCR-TRV240/TRV340)/15× (DCR-TRV740/TRV840) Zoom greater than 25× (DCR-TRV240/TRV340)/15× (DCR-TRV740/TRV840) is at least about 80 cm (about 2 feet 5/8 inch) ...

Operating Instructions
Page 26
...indicator appears in the mirror mode ZERO SET MEMORY on the Remote Commander does not work. 26 During recording in the viewfinder and on the LCD screen. However, the picture will be normal when recorded. Recording a picture Shooting with the Mirror Mode This feature allows the camera subject to check...the standby mode, and z appears in the mirror mode The picture on the LCD screen. Some of other indicators appear mirror-reversed and others are not displayed. The subject uses this feature to view him-or herself on the LCD is a mirror-image. Set the POWER switch to CAMERA or MEMORY (except...
...indicator appears in the mirror mode ZERO SET MEMORY on the Remote Commander does not work. 26 During recording in the viewfinder and on the LCD screen. However, the picture will be normal when recorded. Recording a picture Shooting with the Mirror Mode This feature allows the camera subject to check...the standby mode, and z appears in the mirror mode The picture on the LCD screen. Some of other indicators appear mirror-reversed and others are not displayed. The subject uses this feature to view him-or herself on the LCD is a mirror-image. Set the POWER switch to CAMERA or MEMORY (except...

Operating Instructions
Page 28
BACK LIGHT When you press EXPOSURE when shooting backlit subjects The backlight function will be canceled. 28 BACK LIGHT If you shoot a subject with the light source behind the subject or a subject with a light background, use the backlight function. The . To cancel, press BACK LIGHT again. indicator appears on the screen. In CAMERA or MEMORY (except DCR-TRV240) mode, press BACK LIGHT. Recording a picture Shooting backlit subjects -
BACK LIGHT When you press EXPOSURE when shooting backlit subjects The backlight function will be canceled. 28 BACK LIGHT If you shoot a subject with the light source behind the subject or a subject with a light background, use the backlight function. The . To cancel, press BACK LIGHT again. indicator appears on the screen. In CAMERA or MEMORY (except DCR-TRV240) mode, press BACK LIGHT. Recording a picture Shooting backlit subjects -

Operating Instructions
Page 29
... those recorded in the menu settings (The default setting is ON.) (p. 105). NIGHTSHOT OFF ON SUPER NS COLOR SLOW S Infrared rays emitter Using Super NightShot The Super NightShot function makes subjects up to OFF in CAMERA mode. (2) Press COLOR SLOW S. The and "SUPER NIGHTSHOT" indicators... cancel the Super NightShot mode, press SUPER NS again. Using Color Slow Shutter The Color Slow Shutter function enables you use this function. In CAMERA or MEMORY (except DCR-TRV240) mode, slide NIGHTSHOT to OFF. Using the NightShot Light The picture will be clearer with the NightShot...
... those recorded in the menu settings (The default setting is ON.) (p. 105). NIGHTSHOT OFF ON SUPER NS COLOR SLOW S Infrared rays emitter Using Super NightShot The Super NightShot function makes subjects up to OFF in CAMERA mode. (2) Press COLOR SLOW S. The and "SUPER NIGHTSHOT" indicators... cancel the Super NightShot mode, press SUPER NS again. Using Color Slow Shutter The Color Slow Shutter function enables you use this function. In CAMERA or MEMORY (except DCR-TRV240) mode, slide NIGHTSHOT to OFF. Using the NightShot Light The picture will be clearer with the NightShot...


