
Operating Instructions
Page 88
...the ID-2 system. •You can connect your camcorder to your computer using the USB cable supplied with an S video cable (optional) instead of the A/V connecting cable (supplied). Before operation Set DISPLAY to LCD in the menu settings. (The default setting is LCD.) (1) Set the POWER switch to VCR. (2)...and sound on the analog video unit. Notes •You need to install software that the image may flicker. If your computer has a USB jack You can capture images and sound with 88 your camcorder. Signal convert function You can capture images and sound from an analog video ...
...the ID-2 system. •You can connect your camcorder to your computer using the USB cable supplied with an S video cable (optional) instead of the A/V connecting cable (supplied). Before operation Set DISPLAY to LCD in the menu settings. (The default setting is LCD.) (1) Set the POWER switch to VCR. (2)...and sound on the analog video unit. Notes •You need to install software that the image may flicker. If your computer has a USB jack You can capture images and sound with 88 your camcorder. Signal convert function You can capture images and sound from an analog video ...

Operating Instructions
Page 94
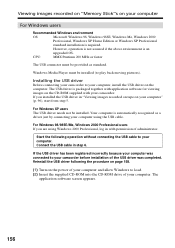
...: Minimum 200 MB available hard disk space for installation 1 GB hard disk space or more recommended for Sony" (p. 101) Recommended computer environment OS: Microsoft Windows 98SE, Windows Me, Windows 2000 Professional, Windows XP...function). If you are using the USB cable, you can view pictures live from your camcorder and pictures recorded on a tape on a tape from your computer •Installing the USB driver (p. 96... colors and less, this function in image processing software and append them in the Macintosh environment. 94 Connecting with USB cable and viewing images on your...
...: Minimum 200 MB available hard disk space for installation 1 GB hard disk space or more recommended for Sony" (p. 101) Recommended computer environment OS: Microsoft Windows 98SE, Windows Me, Windows 2000 Professional, Windows XP...function). If you are using the USB cable, you can view pictures live from your camcorder and pictures recorded on a tape on a tape from your computer •Installing the USB driver (p. 96... colors and less, this function in image processing software and append them in the Macintosh environment. 94 Connecting with USB cable and viewing images on your...
Operating Instructions
Page 96
...load. (2) Insert the supplied CD-ROM into the CD-ROM drive of the USB driver was connected to your camcorder before installation of your computer. The application software screen appears. (3) Move the cursor to your computer. Start the following the procedure on page 97. Connect ...the USB cable in with application software for viewing images on the computer. Your computer recognizes the camcorder, and the Windows Add Hardware Wizard starts. 96 If the USB driver has been registered incorrectly ...
...load. (2) Insert the supplied CD-ROM into the CD-ROM drive of the USB driver was connected to your camcorder before installation of your computer. The application software screen appears. (3) Move the cursor to your computer. Start the following the procedure on page 97. Connect ...the USB cable in with application software for viewing images on the computer. Your computer recognizes the camcorder, and the Windows Add Hardware Wizard starts. 96 If the USB driver has been registered incorrectly ...

Operating Instructions
Page 100
... a tape on your computer (Windows users only) Installing "PIXELA ImageMixer Ver.1.0 for Sony" Install "PIXELA ImageMixer Ver.1.0 for Sony" is packaged on the CD-ROM supplied with your camcorder. DirectX 8.0 will be authorized as a Power User or Administrator. If the application software screen does not appear, double-click "My Computer" and then "ImageMixer" (CDROM...
... a tape on your computer (Windows users only) Installing "PIXELA ImageMixer Ver.1.0 for Sony" Install "PIXELA ImageMixer Ver.1.0 for Sony" is packaged on the CD-ROM supplied with your camcorder. DirectX 8.0 will be authorized as a Power User or Administrator. If the application software screen does not appear, double-click "My Computer" and then "ImageMixer" (CDROM...

Operating Instructions
Page 101
... outlet, and insert a cassette into your computer (Windows users only) Capturing images with "PIXELA ImageMixer Ver.1.0 for Sony" on your camcorder. (4) Set the POWER switch to VCR. Editing Viewing images recorded on a tape on Windows. 101 For Windows XP..., you must be authorized as an Administrator. Select USB STREAM to ON in in the menu settings (p. 105). (5) Select "Start" t "Program" t "PIXELA" t "ImageMixer" t "ImageMixer Ver.1.0 for Sony" To use this software...
... outlet, and insert a cassette into your computer (Windows users only) Capturing images with "PIXELA ImageMixer Ver.1.0 for Sony" on your camcorder. (4) Set the POWER switch to VCR. Editing Viewing images recorded on a tape on Windows. 101 For Windows XP..., you must be authorized as an Administrator. Select USB STREAM to ON in in the menu settings (p. 105). (5) Select "Start" t "Program" t "PIXELA" t "ImageMixer" t "ImageMixer Ver.1.0 for Sony" To use this software...
Operating Instructions
Page 156
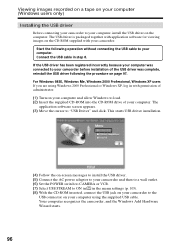
...you are using the USB cable. For Windows 98/98SE/Me, Windows 2000 Professional users If you installed the USB driver in with your camcorder. The USB driver is an upgraded OS. For Windows XP users The USB driver needs not be installed (to your computer. Your computer... is required. If the USB driver has been registered incorrectly because your computer was connected to play back moving pictures). The application software screen appears. 156 Start the following the procedure on page 158. (1) Turn on the computer. CPU: MMX Pentium 200 MHz or faster...
...you are using the USB cable. For Windows 98/98SE/Me, Windows 2000 Professional users If you installed the USB driver in with your camcorder. The USB driver is an upgraded OS. For Windows XP users The USB driver needs not be installed (to your computer. Your computer... is required. If the USB driver has been registered incorrectly because your computer was connected to play back moving pictures). The application software screen appears. 156 Start the following the procedure on page 158. (1) Turn on the computer. CPU: MMX Pentium 200 MHz or faster...
Operating Instructions
Page 160
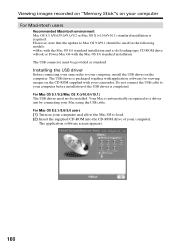
...-ROM into the CD-ROM drive of the USB driver is automatically recognized as standard. Installing the USB driver Before connecting your camcorder to your computer, install the USB driver on your computer For Macintosh users Recommended Macintosh environment Mac OS 8.5.1/8.6/9.0/9.1/9.2 or Mac OS ...X (v10.0/v10.1) standard installation is packaged together with application software for viewing images on your computer and allow the Mac OS to Mac OS 9.0/9.1 should be used for the following models. &#...
...-ROM into the CD-ROM drive of the USB driver is automatically recognized as standard. Installing the USB driver Before connecting your camcorder to your computer, install the USB driver on your computer For Macintosh users Recommended Macintosh environment Mac OS 8.5.1/8.6/9.0/9.1/9.2 or Mac OS ...X (v10.0/v10.1) standard installation is packaged together with application software for viewing images on your computer and allow the Mac OS to Mac OS 9.0/9.1 should be used for the following models. &#...

Operating Instructions
Page 163
... file 163 "Memory Stick" operations Viewing images recorded on "Memory Stick"s on your computer Notes on using retouching software from your computer to your camcorder or when you directly modify the image on your camcorder, the image format will differ so a file error indicator may appear and you may not recover after recovering...
... file 163 "Memory Stick" operations Viewing images recorded on "Memory Stick"s on your computer Notes on using retouching software from your computer to your camcorder or when you directly modify the image on your camcorder, the image format will differ so a file error indicator may appear and you may not recover after recovering...
Operating Instructions
Page 187
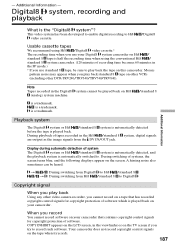
...software. A hissing noise also sometimes can be played back on your camcorder. Additional Information - is a trademark. /standard 8 Additional Information Playback system The Digital8...TRV240/TRV340/TRV740/TRV840). t / : During switching from Digital8 to Digital8 Copyright ...software which is played back on Hi8 (analog) system machine. When you record You cannot record software on the TV screen if you use standard 8 tape, be sure to record such software. COPY INHIBIT appears on the LCD screen, in the SP mode.) * If you try to play back standard 8 tape on this camcorder...
...software. A hissing noise also sometimes can be played back on your camcorder. Additional Information - is a trademark. /standard 8 Additional Information Playback system The Digital8...TRV240/TRV340/TRV740/TRV840). t / : During switching from Digital8 to Digital8 Copyright ...software which is played back on Hi8 (analog) system machine. When you record You cannot record software on the TV screen if you use standard 8 tape, be sure to record such software. COPY INHIBIT appears on the LCD screen, in the SP mode.) * If you try to play back standard 8 tape on this camcorder...

Operating Instructions
Page 192
...) compatible equipment made by this unit is connected to other than video equipment. Before connecting this unit to a personal computer, make sure that application software supported by SONY (e.g. About i.LINK i.LINK functions on this unit For details on how to dub when this unit is already installed on the personal computer. VAIO... series personal computer) other video equipment having DV jacks, see page 72, 137. This unit can also be connected. Required i.LINK cable Use the Sony i.LINK 4-pin-to-4-pin cable (during DV dubbing).
...) compatible equipment made by this unit is connected to other than video equipment. Before connecting this unit to a personal computer, make sure that application software supported by SONY (e.g. About i.LINK i.LINK functions on this unit For details on how to dub when this unit is already installed on the personal computer. VAIO... series personal computer) other video equipment having DV jacks, see page 72, 137. This unit can also be connected. Required i.LINK cable Use the Sony i.LINK 4-pin-to-4-pin cable (during DV dubbing).


