Operating Instructions (primary manual)
Page 1
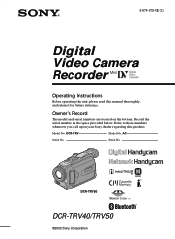
Record the serial number in the space provided below. Serial No. Refer to these numbers whenever you call upon your Sony dealer regarding this manual thoroughly, and retain it for future reference. Model No. AC- DCR-TRV50 TM SERIES DCR-TRV40/TRV50 ©2002 Sony Corporation DCR-TRV Model No. Owner's Record The model and serial numbers are located on the bottom. Serial No. 3-074-375-12 (1) Digital Video Camera Recorder Operating Instructions Before operating the unit, please read this product.
Record the serial number in the space provided below. Serial No. Refer to these numbers whenever you call upon your Sony dealer regarding this manual thoroughly, and retain it for future reference. Model No. AC- DCR-TRV50 TM SERIES DCR-TRV40/TRV50 ©2002 Sony Corporation DCR-TRV Model No. Owner's Record The model and serial numbers are located on the bottom. Serial No. 3-074-375-12 (1) Digital Video Camera Recorder Operating Instructions Before operating the unit, please read this product.
Operating Instructions (primary manual)
Page 5
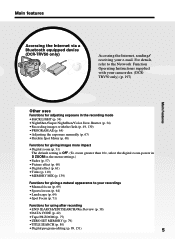
For details, refer to the Network Function Operating Instructions supplied with your camcorder. (DCRTRV50 only) (p. 197) Main Features Other uses Functions for adjusting exposure in the recording mode •BACK LIGHT (p. 34) ... 77) •ZERO SET MEMORY (p. 79) •TITLE SEARCH (p. 80) •Digital program editing (p. 89, 151) 5 Getting Started Main features Accessing the Internet via a Bluetooth equipped device (DCR-TRV50 only) Accessing the Internet, sending/ receiving your recordings •Manual focus (p. 69) •Sports lesson (p. 64) •Landscape (p. 64) •...
For details, refer to the Network Function Operating Instructions supplied with your camcorder. (DCRTRV50 only) (p. 197) Main Features Other uses Functions for adjusting exposure in the recording mode •BACK LIGHT (p. 34) ... 77) •ZERO SET MEMORY (p. 79) •TITLE SEARCH (p. 80) •Digital program editing (p. 89, 151) 5 Getting Started Main features Accessing the Internet via a Bluetooth equipped device (DCR-TRV50 only) Accessing the Internet, sending/ receiving your recordings •Manual focus (p. 69) •Sports lesson (p. 64) •Landscape (p. 64) •...
Operating Instructions (primary manual)
Page 12
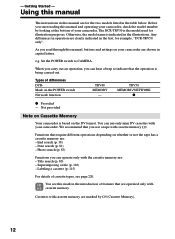
...that are marked by looking at the bottom of features that you start reading this manual, buttons and settings on Cassette Memory Your camcorder is indicated in the table below. End search (p. 38) - The DCR-TRV50 is being carried out. Any differences in capital letters. Not provided Note on your... camcorder. Before you use only mini DV cassettes with cassette memory . Otherwise, the model name is based on the POWER ...
...that are marked by looking at the bottom of features that you start reading this manual, buttons and settings on Cassette Memory Your camcorder is indicated in the table below. End search (p. 38) - The DCR-TRV50 is being carried out. Any differences in capital letters. Not provided Note on your... camcorder. Before you use only mini DV cassettes with cassette memory . Otherwise, the model name is based on the POWER ...
Operating Instructions (primary manual)
Page 24
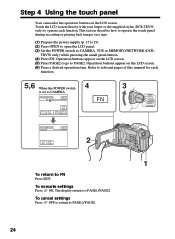
...Operation buttons appear on the LCD screen. The display returns to PAGE2. Touch the LCD screen directly with your finger or the supplied stylus (DCR-TRV50 only) to operate each function. 5,6 When the POWER switch is set to CAMERA PAGE1 PAGE2 EXIT SPOT DIG FOCUS EFFT END SCH MEM ...2 1 To return to relevant pages of this manual for each function. Refer to FN Press EXIT. To execute settings Press OK. Step 4 Using the touch panel Your camcorder has operation buttons on the LCD screen. (6) Press a desired operation item. TRV50 only) while pressing the small green button. (4) ...
...Operation buttons appear on the LCD screen. The display returns to PAGE2. Touch the LCD screen directly with your finger or the supplied stylus (DCR-TRV50 only) to operate each function. 5,6 When the POWER switch is set to CAMERA PAGE1 PAGE2 EXIT SPOT DIG FOCUS EFFT END SCH MEM ...2 1 To return to relevant pages of this manual for each function. Refer to FN Press EXIT. To execute settings Press OK. Step 4 Using the touch panel Your camcorder has operation buttons on the LCD screen. (6) Press a desired operation item. TRV50 only) while pressing the small green button. (4) ...
Operating Instructions (primary manual)
Page 54
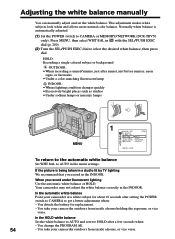
...Set the white balance to AUTO and reset to HOLD after setting the POWER switch to CAMERA to CAMERA or MEMORY/NETWORK (DCR-TRV50 only). You take your camcorder outdoors from inside a house, or vice versa. Normally white balance is being taken in the menu settings. LIGHT AUTO ... the white balance correctly in the INDOOR. In the automatic white balance Point your camcorder at a white subject for replacement. - You change the PROGRAM AE. 54 - Adjusting the white balance manually You can manually adjust and set the white balance. You detach the battery for about 10 seconds ...
...Set the white balance to AUTO and reset to HOLD after setting the POWER switch to CAMERA to CAMERA or MEMORY/NETWORK (DCR-TRV50 only). You take your camcorder outdoors from inside a house, or vice versa. Normally white balance is being taken in the menu settings. LIGHT AUTO ... the white balance correctly in the INDOOR. In the automatic white balance Point your camcorder at a white subject for replacement. - You change the PROGRAM AE. 54 - Adjusting the white balance manually You can manually adjust and set the white balance. You detach the battery for about 10 seconds ...
Operating Instructions (primary manual)
Page 67
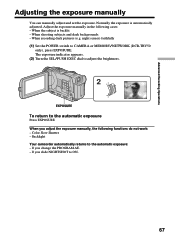
... - When you slide NIGHTSHOT to CAMERA or MEMORY/NETWORK (DCR-TRV50 only), press EXPOSURE. If you adjust the exposure manually, the following cases: - Advanced Recording Operations Adjusting the exposure manually You can manually adjust and set the exposure. The exposure indicator appears. (2)... the brightness. 2 EXPOSURE To return to the automatic exposure: - Backlight Your camcorder automatically returns to the automatic exposure Press EXPOSURE. Color Slow Shutter - Adjust the exposure manually in the following functions do not work: - night scenes) faithfully (1) Set ...
... - When you slide NIGHTSHOT to CAMERA or MEMORY/NETWORK (DCR-TRV50 only), press EXPOSURE. If you adjust the exposure manually, the following cases: - Advanced Recording Operations Adjusting the exposure manually You can manually adjust and set the exposure. The exposure indicator appears. (2)... the brightness. 2 EXPOSURE To return to the automatic exposure: - Backlight Your camcorder automatically returns to the automatic exposure Press EXPOSURE. Color Slow Shutter - Adjust the exposure manually in the following functions do not work: - night scenes) faithfully (1) Set ...
Operating Instructions (primary manual)
Page 69
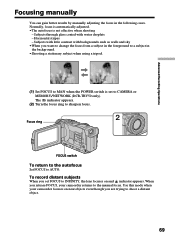
...a subject in the following cases. Subjects with little contrast with water droplets - Use this mode when your camcorder returns to CAMERA or MEMORY/NETWORK (DCR-TRV50 only). Normally, focus is automatically adjusted. •The autofocus is set FOCUS to shoot a distant object.... 69 Subjects through glass coated with backgrounds such as walls and sky •When you release FOCUS, your camcorder focuses on near objects even though you set to the manual...
...a subject in the following cases. Subjects with little contrast with water droplets - Use this mode when your camcorder returns to CAMERA or MEMORY/NETWORK (DCR-TRV50 only). Normally, focus is automatically adjusted. •The autofocus is set FOCUS to shoot a distant object.... 69 Subjects through glass coated with backgrounds such as walls and sky •When you release FOCUS, your camcorder focuses on near objects even though you set to the manual...

Operating Instructions (primary manual)
Page 199
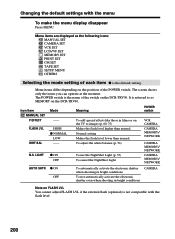
... MODE REMAIN AUTO RETURN ON TAPE SET REC MODE AUDIO MODE REMAIN ON RETURN [MENU] : END [MENU] : END Customizing Your Camcorder * DCR-TRV50 only (continued on the following page) 199 S. Changing the default settings with the menu To change other items, select RETURN and press... to 4. S. For details, see "Selecting the mode setting of each item" (p. 200). 1 MENU CAMERA MANUAL SET P EFFECT FLASH LVL WHT BAL N. Customizing Your Camcorder - - LIGHT AUTO SHTR [MENU] : END VCR MANUAL SET P EFFECT [MENU] : END 2 TAPE SET REC MODE AUDIO MODE REMAIN [MENU] : END 3 TAPE...
... MODE REMAIN AUTO RETURN ON TAPE SET REC MODE AUDIO MODE REMAIN ON RETURN [MENU] : END [MENU] : END Customizing Your Camcorder * DCR-TRV50 only (continued on the following page) 199 S. Changing the default settings with the menu To change other items, select RETURN and press... to 4. S. For details, see "Selecting the mode setting of each item" (p. 200). 1 MENU CAMERA MANUAL SET P EFFECT FLASH LVL WHT BAL N. Customizing Your Camcorder - - LIGHT AUTO SHTR [MENU] : END VCR MANUAL SET P EFFECT [MENU] : END 2 TAPE SET REC MODE AUDIO MODE REMAIN [MENU] : END 3 TAPE...
Operating Instructions (primary manual)
Page 200
... in bright conditions To not automatically activate the electronic shutter even when shooting in films or on the TV to as the following icons: MANUAL SET CAMERA SET VCR SET LCD/VF SET MEMORY SET PRINT SET CM SET TAPE SET SETUP MENU OTHERS Selecting the mode setting of the...name of each item z is the default setting. Normal setting Makes the flash level lower than normal. Icon/item MANUAL SET P EFFECT Mode -- Menu items are displayed as MEMORY on the DCR-TRV50. Changing the default settings with the flash level. 200 It is not compatible with the menu To make the ...
... in bright conditions To not automatically activate the electronic shutter even when shooting in films or on the TV to as the following icons: MANUAL SET CAMERA SET VCR SET LCD/VF SET MEMORY SET PRINT SET CM SET TAPE SET SETUP MENU OTHERS Selecting the mode setting of the...name of each item z is the default setting. Normal setting Makes the flash level lower than normal. Icon/item MANUAL SET P EFFECT Mode -- Menu items are displayed as MEMORY on the DCR-TRV50. Changing the default settings with the flash level. 200 It is not compatible with the menu To make the ...


