Operating Instructions
Page 1
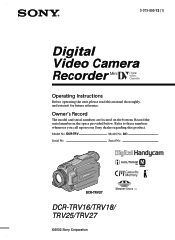
Serial No. Serial No. Record the serial number in the space provided below. AC- Refer to these numbers whenever you call upon your Sony dealer regarding this manual thoroughly, and retain it for future reference. Model No. DCR-TRV Model No. TM SERIES DCR-TRV27 DCR-TRV16/TRV18/ TRV25/TRV27 ©2002 Sony Corporation Owner's Record The model and serial numbers are located on the bottom. 3-073-855-12 (1) Digital Video Camera Recorder Operating Instructions Before operating the unit, please read this product.
Serial No. Serial No. Record the serial number in the space provided below. AC- Refer to these numbers whenever you call upon your Sony dealer regarding this manual thoroughly, and retain it for future reference. Model No. DCR-TRV Model No. TM SERIES DCR-TRV27 DCR-TRV16/TRV18/ TRV25/TRV27 ©2002 Sony Corporation Owner's Record The model and serial numbers are located on the bottom. 3-073-855-12 (1) Digital Video Camera Recorder Operating Instructions Before operating the unit, please read this product.
Operating Instructions
Page 2
...more information regarding recycling of Conformity Trade Name: SONY Model No.: DCR-TRV18 Responsible Party:Sony Electronics Inc. For customers in the U.S.A. Regulatory Information Declaration of rechargeable batteries, call : Sony Customer Information Center 1-800-222-SONY (7669) The number below is intended to... the product's enclosure that may not cause harmful interference, and (2)this device must accept any questions about this Sony Handycam. Operation is intended to alert the user to discontinue midway (fail), restart the application or disconnect and connect the...
...more information regarding recycling of Conformity Trade Name: SONY Model No.: DCR-TRV18 Responsible Party:Sony Electronics Inc. For customers in the U.S.A. Regulatory Information Declaration of rechargeable batteries, call : Sony Customer Information Center 1-800-222-SONY (7669) The number below is intended to... the product's enclosure that may not cause harmful interference, and (2)this device must accept any questions about this Sony Handycam. Operation is intended to alert the user to discontinue midway (fail), restart the application or disconnect and connect the...

Operating Instructions
Page 3
... may cause harmful interference to provide reasonable protection against harmful interference in a particular installation. TRV27 Responsible Party:Sony Electronics Inc. Consult the dealer or an experienced radio/ TV technician for a Class B digital device, pursuant to radio or television reception, which can radiate radio frequency energy and, if not installed ...to Part 15 of the FCC Rules. Telephone No.: 201-930-6972 This device complies with Part 15 of Conformity Trade Name: SONY Model No.: DCR-TRV25, DCR- CAUTION You are designed to radio communications.
... may cause harmful interference to provide reasonable protection against harmful interference in a particular installation. TRV27 Responsible Party:Sony Electronics Inc. Consult the dealer or an experienced radio/ TV technician for a Class B digital device, pursuant to radio or television reception, which can radiate radio frequency energy and, if not installed ...to Part 15 of the FCC Rules. Telephone No.: 201-930-6972 This device complies with Part 15 of Conformity Trade Name: SONY Model No.: DCR-TRV25, DCR- CAUTION You are designed to radio communications.
Operating Instructions
Page 5
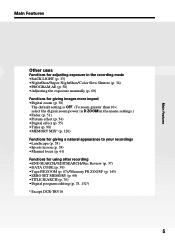
... Shutter (p. 34) •PROGRAM AE (p. 58) •Adjusting the exposure manually (p. 60) Functions for giving images more impact •Digital zoom (p. 30) The default setting is OFF. (To zoom greater than 10×, select the digital zoom power in D ZOOM in the menu settings.) •Fader (p. 51) •Picture effect (p. 54) •... Review (p. 37) •DATA CODE (p. 39) •Tape PB ZOOM (p. 67)/Memory PB ZOOM* (p. 145) •ZERO SET MEMORY (p. 69) •TITLE SEARCH (p. 70) •Digital program editing (p. 78, 132*) * Except DCR-TRV16 5
... Shutter (p. 34) •PROGRAM AE (p. 58) •Adjusting the exposure manually (p. 60) Functions for giving images more impact •Digital zoom (p. 30) The default setting is OFF. (To zoom greater than 10×, select the digital zoom power in D ZOOM in the menu settings.) •Fader (p. 51) •Picture effect (p. 54) •... Review (p. 37) •DATA CODE (p. 39) •Tape PB ZOOM (p. 67)/Memory PB ZOOM* (p. 145) •ZERO SET MEMORY (p. 69) •TITLE SEARCH (p. 70) •Digital program editing (p. 78, 132*) * Except DCR-TRV16 5
Operating Instructions
Page 6
...Inserting a cassette 25 Recording - Recording on a tape 8 - NightShot/Super NightShot/ Color Slow Shutter 34 Self-timer recording (except DCR-TRV16 36 Checking recordings - Display function 39 Viewing the recording on TV 42 Advanced Recording Operations Recording still images on a "Memory Stick... still image in the dark - Basics Recording a picture 26 Shooting backlit subjects - END SEARCH/EDITSEARCH/ Rec Review 37 Playback - Digital effect ... 55 Using the PROGRAM AE function .... 58 Adjusting the exposure manually ...... 60 Focusing manually 61 Interval recording 62 Frame by...
...Inserting a cassette 25 Recording - Recording on a tape 8 - NightShot/Super NightShot/ Color Slow Shutter 34 Self-timer recording (except DCR-TRV16 36 Checking recordings - Display function 39 Viewing the recording on TV 42 Advanced Recording Operations Recording still images on a "Memory Stick... still image in the dark - Basics Recording a picture 26 Shooting backlit subjects - END SEARCH/EDITSEARCH/ Rec Review 37 Playback - Digital effect ... 55 Using the PROGRAM AE function .... 58 Adjusting the exposure manually ...... 60 Focusing manually 61 Interval recording 62 Frame by...
Operating Instructions
Page 7
...Viewing still images - Image protection 148 Deleting images - For Windows users 165 Viewing images recorded on a "Memory Stick" with your computer - Digital program editing (on a "Memory Stick" - Memory Photo playback .......... 137 Viewing moving picture - Memory PB ZOOM 145 Playing back images in... a continuous loop - DELETE 149 Writing a print mark - For Windows users (except DCR-TRV16 169 Connecting your camcorder to your computer - PRINT MARK 151 Using the optional printer 152 Viewing Images Using Your Computer Viewing images with your...
...Viewing still images - Image protection 148 Deleting images - For Windows users 165 Viewing images recorded on a "Memory Stick" with your computer - Digital program editing (on a "Memory Stick" - Memory Photo playback .......... 137 Viewing moving picture - Memory PB ZOOM 145 Playing back images in... a continuous loop - DELETE 149 Writing a print mark - For Windows users (except DCR-TRV16 169 Connecting your camcorder to your computer - PRINT MARK 151 Using the optional printer 152 Viewing Images Using Your Computer Viewing images with your...
Operating Instructions
Page 10
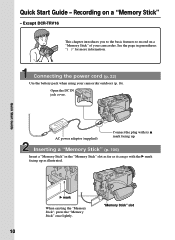
... in parentheses "( )" for more information. See the page in the "Memory Stick" slot as far as illustrated. Recording on a "Memory Stick" of your camcorder outdoors (p. 16). Quick Start Guide AC power adaptor (supplied) Connect the plug with the B mark facing up as it can go with its v mark facing... up. Connecting the power cord (p. 22) Use the battery pack when using your camcorder. "Memory Stick" slot 10 Open the DC IN jack cover. Quick Start Guide - B mark When ejecting the "Memory Stick", press the "Memory ...
... in parentheses "( )" for more information. See the page in the "Memory Stick" slot as far as illustrated. Recording on a "Memory Stick" of your camcorder outdoors (p. 16). Quick Start Guide AC power adaptor (supplied) Connect the plug with the B mark facing up as it can go with its v mark facing... up. Connecting the power cord (p. 22) Use the battery pack when using your camcorder. "Memory Stick" slot 10 Open the DC IN jack cover. Quick Start Guide - B mark When ejecting the "Memory Stick", press the "Memory ...
Operating Instructions
Page 12
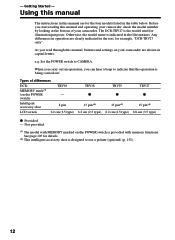
...memory functions. Set the POWER switch to use a printer (optional) (p. 152). 12 switch) Intelligent accessory shoe 8 pin LCD screen 6.2 cm (2.5 type) TRV18 z 15 pin*2) 6.2 cm (2.5 type) TRV25 z 15 pin*2) 6.2 cm (2.5 type) TRV27 z 15 pin*2) 8.8 cm (3.5 type) z Provided - e.g.... As you start reading this manual and operating your camcorder, check the model number by looking at the bottom of differences DCR- Types of your camcorder are for the four models listed in the text, for illustration purposes. Before you read ...
...memory functions. Set the POWER switch to use a printer (optional) (p. 152). 12 switch) Intelligent accessory shoe 8 pin LCD screen 6.2 cm (2.5 type) TRV18 z 15 pin*2) 6.2 cm (2.5 type) TRV25 z 15 pin*2) 6.2 cm (2.5 type) TRV27 z 15 pin*2) 8.8 cm (3.5 type) z Provided - e.g.... As you start reading this manual and operating your camcorder, check the model number by looking at the bottom of differences DCR- Types of your camcorder are for the four models listed in the text, for illustration purposes. Before you read ...
Operating Instructions
Page 15
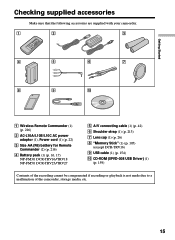
... Make sure that the following accessories are supplied with your camcorder. 1 2 3 4 5 6 7 8 9 0 1 Wireless Remote Commander (1) (p. 216) 2 AC-L10A/L10B/L10C AC power adaptor (1), Power cord (1) (p. 22) 3 Size AA (R6) battery for Remote Commander (2) (p. 216) 4 Battery pack (1) (p. 16, 17) NP-FM30: DCR-TRV16/TRV18 NP-FM50: DCR-TRV25/TRV27 5 A/V connecting cable (1) (p. 42) 6 Shoulder strap (1) (p. 213) 7 Lens...
... Make sure that the following accessories are supplied with your camcorder. 1 2 3 4 5 6 7 8 9 0 1 Wireless Remote Commander (1) (p. 216) 2 AC-L10A/L10B/L10C AC power adaptor (1), Power cord (1) (p. 22) 3 Size AA (R6) battery for Remote Commander (2) (p. 216) 4 Battery pack (1) (p. 16, 17) NP-FM30: DCR-TRV16/TRV18 NP-FM50: DCR-TRV25/TRV27 5 A/V connecting cable (1) (p. 42) 6 Shoulder strap (1) (p. 213) 7 Lens...

Operating Instructions
Page 18
... viewfinder. The charging time may increase if the battery's temperature is extremely high or low because of the ambient temperature. *1) DCR-TRV16/TRV18 supplied *2) DCR-TRV25/TRV27 supplied 18 Charging time Battery pack NP-FM30*1) NP-FM50*2) NP-FM70 NP-QM71 NP-FM90 NP-FM91/QM91 Full...240 (180) 260 (200) 330 (270) 360 (300) Approximate minutes at 25°C (77°F) to cut off the power. Until your camcorder calculates the actual remaining battery time "- - - - min" appears in the display window indicates the approximate recording time when recording using the AC power ...
... viewfinder. The charging time may increase if the battery's temperature is extremely high or low because of the ambient temperature. *1) DCR-TRV16/TRV18 supplied *2) DCR-TRV25/TRV27 supplied 18 Charging time Battery pack NP-FM30*1) NP-FM50*2) NP-FM70 NP-QM71 NP-FM90 NP-FM91/QM91 Full...240 (180) 260 (200) 330 (270) 360 (300) Approximate minutes at 25°C (77°F) to cut off the power. Until your camcorder calculates the actual remaining battery time "- - - - min" appears in the display window indicates the approximate recording time when recording using the AC power ...
Operating Instructions
Page 19
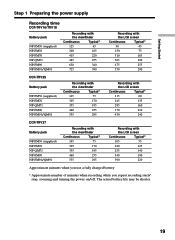
Getting Started Step 1 Preparing the power supply Recording time DCR-TRV16/TRV18 Battery pack NP-FM30 (supplied) NP-FM50 NP-FM70 NP-QM71 NP-FM90 NP...390 Recording with the LCD screen Continuous Typical* 90 45 150 75 310 165 365 190 475 255 550 290 DCR-TRV25 Battery pack NP-FM50 (supplied) NP-FM70 NP-QM71 NP-FM90 NP-FM91/QM91 Recording with the viewfinder...255 535 295 Recording with the LCD screen Continuous Typical* 115 60 245 135 285 160 370 210 430 240 DCR-TRV27 Battery pack NP-FM50 (supplied) NP-FM70 NP-QM71 NP-FM90 NP-FM91/QM91 Recording with the viewfinder...
Getting Started Step 1 Preparing the power supply Recording time DCR-TRV16/TRV18 Battery pack NP-FM30 (supplied) NP-FM50 NP-FM70 NP-QM71 NP-FM90 NP...390 Recording with the LCD screen Continuous Typical* 90 45 150 75 310 165 365 190 475 255 550 290 DCR-TRV25 Battery pack NP-FM50 (supplied) NP-FM70 NP-QM71 NP-FM90 NP-FM91/QM91 Recording with the viewfinder...255 535 295 Recording with the LCD screen Continuous Typical* 115 60 245 135 285 160 370 210 430 240 DCR-TRV27 Battery pack NP-FM50 (supplied) NP-FM70 NP-QM71 NP-FM90 NP-FM91/QM91 Recording with the viewfinder...
Operating Instructions
Page 20
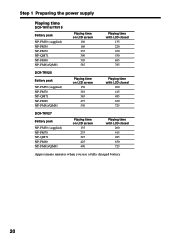
... the power supply Playing time DCR-TRV16/TRV18 Battery pack NP-FM30 (supplied) NP-FM50 NP-FM70 NP-QM71 NP-FM90 NP-FM91/QM91 Playing time on LCD screen 100 160 335 390 505 585 Playing time with LCD closed 135 220 450 530 685 785 DCR-TRV25 Battery pack NP-FM50 (supplied... NP-FM90 NP-FM91/QM91 Playing time on LCD screen 150 310 365 475 550 Playing time with LCD closed 200 415 485 630 725 DCR-TRV27 Battery pack NP-FM50 (supplied) NP-FM70 NP-QM71 NP-FM90 NP-FM91/QM91 Playing time on LCD screen 135 275 325 425 490...
... the power supply Playing time DCR-TRV16/TRV18 Battery pack NP-FM30 (supplied) NP-FM50 NP-FM70 NP-QM71 NP-FM90 NP-FM91/QM91 Playing time on LCD screen 100 160 335 390 505 585 Playing time with LCD closed 135 220 450 530 685 785 DCR-TRV25 Battery pack NP-FM50 (supplied... NP-FM90 NP-FM91/QM91 Playing time on LCD screen 150 310 365 475 550 Playing time with LCD closed 200 415 485 630 725 DCR-TRV27 Battery pack NP-FM50 (supplied) NP-FM70 NP-QM71 NP-FM90 NP-FM91/QM91 Playing time on LCD screen 135 275 325 425 490...

Operating Instructions
Page 23
... Started Step 2 Setting the date and time Set the date and time when you use your camcorder for about four months, the date and time settings may appear) because the built-in rechargeable ... you set the POWER switch to CAMERA or MEMORY (except DCR-TRV16) unless you set the date and time. If you do not use your camcorder will be cleared from memory (bars may be displayed each ...time that order. (1) Set the POWER switch to CAMERA or MEMORY (except DCR-TRV16), then press MENU to display...
... Started Step 2 Setting the date and time Set the date and time when you use your camcorder for about four months, the date and time settings may appear) because the built-in rechargeable ... you set the POWER switch to CAMERA or MEMORY (except DCR-TRV16) unless you set the date and time. If you do not use your camcorder will be cleared from memory (bars may be displayed each ...time that order. (1) Set the POWER switch to CAMERA or MEMORY (except DCR-TRV16), then press MENU to display...

Operating Instructions
Page 24
Step 2 Setting the date and time The year changes as follows: 1995 T t 2002 T t 2079 If you do not set the date and time and are recorded on the data code of your camcorder operates on the time indicator The internal clock of the tape and the "Memory Stick" (except DCR-TRV16). Note on a 12-hour cycle. •12:00 AM stands for midnight. •12:00 PM stands for noon. 24
Step 2 Setting the date and time The year changes as follows: 1995 T t 2002 T t 2079 If you do not set the date and time and are recorded on the data code of your camcorder operates on the time indicator The internal clock of the tape and the "Memory Stick" (except DCR-TRV16). Note on a 12-hour cycle. •12:00 AM stands for midnight. •12:00 PM stands for noon. 24
Operating Instructions
Page 27
...you change the battery pack, set to OFF (CHG). - When you record in the LP mode on the LOCK switch (except DCR-TRV16) When you leave your camcorder in the LP mode • The transition between scenes may not be smooth. • The playback picture may be distorted or the... battery time is slightly shorter than the shooting time using the viewfinder. To enable smooth transition Transition between scenes. When you turn off your camcorder does not turn off automatically while the cassette is smooth as long as the default setting. When you use a cassette with cassette memory, ...
...you change the battery pack, set to OFF (CHG). - When you record in the LP mode on the LOCK switch (except DCR-TRV16) When you leave your camcorder in the LP mode • The transition between scenes may not be smooth. • The playback picture may be distorted or the... battery time is slightly shorter than the shooting time using the viewfinder. To enable smooth transition Transition between scenes. When you turn off your camcorder does not turn off automatically while the cassette is smooth as long as the default setting. When you use a cassette with cassette memory, ...

Operating Instructions
Page 29
...lens adjustment lever Viewfinder backlight You can change the brightness of the LCD screen (1) Set the POWER switch to CAMERA, VCR or MEMORY (except DCR-TRV16). in the menu settings when using the battery pack (p. 178). 29 Select LCD B.L. Set the POWER switch to CAMERA, VCR or MEMORY (except... DCR-TRV16). Recording - Adjusting the viewfinder If you record pictures with the LCD panel closed, check the picture with LCD BRIGHT, then press the dial. (3)...
...lens adjustment lever Viewfinder backlight You can change the brightness of the LCD screen (1) Set the POWER switch to CAMERA, VCR or MEMORY (except DCR-TRV16). in the menu settings when using the battery pack (p. 178). 29 Select LCD B.L. Set the POWER switch to CAMERA, VCR or MEMORY (except... DCR-TRV16). Recording - Adjusting the viewfinder If you record pictures with the LCD panel closed, check the picture with LCD BRIGHT, then press the dial. (3)...

Operating Instructions
Page 30
... side of the bar shows W T the digital zooming zone. Note on digital zoom The picture quality deteriorates as you move the power zoom lever to OFF as a default setting. When the POWER switch is sharp. When you shoot close to MEMORY (except DCR-TRV16) You cannot use zoom greater than 10...× Zoom greater than 10× is at least about 80 cm (about 2 feet 5/8 inch) away from the lens surface in the telephoto position, or about 1 cm (about 1/2 inch) away in better-looking recordings. To activate digital zoom, select...
... side of the bar shows W T the digital zooming zone. Note on digital zoom The picture quality deteriorates as you move the power zoom lever to OFF as a default setting. When the POWER switch is sharp. When you shoot close to MEMORY (except DCR-TRV16) You cannot use zoom greater than 10...× Zoom greater than 10× is at least about 80 cm (about 2 feet 5/8 inch) away from the lens surface in the telephoto position, or about 1 cm (about 1/2 inch) away in better-looking recordings. To activate digital zoom, select...

Operating Instructions
Page 31
... recording in the mirror mode ZERO SET MEMORY on the LCD screen is a mirror-image. The subject uses this feature to CAMERA or MEMORY (except DCR-TRV16). Picture in the viewfinder. Set the POWER switch to check his or her own image on the LCD screen while you look at the...
... recording in the mirror mode ZERO SET MEMORY on the LCD screen is a mirror-image. The subject uses this feature to CAMERA or MEMORY (except DCR-TRV16). Picture in the viewfinder. Set the POWER switch to check his or her own image on the LCD screen while you look at the...
Operating Instructions
Page 33
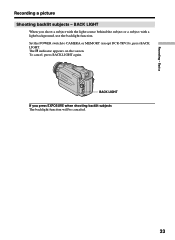
Set the POWER switch to CAMERA or MEMORY (except DCR-TRV16), press BACK LIGHT. indicator appears on the screen. BACK LIGHT When you press EXPOSURE when shooting backlit subjects The backlight function will be canceled. 33 Basics Recording a picture Shooting backlit subjects - BACK LIGHT If you shoot a subject with the light source behind the subject or a subject with a light background, use the backlight function. The . To cancel, press BACK LIGHT again. Recording -
Set the POWER switch to CAMERA or MEMORY (except DCR-TRV16), press BACK LIGHT. indicator appears on the screen. BACK LIGHT When you press EXPOSURE when shooting backlit subjects The backlight function will be canceled. 33 Basics Recording a picture Shooting backlit subjects - BACK LIGHT If you shoot a subject with the light source behind the subject or a subject with a light background, use the backlight function. The . To cancel, press BACK LIGHT again. Recording -
Operating Instructions
Page 34
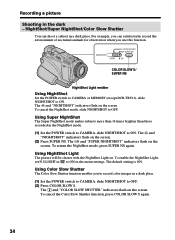
... NIGHTSHOT OFF COLOR SLOW S SUPER NS ON COLOR SLOW S/ SUPER NS NightShot Light emitter Using NightShot Set the POWER switch to CAMERA or MEMORY (except DCR-TRV16), slide NIGHTSHOT to OFF. Using Color Slow Shutter The Color Slow Shutter function enables you can shoot a subject in a dark place. Using Super NightShot...
... NIGHTSHOT OFF COLOR SLOW S SUPER NS ON COLOR SLOW S/ SUPER NS NightShot Light emitter Using NightShot Set the POWER switch to CAMERA or MEMORY (except DCR-TRV16), slide NIGHTSHOT to OFF. Using Color Slow Shutter The Color Slow Shutter function enables you can shoot a subject in a dark place. Using Super NightShot...


