
Operating Instructions primary manual
Page 2
..., and (2) this tape-corder for data storage. • Check and make sure that it can radiate radio frequency energy and, if not installed and used in accordance with the instructions, may cause undesired operation. Connect the equipment into an outlet on a circuit different from the malfunction of the recording operation of this equipment. Reorient or relocate the receiving antenna. - Record the serial number in Canada...
..., and (2) this tape-corder for data storage. • Check and make sure that it can radiate radio frequency energy and, if not installed and used in accordance with the instructions, may cause undesired operation. Connect the equipment into an outlet on a circuit different from the malfunction of the recording operation of this equipment. Reorient or relocate the receiving antenna. - Record the serial number in Canada...
Operating Instructions primary manual
Page 3
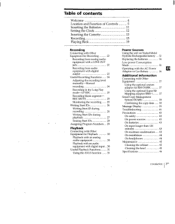
... for Playback 30 Playback with an analog audio equipment 30 Playback with an audio equipment with digital input ...30 Useful Playback Functions 31 Using the AVLS function 31 Power Sources Using the unit on Nickel Metal Hydride Rechargeable battery 32 Replacing the batteries 34 Low-power Consumption Mode 35 Operating with the AC Power Adaptor or Car Battery 36 Additional Information Connecting with digital output 23 Useful Recording Functions 24 Adjusting the recording level manually-Manual recording 24 Recording in the Long Play mode-LP REC 25 Recording blank...
... for Playback 30 Playback with an analog audio equipment 30 Playback with an audio equipment with digital input ...30 Useful Playback Functions 31 Using the AVLS function 31 Power Sources Using the unit on Nickel Metal Hydride Rechargeable battery 32 Replacing the batteries 34 Low-power Consumption Mode 35 Operating with the AC Power Adaptor or Car Battery 36 Additional Information Connecting with digital output 23 Useful Recording Functions 24 Adjusting the recording level manually-Manual recording 24 Recording in the Long Play mode-LP REC 25 Recording blank...
Operating Instructions primary manual
Page 4
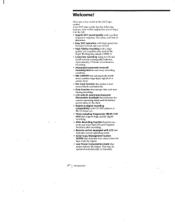
...; Adjustable (automatic/manual) recording level to suit every recording condition. • MIC LIMITER that automatically holds down sudden large input signals to a certain level. • Rec mute function that makes a foursecond blank automatically. • Date function that stamps date and time during recording. • LCD with EL (electroluminescent) illumination backlight that indicates the current operating mode and the battery power status in the dark. • Digital-to-digital recording compatibility with CD/MD players or BS/CS tuner...
...; Adjustable (automatic/manual) recording level to suit every recording condition. • MIC LIMITER that automatically holds down sudden large input signals to a certain level. • Rec mute function that makes a foursecond blank automatically. • Date function that stamps date and time during recording. • LCD with EL (electroluminescent) illumination backlight that indicates the current operating mode and the battery power status in the dark. • Digital-to-digital recording compatibility with CD/MD players or BS/CS tuner...

Operating Instructions primary manual
Page 5
... using the tape-corder in ( ) for the low-power consumption mode). buttons (19) HOLD switch (12, 14, 19, 35) Hold function does not lock the CLOCK/SET, COUNTER/-, RESET/+ buttons (except for details. El REMOTE/O (headphones) jack (19, 24, 31) El LINE OUT (line output) jack (25, 30) O 11 O 12 13 14 15 REC LEVEL (recording level) control (24) MIC/LINE IN (microphone/line input) jack (15, 22, 24) 10 Tape operation buttons: (17) 141 1141 (rewind/review • AMS) button • STOP button...
... using the tape-corder in ( ) for the low-power consumption mode). buttons (19) HOLD switch (12, 14, 19, 35) Hold function does not lock the CLOCK/SET, COUNTER/-, RESET/+ buttons (except for details. El REMOTE/O (headphones) jack (19, 24, 31) El LINE OUT (line output) jack (25, 30) O 11 O 12 13 14 15 REC LEVEL (recording level) control (24) MIC/LINE IN (microphone/line input) jack (15, 22, 24) 10 Tape operation buttons: (17) 141 1141 (rewind/review • AMS) button • STOP button...

Operating Instructions primary manual
Page 8
... (Long Play) mode indicator (16, 25) PGM.NO (program number)•day •AM/PM indicator (12, 20) Tape counter/clock/volume/ message indicator (9, 10, 39) E] START ID (automatic Start ID•renumber•erase signal) indicator (26) El START ID indicator (26) Peak level indicator (24) BATT (remaining battery power status) indicator (34) • MIC LIMITER indicator • AGC indicator • REC (recording) indicator 11 II (pause) indicator 12 Po- (playback) indicator Remote control UI A CattilNO, i_Ti voL riq LP A -TIME REMAIN CLOCK CDOYo-triMCIOD...
... (Long Play) mode indicator (16, 25) PGM.NO (program number)•day •AM/PM indicator (12, 20) Tape counter/clock/volume/ message indicator (9, 10, 39) E] START ID (automatic Start ID•renumber•erase signal) indicator (26) El START ID indicator (26) Peak level indicator (24) BATT (remaining battery power status) indicator (34) • MIC LIMITER indicator • AGC indicator • REC (recording) indicator 11 II (pause) indicator 12 Po- (playback) indicator Remote control UI A CattilNO, i_Ti voL riq LP A -TIME REMAIN CLOCK CDOYo-triMCIOD...

Operating Instructions primary manual
Page 12
.... HOLD CLOCK/SET Make sure that the tape-corder is in the stop mode and that the HOLD function is set , the year, month and date will be set it to its default setting (TU/97Y4M1D/ AMI2H00M00S) if the batteries are removed from the unit for more . Then press the CLOCK/ SET button. PP CLOCK I I NMI Press + or - N1 4 - will return to "00". The display stops flashing and the clock operates. The clock display will...
.... HOLD CLOCK/SET Make sure that the tape-corder is in the stop mode and that the HOLD function is set , the year, month and date will be set it to its default setting (TU/97Y4M1D/ AMI2H00M00S) if the batteries are removed from the unit for more . Then press the CLOCK/ SET button. PP CLOCK I I NMI Press + or - N1 4 - will return to "00". The display stops flashing and the clock operates. The clock display will...

Operating Instructions primary manual
Page 15
... tape. Recording 15` The absolute time is pressed, the absolute time will become "--H--M--S" and will not be erased. If you wish to continue to record on a partially recorded tape Press the 10* I Inserting the Cassette / Recording Recording Microphone (not supplied) II PAUSE • REC MIC ATT MIC/LINE IN MANUAL•MIC LIMITER•AUTO (AGC) ► PLAY to MIC/LINE IN SP•LP Refer to page 22 for "Connecting...
... tape. Recording 15` The absolute time is pressed, the absolute time will become "--H--M--S" and will not be erased. If you wish to continue to record on a partially recorded tape Press the 10* I Inserting the Cassette / Recording Recording Microphone (not supplied) II PAUSE • REC MIC ATT MIC/LINE IN MANUAL•MIC LIMITER•AUTO (AGC) ► PLAY to MIC/LINE IN SP•LP Refer to page 22 for "Connecting...

Operating Instructions primary manual
Page 20
... a track-AMS* function You can locate the beginning of a track in the playback, fastforward/rewind, and stop mode for the remote control. Stop mode: Press Pi* NI (NI) or l44 *4 (144 ) twice. n fourth previous track including the current program (track) ( ) is indicated for three minutes or longer while using the unit on other DAT decks. * Automatic Music Sensor Playing Back WEN To fast-forward/rewind while monitoring the sound You can be operated...
... a track-AMS* function You can locate the beginning of a track in the playback, fastforward/rewind, and stop mode for the remote control. Stop mode: Press Pi* NI (NI) or l44 *4 (144 ) twice. n fourth previous track including the current program (track) ( ) is indicated for three minutes or longer while using the unit on other DAT decks. * Automatic Music Sensor Playing Back WEN To fast-forward/rewind while monitoring the sound You can be operated...

Operating Instructions primary manual
Page 21
... the previous program (track) in the playback mode until the sampling frequency is rewound to the left: rewind Remaining amount of tape To play back the tape from the beginning automatically-Auto-play function This function can check the sampling frequency of tape. Press ► PLAY in the AMS function. Playback begins automatically when the tape is displayed. Peak level indicator (R) shows the remaining amount of the recorded sound. Tape transport direction to the...
... the previous program (track) in the playback mode until the sampling frequency is rewound to the left: rewind Remaining amount of tape To play back the tape from the beginning automatically-Auto-play function This function can check the sampling frequency of tape. Press ► PLAY in the AMS function. Playback begins automatically when the tape is displayed. Peak level indicator (R) shows the remaining amount of the recorded sound. Tape transport direction to the...
Operating Instructions primary manual
Page 23
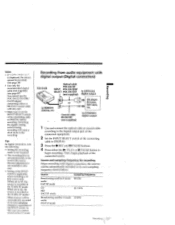
... (COAXIAL) digital output (not supplied) 1 Use and connect the optical cable or coaxial cable according to the'digital output jack of the connected equipment. 2 Set the INPUT SELECT switch of the connecting cable to REMOTE etc. When set the INPUT SELECT switch of the connecting cable to DIGITAL. 3 Press the • REC and II PAUSE buttons. 4 Press either the ► PLAY or II PAUSE button to LIZ, the source is recorded in the recording. Recording from audio equipment with digital connection, the...
... (COAXIAL) digital output (not supplied) 1 Use and connect the optical cable or coaxial cable according to the'digital output jack of the connected equipment. 2 Set the INPUT SELECT switch of the connecting cable to REMOTE etc. When set the INPUT SELECT switch of the connecting cable to DIGITAL. 3 Press the • REC and II PAUSE buttons. 4 Press either the ► PLAY or II PAUSE button to LIZ, the source is recorded in the recording. Recording from audio equipment with digital connection, the...

Operating Instructions primary manual
Page 25
... volume or stop playback. When the blank segment exceeds four seconds, "II" indicator will flash quikly. Therefore, the actual time is twice the amount of the tape are based on the SP mode. A four-second blank segment is 4 and half minutes. Monitoring the recording Use the headphones or speakers of the stereo unit to monitor the sound while recording. 1 Plug the headphones to the REMOTE/O jack or the stereo unit...
... volume or stop playback. When the blank segment exceeds four seconds, "II" indicator will flash quikly. Therefore, the actual time is twice the amount of the tape are based on the SP mode. A four-second blank segment is 4 and half minutes. Monitoring the recording Use the headphones or speakers of the stereo unit to monitor the sound while recording. 1 Plug the headphones to the REMOTE/O jack or the stereo unit...

Operating Instructions primary manual
Page 27
....) • A sound is input after a soundless segment or a segment with a very low recording level of an MD is not written as the Start ID depending.on the CD player in the LP mode) between the start IDs. released. (Start ID is written regardless of the existing recording. 1 Press the START ID•MODE button on the main unit repeatedly until "AUTO ID" appears (to turn on AUTO-ID...
....) • A sound is input after a soundless segment or a segment with a very low recording level of an MD is not written as the Start ID depending.on the CD player in the LP mode) between the start IDs. released. (Start ID is written regardless of the existing recording. 1 Press the START ID•MODE button on the main unit repeatedly until "AUTO ID" appears (to turn on AUTO-ID...

Operating Instructions primary manual
Page 29
... has a missing program number because the program number was erased at the same time a Start ID was written during playback. • Which has missing program numbers or duplicated program numbers because the tape is written in the stop or playback mode. The program number is recorded from the following tapes: • On which indicates the number of the program number that has been recorded on the tape. Renumbering the program number 1 Press the START ID•MODE button repeatedly until "RENUMBER...
... has a missing program number because the program number was erased at the same time a Start ID was written during playback. • Which has missing program numbers or duplicated program numbers because the tape is written in the stop or playback mode. The program number is recorded from the following tapes: • On which indicates the number of the program number that has been recorded on the tape. Renumbering the program number 1 Press the START ID•MODE button repeatedly until "RENUMBER...

Operating Instructions primary manual
Page 32
... using it. • Charge the batteries that are completely exhausted (when " b R T TEP V" starts to flash in the display of the main unit). • Charging may take about 2.5 hours. (The charging time may lead to a malfunction. • When the CHARGE lamp flashes a red light, remove the rechargeable battery and check the polarity and the conditon of the _batteries. If there is not a malfunction. After the charging...
... using it. • Charge the batteries that are completely exhausted (when " b R T TEP V" starts to flash in the display of the main unit). • Charging may take about 2.5 hours. (The charging time may lead to a malfunction. • When the CHARGE lamp flashes a red light, remove the rechargeable battery and check the polarity and the conditon of the _batteries. If there is not a malfunction. After the charging...

Operating Instructions primary manual
Page 34
... batteries are removed from the tape-corder for long continuous playback or recording. hours) Battery Playback Recording Sony nickel metal hydride 4 rechargeable (NH-D100) 3 (3.5*) Sony alkaline LR6 (size AA) 2.5 1.5 (2-.5*) Values for battery life at 20°C and for a long time. Use the recommended NH-D100 battery. " When no plug is connected to the LINE OUT, REMOTE/Q or the REMOTE•DIGITAL l/ O jacks and the display backlight turned off. 34" Power Sources When to replace the batteries...
... batteries are removed from the tape-corder for long continuous playback or recording. hours) Battery Playback Recording Sony nickel metal hydride 4 rechargeable (NH-D100) 3 (3.5*) Sony alkaline LR6 (size AA) 2.5 1.5 (2-.5*) Values for battery life at 20°C and for a long time. Use the recommended NH-D100 battery. " When no plug is connected to the LINE OUT, REMOTE/Q or the REMOTE•DIGITAL l/ O jacks and the display backlight turned off. 34" Power Sources When to replace the batteries...
Operating Instructions primary manual
Page 37
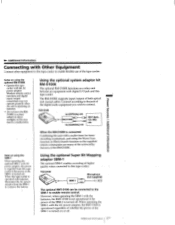
... power adaptor. The RM-DlOOK supports input/output of the SBM-1 is turned off . Connect according to the jack of the RM-Dl00K. Note on using the Music Scan function or Direct Search function on or off . corder with the batteries, the RMT-D100 is not operational if the power of the SBM-1 is turned on the supplied remote commander are many of the noteworthy features of the digital audio...
... power adaptor. The RM-DlOOK supports input/output of the SBM-1 is turned off . Connect according to the jack of the RM-Dl00K. Note on using the Music Scan function or Direct Search function on or off . corder with the batteries, the RMT-D100 is not operational if the power of the SBM-1 is turned on the supplied remote commander are many of the noteworthy features of the digital audio...

Operating Instructions primary manual
Page 39
... the main unit while operating this unit. Flashes when the unrecorded segment of the tape is received. Message Display The following messages will be displayed on the main unit. Ln.2 ,,_ _I PH/71-11WT FIPF PROTECT H ni B T T7P ,c: N B Fr: . Flashes when the cassette compartment lid is set the HOLD switch to LIMIT, or when the AVLS is operating and the VOLUME button is open . Flashes when the Start IDs are...
... the main unit while operating this unit. Flashes when the unrecorded segment of the tape is received. Message Display The following messages will be displayed on the main unit. Ln.2 ,,_ _I PH/71-11WT FIPF PROTECT H ni B T T7P ,c: N B Fr: . Flashes when the cassette compartment lid is set the HOLD switch to LIMIT, or when the AVLS is operating and the VOLUME button is open . Flashes when the Start IDs are...
Operating Instructions primary manual
Page 41
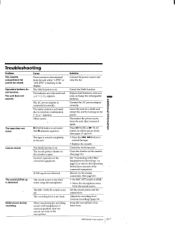
... rewind the tape. • Replace the cassette. The safety system is flashing in the display. Incorrect operation of the connected equipment. The sound source is distorted. Replace both batteries with headphones or external speakers, they are exhausted and b T TEP '3 appears. Cancel the Hold function. Keep the microphone away from the unit while "L On" or "LINL ORB" is activated due to the Operating Instructions manual of the connected equipment. Other causes. Troubleshooting Problem...
... rewind the tape. • Replace the cassette. The safety system is flashing in the display. Incorrect operation of the connected equipment. The sound source is distorted. Replace both batteries with headphones or external speakers, they are exhausted and b T TEP '3 appears. Cancel the Hold function. Keep the microphone away from the unit while "L On" or "LINL ORB" is activated due to the Operating Instructions manual of the connected equipment. Other causes. Troubleshooting Problem...
Operating Instructions primary manual
Page 42
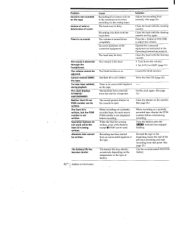
... function is not recorded on the tape. Operate the connected equipment as instructed in the Operating Instructions manual. Set the clock again. (See page 12.) Close the shutter on the cassette. (See page 14.) When recording on a partially recorded tape, display the PGM number before recording. Problem Sound is on. The volume cannot be written. The clock displays 97Y4M1D/ AM12HOOMOOS. The volume is not displayed before commencing recording. The battery life may shorten excessively depending on a partially recorded tape...
... function is not recorded on the tape. Operate the connected equipment as instructed in the Operating Instructions manual. Set the clock again. (See page 12.) Close the shutter on the cassette. (See page 14.) When recording on a partially recorded tape, display the PGM number before recording. Problem Sound is on. The volume cannot be written. The clock displays 97Y4M1D/ AM12HOOMOOS. The volume is not displayed before commencing recording. The battery life may shorten excessively depending on a partially recorded tape...

Operating Instructions primary manual
Page 46
... IN Jack type stereo minijack Impedance MIC 4.7 kilohms LINE IN 47 kilohms Rated input level MIC 1.4 mV LINE IN 500 mV Minimum input level MIC 0.3 mV LINE IN 120 mV Output Jack type Impedance LINE OUT stereo minijack 220 ohms REMOTE/Q stereo minijack 16 ohms Rated output Maximum output level 500 mV - 87mV 20 mW + 20 mW Load impedance 10 kilohms 16 ohms Input/Output Power requirements Battery life Power consumption Dimension Mass DIGITAL I/O REMOTE jack (special jack) Digital input/output, remote control operation...
... IN Jack type stereo minijack Impedance MIC 4.7 kilohms LINE IN 47 kilohms Rated input level MIC 1.4 mV LINE IN 500 mV Minimum input level MIC 0.3 mV LINE IN 120 mV Output Jack type Impedance LINE OUT stereo minijack 220 ohms REMOTE/Q stereo minijack 16 ohms Rated output Maximum output level 500 mV - 87mV 20 mW + 20 mW Load impedance 10 kilohms 16 ohms Input/Output Power requirements Battery life Power consumption Dimension Mass DIGITAL I/O REMOTE jack (special jack) Digital input/output, remote control operation...


