Dimensions Diagram
Page 1
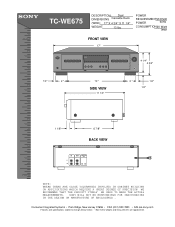
SONY WILL NOT BE RESPONSIBLE FOR INACCURACIES IN THE DESIGN OR MANUFACTURE OF ENCLOSURES . TC-WE675 DESCRIPTION: Dual DIMENSIONS Cassette Deck (WHD): 17" X 4 3/4" X 11 1/4" WEIGHT: 13 lbs POWER REQUIREMENTS1: 20VAC POWER 60Hz CONSUMPTION:20 Watts (max) FRONT VIEW 17" R 4 1/4" 4 3/4" 1/2" 2 " 12 " SIDE VIEW 11 1/4" 2 " 1/2" 1/2".... Consumer Integrated Systems • Park Ridge, New Jersey 07656 • FAX (201) 930 7891 • b2b.sel.sony.com Features and specifications subject to change without notice. • Non-metric weights and measurements are approximate.
SONY WILL NOT BE RESPONSIBLE FOR INACCURACIES IN THE DESIGN OR MANUFACTURE OF ENCLOSURES . TC-WE675 DESCRIPTION: Dual DIMENSIONS Cassette Deck (WHD): 17" X 4 3/4" X 11 1/4" WEIGHT: 13 lbs POWER REQUIREMENTS1: 20VAC POWER 60Hz CONSUMPTION:20 Watts (max) FRONT VIEW 17" R 4 1/4" 4 3/4" 1/2" 2 " 12 " SIDE VIEW 11 1/4" 2 " 1/2" 1/2".... Consumer Integrated Systems • Park Ridge, New Jersey 07656 • FAX (201) 930 7891 • b2b.sel.sony.com Features and specifications subject to change without notice. • Non-metric weights and measurements are approximate.

Operating Instructions (primary manual)
Page 1
4-232-596-12 (1) Stereo Cassette Deck Operating Instructions TC-WE675 TC-WE475 © 2001 Sony Corporation
4-232-596-12 (1) Stereo Cassette Deck Operating Instructions TC-WE675 TC-WE475 © 2001 Sony Corporation
Operating Instructions (primary manual)
Page 7
... playing. Fast-forward or rewind M or m when the deck is operating. Adjust the volume on deck A or normal-speed dubbing (but not during RMS play 2) or RMS dubbing 2)). 2) TC-WE675 only • To play . Do not press POWER or A while the tape deck is stopped Take out the cassette A after playing back five times. 4 Press H. Press...
... playing. Fast-forward or rewind M or m when the deck is operating. Adjust the volume on deck A or normal-speed dubbing (but not during RMS play 2) or RMS dubbing 2)). 2) TC-WE675 only • To play . Do not press POWER or A while the tape deck is stopped Take out the cassette A after playing back five times. 4 Press H. Press...
Operating Instructions (primary manual)
Page 8
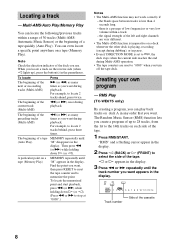
...if: - For example, to locate 2 tracks behind, press three times. For example, to locate 2 tracks ahead, press twice. RMS Play (TC-WE675 only) By creating a program, you can play back tracks on deck A in the display. 0 3 H FRONT RMS BACK 1 2 3 4 5 6 7 8 9 10 11 12 13 14 Track number Side... (FRONT) to "0000" when you turn off the tape deck. A particular point on a deck whenever the other deck is playing, recording (except during Multi-AMS operation. • The tape counters are reset to select the side of the cassette 8 the signal strength of the left and right channels are ...
...if: - For example, to locate 2 tracks behind, press three times. For example, to locate 2 tracks ahead, press twice. RMS Play (TC-WE675 only) By creating a program, you can play back tracks on deck A in the display. 0 3 H FRONT RMS BACK 1 2 3 4 5 6 7 8 9 10 11 12 13 14 Track number Side... (FRONT) to "0000" when you turn off the tape deck. A particular point on a deck whenever the other deck is playing, recording (except during Multi-AMS operation. • The tape counters are reset to select the side of the cassette 8 the signal strength of the left and right channels are ...
Operating Instructions (primary manual)
Page 10
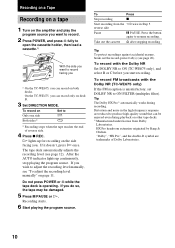
... playing the program source. If you wish to adjust the recording level manually, see "To adjust the recording level manually" on both decks. Take out the cassette A after stopping recording Tip To protect recordings against accidental erasure, break out the record-protect tab(s) (see page 12). Recording on ...the program source you want to record. 2 Press POWER, and press A fully to open the cassette holder, then load a cassette. 1) With the side you want to record facing you 1) On the TC-WE675, you can record on page 11. After the AUTO indicator lights up for recording on Only one...
... playing the program source. If you wish to adjust the recording level manually, see "To adjust the recording level manually" on both decks. Take out the cassette A after stopping recording Tip To protect recordings against accidental erasure, break out the record-protect tab(s) (see page 12). Recording on ...the program source you want to record. 2 Press POWER, and press A fully to open the cassette holder, then load a cassette. 1) With the side you want to record facing you 1) On the TC-WE675, you can record on page 11. After the AUTO indicator lights up for recording on Only one...
Operating Instructions (primary manual)
Page 11
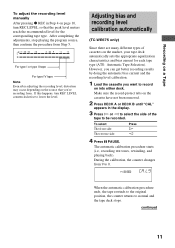
...TC-WE675 only) Since there are many different types of the tape to 0. L9 When the automatic calibration procedure ends, the tape rewinds to the original position, the counter returns to lower the level. continued 11 If this happens, turn REC LEVEL so that you want to record on into either deck... However, you can get better recording results by doing the automatic bias current and the recording level calibration. 1 Load the cassette you 're recording from Step 5. The automatic calibration procedure starts (i.e., recording test tones, rewinding, and playing back). Recording ...
...TC-WE675 only) Since there are many different types of the tape to 0. L9 When the automatic calibration procedure ends, the tape rewinds to the original position, the counter returns to lower the level. continued 11 If this happens, turn REC LEVEL so that you want to record on into either deck... However, you can get better recording results by doing the automatic bias current and the recording level calibration. 1 Load the cassette you 're recording from Step 5. The automatic calibration procedure starts (i.e., recording test tones, rewinding, and playing back). Recording ...
Operating Instructions (primary manual)
Page 12
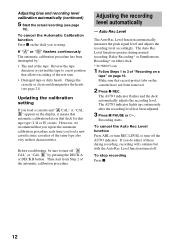
...calibration procedure has been interrupted by pressing the DECK A or DECK B button. However, we recommend that you repeat the automatic calibration procedure each time you load a new cassette since cassettes of the same type also vary in that deck for that automatic calibration data in their characteristics... these during normal recording, Relay Recording* or Simultaneous Recording* on either deck. * TC-WE675 only 1 Follow Steps 1 to turn off "A CAL" or "CAL B" by : • The end of "Recording on a tape" on the deck you load a cassette and "A CAL" or "CAL B" appears in the display, it...
...calibration procedure has been interrupted by pressing the DECK A or DECK B button. However, we recommend that you repeat the automatic calibration procedure each time you load a new cassette since cassettes of the same type also vary in that deck for that automatic calibration data in their characteristics... these during normal recording, Relay Recording* or Simultaneous Recording* on either deck. * TC-WE675 only 1 Follow Steps 1 to turn off "A CAL" or "CAL B" by : • The end of "Recording on a tape" on the deck you load a cassette and "A CAL" or "CAL B" appears in the display, it...
Operating Instructions (primary manual)
Page 14
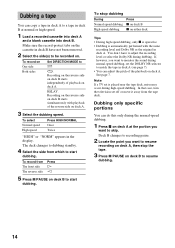
... the side from Press The front side H The reverse side h 5 Press X PAUSE on deck A at normal or high speed. 1 Load a recorded cassette into deck A and a blank cassette into deck B. You don't have not been removed. 2 Select the side(s) to be recorded on deck A. Dubbing only specific portions You can do this only during high-speed dubbing...
... the side from Press The front side H The reverse side h 5 Press X PAUSE on deck A at normal or high speed. 1 Load a recorded cassette into deck A and a blank cassette into deck B. You don't have not been removed. 2 Select the side(s) to be recorded on deck A. Dubbing only specific portions You can do this only during high-speed dubbing...
Operating Instructions (primary manual)
Page 15
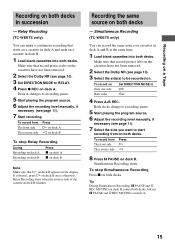
... side Press H h 8 Press X PAUSE on deck B once; To record on a cassette in deck B. 1 Load blank cassettes into both decks in deck A and B at the same time. 1 Load blank cassettes into both decks. Relay Recording (TC-WE675 only) You can record the same source on both decks - If it doesn't, press H on deck B. To record from on deck A. 15 Recording on a Tape Recording on...
... side Press H h 8 Press X PAUSE on deck B once; To record on a cassette in deck B. 1 Load blank cassettes into both decks in deck A and B at the same time. 1 Load blank cassettes into both decks. Relay Recording (TC-WE675 only) You can record the same source on both decks - If it doesn't, press H on deck B. To record from on deck A. 15 Recording on a Tape Recording on...
Operating Instructions (primary manual)
Page 16
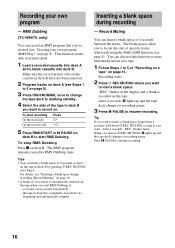
... side h 5 Press RMS/START or X PAUSE on the tape. Make sure the record-protect tabs on the cassette in deck B have not been removed. 2 Program tracks on deck A (see "Inserting a blank space during recording - RMS Dubbing (TC-WE675 only) You can insert a blank space of specific tracks afterwards using the Multi-AMS function (see "Creating...
... side h 5 Press RMS/START or X PAUSE on the tape. Make sure the record-protect tabs on the cassette in deck B have not been removed. 2 Program tracks on deck A (see "Inserting a blank space during recording - RMS Dubbing (TC-WE675 only) You can insert a blank space of specific tracks afterwards using the Multi-AMS function (see "Creating...
Operating Instructions (primary manual)
Page 17
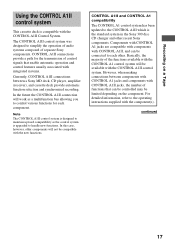
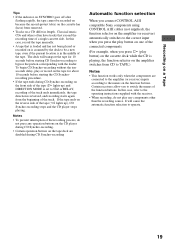
...with CONTROL A1II, and can be controlled may be limited depending on a Tape Using the CONTROL A1II control system This cassette deck is compatible with CONTROL A1II jacks, the number of functions that enable automatic operation and control features usually associated with ... CONTROL A1 jacks and components with the CONTROL A1II Control System. However, when making connections between a Sony MD deck, CD player, amplifier (receiver), and cassette deck provide automatic function selection and synchronized recording. CONTROL A1II and CONTROL A1 compatibility The CONTROL A1 control system...
...with CONTROL A1II, and can be controlled may be limited depending on a Tape Using the CONTROL A1II control system This cassette deck is compatible with CONTROL A1II jacks, the number of functions that enable automatic operation and control features usually associated with ... CONTROL A1 jacks and components with the CONTROL A1II Control System. However, when making connections between a Sony MD deck, CD player, amplifier (receiver), and cassette deck provide automatic function selection and synchronized recording. CONTROL A1II and CONTROL A1 compatibility The CONTROL A1 control system...
Operating Instructions (primary manual)
Page 18
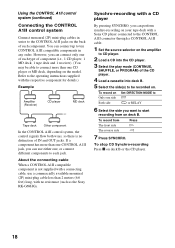
...CD Synchro-recording Press x on the model. Synchro-recording with a CD player By pressing SYNCHRO, you can perform synchro-recording on your tape deck with a Sony CD player connected to the CONTROL A1II connector through a CONTROL A1II cable. 1 Set the source selector on the amplifier to CD player. ...2 Load a CD into the CD player. 3 Select the play mode (CONTINUE, SHUFFLE, or PROGRAM) of the CD player. 4 Load a cassette into deck B. 5 Select the ...
...CD Synchro-recording Press x on the model. Synchro-recording with a CD player By pressing SYNCHRO, you can perform synchro-recording on your tape deck with a Sony CD player connected to the CONTROL A1II connector through a CONTROL A1II cable. 1 Set the source selector on the amplifier to CD player. ...2 Load a CD into the CD player. 3 Select the play mode (CONTINUE, SHUFFLE, or PROGRAM) of the CD player. 4 Load a cassette into deck B. 5 Select the ...
Operating Instructions (primary manual)
Page 19
...Synchrorecording procedure. • If the tape ends during CD Synchro-recording Automatic function selection When you connect CONTROL A1II compatible Sony components using CONTROL A1II cables (not supplied), the function selector on the amplifier (or receiver) automatically switches to the ...CD Synchro-recording without the tenseconds delay, play button) on the cassette deck while the CD is playing, the function selector on the amplifier switches from the beginning of a single cassette side. The deck will cause the automatic function selection to bypass the portion corresponding with...
...Synchrorecording procedure. • If the tape ends during CD Synchro-recording Automatic function selection When you connect CONTROL A1II compatible Sony components using CONTROL A1II cables (not supplied), the function selector on the amplifier (or receiver) automatically switches to the ...CD Synchro-recording without the tenseconds delay, play button) on the cassette deck while the CD is playing, the function selector on the amplifier switches from the beginning of a single cassette side. The deck will cause the automatic function selection to bypass the portion corresponding with...
Operating Instructions (primary manual)
Page 20
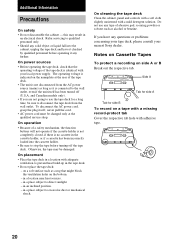
... heat build-up in the cassette holder, or if a cassette has been incorrectly loaded into the cabinet, unplug the tape deck and have any type of the tape deck. • The unit is not disconnected from the wall outlet. Otherwise, the tape may result in a location with your nearest Sony dealer. On placement • Place...
... heat build-up in the cassette holder, or if a cassette has been incorrectly loaded into the cabinet, unplug the tape deck and have any type of the tape deck. • The unit is not disconnected from the wall outlet. Otherwise, the tape may result in a location with your nearest Sony dealer. On placement • Place...
Operating Instructions (primary manual)
Page 21
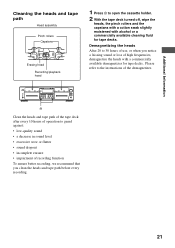
...dropout • incomplete erasure • impairment of high frequencies, demagnetize the heads with alcohol or a commercially available cleaning fluid for tape decks. Demagnetizing the heads After 20 to 30 hours of use, or when you notice a hissing sound or loss of recording function To ensure...Cleaning the heads and tape path Head assembly Pinch rollers Capstans Erasing head Recording/playback head 1 Press A to open the cassette holder. 2 With the tape deck turned off, wipe the heads, the pinch rollers and the capstans with a cotton swab slightly moistened with a commercially available ...
...dropout • incomplete erasure • impairment of high frequencies, demagnetize the heads with alcohol or a commercially available cleaning fluid for tape decks. Demagnetizing the heads After 20 to 30 hours of use, or when you notice a hissing sound or loss of recording function To ensure...Cleaning the heads and tape path Head assembly Pinch rollers Capstans Erasing head Recording/playback head 1 Press A to open the cassette holder. 2 With the tape deck turned off, wipe the heads, the pinch rollers and the capstans with a cotton swab slightly moistened with a commercially available ...
Operating Instructions (primary manual)
Page 22
...placed on or under the amplifier. Wait until "M" disappears. • The cassette shell is bent. Clean them (see page 21). Move the tape deck away from the TV or VCR. • The tape deck is magnetized. Troubleshooting If you've experienced any of the following difficulties while...path are dirty. Should the problem persist, consult your nearest Sony dealer. Demagnetize it (see page 20). • Make sure the amplifier setting is correct. • Check that the cassette is loaded correctly and the cassette holder is not a mechanical problem. 22 The Multi-AMS ...
...placed on or under the amplifier. Wait until "M" disappears. • The cassette shell is bent. Clean them (see page 21). Move the tape deck away from the TV or VCR. • The tape deck is magnetized. Troubleshooting If you've experienced any of the following difficulties while...path are dirty. Should the problem persist, consult your nearest Sony dealer. Demagnetize it (see page 20). • Make sure the amplifier setting is correct. • Check that the cassette is loaded correctly and the cassette holder is not a mechanical problem. 22 The Multi-AMS ...


