
Limited Warranty (US Only)
Page 1
... dealer nearest you . 4-557-172-02 General Stereo/Hifi Components/Tape Decks ® CD Players/Mini Disc Players/Audio Systems Hifi Audio LIMITED WARRANTY Sony Electronics Inc. ("Sony") warrants this Product is determined to be presented to obtain warranty service. Proof of , or to service the Product. This warranty does not cover customer instruction, installation, set up adjustments or signal reception problems. This warranty does not cover cosmetic damage or damage due...
... dealer nearest you . 4-557-172-02 General Stereo/Hifi Components/Tape Decks ® CD Players/Mini Disc Players/Audio Systems Hifi Audio LIMITED WARRANTY Sony Electronics Inc. ("Sony") warrants this Product is determined to be presented to obtain warranty service. Proof of , or to service the Product. This warranty does not cover customer instruction, installation, set up adjustments or signal reception problems. This warranty does not cover cosmetic damage or damage due...
Dimensions Diagram
Page 1
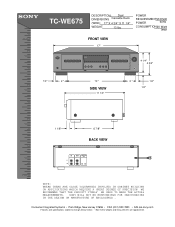
...) 930 7891 • b2b.sel.sony.com Features and specifications subject to change without notice. • Non-metric weights and measurements are approximate. TC-WE675 DESCRIPTION: Dual DIMENSIONS Cassette Deck (WHD): 17" X 4 3/4" X 11 1/4" WEIGHT: 13 lbs POWER REQUIREMENTS1: 20VAC POWER 60Hz CONSUMPTION:20 Watts (max) FRONT VIEW 17" R 4 1/4" 4 3/4" 1/2" 2 " 12 " SIDE VIEW 11 1/4" 2 " 1/2" 1/2" 1 1/8" 6 7/8" BACK VIEW IN OUT CONTROL A1 ll L R R NOTE: WHERE THERE...
...) 930 7891 • b2b.sel.sony.com Features and specifications subject to change without notice. • Non-metric weights and measurements are approximate. TC-WE675 DESCRIPTION: Dual DIMENSIONS Cassette Deck (WHD): 17" X 4 3/4" X 11 1/4" WEIGHT: 13 lbs POWER REQUIREMENTS1: 20VAC POWER 60Hz CONSUMPTION:20 Watts (max) FRONT VIEW 17" R 4 1/4" 4 3/4" 1/2" 2 " 12 " SIDE VIEW 11 1/4" 2 " 1/2" 1/2" 1 1/8" 6 7/8" BACK VIEW IN OUT CONTROL A1 ll L R R NOTE: WHERE THERE...

Operating Instructions (primary manual)
Page 2
... reasonable protection against harmful interference in operation is encouraged to try to persons. Refer to them whenever you call upon your Sony dealer regarding this manual, the TC-WE675 is the model used in accordance with the instructions, may be determined by looking at the rear panel of your model number by turning the equipment off and on a circuit different from that to Part 15...
... reasonable protection against harmful interference in operation is encouraged to try to persons. Refer to them whenever you call upon your Sony dealer regarding this manual, the TC-WE675 is the model used in accordance with the instructions, may be determined by looking at the rear panel of your model number by turning the equipment off and on a circuit different from that to Part 15...
Operating Instructions (primary manual)
Page 3
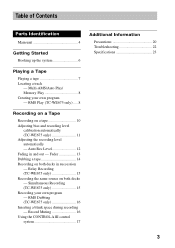
... Dubbing a tape 14 Recording on a tape 10 Adjusting bias and recording level calibration automatically (TC-WE675 only 11 Adjusting the recording level automatically - RMS Dubbing (TC-WE675 only 16 Inserting a blank space during recording - Auto Rec Level 12 Fading in succession - Record Muting 16 Using the CONTROL A1II control system 17 Additional Information Precautions 20 Troubleshooting 22 Specifications 23 3 Multi-AMS/Auto Play/ Memory Play 8 Creating your own program - Simultaneous Recording (TC-WE675 only...
... Dubbing a tape 14 Recording on a tape 10 Adjusting bias and recording level calibration automatically (TC-WE675 only 11 Adjusting the recording level automatically - RMS Dubbing (TC-WE675 only 16 Inserting a blank space during recording - Auto Rec Level 12 Fading in succession - Record Muting 16 Using the CONTROL A1II control system 17 Additional Information Precautions 20 Troubleshooting 22 Specifications 23 3 Multi-AMS/Auto Play/ Memory Play 8 Creating your own program - Simultaneous Recording (TC-WE675 only...
Operating Instructions (primary manual)
Page 4
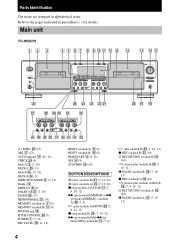
... in parentheses ( ) for details. Main unit TC-WE675 12 3 4 5 6 7 8 9 0 qa qs qd qf qg qh qj POWER DIRECTION MODE RELAY ON OFF PITCH CONTROL -+ RESET MEMORY A COUNTER B RESET MEMORY RMS AUTO CAL ( START X) DUBBING A B RMS/START SET CHECK DISPLAY - RMS + m (AMS) (AMS)M CLEAR BACK FRONT DECK A DECK B A+B REC HIGH/NORMAL m (AMS) START (DECK B X) (AMS) M x x PAUSE REC MUTING XW DOLBY NR REC OFF ON ON FILTER...
... in parentheses ( ) for details. Main unit TC-WE675 12 3 4 5 6 7 8 9 0 qa qs qd qf qg qh qj POWER DIRECTION MODE RELAY ON OFF PITCH CONTROL -+ RESET MEMORY A COUNTER B RESET MEMORY RMS AUTO CAL ( START X) DUBBING A B RMS/START SET CHECK DISPLAY - RMS + m (AMS) (AMS)M CLEAR BACK FRONT DECK A DECK B A+B REC HIGH/NORMAL m (AMS) START (DECK B X) (AMS) M x x PAUSE REC MUTING XW DOLBY NR REC OFF ON ON FILTER...
Operating Instructions (primary manual)
Page 7
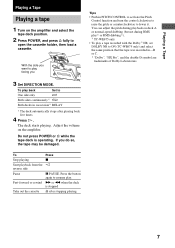
... turn the control clockwise to raise the pitch or counterclockwise to play . Fast-forward or rewind M or m when the deck is operating. With the side you want to lower it. Press the button again to ON (TC-WE675 only) and select the same position that the tape was recorded in-B or C. 3) "Dolby", "HX Pro", and the double-D symbol are trademarks of Dolby Laboratories. 3 Set DIRECTION MODE...
... turn the control clockwise to raise the pitch or counterclockwise to play . Fast-forward or rewind M or m when the deck is operating. With the side you want to lower it. Press the button again to ON (TC-WE675 only) and select the same position that the tape was recorded in-B or C. 3) "Dolby", "HX Pro", and the double-D symbol are trademarks of Dolby Laboratories. 3 Set DIRECTION MODE...
Operating Instructions (primary manual)
Page 8
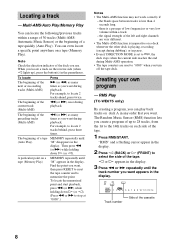
... ), press the button(s) in the display. 0 3 H FRONT RMS BACK 1 2 3 4 5 6 7 8 9 10 11 12 13 14 Track number Side of the tape. For example, to locate 2 tracks behind, press three times. Then press m (or M) while holding down H (or h). there is set to select the side of the cassette 8 RMS Play (TC-WE675 only) By creating a program, you turn off the tape deck. The beginning of a tape quickly (Auto Play). For...
... ), press the button(s) in the display. 0 3 H FRONT RMS BACK 1 2 3 4 5 6 7 8 9 10 11 12 13 14 Track number Side of the tape. For example, to locate 2 tracks behind, press three times. Then press m (or M) while holding down H (or h). there is set to select the side of the cassette 8 RMS Play (TC-WE675 only) By creating a program, you turn off the tape deck. The beginning of a tape quickly (Auto Play). For...
Operating Instructions (primary manual)
Page 10
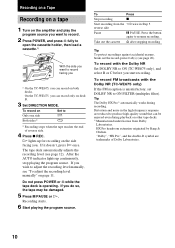
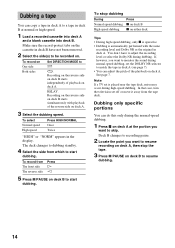
... program source. To Press Stop recording x Start recording from Dolby Laboratories. Recording starts. 6 Start playing the program source. Recording on a Tape Recording on a tape 1 Turn on the amplifier and play the program source you want to record. 2 Press POWER, and press A fully to open the cassette holder, then load a cassette. 1) With the side you want to record facing you 1) On the TC-WE675, you can record on deck B. 3 Set DIRECTION MODE. "Dolby", "HX Pro...
... program source. To Press Stop recording x Start recording from Dolby Laboratories. Recording starts. 6 Start playing the program source. Recording on a Tape Recording on a tape 1 Turn on the amplifier and play the program source you want to record. 2 Press POWER, and press A fully to open the cassette holder, then load a cassette. 1) With the side you want to record facing you 1) On the TC-WE675, you can record on deck B. 3 Set DIRECTION MODE. "Dolby", "HX Pro...
Operating Instructions (primary manual)
Page 11
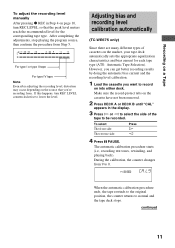
... (i.e., recording test tones, rewinding, and playing back). L9 When the automatic calibration procedure ends, the tape rewinds to the original position, the counter returns to normal and the tape deck stops. Recording on a Tape To adjust the recording level manually After pressing z REC in the display. 3 Press H or h to select the side of cassettes on the market, your tape deck automatically sets the appropriate equalization characteristics and...
... (i.e., recording test tones, rewinding, and playing back). L9 When the automatic calibration procedure ends, the tape rewinds to the original position, the counter returns to normal and the tape deck stops. Recording on a Tape To adjust the recording level manually After pressing z REC in the display. 3 Press H or h to select the side of cassettes on the market, your tape deck automatically sets the appropriate equalization characteristics and...
Operating Instructions (primary manual)
Page 12
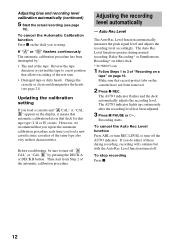
... test tone. • Damaged tape or dirty heads. To stop recording Press x. 12 The AUTO indicator lights up continuously after the recording level has been adjusted. 3 Press X PAUSE or H. The AUTO indicator flashes and the deck automatically adjusts the recording level. Reverse the tape direction or rewind the tape to turn REC LEVEL to a new position that you repeat the automatic calibration procedure each time you 're using. Auto Rec Level...
... test tone. • Damaged tape or dirty heads. To stop recording Press x. 12 The AUTO indicator lights up continuously after the recording level has been adjusted. 3 Press X PAUSE or H. The AUTO indicator flashes and the deck automatically adjusts the recording level. Reverse the tape direction or rewind the tape to turn REC LEVEL to a new position that you repeat the automatic calibration procedure each time you 're using. Auto Rec Level...

Operating Instructions (primary manual)
Page 13
... LEVEL in , the AUTO indicator flashes. The result is lit continuously, the deck will set to turn off . When the fade-in to use this function, for the portion of the program source with the highest signal level. • After you don't want the fade-in has completed, the AUTO indicator lights up if the Auto Rec Level function is working, or goes off abruptly. Turn the deck off the AUTO...
... LEVEL in , the AUTO indicator flashes. The result is lit continuously, the deck will set to turn off . When the fade-in to use this function, for the portion of the program source with the highest signal level. • After you don't want the fade-in has completed, the AUTO indicator lights up if the Auto Rec Level function is working, or goes off abruptly. Turn the deck off the AUTO...
Operating Instructions (primary manual)
Page 14
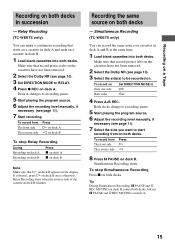
.... 1 Load a recorded cassette into deck A and a blank cassette into deck B. Recording on the reverse side on deck B starts simultaneously with the same recording level and Dolby NR as the original in deck B have to adjust the recording level or select the Dolby NR during normal-speed dubbing, set the DOLBY NR selector to match the tape in the display. In that case, turn the television set is automatically...
.... 1 Load a recorded cassette into deck A and a blank cassette into deck B. Recording on the reverse side on deck B starts simultaneously with the same recording level and Dolby NR as the original in deck B have to adjust the recording level or select the Dolby NR during normal-speed dubbing, set the DOLBY NR selector to match the tape in the display. In that case, turn the television set is automatically...
Operating Instructions (primary manual)
Page 15
... H on a cassette in deck A and B at the same time. 1 Load blank cassettes into both decks. Simultaneous Recording starts. Simultaneous Recording (TC-WE675 only) You can make a continuous recording that record-protect tabs on both decks in succession - To record on Only one side Both sides Set DIRECTION MODE to recording pause. 5 Start playing the program source. 6 Adjust the recording level manually, if necessary (see page 10). 3 Select the side...
... H on a cassette in deck A and B at the same time. 1 Load blank cassettes into both decks. Simultaneous Recording starts. Simultaneous Recording (TC-WE675 only) You can make a continuous recording that record-protect tabs on both decks in succession - To record on Only one side Both sides Set DIRECTION MODE to recording pause. 5 Start playing the program source. 6 Adjust the recording level manually, if necessary (see page 10). 3 Select the side...
Operating Instructions (primary manual)
Page 16
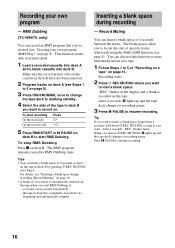
... an RMS program that you load a new cassette into deck B. The blank spaces allow you release W REC MUTING, X lights up and the tape deck changes to recording pause. 3 Press X PAUSE to dubbing standby. 4 Select the side of the tape in the display and a blank is completely rewound to resume recording. 16 Recording your own program (RMS Play)" on the tape. RMS Dubbing (TC-WE675 only) You...
... an RMS program that you load a new cassette into deck B. The blank spaces allow you release W REC MUTING, X lights up and the tape deck changes to recording pause. 3 Press X PAUSE to dubbing standby. 4 Select the side of the tape in the display and a blank is completely rewound to resume recording. 16 Recording your own program (RMS Play)" on the tape. RMS Dubbing (TC-WE675 only) You...
Operating Instructions (primary manual)
Page 17
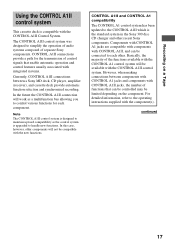
... control system has been updated to handle new functions. Basically, the majority of separate Sony components. In the future the CONTROL A1II connection will work as the control system is upgraded to the CONTROL A1II which is compatible with integrated systems. Currently, CONTROL A1II connections between components with CONTROL A1 jacks and components with CONTROL A1II jacks, the number of control signals that can be limited depending on a Tape Using the CONTROL A1II control system This cassette deck...
... control system has been updated to handle new functions. Basically, the majority of separate Sony components. In the future the CONTROL A1II connection will work as the control system is upgraded to the CONTROL A1II which is compatible with integrated systems. Currently, CONTROL A1II connections between components with CONTROL A1 jacks and components with CONTROL A1II jacks, the number of control signals that can be limited depending on a Tape Using the CONTROL A1II control system This cassette deck...
Operating Instructions (primary manual)
Page 18
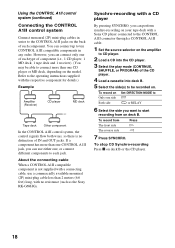
... details.) Example Amplifier (Receiver) CD player MD deck Tape deck Other component In the CONTROL A1II control system, the control signals flow both ways, so there is not supplied with no distinction of each jack. Using the CONTROL A1II control system (continued) Connecting the CONTROL A1II control system Connect monaural (2P) mini-plug cables in any order. Refer to the operating instructions supplied with a Sony CD player connected to the CONTROL A1II connector through a CONTROL A1II cable. 1 Set the source selector on...
... details.) Example Amplifier (Receiver) CD player MD deck Tape deck Other component In the CONTROL A1II control system, the control signals flow both ways, so there is not supplied with no distinction of each jack. Using the CONTROL A1II control system (continued) Connecting the CONTROL A1II control system Connect monaural (2P) mini-plug cables in any order. Refer to the operating instructions supplied with a Sony CD player connected to the CONTROL A1II connector through a CONTROL A1II cable. 1 Set the source selector on...
Operating Instructions (primary manual)
Page 19
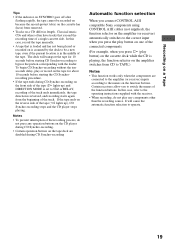
... Synchro-recording. • Certain operation buttons on the tape deck are connected to the amplifier (or receiver) inputs according to switch the names of the tape (h lights up ) and DIRECTION MODE is set to be recorded on because the record-protect tab(s) on the cassette has (have tracks that exceed the recording time of a single cassette side. The deck will cause the automatic function selection to the operating instructions supplied with the leader...
... Synchro-recording. • Certain operation buttons on the tape deck are connected to the amplifier (or receiver) inputs according to switch the names of the tape (h lights up ) and DIRECTION MODE is set to be recorded on because the record-protect tab(s) on the cassette has (have tracks that exceed the recording time of a single cassette side. The deck will cause the automatic function selection to the operating instructions supplied with the leader...
Operating Instructions (primary manual)
Page 20
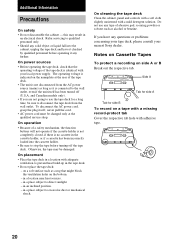
... been turned off the tape deck. in a place subject to stop the tape before operating it is identical with adhesive tape. 20 If you are not going to prevent heat build-up in the tape deck. • Do not place the tape deck: - Side A Tab for side A Tab for a long time, be changed only at the rear of the tape deck is connected to direct sunlight. - On power sources...
... been turned off the tape deck. in a place subject to stop the tape before operating it is identical with adhesive tape. 20 If you are not going to prevent heat build-up in the tape deck. • Do not place the tape deck: - Side A Tab for side A Tab for a long time, be changed only at the rear of the tape deck is connected to direct sunlight. - On power sources...
Operating Instructions (primary manual)
Page 22
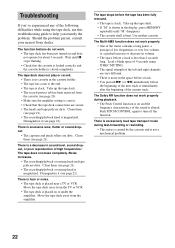
...-protect tab has been removed from the amplifier. The Multi-AMS function does not work . • The tape deck has been just turned on and does not operate for about 3 seconds. The Dolby NR function does not work properly during fast-forwarding or rewinding. • This noise is caused by the cassette and is placed near a TV or VCR. Push PITCH CONTROL again to turn...
...-protect tab has been removed from the amplifier. The Multi-AMS function does not work . • The tape deck has been just turned on and does not operate for about 3 seconds. The Dolby NR function does not work properly during fast-forwarding or rewinding. • This noise is caused by the cassette and is placed near a TV or VCR. Push PITCH CONTROL again to turn...
Operating Instructions (primary manual)
Page 23
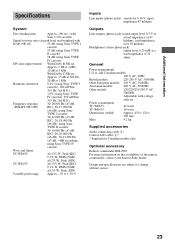
Additional Information Specifications System Fast-winding time Approx. 100 sec. (with Sony C-60 cassette) Signal-to-noise ratio (at peak level and weighted with voltage selector Power consumption TC-WE675: 22 watts TC-WE475: 18 watts Dimensions (w/h/d) Approx. 430 × 120 × 300 mm Mass 4.2 kg Supplied accessories Audio connecting cords (2) Control A1II cable (1)* * Supplied for Canadian models only Optional accessory Remote commander RM-J910 For more information on : Approx...
Additional Information Specifications System Fast-winding time Approx. 100 sec. (with Sony C-60 cassette) Signal-to-noise ratio (at peak level and weighted with voltage selector Power consumption TC-WE675: 22 watts TC-WE475: 18 watts Dimensions (w/h/d) Approx. 430 × 120 × 300 mm Mass 4.2 kg Supplied accessories Audio connecting cords (2) Control A1II cable (1)* * Supplied for Canadian models only Optional accessory Remote commander RM-J910 For more information on : Approx...


