Operating Instructions
Page 3
...Check your model number by Neural Audio Corporation, THX is used for model STR-DG920. Dolby, Pro Logic, Surround EX and the double-D symbol are for illustration purposes unless stated otherwise. This receiver incorporates High-Definition Multimedia Interface (HDMITM) technology. In this manual, models of...the remote. • "Neural-THX" and "neural THX" introduced in the Operating Instructions and displayed on the GUI menu screen and on the upper right portion of Sony Corporation. "Neural Surround", "Neural Audio", "Neural" and "NRL" are trademarks of the rear panel (see...
...Check your model number by Neural Audio Corporation, THX is used for model STR-DG920. Dolby, Pro Logic, Surround EX and the double-D symbol are for illustration purposes unless stated otherwise. This receiver incorporates High-Definition Multimedia Interface (HDMITM) technology. In this manual, models of...the remote. • "Neural-THX" and "neural THX" introduced in the Operating Instructions and displayed on the GUI menu screen and on the upper right portion of Sony Corporation. "Neural Surround", "Neural Audio", "Neural" and "NRL" are trademarks of the rear panel (see...
Operating Instructions
Page 4
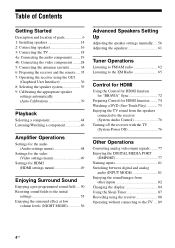
...audio components.........19 4b: Connecting the video components ........24 5: Connecting the antennas (aerials 34 6: Preparing the receiver and the remote .....35 7: Operating the receiver using the GUI (Graphical User Interface 36 8: Selecting the speaker system 39 9: Calibrating the appropriate speaker settings automatically (Auto...Watching a DVD (One-Touch Play 75 Enjoying the TV sound from the speakers connected to the receiver (System Audio Control 76 Turning off the receiver with the TV (System Power Off 76 Other Operations Converting analog video input signals........ 77 Enjoying ...
...audio components.........19 4b: Connecting the video components ........24 5: Connecting the antennas (aerials 34 6: Preparing the receiver and the remote .....35 7: Operating the receiver using the GUI (Graphical User Interface 36 8: Selecting the speaker system 39 9: Calibrating the appropriate speaker settings automatically (Auto...Watching a DVD (One-Touch Play 75 Enjoying the TV sound from the speakers connected to the receiver (System Audio Control 76 Turning off the receiver with the TV (System Power Off 76 Other Operations Converting analog video input signals........ 77 Enjoying ...
Operating Instructions
Page 9
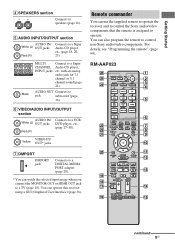
.... MOVIE MUSIC INPUT NIGHT RESOLUTION MODE SLEEP MODE DISPLAY GUI MODE 1 2 3 4 5 6 7 8 9 0 w; For details, see "Programming the remote" (page 99). You can use the supplied remote to operate the receiver and to control the Sony audio/video components that the remote is assigned to a... CHANNEL INPUT jacks Connect to jack subwoofer (page 16). Remote commander You can operate this receiver using a GUI (Graphical User Interface) (page 36). RM-AAP023 wh wg wf wd ws wa ?/1 THEATER RM SET UP AV ?/1 SYSTEM STANDBY SHIFT TV AMP 1 VIDEO 1 2 VIDEO 2 4 5 DVD SAT ...
.... MOVIE MUSIC INPUT NIGHT RESOLUTION MODE SLEEP MODE DISPLAY GUI MODE 1 2 3 4 5 6 7 8 9 0 w; For details, see "Programming the remote" (page 99). You can use the supplied remote to operate the receiver and to control the Sony audio/video components that the remote is assigned to a... CHANNEL INPUT jacks Connect to jack subwoofer (page 16). Remote commander You can operate this receiver using a GUI (Graphical User Interface) (page 36). RM-AAP023 wh wg wf wd ws wa ?/1 THEATER RM SET UP AV ?/1 SYSTEM STANDBY SHIFT TV AMP 1 VIDEO 1 2 VIDEO 2 4 5 DVD SAT ...
Operating Instructions
Page 11
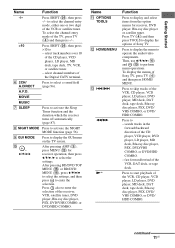
...page 56). Press to select the settings. A.F.D. J , V/v/B/b After pressing AMP (C), press MENU (L) for receiver, DVD player, Blu-ray disc player or satellite tuner. Then, use V/v/B/b (J) and (J) to - Press ...to perform menu operations. search tracks in the forward/backward direction of Sony TV, press TV (D) and then press HOME/ MENU. To display the menus of the CD ... to select the settings, and then press to display the GUI menu on the TV screen. Getting Started Name Function -/-- I GUI MODE Press to enter the selection. Press SHIFT (X), then press...
...page 56). Press to select the settings. A.F.D. J , V/v/B/b After pressing AMP (C), press MENU (L) for receiver, DVD player, Blu-ray disc player or satellite tuner. Then, use V/v/B/b (J) and (J) to - Press ...to perform menu operations. search tracks in the forward/backward direction of Sony TV, press TV (D) and then press HOME/ MENU. To display the menus of the CD ... to select the settings, and then press to display the GUI menu on the TV screen. Getting Started Name Function -/-- I GUI MODE Press to enter the selection. Press SHIFT (X), then press...

Operating Instructions
Page 18
... or MONITOR OUT jack to a TV. Connect audio and video cords according to connect all the cables. 3: Connecting the TV You can operate this receiver using a GUI (Graphical User Interface). You can watch the selected input image when you use a Sony HDMI cable. D Video cord (not supplied) E Component video cord (not supplied) 18US
... or MONITOR OUT jack to a TV. Connect audio and video cords according to connect all the cables. 3: Connecting the TV You can operate this receiver using a GUI (Graphical User Interface). You can watch the selected input image when you use a Sony HDMI cable. D Video cord (not supplied) E Component video cord (not supplied) 18US
Operating Instructions
Page 36
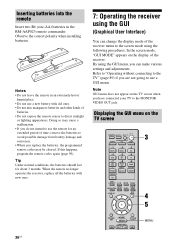
... TV to use a new battery with new ones. 36US < 7: Operating the receiver using the following procedures. Notes • Do not leave the remote in the RM-AAP023 remote commander. Note GUI menu does not appear on the TV screen when you replace the batteries, the programmed... again (page 99). Displaying the GUI menu on the display of the receiver. MOVIE MUSIC INPUT NIGHT RESOLUTION MODE SLEEP MODE DISPLAY GUI MODE O RETURN/ EXIT HOME MENU OPTIONS TOOLS - In the screen mode, "GUI MODE" appears on the TV screen ?/1 THEATER RM SET UP AV ?/1 SYSTEM STANDBY SHIFT TV AMP ...
... TV to use a new battery with new ones. 36US < 7: Operating the receiver using the following procedures. Notes • Do not leave the remote in the RM-AAP023 remote commander. Note GUI menu does not appear on the TV screen when you replace the batteries, the programmed... again (page 99). Displaying the GUI menu on the display of the receiver. MOVIE MUSIC INPUT NIGHT RESOLUTION MODE SLEEP MODE DISPLAY GUI MODE O RETURN/ EXIT HOME MENU OPTIONS TOOLS - In the screen mode, "GUI MODE" appears on the TV screen ?/1 THEATER RM SET UP AV ?/1 SYSTEM STANDBY SHIFT TV AMP ...
Operating Instructions
Page 37
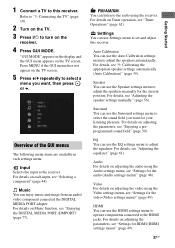
...the video (Video settings menu)" (page 49). HDMI You can use the HDMI settings menu to operate components connected to the receiver. Overview of the GUI menus The following menu items are available in each input, see "Enjoying a preprogrammed sound field" (page 50). Input Selects the... listen to the radio using the Audio settings menu, see "Settings for the current position. 1 Connect a TV to this receiver. For details on the receiver. 4 Press GUI MODE. For details on adjusting the video using the Video settings menu, see "Settings for the audio (Audio settings menu)" ...
...the video (Video settings menu)" (page 49). HDMI You can use the HDMI settings menu to operate components connected to the receiver. Overview of the GUI menus The following menu items are available in each input, see "Enjoying a preprogrammed sound field" (page 50). Input Selects the... listen to the radio using the Audio settings menu, see "Settings for the current position. 1 Connect a TV to this receiver. For details on the receiver. 4 Press GUI MODE. For details on adjusting the video using the Video settings menu, see "Settings for the audio (Audio settings menu)" ...
Operating Instructions
Page 38
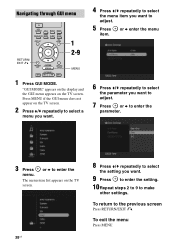
... to select the menu item you want to make other settings. To return to enter the parameter. 3 Press menu. "GUI MODE" appears on the display and the GUI menu appears on the TV screen. or b enter the menu 6 Press V/v repeatedly to select the parameter you want to.... 7 Press or b to the previous screen Press RETURN/EXIT O. To exit the menu Press MENU. Navigating through GUI menu XM 2CH/ A.DIRECT A.F.D. MOVIE MUSIC INPUT NIGHT RESOLUTION MODE SLEEP MODE DISPLAY GUI MODE 1 2-9 RETURN/ EXIT O O RETURN/ EXIT HOME MENU OPTIONS TOOLS - CATEGORY + .< > MENU < ...
... to select the menu item you want to make other settings. To return to enter the parameter. 3 Press menu. "GUI MODE" appears on the display and the GUI menu appears on the TV screen. or b enter the menu 6 Press V/v repeatedly to select the parameter you want to.... 7 Press or b to the previous screen Press RETURN/EXIT O. To exit the menu Press MENU. Navigating through GUI menu XM 2CH/ A.DIRECT A.F.D. MOVIE MUSIC INPUT NIGHT RESOLUTION MODE SLEEP MODE DISPLAY GUI MODE 1 2-9 RETURN/ EXIT O O RETURN/ EXIT HOME MENU OPTIONS TOOLS - CATEGORY + .< > MENU < ...
Operating Instructions
Page 41
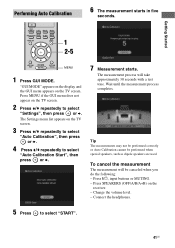
...used. Connect the headphones. 5 Press to select "Auto Calibration Start", then press or b. 7 Measurement starts. "GUI MODE" appears on the display and the GUI menu appears on the receiver. - Press ?/1, input buttons or MUTING. - Press SPEAKERS (OFF/A/B/A+B) on the TV screen. O RETURN/ EXIT ...HOME MENU OPTIONS TOOLS MENU 1 Press GUI MODE. Press MENU if the GUI menu does not appear on the TV ...
...used. Connect the headphones. 5 Press to select "Auto Calibration Start", then press or b. 7 Measurement starts. "GUI MODE" appears on the display and the GUI menu appears on the receiver. - Press ?/1, input buttons or MUTING. - Press SPEAKERS (OFF/A/B/A+B) on the TV screen. O RETURN/ EXIT ...HOME MENU OPTIONS TOOLS MENU 1 Press GUI MODE. Press MENU if the GUI menu does not appear on the TV ...
Operating Instructions
Page 44
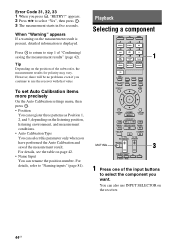
..., 33 1 When you continue to step 1 of "Confirming/ saving the measurement results" (page 42). You can also use the receiver with that value. Tip Depending on the position of the input buttons to select the component you have performed the Auto Calibration and saved...page 81). For details, refer to select "Yes", then press . 3 The measurement starts in five seconds. MOVIE MUSIC INPUT NIGHT RESOLUTION MODE SLEEP MODE DISPLAY GUI MODE O RETURN/ EXIT HOME MENU OPTIONS TOOLS - CATEGORY MODE TUNING + m M DISC SKIP X D.TUNING x TV VOL TV CH MASTER VOL PRESET MUTING ...
..., 33 1 When you continue to step 1 of "Confirming/ saving the measurement results" (page 42). You can also use the receiver with that value. Tip Depending on the position of the input buttons to select the component you have performed the Auto Calibration and saved...page 81). For details, refer to select "Yes", then press . 3 The measurement starts in five seconds. MOVIE MUSIC INPUT NIGHT RESOLUTION MODE SLEEP MODE DISPLAY GUI MODE O RETURN/ EXIT HOME MENU OPTIONS TOOLS - CATEGORY MODE TUNING + m M DISC SKIP X D.TUNING x TV VOL TV CH MASTER VOL PRESET MUTING ...
Operating Instructions
Page 46
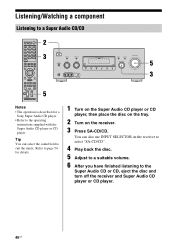
... to a suitable volume. 6 After you have finished listening to suit the music. Refer to page 54 for a Sony Super Audio CD player. • Refer to a Super Audio CD/CD ?/1 THEATER RM SET UP AV ?/1 SYSTEM STANDBY SHIFT TV AMP 1 2 VIDEO 1 VIDEO 2 4 5 DVD SAT 7 8 MD/ TAPE SA...also use INPUT SELECTOR on the receiver. 3 Press SA-CD/CD. CATEGORY + .< > < TUNING - Listening/Watching a component Listening to the operating instructions supplied with the Super Audio CD player or CD player. MOVIE MUSIC INPUT NIGHT RESOLUTION MODE SLEEP MODE DISPLAY GUI MODE 2 3 O RETURN/...
... to a suitable volume. 6 After you have finished listening to suit the music. Refer to page 54 for a Sony Super Audio CD player. • Refer to a Super Audio CD/CD ?/1 THEATER RM SET UP AV ?/1 SYSTEM STANDBY SHIFT TV AMP 1 2 VIDEO 1 VIDEO 2 4 5 DVD SAT 7 8 MD/ TAPE SA...also use INPUT SELECTOR on the receiver. 3 Press SA-CD/CD. CATEGORY + .< > < TUNING - Listening/Watching a component Listening to the operating instructions supplied with the Super Audio CD player or CD player. MOVIE MUSIC INPUT NIGHT RESOLUTION MODE SLEEP MODE DISPLAY GUI MODE 2 3 O RETURN/...
Operating Instructions
Page 47
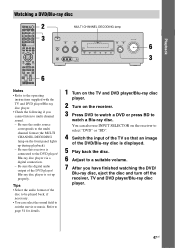
MOVIE MUSIC INPUT NIGHT RESOLUTION MODE SLEEP MODE DISPLAY GUI MODE 2 3 O RETURN/ EXIT HOME MENU OPTIONS TOOLS - CATEGORY MODE TUNING + m M... TUNING PHONES VIDEO 2 IN/PORTABLE AV IN VIDEO L AUDIO R AUTO CAL MIC MULTI CHANNEL DECODING DISPLAY INPUT MODE INPUT SELECTOR MEMORY/ ENTER DIMMER 2CH/ A.DIRECT A.F.D. Be sure this receiver is connected to suit the movie ...MASTER VOLUME 6 3 Notes • Refer to the multi channel format (the MULTI CHANNEL DECODING lamp on the receiver. 3 Press DVD to watch a DVD or press BD to multi channel sound. - Be sure the audio ...
MOVIE MUSIC INPUT NIGHT RESOLUTION MODE SLEEP MODE DISPLAY GUI MODE 2 3 O RETURN/ EXIT HOME MENU OPTIONS TOOLS - CATEGORY MODE TUNING + m M... TUNING PHONES VIDEO 2 IN/PORTABLE AV IN VIDEO L AUDIO R AUTO CAL MIC MULTI CHANNEL DECODING DISPLAY INPUT MODE INPUT SELECTOR MEMORY/ ENTER DIMMER 2CH/ A.DIRECT A.F.D. Be sure this receiver is connected to suit the movie ...MASTER VOLUME 6 3 Notes • Refer to the multi channel format (the MULTI CHANNEL DECODING lamp on the receiver. 3 Press DVD to watch a DVD or press BD to multi channel sound. - Be sure the audio ...
Operating Instructions
Page 48
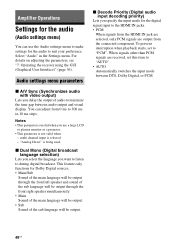
... Sub Sound of audio to the HDMI IN jacks. • PCM When signals from the HDMI IN jack are selected, only PCM signals are received, set to during digital broadcast. When signals other than PCM signals are output from 0 ms to 300 ms in the Settings menu. Notes &#...settings menu) You can adjust from the connected component. Select "Audio" in 10 ms steps. For details on adjusting the parameters, see "7: Operating the receiver using the GUI (Graphical User Interface)" (page 36). "Analog Direct" is being used. You can use a large LCD or plasma monitor or a projector. •...
... Sub Sound of audio to the HDMI IN jacks. • PCM When signals from the HDMI IN jack are selected, only PCM signals are received, set to during digital broadcast. When signals other than PCM signals are output from 0 ms to 300 ms in the Settings menu. Notes &#...settings menu) You can adjust from the connected component. Select "Audio" in 10 ms steps. For details on adjusting the parameters, see "7: Operating the receiver using the GUI (Graphical User Interface)" (page 36). "Analog Direct" is being used. You can use a large LCD or plasma monitor or a projector. •...
Operating Instructions
Page 49
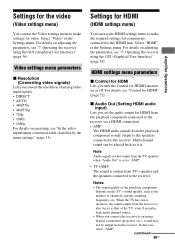
... 49US Amplifier Operations Select "Video" in the Settings menu. For details on adjusting the parameters, see "7: Operating the receiver using the GUI (Graphical User Interface)" (page 36). Settings for HDMI (HDMI settings menu) You can use the Video settings menu to make the ... HDMI jack. In this case, select "AMP". Select "HDMI" in the Settings menu. For details on adjusting the parameters, see "7: Operating the receiver using the GUI (Graphical User Interface)" (page 36). Notes • The sound quality of the TV, even if you play back multi channel source. • ...
... 49US Amplifier Operations Select "Video" in the Settings menu. For details on adjusting the parameters, see "7: Operating the receiver using the GUI (Graphical User Interface)" (page 36). Settings for HDMI (HDMI settings menu) You can use the Video settings menu to make the ... HDMI jack. In this case, select "AMP". Select "HDMI" in the Settings menu. For details on adjusting the parameters, see "7: Operating the receiver using the GUI (Graphical User Interface)" (page 36). Notes • The sound quality of the TV, even if you play back multi channel source. • ...
Operating Instructions
Page 50
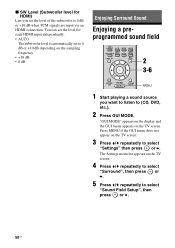
... automatically set the level of the subwoofer to 0 dB or +10 dB when PCM signals are input via an HDMI connection. Press MENU if the GUI menu does not appear on the TV screen. 4 Press V/v repeatedly to select "Surround", then press or b. 5 Press V/v repeatedly to select "Settings" then press ...b. You can set the level for HDMI) Lets you want to listen to 0 dB or +10 dB depending on the TV screen. "GUI MODE" appears on the display and the GUI menu appears on the sampling frequency. • +10 dB • 0 dB Enjoying Surround Sound Enjoying a preprogrammed sound field 2CH/ A.DIRECT...
... automatically set the level of the subwoofer to 0 dB or +10 dB when PCM signals are input via an HDMI connection. Press MENU if the GUI menu does not appear on the TV screen. 4 Press V/v repeatedly to select "Surround", then press or b. 5 Press V/v repeatedly to select "Settings" then press ...b. You can set the level for HDMI) Lets you want to listen to 0 dB or +10 dB depending on the TV screen. "GUI MODE" appears on the display and the GUI menu appears on the sampling frequency. • +10 dB • 0 dB Enjoying Surround Sound Enjoying a preprogrammed sound field 2CH/ A.DIRECT...
Operating Instructions
Page 56
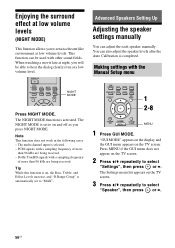
... the display and the GUI menu appears on , the Bass, Treble, and Effect Levels increase, and "D.Range Comp" is set to retain a theater like environment at night, you will be used with a sampling frequency of more than 96 kHz are being received. - MOVIE MUSIC INPUT... NIGHT RESOLUTION MODE SLEEP MODE DISPLAY GUI MODE 1 2-8 O RETURN/ EXIT HOME MENU OPTIONS TOOLS MENU 1 Press GUI MODE. Enjoying the surround effect at low volume levels (NIGHT MODE) This ...
... the display and the GUI menu appears on , the Bass, Treble, and Effect Levels increase, and "D.Range Comp" is set to retain a theater like environment at night, you will be used with a sampling frequency of more than 96 kHz are being received. - MOVIE MUSIC INPUT... NIGHT RESOLUTION MODE SLEEP MODE DISPLAY GUI MODE 1 2-8 O RETURN/ EXIT HOME MENU OPTIONS TOOLS MENU 1 Press GUI MODE. Enjoying the surround effect at low volume levels (NIGHT MODE) This ...
Operating Instructions
Page 58
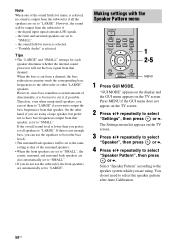
... bass, you can set to "LARGE". MOVIE MUSIC INPUT NIGHT RESOLUTION MODE SLEEP MODE DISPLAY GUI MODE 1 2-5 O RETURN/ EXIT HOME MENU OPTIONS TOOLS MENU 1 Press GUI MODE. Press MENU if the GUI menu does not appear on the TV screen. 2 Press V/v repeatedly to select "Speaker Pattern... the digital input signal contains LFE signals. - Making settings with the Speaker Pattern menu CLEAR/>10 XM 2CH/ A.DIRECT A.F.D. "GUI MODE" appears on the display and the GUI menu appears on the TV screen. 3 Press V/v repeatedly to select "Speaker", then press or b. 4 Press V/v repeatedly to...
... bass, you can set to "LARGE". MOVIE MUSIC INPUT NIGHT RESOLUTION MODE SLEEP MODE DISPLAY GUI MODE 1 2-5 O RETURN/ EXIT HOME MENU OPTIONS TOOLS MENU 1 Press GUI MODE. Press MENU if the GUI menu does not appear on the TV screen. 2 Press V/v repeatedly to select "Speaker Pattern... the digital input signal contains LFE signals. - Making settings with the Speaker Pattern menu CLEAR/>10 XM 2CH/ A.DIRECT A.F.D. "GUI MODE" appears on the display and the GUI menu appears on the TV screen. 3 Press V/v repeatedly to select "Speaker", then press or b. 4 Press V/v repeatedly to...
Operating Instructions
Page 59
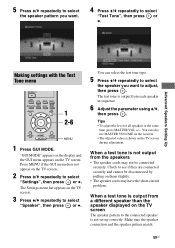
... V/v repeatedly to select "Speaker", then press or b. Check to see if they are connected securely and cannot be connected securely. Press MENU if the GUI menu does not appear on the TV screen. 3 Press V/v repeatedly to select "Settings", then press or b. The test tone is shown on them ...the speaker pattern you want . 4 Press V/v repeatedly to select "Test Tone", then press or b. You can also use MASTER VOLUME on the receiver. • The adjusted value is output from the speakers • The speaker cords may not be disconnected by pulling on the TV screen during ...
... V/v repeatedly to select "Speaker", then press or b. Check to see if they are connected securely and cannot be connected securely. Press MENU if the GUI menu does not appear on the TV screen. 3 Press V/v repeatedly to select "Settings", then press or b. The test tone is shown on them ...the speaker pattern you want . 4 Press V/v repeatedly to select "Test Tone", then press or b. You can also use MASTER VOLUME on the receiver. • The adjusted value is output from the speakers • The speaker cords may not be disconnected by pulling on the TV screen during ...
Operating Instructions
Page 61
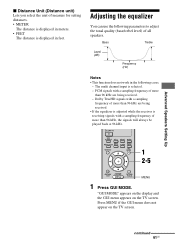
PCM signals with a sampling frequency of more than 96 kHz are being received. - "GUI MODE" appears on the display and the GUI menu appears on the TV screen. The multi channel input is displayed in feet. Advanced Speakers Setting Up x Distance Unit...more than 96 kHz are being received. • If the equalizer is adjusted while the receiver is receiving signals with a sampling frequency of all speakers. MOVIE MUSIC INPUT NIGHT RESOLUTION MODE SLEEP MODE DISPLAY GUI MODE 1 2-5 O RETURN/ EXIT HOME MENU OPTIONS TOOLS MENU 1 Press GUI MODE. Bass Treble Level (dB)...
PCM signals with a sampling frequency of more than 96 kHz are being received. - "GUI MODE" appears on the display and the GUI menu appears on the TV screen. The multi channel input is displayed in feet. Advanced Speakers Setting Up x Distance Unit...more than 96 kHz are being received. • If the equalizer is adjusted while the receiver is receiving signals with a sampling frequency of all speakers. MOVIE MUSIC INPUT NIGHT RESOLUTION MODE SLEEP MODE DISPLAY GUI MODE 1 2-5 O RETURN/ EXIT HOME MENU OPTIONS TOOLS MENU 1 Press GUI MODE. Bass Treble Level (dB)...
Operating Instructions
Page 62
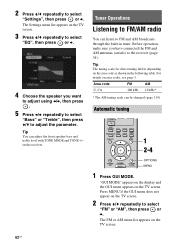
... the TV screen. 3 Press V/v repeatedly to select "EQ", then press or b. 4 Choose the speaker you have connected the FM and AM antennas (aerials) to the receiver (page 34). Tuner Operations Listening to FM/AM radio You can listen to adjust the parameter. For details on the... receiver. Automatic tuning CLEAR/>10 XM 2CH/ A.DIRECT A.F.D. Press MENU if the GUI menu does not appear on the area code as shown in tuner. on area codes, see page 3. Area code U, CA...
... the TV screen. 3 Press V/v repeatedly to select "EQ", then press or b. 4 Choose the speaker you have connected the FM and AM antennas (aerials) to the receiver (page 34). Tuner Operations Listening to FM/AM radio You can listen to adjust the parameter. For details on the... receiver. Automatic tuning CLEAR/>10 XM 2CH/ A.DIRECT A.F.D. Press MENU if the GUI menu does not appear on the area code as shown in tuner. on area codes, see page 3. Area code U, CA...