Operating Instructions
Page 3
...the supplied remote. This receiver incorporates Dolby* Digital and Pro Logic Surround and the DTS** Digital Surround System. * Manufactured under license from Dolby Laboratories. This receiver incorporates High-Definition Multimedia Interface (HDMITM) technology. XM Ready® is a registered trademark of Sony Corporation. ...not specified. Dolby, Pro Logic, Surround EX and the double-D symbol are clearly indicated in the text, for model STR-DG920. Sony Corporation hereby grants the user a non-exclusive, non-transferable, limited right of THX Ltd., which may be registered in...
...the supplied remote. This receiver incorporates Dolby* Digital and Pro Logic Surround and the DTS** Digital Surround System. * Manufactured under license from Dolby Laboratories. This receiver incorporates High-Definition Multimedia Interface (HDMITM) technology. XM Ready® is a registered trademark of Sony Corporation. ...not specified. Dolby, Pro Logic, Surround EX and the double-D symbol are clearly indicated in the text, for model STR-DG920. Sony Corporation hereby grants the user a non-exclusive, non-transferable, limited right of THX Ltd., which may be registered in...
Operating Instructions
Page 4
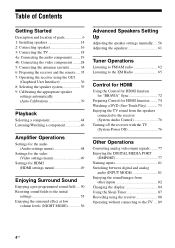
...the audio components.........19 4b: Connecting the video components ........24 5: Connecting the antennas (aerials 34 6: Preparing the receiver and the remote .....35 7: Operating the receiver using the GUI (Graphical User Interface 36 8: Selecting the speaker system 39 9: Calibrating the appropriate speaker settings automatically... Watching a DVD (One-Touch Play 75 Enjoying the TV sound from the speakers connected to the receiver (System Audio Control 76 Turning off the receiver with the TV (System Power Off 76 Other Operations Converting analog video input signals........ 77 Enjoying the...
...the audio components.........19 4b: Connecting the video components ........24 5: Connecting the antennas (aerials 34 6: Preparing the receiver and the remote .....35 7: Operating the receiver using the GUI (Graphical User Interface 36 8: Selecting the speaker system 39 9: Calibrating the appropriate speaker settings automatically... Watching a DVD (One-Touch Play 75 Enjoying the TV sound from the speakers connected to the receiver (System Audio Control 76 Turning off the receiver with the TV (System Power Off 76 Other Operations Converting analog video input signals........ 77 Enjoying the...
Operating Instructions
Page 5
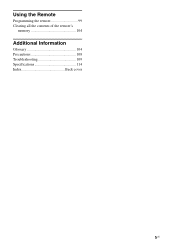
Using the Remote Programming the remote 99 Clearing all the contents of the remote's memory 104 Additional Information Glossary 104 Precautions 108 Troubleshooting 109 Specifications 114 Index Back cover 5US
Using the Remote Programming the remote 99 Clearing all the contents of the remote's memory 104 Additional Information Glossary 104 Precautions 108 Troubleshooting 109 Specifications 114 Index Back cover 5US
Operating Instructions
Page 6
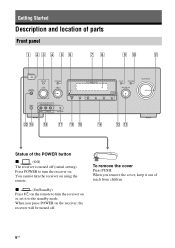
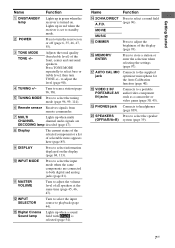
... it to the standby mode. MOVIE MUSIC MASTER VOLUME w; x (On/Standby) Press ?/1 on the remote to turn the receiver on using the remote. qa ON/STANDBY POWER SPEAKERS (OFF/A/B/A+B) TONE MODE TONE TUNING MODE TUNING PHONES VIDEO 2 IN/PORTABLE AV IN VIDEO L AUDIO R AUTO CAL MIC MULTI CHANNEL DECODING DISPLAY INPUT MODE INPUT SELECTOR...
... it to the standby mode. MOVIE MUSIC MASTER VOLUME w; x (On/Standby) Press ?/1 on the remote to turn the receiver on using the remote. qa ON/STANDBY POWER SPEAKERS (OFF/A/B/A+B) TONE MODE TONE TUNING MODE TUNING PHONES VIDEO 2 IN/PORTABLE AV IN VIDEO L AUDIO R AUTO CAL MIC MULTI CHANNEL DECODING DISPLAY INPUT MODE INPUT SELECTOR...
Operating Instructions
Page 7
...scan a station (page 96, 98). Turn to store a station or enter the selection when selecting the settings (page 97). F Remote sensor Receives signals from remote commander. M Digital Cinema Lights up when multi CHANNEL channel audio signals are connected to both digital and analog jacks (page 81). ...optimizer microphone for the Auto Calibration function (page 40). R VIDEO 2 IN/ PORTABLE AV IN jacks Connects to select a sound field A.F.D. (page 96). Lights up in red when the receiver is set to standby mode. Adjusts the tonal quality (bass/treble level) of selectable...
...scan a station (page 96, 98). Turn to store a station or enter the selection when selecting the settings (page 97). F Remote sensor Receives signals from remote commander. M Digital Cinema Lights up when multi CHANNEL channel audio signals are connected to both digital and analog jacks (page 81). ...optimizer microphone for the Auto Calibration function (page 40). R VIDEO 2 IN/ PORTABLE AV IN jacks Connects to select a sound field A.F.D. (page 96). Lights up in red when the receiver is set to standby mode. Adjusts the tonal quality (bass/treble level) of selectable...
Operating Instructions
Page 9
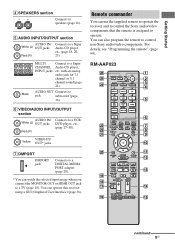
...(page 18). You can use the supplied remote to operate the receiver and to control the Sony audio/video components that the remote is assigned to jack subwoofer (page 16). Remote commander You can operate this receiver using a GUI (Graphical User Interface) (...page 36). For details, see "Programming the remote" (page 99). RM-AAP023 wh wg wf wd ws wa ?/1 THEATER RM SET UP AV...
...(page 18). You can use the supplied remote to operate the receiver and to control the Sony audio/video components that the remote is assigned to jack subwoofer (page 16). Remote commander You can operate this receiver using a GUI (Graphical User Interface) (...page 36). For details, see "Programming the remote" (page 99). RM-AAP023 wh wg wf wd ws wa ?/1 THEATER RM SET UP AV...
Operating Instructions
Page 10
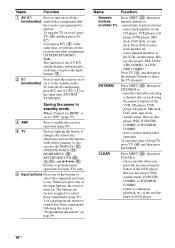
...of the input buttons, the receiver turns on. Saving the power in "Programming the remote" on /standby) audio/video components that the remote is set it will turn the receiver on or (on or off, press TV (D) and then press AV ?/1. When you press any of the AV ?/1 switch changes automatically each...E Input buttons Press one of the DVD player, Blu-ray disc player, PSX, satellite tuner, DVD/VHS COMBO, or DVD/HDD COMBO. - of Sony TV, press TV (D) and then press ENT/MEM. Name Numeric buttons (number 5*) ENT/MEM CLEAR Function Press SHIFT (X), then press numeric buttons to ...
...of the input buttons, the receiver turns on. Saving the power in "Programming the remote" on /standby) audio/video components that the remote is set it will turn the receiver on or (on or off, press TV (D) and then press AV ?/1. When you press any of the AV ?/1 switch changes automatically each...E Input buttons Press one of the DVD player, Blu-ray disc player, PSX, satellite tuner, DVD/VHS COMBO, or DVD/HDD COMBO. - of Sony TV, press TV (D) and then press ENT/MEM. Name Numeric buttons (number 5*) ENT/MEM CLEAR Function Press SHIFT (X), then press numeric buttons to ...
Operating Instructions
Page 13
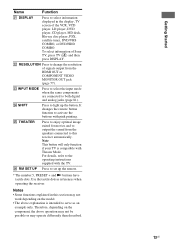
...Notes • Some functions explained in the display, TV screen of Sony TV, press TV (D) and then press DISPLAY. Note This button will only function if your TV is intended to serve as references when operating the receiver. To select information of the VCR, VCD player, LD player, ...• The above explanation is compatible with the TV. For details, refer to the operating instructions supplied with Theater Mode. It changes the remote button function to both digital and analog jacks (page 81). Y THEATER Press to enjoy optimal image suited for movies and to output the...
...Notes • Some functions explained in the display, TV screen of Sony TV, press TV (D) and then press DISPLAY. Note This button will only function if your TV is intended to serve as references when operating the receiver. To select information of the VCR, VCD player, LD player, ...• The above explanation is compatible with the TV. For details, refer to the operating instructions supplied with Theater Mode. It changes the remote button function to both digital and analog jacks (page 81). Y THEATER Press to enjoy optimal image suited for movies and to output the...
Operating Instructions
Page 30
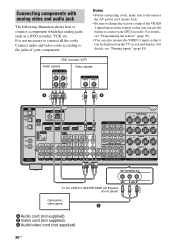
...BACK SUBWOOFER VIDEO 1 SUBWOOFER MULTI CHANNEL INPUT SURROUND BACK R L SURROUND R L R FRONT B L FRONT A R L SPEAKERS VIDEO 2 IN/PORTABLE AV IN VIDEO To the VIDEO 2 IN/PORTABLE AV IN jacks (Front panel) L AUDIO R Camcorder, video game C A Audio cord (not supplied) B Video cord (not supplied) C Audio/video cord... (not supplied) 30US For details, see "Programming the remote" (page 99). • You can ...
...BACK SUBWOOFER VIDEO 1 SUBWOOFER MULTI CHANNEL INPUT SURROUND BACK R L SURROUND R L R FRONT B L FRONT A R L SPEAKERS VIDEO 2 IN/PORTABLE AV IN VIDEO To the VIDEO 2 IN/PORTABLE AV IN jacks (Front panel) L AUDIO R Camcorder, video game C A Audio cord (not supplied) B Video cord (not supplied) C Audio/video cord... (not supplied) 30US For details, see "Programming the remote" (page 99). • You can ...
Operating Instructions
Page 35
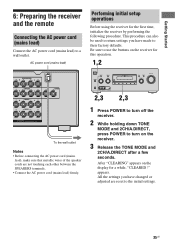
..." appears on the display for this operation. 1,2 ON/STANDBY POWER SPEAKERS (OFF/A/B/A+B) TONE MODE TONE TUNING MODE TUNING PHONES VIDEO 2 IN/PORTABLE AV IN VIDEO L AUDIO R AUTO CAL MIC MULTI CHANNEL DECODING DISPLAY INPUT MODE INPUT SELECTOR MEMORY/ ENTER DIMMER 2CH/ A.DIRECT A.F.D. AC power cord... 2CH/A.DIRECT, press POWER to a wall outlet. Getting Started 6: Preparing the receiver and the remote Connecting the AC power cord (mains lead) Connect the AC power cord (mains lead) to turn on the receiver. 3 Release the TONE MODE and 2CH/A.DIRECT after a few seconds. appears....
..." appears on the display for this operation. 1,2 ON/STANDBY POWER SPEAKERS (OFF/A/B/A+B) TONE MODE TONE TUNING MODE TUNING PHONES VIDEO 2 IN/PORTABLE AV IN VIDEO L AUDIO R AUTO CAL MIC MULTI CHANNEL DECODING DISPLAY INPUT MODE INPUT SELECTOR MEMORY/ ENTER DIMMER 2CH/ A.DIRECT A.F.D. AC power cord... 2CH/A.DIRECT, press POWER to a wall outlet. Getting Started 6: Preparing the receiver and the remote Connecting the AC power cord (mains lead) Connect the AC power cord (mains lead) to turn on the receiver. 3 Release the TONE MODE and 2CH/A.DIRECT after a few seconds. appears....
Operating Instructions
Page 36
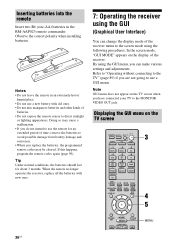
... the MONITOR VIDEO OUT jack. CATEGORY + .< > 3 4 5 MENU Notes • Do not leave the remote in the RM-AAP023 remote commander. In the screen mode, "GUI MODE" appears on the TV screen ?/1 THEATER RM SET UP AV ?/1 SYSTEM STANDBY SHIFT TV AMP 1 VIDEO 1 2 VIDEO 2 4 5 DVD SAT 7 8 MD/ TAPE... When you do not intend to use a new battery with new ones. 36US < 7: Operating the receiver using the GUI menu, you can change the display mode of the receiver. MOVIE MUSIC INPUT NIGHT RESOLUTION MODE SLEEP MODE DISPLAY GUI MODE O RETURN/ EXIT HOME MENU OPTIONS TOOLS ...
... the MONITOR VIDEO OUT jack. CATEGORY + .< > 3 4 5 MENU Notes • Do not leave the remote in the RM-AAP023 remote commander. In the screen mode, "GUI MODE" appears on the TV screen ?/1 THEATER RM SET UP AV ?/1 SYSTEM STANDBY SHIFT TV AMP 1 VIDEO 1 2 VIDEO 2 4 5 DVD SAT 7 8 MD/ TAPE... When you do not intend to use a new battery with new ones. 36US < 7: Operating the receiver using the GUI menu, you can change the display mode of the receiver. MOVIE MUSIC INPUT NIGHT RESOLUTION MODE SLEEP MODE DISPLAY GUI MODE O RETURN/ EXIT HOME MENU OPTIONS TOOLS ...
Operating Instructions
Page 45
... can be played back VIDEO 1 VCR, etc., connected to the VIDEO 1 jack VIDEO 2 Camcorder, video game, etc., connected to the VIDEO 2 IN/PORTABLE AV IN jack BD Blu-ray disc player, etc., connected to the BD jack DVD DVD player, etc., connected to DVD jack SAT Satellite tuner, set...the volume differently depending on the length of time you press and hold the button. button on the remote. To make a fine adjustment: press the button and release it immediately. to turn off the receiver, be canceled when you do the following. • Press MUTING again. • Increase the volume....
... can be played back VIDEO 1 VCR, etc., connected to the VIDEO 1 jack VIDEO 2 Camcorder, video game, etc., connected to the VIDEO 2 IN/PORTABLE AV IN jack BD Blu-ray disc player, etc., connected to the BD jack DVD DVD player, etc., connected to DVD jack SAT Satellite tuner, set...the volume differently depending on the length of time you press and hold the button. button on the remote. To make a fine adjustment: press the button and release it immediately. to turn off the receiver, be canceled when you do the following. • Press MUTING again. • Increase the volume....
Operating Instructions
Page 76
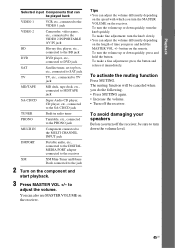
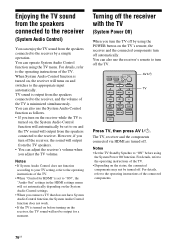
... 2 4 5 DVD SAT 7 8 MD/ TAPE SA-CD/ CD -/-- 0/10 PHONO MULTI IN CLEAR/>10 XM 3 BD 6 TV 9 TUNER ENT/MEM DMPORT AV ?/1 TV Press TV, then press AV ?/1. TV sound is turned on before using the System Power Off function. However, if you connect a TV that does not have System Audio... of the TV. • Depending on the status, the connected components may not be output for HDMI" is turned on the TV's remote, the receiver and the connected components turn the TV off . For details, refer to the operating instructions of the connected components. 76US For details, refer...
... 2 4 5 DVD SAT 7 8 MD/ TAPE SA-CD/ CD -/-- 0/10 PHONO MULTI IN CLEAR/>10 XM 3 BD 6 TV 9 TUNER ENT/MEM DMPORT AV ?/1 TV Press TV, then press AV ?/1. TV sound is turned on before using the System Power Off function. However, if you connect a TV that does not have System Audio... of the TV. • Depending on the status, the connected components may not be output for HDMI" is turned on the TV's remote, the receiver and the connected components turn the TV off . For details, refer to the operating instructions of the connected components. 76US For details, refer...
Operating Instructions
Page 80
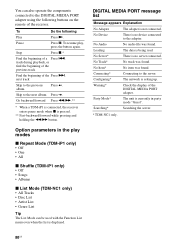
To Do the following buttons on the remote of the Press >. To resume play modes x Repeat Mode (TDM-iP1 only) • Off • One • All x Shuffle (TDM-iP1 only) • Off • .... 80US Pause Press X. No Item* No item was found . track during playback, or find the beginning of the previous track Find the beginning of the receiver. Configuring* The network is not connected. DIGITAL MEDIA PORT message list Message appears Explanation No Adapter The adapter is setting up. Loading The data is...
To Do the following buttons on the remote of the Press >. To resume play modes x Repeat Mode (TDM-iP1 only) • Off • One • All x Shuffle (TDM-iP1 only) • Off • .... 80US Pause Press X. No Item* No item was found . track during playback, or find the beginning of the previous track Find the beginning of the receiver. Configuring* The network is not connected. DIGITAL MEDIA PORT message list Message appears Explanation No Adapter The adapter is setting up. Loading The data is...
Operating Instructions
Page 99
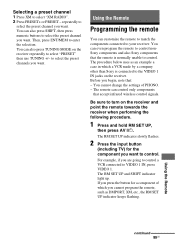
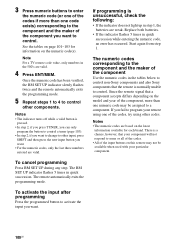
... then use TUNING +/- You can also press TUNING MODE on the receiver repeatedly to select "XM RADIO". 2 Press PRESET+ or PRESET - The remote can even program the remote to control nonSony components and also Sony components that the remote is connected to enter the selection. For example, if you are ...connected to control. Then, press ENT/MEM to the VIDEO 1 IN jacks on the receiver and point the remote towards the receiver when performing the following procedure. 1 Press and hold RM SET UP, then press AV ?/1. The procedure below uses as DMPORT, XM, etc., the RM SET UP indicator ...
... then use TUNING +/- You can also press TUNING MODE on the receiver repeatedly to select "XM RADIO". 2 Press PRESET+ or PRESET - The remote can even program the remote to control nonSony components and also Sony components that the remote is connected to enter the selection. For example, if you are ...connected to control. Then, press ENT/MEM to the VIDEO 1 IN jacks on the receiver and point the remote towards the receiver when performing the following procedure. 1 Press and hold RM SET UP, then press AV ?/1. The procedure below uses as DMPORT, XM, etc., the RM SET UP indicator ...
Operating Instructions
Page 100
... Press RM SET UP during any step. The RM SET UP indicator flashes 5 times in the tables below to control non-Sony components and also Sony components that the remote is pressed. • In step 2, if you press TUNER, you can only program the button to control a tuner (page... Notes • The numeric codes are weak. Once the numeric code has been verified, the RM SET UP indicator slowly flashes twice and the remote automatically exits the programming mode. 5 Repeat steps 1 to 4 to control other codes. Notes • The indicator turns off while a valid button...
... Press RM SET UP during any step. The RM SET UP indicator flashes 5 times in the tables below to control non-Sony components and also Sony components that the remote is pressed. • In step 2, if you press TUNER, you can only program the button to control a tuner (page... Notes • The numeric codes are weak. Once the numeric code has been verified, the RM SET UP indicator slowly flashes twice and the remote automatically exits the programming mode. 5 Repeat steps 1 to 4 to control other codes. Notes • The indicator turns off while a valid button...
Operating Instructions
Page 101
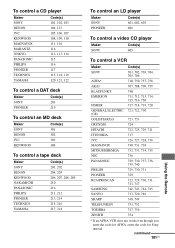
continued 101US Using the Remote To control a CD player Maker SONY DENON JVC KENWOOD MAGNAVOX MARANTZ ONKYO PANASONIC PHILIPS PIONEER TECHNICS YAMAHA Code(s) 101, 102, 103 104, 123 105, 106, 107 108, 109, 110 111, 116 ... 210 216 211, 212 213, 214 215, 216 217, 218 To control an LD player Maker SONY PIONEER Code(s) 601, 602, 603 606 To control a video CD player Maker SONY Code(s) 605 To control a VCR Maker SONY AIWA* AKAI BLAUPUNKT EMERSON FISHER GENERAL ELECTRIC (GE) GOLDSTAR/LG GRUNDIG HITACHI ITT/NOKIA JVC MAGNAVOX...
continued 101US Using the Remote To control a CD player Maker SONY DENON JVC KENWOOD MAGNAVOX MARANTZ ONKYO PANASONIC PHILIPS PIONEER TECHNICS YAMAHA Code(s) 101, 102, 103 104, 123 105, 106, 107 108, 109, 110 111, 116 ... 210 216 211, 212 213, 214 215, 216 217, 218 To control an LD player Maker SONY PIONEER Code(s) 601, 602, 603 606 To control a video CD player Maker SONY Code(s) 605 To control a VCR Maker SONY AIWA* AKAI BLAUPUNKT EMERSON FISHER GENERAL ELECTRIC (GE) GOLDSTAR/LG GRUNDIG HITACHI ITT/NOKIA JVC MAGNAVOX...
Operating Instructions
Page 103
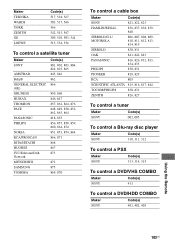
...518, 567 503, 517, 566 566 542, 543, 567 509, 510, 503, 544 515, 534, 556 To control a satellite tuner Maker SONY AMSTRAD BskyB GENERAL ELECTRIC (GE) GRUNDIG HUMAX THOMSON PACE PANASONIC PHILIPS NOKIA RCA/PROSCAN BITA/HITACHI HUGHES JVC/Echostar/Dish Network MITSUBISHI SAMSUNG TOSHIBA Code... a tuner Maker SONY Code(s) 002, 005 To control a Blu-ray disc player Maker SONY Code(s) 310, 311, 312 To control a PSX Maker SONY Code(s) 313, 314, 315 To control a DVD/VHS COMBO Maker SONY Code(s) 411 To control a DVD/HDD COMBO Maker SONY Code(s) 401, 402, 403 Using the Remote 103US
...518, 567 503, 517, 566 566 542, 543, 567 509, 510, 503, 544 515, 534, 556 To control a satellite tuner Maker SONY AMSTRAD BskyB GENERAL ELECTRIC (GE) GRUNDIG HUMAX THOMSON PACE PANASONIC PHILIPS NOKIA RCA/PROSCAN BITA/HITACHI HUGHES JVC/Echostar/Dish Network MITSUBISHI SAMSUNG TOSHIBA Code... a tuner Maker SONY Code(s) 002, 005 To control a Blu-ray disc player Maker SONY Code(s) 310, 311, 312 To control a PSX Maker SONY Code(s) 313, 314, 315 To control a DVD/VHS COMBO Maker SONY Code(s) 411 To control a DVD/HDD COMBO Maker SONY Code(s) 401, 402, 403 Using the Remote 103US
Operating Instructions
Page 104
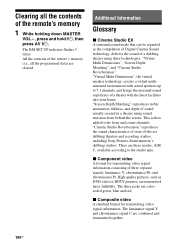
... (i.e., all the programmed data) are cleared. The RM SET UP indicator flashes 3 times. All the contents of the remote's memory 1 While holding down MASTER VOL - , press and hold ?/1, then press AV ?/1. High quality pictures, such as the compilation of Digital Cinema Sound technology, delivers the sound of a theater with actual speakers ... Matching", and "Cinema Studio Reverberation". x Composite video A standard format for transmitting video signal information consisting of -the-art dubbing theaters and recording studios, including Sony Pictures Entertainment's dubbing studios.
... (i.e., all the programmed data) are cleared. The RM SET UP indicator flashes 3 times. All the contents of the remote's memory 1 While holding down MASTER VOL - , press and hold ?/1, then press AV ?/1. High quality pictures, such as the compilation of Digital Cinema Sound technology, delivers the sound of a theater with actual speakers ... Matching", and "Cinema Studio Reverberation". x Composite video A standard format for transmitting video signal information consisting of -the-art dubbing theaters and recording studios, including Sony Pictures Entertainment's dubbing studios.
Operating Instructions
Page 112
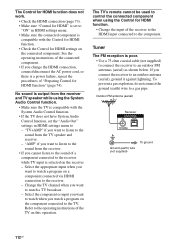
... the sound of the connected component. • If you change the HDMI connection, connect/disconnect the AC power cord, or there is output from the receiver. • If you want to watch a program on this operation. To prevent a gas explosion, do not connect the ground (earth) wire to...Audio Control function, set the "Audio Out" settings in HDMI settings menu to - Select the appropriate input when you connect the receiver to the component. The TV's remote cannot be used to control the connected component when using the System Audio Control function. • Make sure the TV is ...
... the sound of the connected component. • If you change the HDMI connection, connect/disconnect the AC power cord, or there is output from the receiver. • If you want to watch a program on this operation. To prevent a gas explosion, do not connect the ground (earth) wire to...Audio Control function, set the "Audio Out" settings in HDMI settings menu to - Select the appropriate input when you connect the receiver to the component. The TV's remote cannot be used to control the connected component when using the System Audio Control function. • Make sure the TV is ...


