Operating Instructions
Page 4
... Connecting speakers 16 3: Connecting the TV 18 4a: Connecting the audio components.........19 4b: Connecting the video components ........24 5: Connecting the antennas (aerials 34 6: Preparing the receiver and the remote .....35 7: Operating the receiver using the GUI (Graphical User Interface 36 8: Selecting the speaker system... 75 Enjoying the TV sound from the speakers connected to the receiver (System Audio Control 76 Turning off the receiver with the TV (System Power Off 76 Other Operations Converting analog video input signals........ 77 Enjoying the DIGITAL MEDIA PORT (DMPORT 77 ...
... Connecting speakers 16 3: Connecting the TV 18 4a: Connecting the audio components.........19 4b: Connecting the video components ........24 5: Connecting the antennas (aerials 34 6: Preparing the receiver and the remote .....35 7: Operating the receiver using the GUI (Graphical User Interface 36 8: Selecting the speaker system... 75 Enjoying the TV sound from the speakers connected to the receiver (System Audio Control 76 Turning off the receiver with the TV (System Power Off 76 Other Operations Converting analog video input signals........ 77 Enjoying the DIGITAL MEDIA PORT (DMPORT 77 ...
Operating Instructions
Page 6
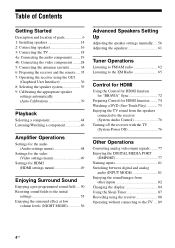
...using the remote. When you remove the cover, keep it to turn the receiver on the receiver, the receiver will be turned off (initial setting). Getting Started Description and location of the POWER button x (Off) The receiver is turned off . x (On/Standby) Press ?/1 on the remote to... the standby mode. When you press POWER on or set it out of reach from children. 6US qa ON/STANDBY POWER SPEAKERS (OFF/A/B/A+B) TONE MODE TONE TUNING MODE TUNING PHONES VIDEO 2 IN/PORTABLE AV IN VIDEO L AUDIO R ...
...using the remote. When you remove the cover, keep it to turn the receiver on the receiver, the receiver will be turned off (initial setting). Getting Started Description and location of the POWER button x (Off) The receiver is turned off . x (On/Standby) Press ?/1 on the remote to... the standby mode. When you press POWER on or set it out of reach from children. 6US qa ON/STANDBY POWER SPEAKERS (OFF/A/B/A+B) TONE MODE TONE TUNING MODE TUNING PHONES VIDEO 2 IN/PORTABLE AV IN VIDEO L AUDIO R ...
Operating Instructions
Page 7
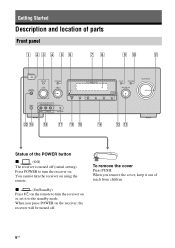
...D TUNING +/- E TUNING MODE Press to select the speaker (OFF/A/B/A+B) system (page 39). 7US Turn to a portable audio/video component such as a camcorder or video game (page 30, 45). R VIDEO 2 IN/ PORTABLE AV IN jacks Connects to scan a station (page 96, 98). S PHONES jack Connects to select a sound field A.F.D.... N 2CH/A.DIRECT Press to headphones (page 109). Getting Started Name Function A ON/STANDBY lamp Lights up in red when the receiver is set to standby mode. P MEMORY/ ENTER Press to adjust the level (page 90). to store a station or enter ...
...D TUNING +/- E TUNING MODE Press to select the speaker (OFF/A/B/A+B) system (page 39). 7US Turn to a portable audio/video component such as a camcorder or video game (page 30, 45). R VIDEO 2 IN/ PORTABLE AV IN jacks Connects to scan a station (page 96, 98). S PHONES jack Connects to select a sound field A.F.D.... N 2CH/A.DIRECT Press to headphones (page 109). Getting Started Name Function A ON/STANDBY lamp Lights up in red when the receiver is set to standby mode. P MEMORY/ ENTER Press to adjust the level (page 90). to store a station or enter ...
Operating Instructions
Page 8
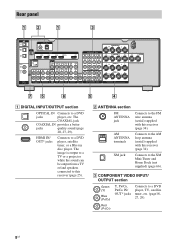
... IN IN Y VIDEO VIDEO OUT IN AUDIO AUDIO OUT IN PB/ CB PR/ CR ASSIGNABLE (INPUT ONLY) L L L AUDIO OUT CENTER R R R FRONT SURROUND SUR BACK SUBWOOFER VIDEO 1 SUBWOOFER MULTI CHANNEL INPUT SURROUND BACK R L SURROUND R L R FRONT B L FRONT A R L SPEAKERS CENTER 75 6 5 4 A DIGITAL INPUT/OUTPUT section OPTICAL IN Connects to the FM wire antenna (aerial) supplied with this receiver (page 34).
... IN IN Y VIDEO VIDEO OUT IN AUDIO AUDIO OUT IN PB/ CB PR/ CR ASSIGNABLE (INPUT ONLY) L L L AUDIO OUT CENTER R R R FRONT SURROUND SUR BACK SUBWOOFER VIDEO 1 SUBWOOFER MULTI CHANNEL INPUT SURROUND BACK R L SURROUND R L R FRONT B L FRONT A R L SPEAKERS CENTER 75 6 5 4 A DIGITAL INPUT/OUTPUT section OPTICAL IN Connects to the FM wire antenna (aerial) supplied with this receiver (page 34).
Operating Instructions
Page 9
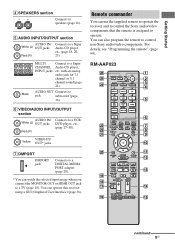
...(page 16). You can operate this receiver using a GUI (Graphical User Interface) (page 36). Black AUDIO OUT Connects to a VCR, DVD player, etc. (page 27-30). RM-AAP023 wh wg wf wd ws wa ?/1 THEATER RM SET UP AV ?/1 SYSTEM STANDBY SHIFT TV AMP 1 VIDEO 1 2 VIDEO 2 4 5 DVD SAT 7 ...with an analog audio jack for 7.1 channel or 5.1 channel sound (page 22). VIDEO IN/ Yellow OUT* jacks G DMPORT DMPORT jack Connects to a DIGITAL MEDIA PORT adapter (page 20). * You can use the supplied remote to operate the receiver and to control the Sony audio/video components that the...
...(page 16). You can operate this receiver using a GUI (Graphical User Interface) (page 36). Black AUDIO OUT Connects to a VCR, DVD player, etc. (page 27-30). RM-AAP023 wh wg wf wd ws wa ?/1 THEATER RM SET UP AV ?/1 SYSTEM STANDBY SHIFT TV AMP 1 VIDEO 1 2 VIDEO 2 4 5 DVD SAT 7 ...with an analog audio jack for 7.1 channel or 5.1 channel sound (page 22). VIDEO IN/ Yellow OUT* jacks G DMPORT DMPORT jack Connects to a DIGITAL MEDIA PORT adapter (page 20). * You can use the supplied remote to operate the receiver and to control the Sony audio/video components that the...
Operating Instructions
Page 10
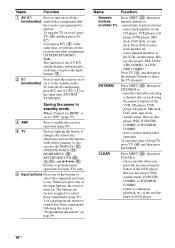
...Press SHIFT (X), then press ENT/MEM to - return to perform menu operations for HDMI" is programmed to "OFF" (page 75). To turn off the receiver and other components (SYSTEM STANDBY). It also activate the DISPLAY (U), OPTIONS TOOLS (K), HOME/MENU (L), RETURN/EXIT O (T), (J), and V/v/B/b (J) buttons to ...turn on or off the (on/standby) audio/video components that the remote is set it will turn the TV on or off, press TV (D) and then press AV ?/1. If you press ?/1 (B) at the same time (SYSTEM STANDBY). When "Control for Sony TVs only. C AMP Press to use...
...Press SHIFT (X), then press ENT/MEM to - return to perform menu operations for HDMI" is programmed to "OFF" (page 75). To turn off the receiver and other components (SYSTEM STANDBY). It also activate the DISPLAY (U), OPTIONS TOOLS (K), HOME/MENU (L), RETURN/EXIT O (T), (J), and V/v/B/b (J) buttons to ...turn on or off the (on/standby) audio/video components that the remote is set it will turn the TV on or off, press TV (D) and then press AV ?/1. If you press ?/1 (B) at the same time (SYSTEM STANDBY). When "Control for Sony TVs only. C AMP Press to use...
Operating Instructions
Page 11
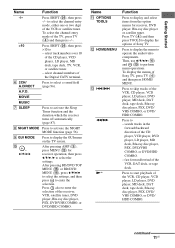
... ./> m/M N* Function Press to display and select items from the option menus for receiver operation, then press V/v/B /b to select the settings. continued 11US Press also to operate the audio/video components. To display the menus of the receiver, VCR, satellite tuner, DVD player, Blu-ray disc player, PSX, DVD/VHS ...COMBO, or DVD/HDD COMBO. Press to display the menu to enter the selection of Sony TV, press TV (D) and then...
... ./> m/M N* Function Press to display and select items from the option menus for receiver operation, then press V/v/B /b to select the settings. continued 11US Press also to operate the audio/video components. To display the menus of the receiver, VCR, satellite tuner, DVD player, Blu-ray disc player, PSX, DVD/VHS ...COMBO, or DVD/HDD COMBO. Press to display the menu to enter the selection of Sony TV, press TV (D) and then...

Operating Instructions
Page 18
... can watch the selected input image when you use a Sony HDMI cable. It is not necessary to the jacks of your components. D Video cord (not supplied) E Component video cord (not supplied) 18US Connect audio and video cords according to connect all the cables. 3: Connecting the TV You can operate this receiver using a GUI (Graphical User Interface).
... can watch the selected input image when you use a Sony HDMI cable. It is not necessary to the jacks of your components. D Video cord (not supplied) E Component video cord (not supplied) 18US Connect audio and video cords according to connect all the cables. 3: Connecting the TV You can operate this receiver using a GUI (Graphical User Interface).
Operating Instructions
Page 19
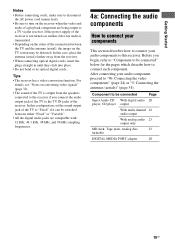
...8226; Before connecting cords, make sure to disconnect the AC power cord (mains lead). • Be sure to turn on the receiver when the video and audio of a playback component are compatible with 32 kHz, 44.1 kHz, 48 kHz, and 96 kHz sampling frequencies. 4a: Connecting the... audio components How to connect your components This section describes how to connect your audio component, proceed to a TV via the receiver. Tips • The receiver has a video conversion function. In this configuration, set the sound output jack of ...
...8226; Before connecting cords, make sure to disconnect the AC power cord (mains lead). • Be sure to turn on the receiver when the video and audio of a playback component are compatible with 32 kHz, 44.1 kHz, 48 kHz, and 96 kHz sampling frequencies. 4a: Connecting the... audio components How to connect your components This section describes how to connect your audio component, proceed to a TV via the receiver. Tips • The receiver has a video conversion function. In this configuration, set the sound output jack of ...
Operating Instructions
Page 20
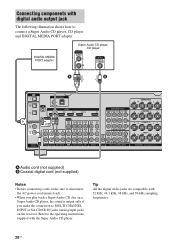
... IN jacks (analog input jack) on the receiver. Tip All the digital audio jacks are compatible with 32 kHz, 44.1 kHz, 48 kHz, and 96 kHz sampling frequencies. 20US Super Audio CD player, CD player DIGITAL MEDIA PORT adapter A B TV OPTICAL IN ANTENNA FM AM OPTICAL VIDEO 1 IN SAT IN XM SAT IN HDMI...
... IN jacks (analog input jack) on the receiver. Tip All the digital audio jacks are compatible with 32 kHz, 44.1 kHz, 48 kHz, and 96 kHz sampling frequencies. 20US Super Audio CD player, CD player DIGITAL MEDIA PORT adapter A B TV OPTICAL IN ANTENNA FM AM OPTICAL VIDEO 1 IN SAT IN XM SAT IN HDMI...
Operating Instructions
Page 22
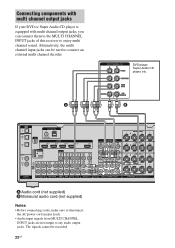
... IN L MONITOR VIDEO VIDEO VIDEO VIDEO OUT IN IN IN OUT IN L AUDIO IN IN L AUDIO AUDIO IN IN L R R R R PHONO SA-CD/CD MD/TAPE TV SAT DVD BD VIDEO VIDEO OUT IN AUDIO AUDIO OUT IN PB/ CB PR/ CR ASSIGNABLE (INPUT ONLY) L L L AUDIO OUT CENTER R R R FRONT SURROUND SUR BACK SUBWOOFER VIDEO 1 SUBWOOFER MULTI .... 22US Alternatively, the multi channel input jacks can connect them to the MULTI CHANNEL INPUT jacks of this receiver to enjoy multi channel sound. The signals cannot be used to any audio output jacks. DVD player, Super Audio CD player, etc.
... IN L MONITOR VIDEO VIDEO VIDEO VIDEO OUT IN IN IN OUT IN L AUDIO IN IN L AUDIO AUDIO IN IN L R R R R PHONO SA-CD/CD MD/TAPE TV SAT DVD BD VIDEO VIDEO OUT IN AUDIO AUDIO OUT IN PB/ CB PR/ CR ASSIGNABLE (INPUT ONLY) L L L AUDIO OUT CENTER R R R FRONT SURROUND SUR BACK SUBWOOFER VIDEO 1 SUBWOOFER MULTI .... 22US Alternatively, the multi channel input jacks can connect them to the MULTI CHANNEL INPUT jacks of this receiver to enjoy multi channel sound. The signals cannot be used to any audio output jacks. DVD player, Super Audio CD player, etc.
Operating Instructions
Page 24
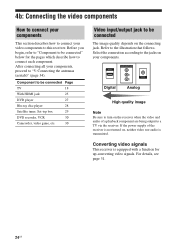
... be connected The image quality depends on , neither video nor audio is equipped with a function for the pages which describe how to the jacks on the receiver when the video and audio of the receiver is not turned on the connecting jack. Converting video signals This receiver is transmitted. COMPONENT VIDEO Y PB/ CB PR/ CR Digital Analog High quality...
... be connected The image quality depends on , neither video nor audio is equipped with a function for the pages which describe how to the jacks on the receiver when the video and audio of the receiver is not turned on the connecting jack. Converting video signals This receiver is transmitted. COMPONENT VIDEO Y PB/ CB PR/ CR Digital Analog High quality...
Operating Instructions
Page 25
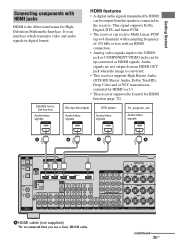
... A HDMI cable (not supplied) We recommend that you use a Sony HDMI cable. Satellite tuner, Set-top box Audio/video signals Blu-ray disc player Audio/video signals DVD player Audio/video signals TV, projector, etc. continued 25US HDMI features • A digital audio signals transmitted by HDMI ver1.3. • This receiver supports the Control for HighDefinition Multimedia Interface. Getting Started...
... A HDMI cable (not supplied) We recommend that you use a Sony HDMI cable. Satellite tuner, Set-top box Audio/video signals Blu-ray disc player Audio/video signals DVD player Audio/video signals TV, projector, etc. continued 25US HDMI features • A digital audio signals transmitted by HDMI ver1.3. • This receiver supports the Control for HighDefinition Multimedia Interface. Getting Started...
Operating Instructions
Page 26
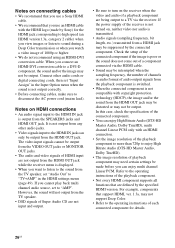
... However, the sound will not output from the TV speaker. • DSD signals of Super Audio CD are not input and output. • Be sure to turn on the receiver when the video and audio of a playback component are being output to the operating instructions of the playback component. • ...HDMI version. Notes on connecting cables • We recommend that you use a Sony HDMI cable. • We recommend that you use an HDMI cable with the HDMI logo (made before you watch a video image of audio output signals from the playback component is switched. • When the connected ...
... However, the sound will not output from the TV speaker. • DSD signals of Super Audio CD are not input and output. • Be sure to turn on the receiver when the video and audio of a playback component are being output to the operating instructions of the playback component. • ...HDMI version. Notes on connecting cables • We recommend that you use a Sony HDMI cable. • We recommend that you use an HDMI cable with the HDMI logo (made before you watch a video image of audio output signals from the playback component is switched. • When the connected ...
Operating Instructions
Page 31
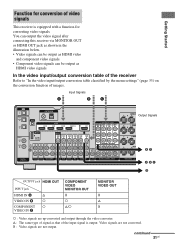
... Video signals can be output as HDMI video and component video signals. • Component video signals can be output as that of signal as HDMI video signals. Video signals are not output. In the video input/output conversion table of the receiver Refer to "In the video input... IN IN L MONITOR VIDEO VIDEO VIDEO VIDEO OUT IN IN IN OUT IN L AUDIO IN IN L AUDIO AUDIO IN IN L R R R R PHONO SA-CD/CD MD/TAPE TV SAT DVD BD PB/ VIDEO VIDEO CB OUT IN AUDIO AUDIO OUT IN L L AUDIO OUT PR/ CR ASSIGNABLE (INPUT ONLY) L L CENTER R R VIDEO 1 R R FRONT SURROUND...
... Video signals can be output as HDMI video and component video signals. • Component video signals can be output as that of signal as HDMI video signals. Video signals are not output. In the video input/output conversion table of the receiver Refer to "In the video input... IN IN L MONITOR VIDEO VIDEO VIDEO VIDEO OUT IN IN IN OUT IN L AUDIO IN IN L AUDIO AUDIO IN IN L R R R R PHONO SA-CD/CD MD/TAPE TV SAT DVD BD PB/ VIDEO VIDEO CB OUT IN AUDIO AUDIO OUT IN L L AUDIO OUT PR/ CR ASSIGNABLE (INPUT ONLY) L L CENTER R R VIDEO 1 R R FRONT SURROUND...
Operating Instructions
Page 34
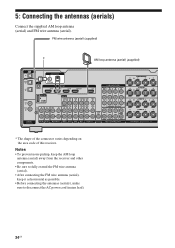
.../TAPE TV SAT DVD BD VIDEO VIDEO OUT IN AUDIO AUDIO OUT IN PB/ CB PR/ CR ASSIGNABLE (INPUT ONLY) L L L AUDIO OUT CENTER R R R FRONT SURROUND SUR BACK SUBWOOFER VIDEO 1 SUBWOOFER MULTI CHANNEL INPUT SURROUND BACK R L SURROUND R L R FRONT B L FRONT A R L SPEAKERS * The shape of the connector varies depending on the area code of this receiver. Notes • To prevent...
.../TAPE TV SAT DVD BD VIDEO VIDEO OUT IN AUDIO AUDIO OUT IN PB/ CB PR/ CR ASSIGNABLE (INPUT ONLY) L L L AUDIO OUT CENTER R R R FRONT SURROUND SUR BACK SUBWOOFER VIDEO 1 SUBWOOFER MULTI CHANNEL INPUT SURROUND BACK R L SURROUND R L R FRONT B L FRONT A R L SPEAKERS * The shape of the connector varies depending on the area code of this receiver. Notes • To prevent...
Operating Instructions
Page 35
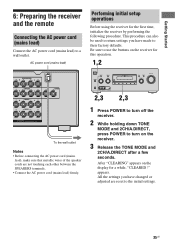
... Connect the AC power cord (mains lead) to use the buttons on the receiver for this operation. 1,2 ON/STANDBY POWER SPEAKERS (OFF/A/B/A+B) TONE MODE TONE TUNING MODE TUNING PHONES VIDEO 2 IN/PORTABLE AV IN VIDEO L AUDIO R AUTO CAL MIC MULTI CHANNEL DECODING DISPLAY INPUT MODE INPUT SELECTOR MEMORY/ ENTER ...; Before connecting the AC power cord (mains lead), make sure that metallic wires of the speaker cords are reset to turn off the receiver. 2 While holding down TONE MODE and 2CH/A.DIRECT, press POWER to the initial settings. 35US MOVIE MUSIC MASTER VOLUME 2,3 2,3 1 ...
... Connect the AC power cord (mains lead) to use the buttons on the receiver for this operation. 1,2 ON/STANDBY POWER SPEAKERS (OFF/A/B/A+B) TONE MODE TONE TUNING MODE TUNING PHONES VIDEO 2 IN/PORTABLE AV IN VIDEO L AUDIO R AUTO CAL MIC MULTI CHANNEL DECODING DISPLAY INPUT MODE INPUT SELECTOR MEMORY/ ENTER ...; Before connecting the AC power cord (mains lead), make sure that metallic wires of the speaker cords are reset to turn off the receiver. 2 While holding down TONE MODE and 2CH/A.DIRECT, press POWER to the initial settings. 35US MOVIE MUSIC MASTER VOLUME 2,3 2,3 1 ...
Operating Instructions
Page 37
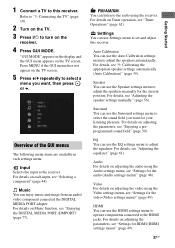
... to adjust the speakers manually for the audio (Audio settings menu)" (page 48). FM/AM/XM You can use the EQ settings menu to adjust the equalizer. Press MENU if the GUI menu does not appear on adjusting the video using the receiver. For details on adjusting the parameters, see... 18). 2 Turn on the receiver. 4 Press GUI MODE. For details, see "Tuner Operations" (page 62). Input Selects the input to turn on the TV. 3 Press ?/1 to the receiver. For details on the TV screen. EQ You can enjoy music and image from an audio/ video component connected the DIGITAL MEDIA PORT...
... to adjust the speakers manually for the audio (Audio settings menu)" (page 48). FM/AM/XM You can use the EQ settings menu to adjust the equalizer. Press MENU if the GUI menu does not appear on adjusting the video using the receiver. For details on adjusting the parameters, see... 18). 2 Turn on the receiver. 4 Press GUI MODE. For details, see "Tuner Operations" (page 62). Input Selects the input to turn on the TV. 3 Press ?/1 to the receiver. For details on the TV screen. EQ You can enjoy music and image from an audio/ video component connected the DIGITAL MEDIA PORT...
Operating Instructions
Page 73
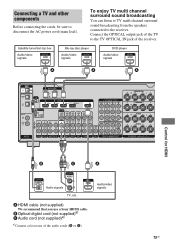
... use a Sony HDMI cable. Satellite tuner/Set-top box Audio/video signals Blu-ray disc player Audio/video signals DVD player Audio/video signals A A A TV OPTICAL IN ANTENNA FM AM OPTICAL VIDEO 1 IN SAT IN XM SAT IN HDMI BD IN DVD IN VIDEO 1 IN COMPONENT VIDEO MONITOR COMPO ... for HDMI B C A Audio signals TV, etc. Audio/video signals 73US Connect the OPTICAL output jack of the TV to the TV OPTICAL IN jack of the audio cords (B or C). B Optical digital cord (not supplied)a) C Audio cord (not supplied)a) a)Connect at least one of the receiver. Connecting a TV and other...
... use a Sony HDMI cable. Satellite tuner/Set-top box Audio/video signals Blu-ray disc player Audio/video signals DVD player Audio/video signals A A A TV OPTICAL IN ANTENNA FM AM OPTICAL VIDEO 1 IN SAT IN XM SAT IN HDMI BD IN DVD IN VIDEO 1 IN COMPONENT VIDEO MONITOR COMPO ... for HDMI B C A Audio signals TV, etc. Audio/video signals 73US Connect the OPTICAL output jack of the TV to the TV OPTICAL IN jack of the audio cords (B or C). B Optical digital cord (not supplied)a) C Audio cord (not supplied)a) a)Connect at least one of the receiver. Connecting a TV and other...
Operating Instructions
Page 77
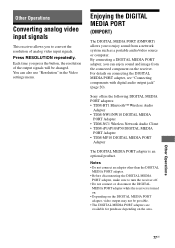
...such as a portable audio/video source or computer. Notes • Do not connect an adapter other than the DIGITAL MEDIA PORT adapter. • Before disconnecting the DIGITAL MEDIA PORT adapter, make sure to enjoy sound from the connected component on the receiver. Sony offers the following ...DIGITAL MEDIA PORT adapters: • TDM-BT1 Bluetooth™ Wireless Audio Adapter • TDM-NW1/NW10 DIGITAL MEDIA PORT Adapter • TDM-NC1 Wireless Network...
...such as a portable audio/video source or computer. Notes • Do not connect an adapter other than the DIGITAL MEDIA PORT adapter. • Before disconnecting the DIGITAL MEDIA PORT adapter, make sure to enjoy sound from the connected component on the receiver. Sony offers the following ...DIGITAL MEDIA PORT adapters: • TDM-BT1 Bluetooth™ Wireless Audio Adapter • TDM-NW1/NW10 DIGITAL MEDIA PORT Adapter • TDM-NC1 Wireless Network...


