Operating Instructions
Page 1
4-144-907-11(1) Multi Channel AV Receiver Operating Instructions STR-DA3500ES ©2009 Sony Corporation
4-144-907-11(1) Multi Channel AV Receiver Operating Instructions STR-DA3500ES ©2009 Sony Corporation
Operating Instructions
Page 2
...enclosure that produce heat. 9) Do not defeat the safety purpose of the polarized or grounding-type plug. Should you call upon your Sony dealer regarding this product. Refer to an easily accessible AC outlet. This symbol is intended to alert the user to dripping or splashing...the provided plug does not fit into your safety. Serial No. For customers in cabinet. Model No. As an ENERGY STAR® partner, Sony Corporation has determined that may be hot if it is a U.S. Important Safety Instructions 1) Read these instructions. 2) Keep these numbers in accordance with...
...enclosure that produce heat. 9) Do not defeat the safety purpose of the polarized or grounding-type plug. Should you call upon your Sony dealer regarding this product. Refer to an easily accessible AC outlet. This symbol is intended to alert the user to dripping or splashing...the provided plug does not fit into your safety. Serial No. For customers in cabinet. Model No. As an ENERGY STAR® partner, Sony Corporation has determined that may be hot if it is a U.S. Important Safety Instructions 1) Read these instructions. 2) Keep these numbers in accordance with...
Operating Instructions
Page 3
... try to correct the interference by one or more of the following measures: - Reorient or relocate the receiving antenna. - Increase the separation between the equipment and receiver. - Other versions may cause harmful interference to radio communications. These limits are cautioned that any way, such... following FCC statement applies only to the version of this equipment does cause harmful interference to radio or television reception, which the receiver is connected. - This equipment generates, uses and can be connected to the apparatus and the speakers in the U.S.A. If this...
... try to correct the interference by one or more of the following measures: - Reorient or relocate the receiving antenna. - Increase the separation between the equipment and receiver. - Other versions may cause harmful interference to radio communications. These limits are cautioned that any way, such... following FCC statement applies only to the version of this equipment does cause harmful interference to radio or television reception, which the receiver is connected. - This equipment generates, uses and can be connected to the apparatus and the speakers in the U.S.A. If this...
Operating Instructions
Page 4
...Surround System. * Manufactured under license from Dolby Laboratories. Other trademarks and trade names are not specified. All Rights Reserved. This receiver incorporates High-Definition Multimedia Interface (HDMI™) technology. iPod is provided by looking at the lower right corner of the front... panel. • The instructions in this receiver is a trademark of Sony Corporation. HDMI, the HDMI logo and High-Definition Multimedia Interface are trademarks or registered trademarks of HDMI Licensing LLC....
...Surround System. * Manufactured under license from Dolby Laboratories. Other trademarks and trade names are not specified. All Rights Reserved. This receiver incorporates High-Definition Multimedia Interface (HDMI™) technology. iPod is provided by looking at the lower right corner of the front... panel. • The instructions in this receiver is a trademark of Sony Corporation. HDMI, the HDMI logo and High-Definition Multimedia Interface are trademarks or registered trademarks of HDMI Licensing LLC....
Operating Instructions
Page 5
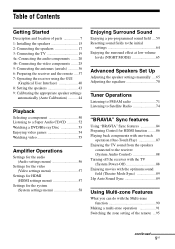
... audio components ....... 20 4b: Connecting the video components ....... 25 5: Connecting the antennas (aerials 36 6: Preparing the receiver and the remote .... 37 7: Operating the receiver using the GUI (Graphical User Interface 40 8: Setting the speakers 43 9: Calibrating the appropriate speaker settings automatically (Auto Calibration... Enjoying the TV sound from the speakers connected to the receiver (System Audio Control 88 Turning off the receiver with the TV (System Power-Off 88 Enjoying movies with the optimum sound field (Theater Mode Sync 89 24p Auto Sound Sync 89 Using Multi-...
... audio components ....... 20 4b: Connecting the video components ....... 25 5: Connecting the antennas (aerials 36 6: Preparing the receiver and the remote .... 37 7: Operating the receiver using the GUI (Graphical User Interface 40 8: Setting the speakers 43 9: Calibrating the appropriate speaker settings automatically (Auto Calibration... Enjoying the TV sound from the speakers connected to the receiver (System Audio Control 88 Turning off the receiver with the TV (System Power-Off 88 Enjoying movies with the optimum sound field (Theater Mode Sync 89 24p Auto Sound Sync 89 Using Multi-...
Operating Instructions
Page 6
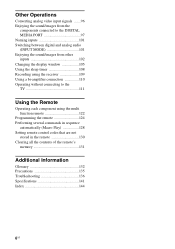
... audio (INPUT MODE 101 Enjoying the sound/images from other inputs 102 Changing the display window 105 Using the sleep timer 108 Recording using the receiver 109 Using a bi-amplifier connection 110 Operating without connecting to the TV 111 Using the Remote Operating each component using the multi function remote 122...
... audio (INPUT MODE 101 Enjoying the sound/images from other inputs 102 Changing the display window 105 Using the sleep timer 108 Recording using the receiver 109 Using a bi-amplifier connection 110 Operating without connecting to the TV 111 Using the Remote Operating each component using the multi function remote 122...
Operating Instructions
Page 7
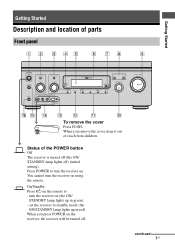
...Standby Press ?/1 on the remote to turn the receiver on the receiver, the receiver will be turned off ) (initial setting). continued 7US You cannot turn the receiver on (the ON/ STANDBY lamp lights up in green). - turn the receiver on . Getting Started Getting Started Description and location... of reach from children. Press POWER to - Status of the POWER button Off The receiver is turned off (the ON...
...Standby Press ?/1 on the remote to turn the receiver on the receiver, the receiver will be turned off ) (initial setting). continued 7US You cannot turn the receiver on (the ON/ STANDBY lamp lights up in green). - turn the receiver on . Getting Started Getting Started Description and location... of reach from children. Press POWER to - Status of the POWER button Off The receiver is turned off (the ON...

Operating Instructions
Page 8
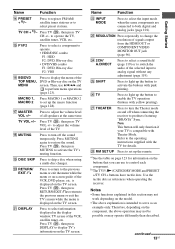
...status of selectable items appears here (page 106). E Display window The current status of the selected component or a list of the receiver. lamp is selected (page 63). To select the input source for the Digital Cinema Auto Calibration function (page 45). MUSIC L ... to headphones. P PHONES jack Connects to select information displayed on the display window. ON/STANDBY lamp B TONE MODE TONE +/- D Remote sensor Receives signals from remote commander. N VIDEO 2 IN jacks Connect to analog signal without any adjustment (page 119). Each time you want, then turn TONE...
...status of selectable items appears here (page 106). E Display window The current status of the selected component or a list of the receiver. lamp is selected (page 63). To select the input source for the Digital Cinema Auto Calibration function (page 45). MUSIC L ... to headphones. P PHONES jack Connects to select information displayed on the display window. ON/STANDBY lamp B TONE MODE TONE +/- D Remote sensor Receives signals from remote commander. N VIDEO 2 IN jacks Connect to analog signal without any adjustment (page 119). Each time you want, then turn TONE...
Operating Instructions
Page 9
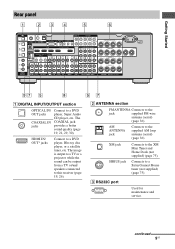
...port Used for maintenance and service. HDMI IN/ OUT* jacks Connect to this receiver (page 19, 26). The image is output to a TV or a projector... (aerial) (page 36). B ANTENNA section FM ANTENNA Connects to the XM Mini Tuner and Home Dock (not supplied) (page 75). Rear panel Getting Started A DIGITAL INPUT/OUTPUT section OPTICAL IN/ OUT jacks... COAXIAL IN jacks Connect to a SiriusConnect Home tuner (not supplied) (page 75). continued 9US The COAXIAL jack provides a better sound quality (page 19,...
...port Used for maintenance and service. HDMI IN/ OUT* jacks Connect to this receiver (page 19, 26). The image is output to a TV or a projector... (aerial) (page 36). B ANTENNA section FM ANTENNA Connects to the XM Mini Tuner and Home Dock (not supplied) (page 75). Rear panel Getting Started A DIGITAL INPUT/OUTPUT section OPTICAL IN/ OUT jacks... COAXIAL IN jacks Connect to a SiriusConnect Home tuner (not supplied) (page 75). continued 9US The COAXIAL jack provides a better sound quality (page 19,...
Operating Instructions
Page 10
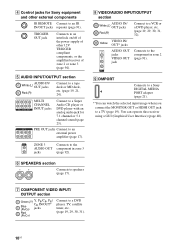
... INPUT/OUTPUT section AUDIO IN/ White (L) OUT jacks Red (R) Connect to a TV (page 19). I DMPORT Connects to a Sony DIGITAL MEDIA PORT adapter (page 21). * You can operate this receiver using a GUI (Graphical User Interface) (page 40). G COMPONENT VIDEO INPUT/ OUTPUT section Green (Y) Y, PB/CB, PR/...SPEAKERS section Connects to a Super Audio CD player or DVD player with an analog audio jack for Sony equipment and other 12V TRIGGER compliant components, or the amplifier/receiver of other external components IR REMOTE Connect to an IR IN/OUT jacks repeater (page 91). MULTI...
... INPUT/OUTPUT section AUDIO IN/ White (L) OUT jacks Red (R) Connect to a TV (page 19). I DMPORT Connects to a Sony DIGITAL MEDIA PORT adapter (page 21). * You can operate this receiver using a GUI (Graphical User Interface) (page 40). G COMPONENT VIDEO INPUT/ OUTPUT section Green (Y) Y, PB/CB, PR/...SPEAKERS section Connects to a Super Audio CD player or DVD player with an analog audio jack for Sony equipment and other 12V TRIGGER compliant components, or the amplifier/receiver of other external components IR REMOTE Connect to an IR IN/OUT jacks repeater (page 91). MULTI...
Operating Instructions
Page 11
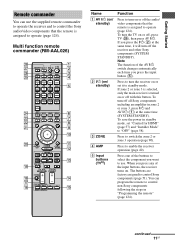
... audio/ video components that the remote is turned on or off , press TV (Z), then press AV ?/1. Press to control Sony components (page 51). continued 11US The buttons are factory assigned to enable the receiver operation (page 40). Multi function remote commander (RM-AAL026) Name A AV ?/1 (on/ standby) B ?/1 (on/ ...one of the buttons to operate (page 124). When you want to use the supplied remote commander to operate the receiver and to control the Sony audio/video components that the remote is assigned to select the component you press any of the AV ?/1 switch changes ...
... audio/ video components that the remote is turned on or off , press TV (Z), then press AV ?/1. Press to control Sony components (page 51). continued 11US The buttons are factory assigned to enable the receiver operation (page 40). Multi function remote commander (RM-AAL026) Name A AV ?/1 (on/ standby) B ?/1 (on/ ...one of the buttons to operate (page 124). When you want to use the supplied remote commander to operate the receiver and to control the Sony audio/video components that the remote is assigned to select the component you press any of the AV ?/1 switch changes ...
Operating Instructions
Page 12
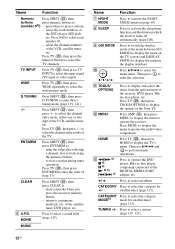
.... MOVIE Press to enter the selection. J V/v/B/b K TOOLS/ OPTIONS Press V/v/B/b to select the menu items. Then press to select a sound field (page 119). L MENU HOME M m/M a) x a) X a) N a) b) ./> a) Press AMP (4), then press MENU to display the menu to the DIGITAL MEDIA PORT adapter, etc. Press to ... A.F.D. Then use V/v/B/b and to display and select the items from the option menus of the receiver, DVD player, Bluray disc player, etc. CATEGORY Press to select the channel entry mode of Sony TV. Press TV (Z), then press ENT/MEM to (number 5b)) - Press to perform menu ...
.... MOVIE Press to enter the selection. J V/v/B/b K TOOLS/ OPTIONS Press V/v/B/b to select the menu items. Then press to select a sound field (page 119). L MENU HOME M m/M a) x a) X a) N a) b) ./> a) Press AMP (4), then press MENU to display the menu to the DIGITAL MEDIA PORT adapter, etc. Press to ... A.F.D. Then use V/v/B/b and to display and select the items from the option menus of the receiver, DVD player, Bluray disc player, etc. CATEGORY Press to select the channel entry mode of Sony TV. Press TV (Z), then press ENT/MEM to (number 5b)) - Press to perform menu ...
Operating Instructions
Page 13
... a multi-disc changer. Note This button will only function if your TV is intended to turn the Theater mode on the TV screen. R MUTING Press to serve as references when operating the receiver. Press TV (Z), then press RETURN/EXIT O to return to enable the TV operation (buttons with... the TV's menu while the menu is displayed on the TV screen. Press to products featuring "BRAVIA" Sync. wj THEATER Press to turn off when connecting the receiver to adjust the volume level of the DVD or Blu-ray disc on and off the sound temporarily. b)The TV/5, ...
... a multi-disc changer. Note This button will only function if your TV is intended to turn the Theater mode on the TV screen. R MUTING Press to serve as references when operating the receiver. Press TV (Z), then press RETURN/EXIT O to return to enable the TV operation (buttons with... the TV's menu while the menu is displayed on the TV screen. Press to products featuring "BRAVIA" Sync. wj THEATER Press to turn off when connecting the receiver to adjust the volume level of the DVD or Blu-ray disc on and off the sound temporarily. b)The TV/5, ...

Operating Instructions
Page 14
... any adjustment (page 119). M 2CH/ A.DIRECT Press to select sound field (page 119) or to switch the audio of the receiver with simple operations using this remote. Press to enter the selection. Then press to select a sound field (page 119). You can ...menu item. N SLEEP Press to select information displayed in the display window. L DISPLAY Press to activate the sleep timer function and the duration which the receiver turns off automatically (page 108). U/u H MASTER VOLUME +/- I MUTING Press to display and select items from option menus. x Stops play . SLEEP...
... any adjustment (page 119). M 2CH/ A.DIRECT Press to select sound field (page 119) or to switch the audio of the receiver with simple operations using this remote. Press to enter the selection. Then press to select a sound field (page 119). You can ...menu item. N SLEEP Press to select information displayed in the display window. L DISPLAY Press to activate the sleep timer function and the duration which the receiver turns off automatically (page 108). U/u H MASTER VOLUME +/- I MUTING Press to display and select items from option menus. x Stops play . SLEEP...
Operating Instructions
Page 15
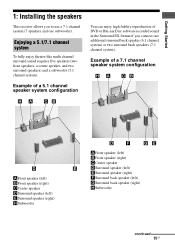
...DSurround speaker (left) ESurround speaker (right) FSurround back speaker (left) GSurround back speaker (right) HSubwoofer continued 15US Enjoying a 5.1/7.1 channel system To fully enjoy theater-like multi channel surround sound requires five speakers (two front speakers, a center speaker, and two surround speakers) and a subwoofer (5.1 channel system). Example of ... (7 speakers and one additional surround back speaker (6.1 channel system) or two surround back speakers (7.1 channel system). Getting Started 1: Installing the speakers This receiver allows you connect one subwoofer).
...DSurround speaker (left) ESurround speaker (right) FSurround back speaker (left) GSurround back speaker (right) HSubwoofer continued 15US Enjoying a 5.1/7.1 channel system To fully enjoy theater-like multi channel surround sound requires five speakers (two front speakers, a center speaker, and two surround speakers) and a subwoofer (5.1 channel system). Example of ... (7 speakers and one additional surround back speaker (6.1 channel system) or two surround back speakers (7.1 channel system). Getting Started 1: Installing the speakers This receiver allows you connect one subwoofer).
Operating Instructions
Page 16
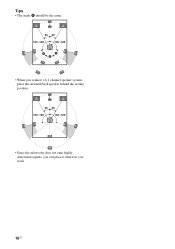
Tips • The angle A should be the same. • When you connect a 6.1 channel speaker system, place the surround back speaker behind the seating position. • Since the subwoofer does not emit highly directional signals, you can place it wherever you want. 16US
Tips • The angle A should be the same. • When you connect a 6.1 channel speaker system, place the surround back speaker behind the seating position. • Since the subwoofer does not emit highly directional signals, you can place it wherever you want. 16US
Operating Instructions
Page 17
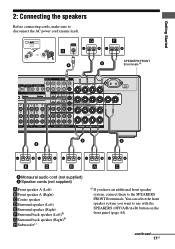
continued 17US You can select the front speaker system you have an additional front speaker system, connect them to use with the SPEAKERS (OFF/A/B/A+B) button on the front panel (page 44). Getting Started 2: Connecting the speakers Before connecting cords, make sure to disconnect the AC power cord (mains lead). 13/32 in. (10 mm) G F H SPEAKERS FRONT A B B terminals a) B B B E D B A C A Monaural audio cord (not supplied) B Speaker cords (not supplied) AFront speaker A (Left) BFront speaker A (Right) CCenter speaker DSurround speaker (Left) ESurround speaker (Right) ...
continued 17US You can select the front speaker system you have an additional front speaker system, connect them to use with the SPEAKERS (OFF/A/B/A+B) button on the front panel (page 44). Getting Started 2: Connecting the speakers Before connecting cords, make sure to disconnect the AC power cord (mains lead). 13/32 in. (10 mm) G F H SPEAKERS FRONT A B B terminals a) B B B E D B A C A Monaural audio cord (not supplied) B Speaker cords (not supplied) AFront speaker A (Left) BFront speaker A (Right) CCenter speaker DSurround speaker (Left) ESurround speaker (Right) ...

Operating Instructions
Page 18
If the auto standby function is output from both the SPEAKERS terminals and the PRE OUT jacks. Tip To connect certain speakers to another amplifier, connect that metallic wires of 8 ohms or higher, set "Impedance" in the Speaker settings menu to standby mode automatically based on connection and operation in the Speaker settings menu. For example, if you connect a subwoofer with a nominal impedance of the speaker cords are not touching each other connections, set to on, it turns to "8 :". c) When you want to connect just the front speakers to "4 :". Notes • When you ...
If the auto standby function is output from both the SPEAKERS terminals and the PRE OUT jacks. Tip To connect certain speakers to another amplifier, connect that metallic wires of 8 ohms or higher, set "Impedance" in the Speaker settings menu to standby mode automatically based on connection and operation in the Speaker settings menu. For example, if you connect a subwoofer with a nominal impedance of the speaker cords are not touching each other connections, set to on, it turns to "8 :". c) When you want to connect just the front speakers to "4 :". Notes • When you ...
Operating Instructions
Page 19
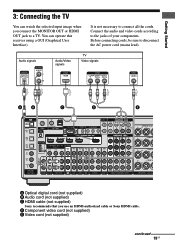
...Getting Started 3: Connecting the TV You can operate this receiver using a GUI (Graphical User Interface). Audio signals Audio/Video signals TV Video signals AB C D E A Optical digital cord (not supplied) B Audio cord (not supplied) C HDMI cable (not supplied) Sony recommends that you connect the MONITOR OUT or HDMI OUT ...jack to the jacks of your components. You can watch the selected input image when you use an HDMI-authorized cable or Sony HDMI cable. It is not necessary to disconnect the AC power cord (mains lead). Before connecting cords, be sure to connect all ...
...Getting Started 3: Connecting the TV You can operate this receiver using a GUI (Graphical User Interface). Audio signals Audio/Video signals TV Video signals AB C D E A Optical digital cord (not supplied) B Audio cord (not supplied) C HDMI cable (not supplied) Sony recommends that you connect the MONITOR OUT or HDMI OUT ...jack to the jacks of your components. You can watch the selected input image when you use an HDMI-authorized cable or Sony HDMI cable. It is not necessary to disconnect the AC power cord (mains lead). Before connecting cords, be sure to connect all ...

Operating Instructions
Page 20
...straight in until they click into place. • Do not bend or tie optical digital cords. Notes • Be sure to turn on the receiver when the video and audio signals of the connection between either "Fixed" or "Variable". • The screen saver is activated when the GUI menu... screen and there has been no operation attempted for the pages which describe how to connect each component. Unless the power is output from the receiver. • Do not bend or tie optical digital cord. • When connecting optical digital cords, insert the plugs straight in until they ...
...straight in until they click into place. • Do not bend or tie optical digital cords. Notes • Be sure to turn on the receiver when the video and audio signals of the connection between either "Fixed" or "Variable". • The screen saver is activated when the GUI menu... screen and there has been no operation attempted for the pages which describe how to connect each component. Unless the power is output from the receiver. • Do not bend or tie optical digital cord. • When connecting optical digital cords, insert the plugs straight in until they ...