Operating Instructions
Page 4
... from Dolby Laboratories. "Neural-THX" and "NEURAL-THX" introduced in the Operating Instructions and displayed in the display window and on the remote. This product using Neural-THX® Surround is a registered trademark and the DTS logos, Symbol, DTS-HD and DTS-HD Master Audio...487,535; 7,212,872; 7,333,929; 7,392,195; 7,272,567 & other technology or trademarks owned by Sony Corporation is a trademark of the front panel. • The instructions in this receiver is a trademark of THX Ltd., which may be registered in some jurisdictions. The Bluetooth word mark and logos are...
... from Dolby Laboratories. "Neural-THX" and "NEURAL-THX" introduced in the Operating Instructions and displayed in the display window and on the remote. This product using Neural-THX® Surround is a registered trademark and the DTS logos, Symbol, DTS-HD and DTS-HD Master Audio...487,535; 7,212,872; 7,333,929; 7,392,195; 7,272,567 & other technology or trademarks owned by Sony Corporation is a trademark of the front panel. • The instructions in this receiver is a trademark of THX Ltd., which may be registered in some jurisdictions. The Bluetooth word mark and logos are...
Operating Instructions
Page 5
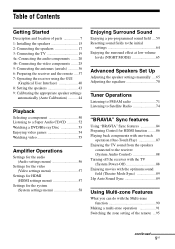
... ....... 20 4b: Connecting the video components ....... 25 5: Connecting the antennas (aerials 36 6: Preparing the receiver and the remote .... 37 7: Operating the receiver using the GUI (Graphical User Interface 40 8: Setting the speakers 43 9: Calibrating the appropriate speaker settings automatically...receiver with the TV (System Power-Off 88 Enjoying movies with the optimum sound field (Theater Mode Sync 89 24p Auto Sound Sync 89 Using Multi-zone Features What you can do with the Multi-zone function 90 Making a multi-zone operation 91 Switching the zone setting of the remote...
... ....... 20 4b: Connecting the video components ....... 25 5: Connecting the antennas (aerials 36 6: Preparing the receiver and the remote .... 37 7: Operating the receiver using the GUI (Graphical User Interface 40 8: Setting the speakers 43 9: Calibrating the appropriate speaker settings automatically...receiver with the TV (System Power-Off 88 Enjoying movies with the optimum sound field (Theater Mode Sync 89 24p Auto Sound Sync 89 Using Multi-zone Features What you can do with the Multi-zone function 90 Making a multi-zone operation 91 Switching the zone setting of the remote...
Operating Instructions
Page 6
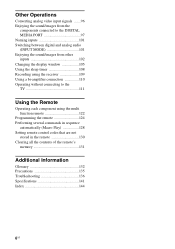
... 102 Changing the display window 105 Using the sleep timer 108 Recording using the receiver 109 Using a bi-amplifier connection 110 Operating without connecting to the TV 111 Using the Remote Operating each component using the multi function remote 122 Programming the remote 124 Performing several commands in sequence automatically (Macro Play 128 Setting...
... 102 Changing the display window 105 Using the sleep timer 108 Recording using the receiver 109 Using a bi-amplifier connection 110 Operating without connecting to the TV 111 Using the Remote Operating each component using the multi function remote 122 Programming the remote 124 Performing several commands in sequence automatically (Macro Play 128 Setting...
Operating Instructions
Page 7
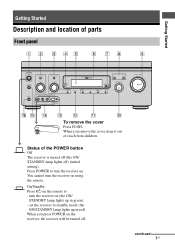
...it out of parts Front panel To remove the cover Press PUSH. continued 7US turn the receiver on the receiver, the receiver will be turned off ) (initial setting). set the receiver to turn the receiver on the remote to - When you press POWER on (the ON/ STANDBY lamp lights up in green). ...- You cannot turn the receiver on. On/Standby Press ?/1 on using the remote. Press POWER to standby mode (the ON/...
...it out of parts Front panel To remove the cover Press PUSH. continued 7US turn the receiver on the receiver, the receiver will be turned off ) (initial setting). set the receiver to turn the receiver on the remote to - When you press POWER on (the ON/ STANDBY lamp lights up in green). ...- You cannot turn the receiver on. On/Standby Press ?/1 on using the remote. Press POWER to standby mode (the ON/...

Operating Instructions
Page 8
...Digital Cinema Auto Calibration function (page 45). MEMORY/ ENTER (FM/AM) and satellite radio (XM/SIRIUS) (page 119-122). D Remote sensor Receives signals from remote commander. M AUTO CAL MIC Connects to the jack supplied optimizer microphone for the selected zone will be turned on or off . Adjust...sound Cinema Sound field with HD-D.C.S. K 2CH/A.DIRECT Press to select a sound field (page 119) or to switch the audio of the receiver. lamp is selected (page 63). J INPUT SELECTOR Turn to select the input source to select information displayed on the display window. To ...
...Digital Cinema Auto Calibration function (page 45). MEMORY/ ENTER (FM/AM) and satellite radio (XM/SIRIUS) (page 119-122). D Remote sensor Receives signals from remote commander. M AUTO CAL MIC Connects to the jack supplied optimizer microphone for the selected zone will be turned on or off . Adjust...sound Cinema Sound field with HD-D.C.S. K 2CH/A.DIRECT Press to select a sound field (page 119) or to switch the audio of the receiver. lamp is selected (page 63). J INPUT SELECTOR Turn to select the input source to select information displayed on the display window. To ...
Operating Instructions
Page 10
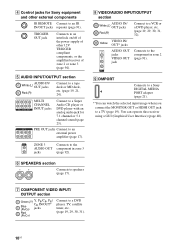
... INPUT/OUTPUT section AUDIO IN/ White (L) OUT jacks Red (R) Connect to an interlock on/off of the power supply of other external components IR REMOTE Connect to a tape deck or MD deck, etc. (page 19, 21, 24). Yellow VIDEO IN/ OUT* jacks AUDIO OUT jacks VIDEO OUT... jack Connects to the AUDIO OUT component in zone 2 (page 91). I DMPORT Connects to a Sony DIGITAL MEDIA PORT adapter (page 21). * You can operate this receiver using a GUI (Graphical User Interface) (page 40). F SPEAKERS section Connects to a TV (page 19). MULTI CHANNEL INPUT jacks...
... INPUT/OUTPUT section AUDIO IN/ White (L) OUT jacks Red (R) Connect to an interlock on/off of the power supply of other external components IR REMOTE Connect to a tape deck or MD deck, etc. (page 19, 21, 24). Yellow VIDEO IN/ OUT* jacks AUDIO OUT jacks VIDEO OUT... jack Connects to the AUDIO OUT component in zone 2 (page 91). I DMPORT Connects to a Sony DIGITAL MEDIA PORT adapter (page 21). * You can operate this receiver using a GUI (Graphical User Interface) (page 40). F SPEAKERS section Connects to a TV (page 19). MULTI CHANNEL INPUT jacks...
Operating Instructions
Page 11
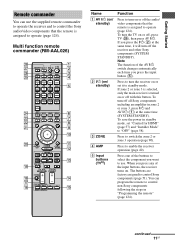
...time, it to standby mode. When you want to use the supplied remote commander to operate the receiver and to control the Sony audio/video components that the remote is turned on or off the receiver and other Sony components (SYSTEM STANDBY). If zone 2 or zone 3 is selected, only... Press to enable the receiver operation (page 40). If you press the input button (E). Getting Started Remote commander You can program the remote to control non-Sony components following the steps in "Programming the remote" (page 124). To turn off all Sony components including an amplifier ...
...time, it to standby mode. When you want to use the supplied remote commander to operate the receiver and to control the Sony audio/video components that the remote is turned on or off the receiver and other Sony components (SYSTEM STANDBY). If zone 2 or zone 3 is selected, only... Press to enable the receiver operation (page 40). If you press the input button (E). Getting Started Remote commander You can program the remote to control non-Sony components following the steps in "Programming the remote" (page 124). To turn off all Sony components including an amplifier ...
Operating Instructions
Page 13
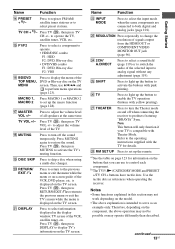
...TV (Z), then press TV VOL +/- S DISC SKIP Press to both digital and analog jacks (page 101). is intended to set up the remote. Name Function V INPUT MODE Press to select the input mode when the same components are connected to skip a disc when using a multi-...is displayed on the TV screen. Refer to products featuring "BRAVIA" Sync. Q MASTER VOL +/- wj THEATER Press to turn off when connecting the receiver to the operating instructions supplied with Theater Mode. to restore the sound. Press TV (Z), then press DISPLAY to set up the macro function (...
...TV (Z), then press TV VOL +/- S DISC SKIP Press to both digital and analog jacks (page 101). is intended to set up the remote. Name Function V INPUT MODE Press to select the input mode when the same components are connected to skip a disc when using a multi-...is displayed on the TV screen. Refer to products featuring "BRAVIA" Sync. Q MASTER VOL +/- wj THEATER Press to turn off when connecting the receiver to the operating instructions supplied with Theater Mode. to restore the sound. Press TV (Z), then press DISPLAY to set up the macro function (...

Operating Instructions
Page 14
... O Press to return to activate the sleep timer function and the duration which the receiver turns off . N SLEEP Press to the previous menu or exit the menu. Press to operate the receiver. U/u H MASTER VOLUME +/- Simple remote commander (RM-AAU039) This remote can control the main functions of the selected input to enter the selection...
... O Press to return to activate the sleep timer function and the duration which the receiver turns off . N SLEEP Press to the previous menu or exit the menu. Press to operate the receiver. U/u H MASTER VOLUME +/- Simple remote commander (RM-AAU039) This remote can control the main functions of the selected input to enter the selection...

Operating Instructions
Page 37
... MODE and 2CH/A.DIRECT, press POWER to turn on the receiver, then connect the AC power cord (mains lead) to a wall outlet (mains). The cord is not malfunction. 37US Getting Started 6: Preparing the receiver and the remote Connecting the AC power cord (mains lead) Connect the supplied... AC power cord (mains lead) to the AC INLET terminal on the receiver. 3 Release the TONE MODE and 2CH/A.DIRECT after a few seconds. A...
... MODE and 2CH/A.DIRECT, press POWER to turn on the receiver, then connect the AC power cord (mains lead) to a wall outlet (mains). The cord is not malfunction. 37US Getting Started 6: Preparing the receiver and the remote Connecting the AC power cord (mains lead) Connect the supplied... AC power cord (mains lead) to the AC INLET terminal on the receiver. 3 Release the TONE MODE and 2CH/A.DIRECT after a few seconds. A...
Operating Instructions
Page 38
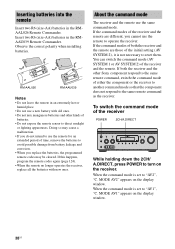
...AV2", "C. If this happens, program the remote codes again (page 124). • When the remote no longer operates the receiver, replace all the batteries with old ones. • Do not mix manganese batteries and other Sony component respond to the same remote command, switch the command mode of the initial... setting (AV SYSTEM 2), it is set to turn on the receiver. RM-AAL026 RM-AAU039 Notes • Do not leave the remote in an extremely hot or humid ...
...AV2", "C. If this happens, program the remote codes again (page 124). • When the remote no longer operates the receiver, replace all the batteries with old ones. • Do not mix manganese batteries and other Sony component respond to the same remote command, switch the command mode of the initial... setting (AV SYSTEM 2), it is set to turn on the receiver. RM-AAL026 RM-AAU039 Notes • Do not leave the remote in an extremely hot or humid ...

Operating Instructions
Page 39
... same time. 39US The ZONE button lights off . Getting Started To switch the command mode of the multi function remote commander RM SET UP 1, 2 ?/1 AMP To switch the command mode of the simple remote commander SLEEP DISPLAY DISPLAY GUI MODE ENT/MEM 1 While holding down RM SET UP, press ?/1. When you press...
... same time. 39US The ZONE button lights off . Getting Started To switch the command mode of the multi function remote commander RM SET UP 1, 2 ?/1 AMP To switch the command mode of the simple remote commander SLEEP DISPLAY DISPLAY GUI MODE ENT/MEM 1 While holding down RM SET UP, press ?/1. When you press...

Operating Instructions
Page 47
... been performed correctly or Auto Calibration cannot be performed. - When the measurement ends, a beep sounds and the measurement result appears on the remote when "Please Press ENTER." To cancel the measurement The measurement will take approximately 30 seconds with a test tone. The "+" and "-" terminals... seconds. Follow the instructions of the TV screen when you can change the unit of the phase, "Out Phase" is feet. appears on the receiver. - when using the zone 2/zone 3 function in zone 2/zone 3. Press SPEAKERS (OFF/A/B/A+B) on the TV screen. Connect the headphones. - ...
... been performed correctly or Auto Calibration cannot be performed. - When the measurement ends, a beep sounds and the measurement result appears on the remote when "Please Press ENTER." To cancel the measurement The measurement will take approximately 30 seconds with a test tone. The "+" and "-" terminals... seconds. Follow the instructions of the TV screen when you can change the unit of the phase, "Out Phase" is feet. appears on the receiver. - when using the zone 2/zone 3 function in zone 2/zone 3. Press SPEAKERS (OFF/A/B/A+B) on the TV screen. Connect the headphones. - ...

Operating Instructions
Page 51
... Built-in radio tuner. PHONO Turntable, etc., connected to adjust the volume. to the PHONO jack. You can also use INPUT SELECTOR on the receiver. To make fine adjustment: press the button and release it immediately. To make fine adjustment: turn the knob slowly. • You can adjust the... connected to the XM jack or SiriusConnect Home tuner connected to the MULTI CHANNEL INPUT jack. MULTI IN DMPORT Component connected to the SIRIUS jack. button on the remote. To cancel, press MUTING on the remote again or turn the knob quickly. Selected input Components that can be sure to ...
... Built-in radio tuner. PHONO Turntable, etc., connected to adjust the volume. to the PHONO jack. You can also use INPUT SELECTOR on the receiver. To make fine adjustment: press the button and release it immediately. To make fine adjustment: turn the knob slowly. • You can adjust the... connected to the XM jack or SiriusConnect Home tuner connected to the MULTI CHANNEL INPUT jack. MULTI IN DMPORT Component connected to the SIRIUS jack. button on the remote. To cancel, press MUTING on the remote again or turn the knob quickly. Selected input Components that can be sure to ...
Operating Instructions
Page 88
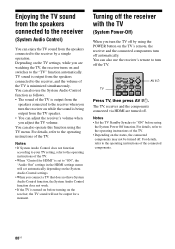
...turned on before using the System Power Off function. The TV, receiver and the components connected via HDMI are watching the TV, the receiver turns on the TV settings, while you turn off automatically. You can also use the receiver's remote to turn the TV off the TV. For details, refer ...to the operating instructions of the connected components. 88US Turning off the receiver with the TV (System Power-Off) When you adjust the TV volume. ...
...turned on before using the System Power Off function. The TV, receiver and the components connected via HDMI are watching the TV, the receiver turns on the TV settings, while you turn off automatically. You can also use the receiver's remote to turn the TV off the TV. For details, refer ...to the operating instructions of the connected components. 88US Turning off the receiver with the TV (System Power-Off) When you adjust the TV volume. ...

Operating Instructions
Page 89
... the TV. Therefore, if a player that is not compatible with "BRAVIA" Sync sends out 24p signals, the receiver will not switch the sound field to the previous sound field, press the THEATER button again. Enjoying movies with 24p Auto Sound Sync. • When "Control for HDMI" is set to ... function does not work if a player is not compatible with the optimum sound field (Theater Mode Sync) Press the THEATER button on the remote of the receiver, TV, or the Blu-ray Disc Player, while pointing the remote toward the TV. The sound field switches to HD-D.C.S. Tip The sound field may not...
... the TV. Therefore, if a player that is not compatible with "BRAVIA" Sync sends out 24p signals, the receiver will not switch the sound field to the previous sound field, press the THEATER button again. Enjoying movies with 24p Auto Sound Sync. • When "Control for HDMI" is set to ... function does not work if a player is not compatible with the optimum sound field (Theater Mode Sync) Press the THEATER button on the remote of the receiver, TV, or the Blu-ray Disc Player, while pointing the remote toward the TV. The sound field switches to HD-D.C.S. Tip The sound field may not...
Operating Instructions
Page 90
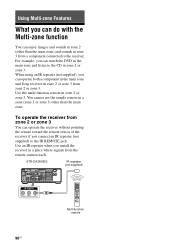
... main zone. Use an IR repeater when you install the receiver in a place where signals from zone 2 or zone 3 You can operate the receiver without pointing the remote toward the remote sensor of the receiver if you can operate both a component in the main zone and Sony receiver in zone 2 or zone 3. You cannot use the simple...
... main zone. Use an IR repeater when you install the receiver in a place where signals from zone 2 or zone 3 You can operate the receiver without pointing the remote toward the remote sensor of the receiver if you can operate both a component in the main zone and Sony receiver in zone 2 or zone 3. You cannot use the simple...
Operating Instructions
Page 91
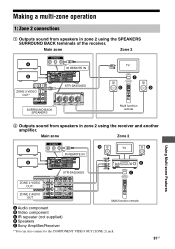
... 1: Zone 2 connections 1 Outputs sound from speakers in zone 2 using the receiver and another amplifier. Main zone Zone 2 D TV D A IR REMOTE IN B E STR-DA3500ES C ZONE 2 VIDEO OUT* ZONE 2 AUDIO OUT Multi function remote A Audio component B Video component C IR repeater (not supplied) D Speakers E Sony Amplifier/Receiver * You can also connect to the COMPONENT VIDEO OUT (ZONE 2) jack...
... 1: Zone 2 connections 1 Outputs sound from speakers in zone 2 using the receiver and another amplifier. Main zone Zone 2 D TV D A IR REMOTE IN B E STR-DA3500ES C ZONE 2 VIDEO OUT* ZONE 2 AUDIO OUT Multi function remote A Audio component B Video component C IR repeater (not supplied) D Speakers E Sony Amplifier/Receiver * You can also connect to the COMPONENT VIDEO OUT (ZONE 2) jack...
Operating Instructions
Page 92
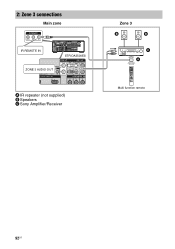
2: Zone 3 connections Main zone IR REMOTE IN STR-DA3500ES ZONE 3 AUDIO OUT A IR repeater (not supplied) B Speakers C Sony Amplifier/Receiver Zone 3 B B C A Multi function remote 92US
2: Zone 3 connections Main zone IR REMOTE IN STR-DA3500ES ZONE 3 AUDIO OUT A IR repeater (not supplied) B Speakers C Sony Amplifier/Receiver Zone 3 B B C A Multi function remote 92US
Operating Instructions
Page 94
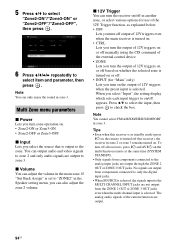
.... If "Sur Back Assign" is selected, the signals input to the MULTI CHANNEL INPUT jacks are output. 94US Tips • Even when this receiver), the receiver in zone 3. No signals are output from components connected to only the digital input jacks. • When SOURCE is set to select item and...connected to check the box. Note You can adjust the volume in standby mode (press ?/1 on the remote to on/off all receivers, press ?/1 and AV ?/1 on . Multi Zone menu parameters x Power Lets you turn the receiver on . • Zone2-ON or Zone3-ON • Zone2-OFF or Zone3-OFF x Input ...
.... If "Sur Back Assign" is selected, the signals input to the MULTI CHANNEL INPUT jacks are output. 94US Tips • Even when this receiver), the receiver in zone 3. No signals are output from components connected to only the digital input jacks. • When SOURCE is set to select item and...connected to check the box. Note You can adjust the volume in standby mode (press ?/1 on the remote to on/off all receivers, press ?/1 and AV ?/1 on . Multi Zone menu parameters x Power Lets you turn the receiver on . • Zone2-ON or Zone3-ON • Zone2-OFF or Zone3-OFF x Input ...


