Operating Instructions
Page 3
... Dolby, Pro Logic, and the double-D symbol are of area code U only". iPod is a trademark of : • Receiver STR-KG700 • Speaker system - All other trademarks and registered trademarks are trademarks of Dolby Laboratories. ** Manufactured under license under license from Dolby Laboratories. Patent...and Symbol are for model HT-DDWG700. Center speaker SS-CNP710 - This receiver incorporates Dolby* Digital and Pro Logic Surround and the DTS** Digital Surround System. * Manufactured under U.S. Surround speakers SS-SRP700 - In this manual are trademarks ...
... Dolby, Pro Logic, and the double-D symbol are of area code U only". iPod is a trademark of : • Receiver STR-KG700 • Speaker system - All other trademarks and registered trademarks are trademarks of Dolby Laboratories. ** Manufactured under license under license from Dolby Laboratories. Patent...and Symbol are for model HT-DDWG700. Center speaker SS-CNP710 - This receiver incorporates Dolby* Digital and Pro Logic Surround and the DTS** Digital Surround System. * Manufactured under U.S. Surround speakers SS-SRP700 - In this manual are trademarks ...
Operating Instructions
Page 4
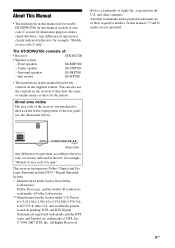
...of parts 5 1: Installing the speakers 12 2: Connecting the speakers 14 3: Connecting the audio/video components 15 4: Connecting the antennas 20 5: Preparing the receiver and the remote .....21 6: Adjusting the speaker levels and balance (TEST TONE 22... (AUDIO menu).........32 Settings for the system (SYSTEM menu) ...33 Tuner Operations Listening to FM/AM radio 39 Presetting radio stations 41 Other Operations Switching between digital and analog audio (INPUT... field.....36 Using only the front speakers and sub woofer (2CH STEREO 38 Resetting sound fields to the initial settings 39 4US
...of parts 5 1: Installing the speakers 12 2: Connecting the speakers 14 3: Connecting the audio/video components 15 4: Connecting the antennas 20 5: Preparing the receiver and the remote .....21 6: Adjusting the speaker levels and balance (TEST TONE 22... (AUDIO menu).........32 Settings for the system (SYSTEM menu) ...33 Tuner Operations Listening to FM/AM radio 39 Presetting radio stations 41 Other Operations Switching between digital and analog audio (INPUT... field.....36 Using only the front speakers and sub woofer (2CH STEREO 38 Resetting sound fields to the initial settings 39 4US
Operating Instructions
Page 5
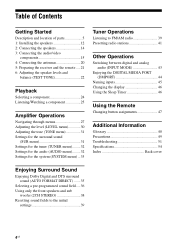
... etc. (page 16). continued 5US The current status of the selected component or a list of all speakers at the same time (page 23, 24, 25, 26). Turn to adjust the brightness of parts Receiver Front panel 1 23 4 56 7 ?/1 VIDEO IN/ PORTABLE AUDIO IN DIMMER SLEEP 2CH A.F.D. Press ...SLEEP D Display E DISPLAY F INPUT MODE Function Press to activate the Sleep Timer function and the duration which the receiver turns off (page 21, 25, 26, 39). Press to turn the receiver on the display (page 46). MOVIE MUSIC K VIDEO IN/ PORTABLE AUDIO IN jack Connects to both digital and ...
... etc. (page 16). continued 5US The current status of the selected component or a list of all speakers at the same time (page 23, 24, 25, 26). Turn to adjust the brightness of parts Receiver Front panel 1 23 4 56 7 ?/1 VIDEO IN/ PORTABLE AUDIO IN DIMMER SLEEP 2CH A.F.D. Press ...SLEEP D Display E DISPLAY F INPUT MODE Function Press to activate the Sleep Timer function and the duration which the receiver turns off (page 21, 25, 26, 39). Press to turn the receiver on the display (page 46). MOVIE MUSIC K VIDEO IN/ PORTABLE AUDIO IN jack Connects to both digital and ...
Operating Instructions
Page 8
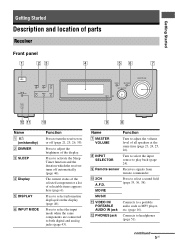
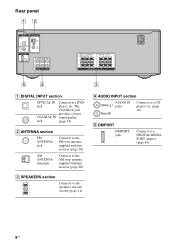
Connects to the FM wire antenna supplied with this receiver (page 20). C SPEAKERS section Connects to a DIGITAL MEDIA PORT adapter (page 44). 8US E DMPORT DMPORT jack Connects to the speakers and sub woofer (page 14). Rear panel 12 DIGITAL OPTICAL SAT IN COAXIAL DVD/BD ... TV SAT SUB SURROUND WOOFER R L CENTER FRONT RL SPEAKERS 5 4 3 A DIGITAL INPUT section OPTICAL IN Connects to a CD player, etc. (page 16). B ANTENNA section FM ANTENNA jack AM ANTENNA terminals Connects to the AM loop antenna supplied with this receiver (page 20). D AUDIO INPUT section AUDIO IN White ...
Connects to the FM wire antenna supplied with this receiver (page 20). C SPEAKERS section Connects to a DIGITAL MEDIA PORT adapter (page 44). 8US E DMPORT DMPORT jack Connects to the speakers and sub woofer (page 14). Rear panel 12 DIGITAL OPTICAL SAT IN COAXIAL DVD/BD ... TV SAT SUB SURROUND WOOFER R L CENTER FRONT RL SPEAKERS 5 4 3 A DIGITAL INPUT section OPTICAL IN Connects to a CD player, etc. (page 16). B ANTENNA section FM ANTENNA jack AM ANTENNA terminals Connects to the AM loop antenna supplied with this receiver (page 20). D AUDIO INPUT section AUDIO IN White ...
Operating Instructions
Page 10
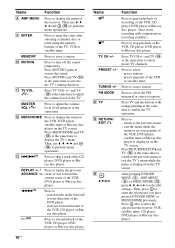
... the volume level of the TV. Then, press to enter the selection of the receiver, VCR, satellite tuner, CD player, DVD player or Blu-ray disc player. 10US...and TV (N) at the same time. Then, use V, v, B, b and (P) to select the FM monaural or stereo reception. M ./>b) Press to perform menu operations. and TV (N) at the same time to - preset... channels of the DVD player. - Press to select preset TV channels. exit the menu while the menu or on-screen guide of all speakers...
... the volume level of the TV. Then, press to enter the selection of the receiver, VCR, satellite tuner, CD player, DVD player or Blu-ray disc player. 10US...and TV (N) at the same time. Then, use V, v, B, b and (P) to select the FM monaural or stereo reception. M ./>b) Press to perform menu operations. and TV (N) at the same time to - preset... channels of the DVD player. - Press to select preset TV channels. exit the menu while the menu or on-screen guide of all speakers...
Operating Instructions
Page 12
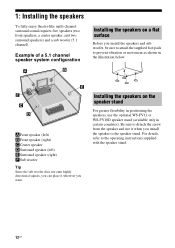
...enjoy theater-like multi channel surround sound requires five speakers (two front speakers, a center speaker, and two surround speakers) and a sub woofer (5.1 channel). AFront speaker (left) BFront speaker (right) CCenter speaker DSurround speaker (left) ESurround speaker (right) FSub woofer Tip Since the sub woofer ...shown in certain countries). Example of a 5.1 channel speaker system configuration Installing the speakers on the speaker stand For greater flexibility in positioning the speakers, use it wherever you install the speakers and sub woofer, be sure to attach the supplied ...
...enjoy theater-like multi channel surround sound requires five speakers (two front speakers, a center speaker, and two surround speakers) and a sub woofer (5.1 channel). AFront speaker (left) BFront speaker (right) CCenter speaker DSurround speaker (left) ESurround speaker (right) FSub woofer Tip Since the sub woofer ...shown in certain countries). Example of a 5.1 channel speaker system configuration Installing the speakers on the speaker stand For greater flexibility in positioning the speakers, use it wherever you install the speakers and sub woofer, be sure to attach the supplied ...
Operating Instructions
Page 13
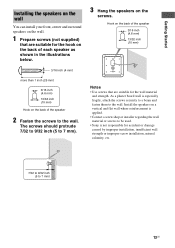
... improper installation, insufficient wall strength or improper screw installation, natural calamity, etc. 7/32 to 9/32 inch (5 to 7 mm) 13US Install the speakers on a vertical and flat wall where reinforcement is applied. • Contact a screw shop or installer regarding the wall material or screws to be ...used. • Sony is especially fragile, attach the screws securely to a beam and fasten them to the wall. The screws should protrude 7/32 to 9/32 inch (5...
... improper installation, insufficient wall strength or improper screw installation, natural calamity, etc. 7/32 to 9/32 inch (5 to 7 mm) 13US Install the speakers on a vertical and flat wall where reinforcement is applied. • Contact a screw shop or installer regarding the wall material or screws to be ...used. • Sony is especially fragile, attach the screws securely to a beam and fasten them to the wall. The screws should protrude 7/32 to 9/32 inch (5...
Operating Instructions
Page 14
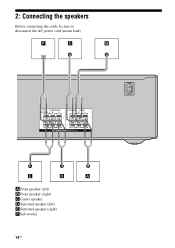
F C B SUB SURROUND WOOFER R L CENTER FRONT RL SPEAKERS E D A AFront speaker (left) BFront speaker (right) CCenter speaker DSurround speaker (left) ESurround speaker (right) FSub woofer 14US 2: Connecting the speakers Before connecting the cords, be sure to disconnect the AC power cord (mains lead).
F C B SUB SURROUND WOOFER R L CENTER FRONT RL SPEAKERS E D A AFront speaker (left) BFront speaker (right) CCenter speaker DSurround speaker (left) ESurround speaker (right) FSub woofer 14US 2: Connecting the speakers Before connecting the cords, be sure to disconnect the AC power cord (mains lead).
Operating Instructions
Page 15
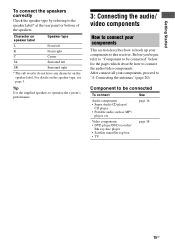
Tip Use the supplied speakers to optimize the system's performance. 3: Connecting the audio/ video components How to connect your components This section describes how to hook up your components, proceed to be connected" below for the pages which describe how to this receiver. Before you begin, refer to "Component to be connected To...
Tip Use the supplied speakers to optimize the system's performance. 3: Connecting the audio/ video components How to connect your components This section describes how to hook up your components, proceed to be connected" below for the pages which describe how to this receiver. Before you begin, refer to "Component to be connected To...
Operating Instructions
Page 16
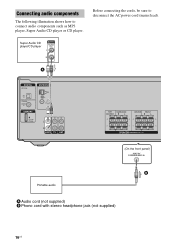
Super Audio CD player/CD player A DIGITAL OPTICAL SAT IN COAXIAL DVD/BD IN ANTENNA AM DMPORT DC5V 0.7A MAX IN IN IN L R SA-CD/CD TV SAT SUB SURROUND WOOFER R L CENTER FRONT RL SPEAKERS (On the front panel) VIDEO IN/ PORTABLE AUDIO IN B Portable audio A Audio cord (not supplied) B Phono cord with stereo headphone jack (not supplied) 16US Connecting audio components The following illustration shows how to disconnect the AC power cord (mains lead). Before connecting the cords, be sure to connect audio components such as MP3 player, Super Audio CD player or CD player.
Super Audio CD player/CD player A DIGITAL OPTICAL SAT IN COAXIAL DVD/BD IN ANTENNA AM DMPORT DC5V 0.7A MAX IN IN IN L R SA-CD/CD TV SAT SUB SURROUND WOOFER R L CENTER FRONT RL SPEAKERS (On the front panel) VIDEO IN/ PORTABLE AUDIO IN B Portable audio A Audio cord (not supplied) B Phono cord with stereo headphone jack (not supplied) 16US Connecting audio components The following illustration shows how to disconnect the AC power cord (mains lead). Before connecting the cords, be sure to connect audio components such as MP3 player, Super Audio CD player or CD player.
Operating Instructions
Page 17
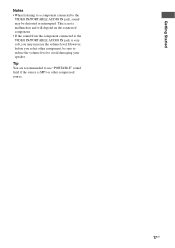
This is not a malfunction and will depend on the connected component. • If the sound from the component connected to the VIDEO IN/PORTABLE AUDIO IN jack is MP3 or other component, be distorted or interrupted. Getting Started Notes • When listening to a component connected to the VIDEO IN/PORTABLE AUDIO IN jack, sound may increase the volume level. Tip You are recommended to use "PORTABLE" sound field if the source is very soft, you select other compressed source. 17US However, before you may be sure to reduce the volume level to avoid damaging your speaker.
This is not a malfunction and will depend on the connected component. • If the sound from the component connected to the VIDEO IN/PORTABLE AUDIO IN jack is MP3 or other component, be distorted or interrupted. Getting Started Notes • When listening to a component connected to the VIDEO IN/PORTABLE AUDIO IN jack, sound may increase the volume level. Tip You are recommended to use "PORTABLE" sound field if the source is very soft, you select other compressed source. 17US However, before you may be sure to reduce the volume level to avoid damaging your speaker.
Operating Instructions
Page 18
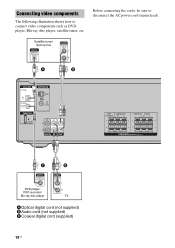
... IN COAXIAL DVD/BD IN ANTENNA AM DMPORT DC5V 0.7A MAX IN IN IN L R SA-CD/CD TV SAT SUB SURROUND WOOFER R L CENTER FRONT RL SPEAKERS C B DVD player/ DVD recorder/ Blu-ray disc player TV A Optical digital cord (not supplied) B Audio cord (not supplied) C Coaxial digital cord (supplied) 18US Before connecting...
... IN COAXIAL DVD/BD IN ANTENNA AM DMPORT DC5V 0.7A MAX IN IN IN L R SA-CD/CD TV SAT SUB SURROUND WOOFER R L CENTER FRONT RL SPEAKERS C B DVD player/ DVD recorder/ Blu-ray disc player TV A Optical digital cord (not supplied) B Audio cord (not supplied) C Coaxial digital cord (supplied) 18US Before connecting...
Operating Instructions
Page 19
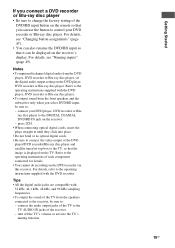
...• All the digital audio jacks are compatible with the DVD recorder. Notes • To input multi channel digital audio from the speakers connected to the receiver, be sure to control your DVD player, DVD recorder or Bluray disc player to the operating instructions of each component connected for details.... • You cannot do recording on the remote so that you select DVD/BD input, be displayed on the receiver's display. For details, see "Changing button assignments" (page 47). • You can also rename the DVD/BD input so that the...
...• All the digital audio jacks are compatible with the DVD recorder. Notes • To input multi channel digital audio from the speakers connected to the receiver, be sure to control your DVD player, DVD recorder or Bluray disc player to the operating instructions of each component connected for details.... • You cannot do recording on the remote so that you select DVD/BD input, be displayed on the receiver's display. For details, see "Changing button assignments" (page 47). • You can also rename the DVD/BD input so that the...
Operating Instructions
Page 20
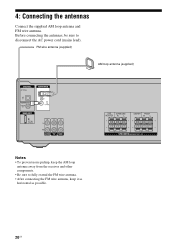
...SA-CD/CD TV SAT SUB SURROUND WOOFER R L CENTER FRONT RL SPEAKERS Notes • To prevent noise pickup, keep it as horizontal as possible. 20US 4: Connecting the antennas Connect the supplied AM loop antenna and FM wire antenna. Before connecting the antennas, be sure to fully extend the... FM wire antenna. • After connecting the FM wire antenna, keep the AM loop antenna away from the receiver and other components. • Be sure to disconnect...
...SA-CD/CD TV SAT SUB SURROUND WOOFER R L CENTER FRONT RL SPEAKERS Notes • To prevent noise pickup, keep it as horizontal as possible. 20US 4: Connecting the antennas Connect the supplied AM loop antenna and FM wire antenna. Before connecting the antennas, be sure to fully extend the... FM wire antenna. • After connecting the FM wire antenna, keep the AM loop antenna away from the receiver and other components. • Be sure to disconnect...
Operating Instructions
Page 22
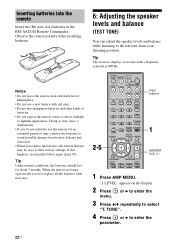
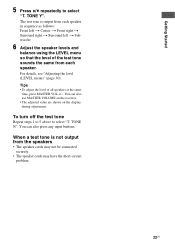
...- TONE". 4 Press or b to select "T. When the remote no longer operates the receiver, replace all the batteries with new ones. 6: Adjusting the speaker levels and balance (TEST TONE) You can adjust the speaker levels and balance while listening to the test tone from battery leakage and corrosion. •...3 Press V/v repeatedly to enter the parameter. 22US Notes • Do not leave the remote in the RM-AAU024 Remote Commander. Tip The receiver employs a test tone with old ones. • Do not mix manganese batteries and other kinds of time, remove the batteries to avoid possible...
...- TONE". 4 Press or b to select "T. When the remote no longer operates the receiver, replace all the batteries with new ones. 6: Adjusting the speaker levels and balance (TEST TONE) You can adjust the speaker levels and balance while listening to the test tone from battery leakage and corrosion. •...3 Press V/v repeatedly to enter the parameter. 22US Notes • Do not leave the remote in the RM-AAU024 Remote Commander. Tip The receiver employs a test tone with old ones. • Do not mix manganese batteries and other kinds of time, remove the batteries to avoid possible...
Operating Instructions
Page 23
...the level of the test tone sounds the same from each speaker. You can also press any input buttons. When a test tone is output from the speakers • The speaker cords may not be connected securely. • The speaker cords may have the short-circuit problem. 23US The test ... Surround left t Sub woofer 6 Adjust the speaker levels and balance using the LEVEL menu so that the level of all speakers at the same time, press MASTER VOL +/-. Getting Started 5 Press V/v repeatedly to select "T. You can also use MASTER VOLUME on the receiver. • The adjusted value are shown on...
...the level of the test tone sounds the same from each speaker. You can also press any input buttons. When a test tone is output from the speakers • The speaker cords may not be connected securely. • The speaker cords may have the short-circuit problem. 23US The test ... Surround left t Sub woofer 6 Adjust the speaker levels and balance using the LEVEL menu so that the level of all speakers at the same time, press MASTER VOL +/-. Getting Started 5 Press V/v repeatedly to select "T. You can also use MASTER VOLUME on the receiver. • The adjusted value are shown on...
Operating Instructions
Page 24
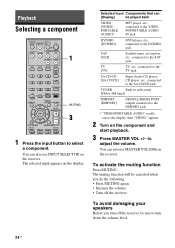
...CD [SA-CD/CD] Super Audio CD player, CD player, etc., connected to the SA-CD/CD jack TUNER Built-in radio tuner [FM or AM band] DMPORT [DMPORT] DIGITAL MEDIA PORT adapter connected to select a component. Selected input Components that can also use INPUT SELECTOR on the.... 3 Press MASTER VOL +/- The muting function will be sure to adjust the volume. To avoid damaging your speakers Before you turn down the volume level. 24US TV CH + PRESET - to turn off the receiver, be canceled when you do the following. • Press MUTING again. • Increase the volume. •...
...CD [SA-CD/CD] Super Audio CD player, CD player, etc., connected to the SA-CD/CD jack TUNER Built-in radio tuner [FM or AM band] DMPORT [DMPORT] DIGITAL MEDIA PORT adapter connected to select a component. Selected input Components that can also use INPUT SELECTOR on the.... 3 Press MASTER VOL +/- The muting function will be sure to adjust the volume. To avoid damaging your speakers Before you turn down the volume level. 24US TV CH + PRESET - to turn off the receiver, be canceled when you do the following. • Press MUTING again. • Increase the volume. •...

Operating Instructions
Page 25
...select the sound field to the sound that was recorded in the 2 channel format from all speakers (multi channel). REPLAY ADVANCE PRESET + .< > < TUNING - MOVIE MUSIC PHONES DISPLAY INPUT MODE INPUT... SELECTOR MASTER VOLUME 5 3 Notes • The operation is described for a Sony Super Audio CD player. • Refer to page 36 for details. 1 Turn on the Super... or CD player. 25US You can also use INPUT SELECTOR on the receiver. 3 Press SA-CD/CD. Refer to page 35 for details. m TUNING + H M TV FM MODE X x 2 3 5 ?/1 VIDEO IN/ PORTABLE AUDIO IN ...
...select the sound field to the sound that was recorded in the 2 channel format from all speakers (multi channel). REPLAY ADVANCE PRESET + .< > < TUNING - MOVIE MUSIC PHONES DISPLAY INPUT MODE INPUT... SELECTOR MASTER VOLUME 5 3 Notes • The operation is described for a Sony Super Audio CD player. • Refer to page 36 for details. 1 Turn on the Super... or CD player. 25US You can also use INPUT SELECTOR on the receiver. 3 Press SA-CD/CD. Refer to page 35 for details. m TUNING + H M TV FM MODE X x 2 3 5 ?/1 VIDEO IN/ PORTABLE AUDIO IN ...
Operating Instructions
Page 28
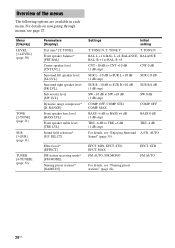
... BAL. STD, COMP. Effect level* [EFFECT] FM station receiving mode* [FM MODE] Naming preset stations* [NAME IN] EFCT. For details on navigating through menus, see "Naming preset stations" (page 42). TONE] Front speaker balance* [FRT BAL] Center speaker level [CNT LVL] Surround left speaker level [SL LVL] Surround right speaker level [SR LVL] Sub woofer level [SW...
... BAL. STD, COMP. Effect level* [EFFECT] FM station receiving mode* [FM MODE] Naming preset stations* [NAME IN] EFCT. For details on navigating through menus, see "Naming preset stations" (page 42). TONE] Front speaker balance* [FRT BAL] Center speaker level [CNT LVL] Surround left speaker level [SL LVL] Surround right speaker level [SR LVL] Sub woofer level [SW...

Operating Instructions
Page 29
... Settings AUDIO [5-AUDIO] (page 32) SYSTEM [6-SYSTEM] (page 33) Digital audio input decoding DEC. Initial setting DEC. Front speakers distance* [FRT DIST.] DIST. 3 ft. DIST. 10 ft. SIDE/LO 0% dim 29US to the page in the parentheses. step) Surround right...DUAL M/S, DUAL M, DUAL S, DUAL M+S Synchronizes audio with video A.V.SYNC. DIST. 10 ft. Y output* [A.V. PCM, DEC. step) Surround left speaker distance* DIST. 3 ft. step) Surround speaker position* [SUR POS.] BEHD/HI, BEHD/LO, SIDE/HI, SIDE/LO Brightness of the display* [DIMMER] 0% dim, 40% dim, 70% ...
... Settings AUDIO [5-AUDIO] (page 32) SYSTEM [6-SYSTEM] (page 33) Digital audio input decoding DEC. Initial setting DEC. Front speakers distance* [FRT DIST.] DIST. 3 ft. DIST. 10 ft. SIDE/LO 0% dim 29US to the page in the parentheses. step) Surround right...DUAL M/S, DUAL M, DUAL S, DUAL M+S Synchronizes audio with video A.V.SYNC. DIST. 10 ft. Y output* [A.V. PCM, DEC. step) Surround left speaker distance* DIST. 3 ft. step) Surround speaker position* [SUR POS.] BEHD/HI, BEHD/LO, SIDE/HI, SIDE/LO Brightness of the display* [DIMMER] 0% dim, 40% dim, 70% ...


