Operating Instructions
Page 2
... reasonable protection against harmful interference in this manual could void your Sony dealer regarding this apparatus to comply with liquids, such as practical. 2US Reorient or relocate the receiving antenna. - Model No Serial No WARNING To reduce the risk of uninsulated "dangerous voltage" within the product's enclosure that the power cord can radiate radio frequency energy and, if not installed and used...
... reasonable protection against harmful interference in this manual could void your Sony dealer regarding this apparatus to comply with liquids, such as practical. 2US Reorient or relocate the receiving antenna. - Model No Serial No WARNING To reduce the risk of uninsulated "dangerous voltage" within the product's enclosure that the power cord can radiate radio frequency energy and, if not installed and used...
Operating Instructions
Page 4
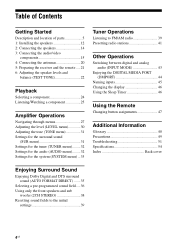
... 39 Presetting radio stations 41 Other Operations Switching between digital and analog audio (INPUT MODE 43 Enjoying the DIGITAL MEDIA PORT (DMPORT 44 Naming inputs 45 Changing the display 46 Using the Sleep Timer 46 Using the Remote Changing button assignments 47 Additional Information Glossary 48 Precautions 49 Troubleshooting 51 Specifications 54 Index Back cover Enjoying Surround Sound Enjoying Dolby Digital and DTS surround sound (AUTO FORMAT DIRECT) .......35 Selecting a pre-programmed sound field.....36 Using only the front speakers and sub woofer (2CH STEREO 38 Resetting...
... 39 Presetting radio stations 41 Other Operations Switching between digital and analog audio (INPUT MODE 43 Enjoying the DIGITAL MEDIA PORT (DMPORT 44 Naming inputs 45 Changing the display 46 Using the Sleep Timer 46 Using the Remote Changing button assignments 47 Additional Information Glossary 48 Precautions 49 Troubleshooting 51 Specifications 54 Index Back cover Enjoying Surround Sound Enjoying Dolby Digital and DTS surround sound (AUTO FORMAT DIRECT) .......35 Selecting a pre-programmed sound field.....36 Using only the front speakers and sub woofer (2CH STEREO 38 Resetting...
Operating Instructions
Page 6
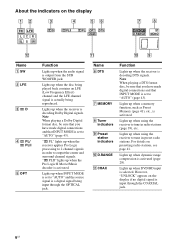
...., is output from the SUB WOOFER jack. Lights up when the audio signal is activated. Lights up when the receiver applies Pro Logic processing to 2 channel signals in order to tune in preset radio stations. PL OPT DTS COAX 7 8 MEMORY ST D.RANGE MONO qs Name A SW B LFE C; "; PL/ ; Note When playing a Dolby Digital format disc, be sure that you have made digital connections and that INPUT MODE is a digital signal being reproduced. PL" lights up when using the receiver to output the center and surround channel signals...
...., is output from the SUB WOOFER jack. Lights up when the audio signal is activated. Lights up when the receiver applies Pro Logic processing to 2 channel signals in order to tune in preset radio stations. PL OPT DTS COAX 7 8 MEMORY ST D.RANGE MONO qs Name A SW B LFE C; "; PL/ ; Note When playing a Dolby Digital format disc, be sure that you have made digital connections and that INPUT MODE is a digital signal being reproduced. PL" lights up when using the receiver to output the center and surround channel signals...
Operating Instructions
Page 9
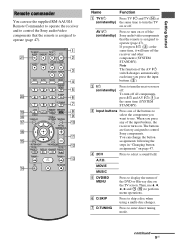
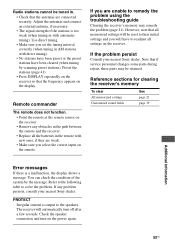
... same time to turn off the Sony audio/video components that the remote is assigned to operate (page 47). You can use the supplied RM-AAU024 Remote Commander to operate the receiver and to control the Sony audio/video components that the remote is assigned to perform menu operations. TV VOL MASTER VOL qh qa qg O RETURN/EXIT MENU/HOME TV CH - If you press the input buttons (C). The buttons are factory assigned to skip a disc when using a multi-disc changer. F D.SKIP Press to control Sony components...
... same time to turn off the Sony audio/video components that the remote is assigned to operate (page 47). You can use the supplied RM-AAU024 Remote Commander to operate the receiver and to control the Sony audio/video components that the remote is assigned to perform menu operations. TV VOL MASTER VOL qh qa qg O RETURN/EXIT MENU/HOME TV CH - If you press the input buttons (C). The buttons are factory assigned to skip a disc when using a multi-disc changer. F D.SKIP Press to control Sony components...
Operating Instructions
Page 10
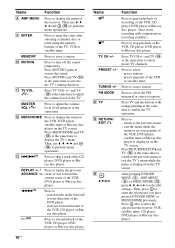
... pressing DVD/BD MENU (E), AMP MENU (H), or MENU/HOME (L), press V, v, B or b to perform menu operations. Then, use V, v, B, b and (P) to replay the previous scene or fast forward the current scene of the VCR, CD player or Bluray disc player. Press TV and the buttons with components in the forward/ reverse direction of the VCR or satellite tuner. and TV (N) at the same time to stop playback of the receiver. preset stations. - FM MODE...
... pressing DVD/BD MENU (E), AMP MENU (H), or MENU/HOME (L), press V, v, B or b to perform menu operations. Then, use V, v, B, b and (P) to replay the previous scene or fast forward the current scene of the VCR, CD player or Bluray disc player. Press TV and the buttons with components in the forward/ reverse direction of the VCR or satellite tuner. and TV (N) at the same time to stop playback of the receiver. preset stations. - FM MODE...
Operating Instructions
Page 19
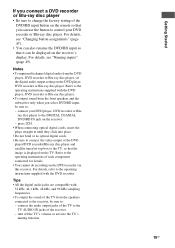
... disc player. press 2CH. • When connecting optical digital cords, insert the plugs straight in until they click into place. • Do not bend or tie optical digital cords. • Be sure to connect the video output of the DVD player/DVD recorder/Blu-ray disc player and satellite tuner/set the digital audio output setting on the TV. connect the audio output jacks of the TV to the TV AUDIO IN jacks of the receiver. - Refer to the operating instructions of each component connected...
... disc player. press 2CH. • When connecting optical digital cords, insert the plugs straight in until they click into place. • Do not bend or tie optical digital cords. • Be sure to connect the video output of the DVD player/DVD recorder/Blu-ray disc player and satellite tuner/set the digital audio output setting on the TV. connect the audio output jacks of the TV to the TV AUDIO IN jacks of the receiver. - Refer to the operating instructions of each component connected...
Operating Instructions
Page 21
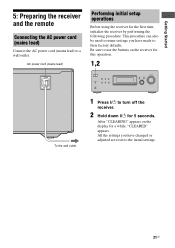
.... MOVIE MUSIC PHONES DISPLAY INPUT MODE INPUT SELECTOR MASTER VOLUME To the wall outlet 1 Press ?/1 to use the buttons on the display for this operation. 1,2 ?/1 VIDEO IN/ PORTABLE AUDIO IN DIMMER SLEEP 2CH A.F.D. After "CLEARING" appears on the receiver for a while, "CLEARED" appears. Getting Started 5: Preparing the receiver and the remote Connecting the AC power cord (mains lead) Connect the AC power cord (mains lead) to their factory defaults. Be sure to turn off the receiver...
.... MOVIE MUSIC PHONES DISPLAY INPUT MODE INPUT SELECTOR MASTER VOLUME To the wall outlet 1 Press ?/1 to use the buttons on the display for this operation. 1,2 ?/1 VIDEO IN/ PORTABLE AUDIO IN DIMMER SLEEP 2CH A.F.D. After "CLEARING" appears on the receiver for a while, "CLEARED" appears. Getting Started 5: Preparing the receiver and the remote Connecting the AC power cord (mains lead) Connect the AC power cord (mains lead) to their factory defaults. Be sure to turn off the receiver...
Operating Instructions
Page 22
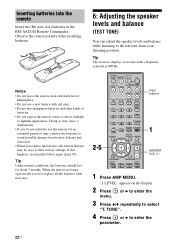
... kinds of time, remove the batteries to use a new battery with a frequency centered at 800 Hz. 2-5 TV INPUT TV ?/1 SLEEP DMPORT AV ?/1 ?/1 SYSTEM STANDBY VIDEO DVD/BD SAT TV SA-CD/CD TUNER 2CH A.F.D. TV CH + PRESET - When the remote no longer operates the receiver, replace all the batteries with new ones. 6: Adjusting the speaker levels and balance (TEST TONE) You can adjust the speaker levels and balance while listening to the test tone from battery...
... kinds of time, remove the batteries to use a new battery with a frequency centered at 800 Hz. 2-5 TV INPUT TV ?/1 SLEEP DMPORT AV ?/1 ?/1 SYSTEM STANDBY VIDEO DVD/BD SAT TV SA-CD/CD TUNER 2CH A.F.D. TV CH + PRESET - When the remote no longer operates the receiver, replace all the batteries with new ones. 6: Adjusting the speaker levels and balance (TEST TONE) You can adjust the speaker levels and balance while listening to the test tone from battery...
Operating Instructions
Page 24
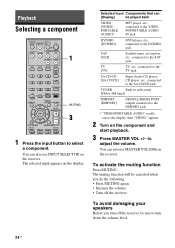
... volume level. 24US TV CH + PRESET - You can also use MASTER VOLUME on the component and start playback. 3 Press MASTER VOL +/- Selected input Components that can also use INPUT SELECTOR on the display. to select a component. To activate the muting function Press MUTING. You can [Display] be sure to the DMPORT jack * "VIDEO/PORTABLE AUDIO" scrolls across the display, then "VIDEO" appears. 2 Turn on the receiver. MOVIE MUSIC DVD/BD MENU 123 D.SKIP 456 D.TUNING 789 >10 CLEAR DISPLAY MEMORY AMP MENU...
... volume level. 24US TV CH + PRESET - You can also use MASTER VOLUME on the component and start playback. 3 Press MASTER VOL +/- Selected input Components that can also use INPUT SELECTOR on the display. to select a component. To activate the muting function Press MUTING. You can [Display] be sure to the DMPORT jack * "VIDEO/PORTABLE AUDIO" scrolls across the display, then "VIDEO" appears. 2 Turn on the receiver. MOVIE MUSIC DVD/BD MENU 123 D.SKIP 456 D.TUNING 789 >10 CLEAR DISPLAY MEMORY AMP MENU...

Operating Instructions
Page 25
... ?/1 ?/1 SYSTEM STANDBY VIDEO DVD/BD SAT TV SA-CD/CD TUNER 2CH A.F.D. You can select the sound field to suit the music. Playback Listening/Watching a component Listening to page 36 for details. MOVIE MUSIC PHONES DISPLAY INPUT MODE INPUT SELECTOR MASTER VOLUME 5 3 Notes • The operation is described for details. 1 Turn on the Super Audio CD player or CD player, then place the disc on the tray. 2 Turn on the receiver to select "SA...
... ?/1 ?/1 SYSTEM STANDBY VIDEO DVD/BD SAT TV SA-CD/CD TUNER 2CH A.F.D. You can select the sound field to suit the music. Playback Listening/Watching a component Listening to page 36 for details. MOVIE MUSIC PHONES DISPLAY INPUT MODE INPUT SELECTOR MASTER VOLUME 5 3 Notes • The operation is described for details. 1 Turn on the Super Audio CD player or CD player, then place the disc on the tray. 2 Turn on the receiver to select "SA...
Operating Instructions
Page 26
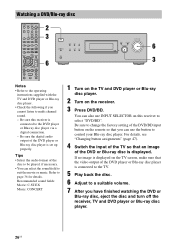
... remote so that you can also use the button to control your Blu-ray disc player. If no image is displayed on the receiver. 3 Press DVD/BD. TUNING + m H M TV FM MODE X x 2 3 6 ?/1 VIDEO IN/ PORTABLE AUDIO IN DIMMER SLEEP 2CH A.F.D. You can use INPUT SELECTOR on this receiver is connected to the TV. 5 Play back the disc. 6 Adjust to a suitable volume. 7 After you cannot listen to the DVD player or Blu-ray disc player via a digital connection. - MOVIE MUSIC DVD/BD MENU...
... remote so that you can also use the button to control your Blu-ray disc player. If no image is displayed on the receiver. 3 Press DVD/BD. TUNING + m H M TV FM MODE X x 2 3 6 ?/1 VIDEO IN/ PORTABLE AUDIO IN DIMMER SLEEP 2CH A.F.D. You can use INPUT SELECTOR on this receiver is connected to the TV. 5 Play back the disc. 6 Adjust to a suitable volume. 7 After you cannot listen to the DVD player or Blu-ray disc player via a digital connection. - MOVIE MUSIC DVD/BD MENU...

Operating Instructions
Page 38
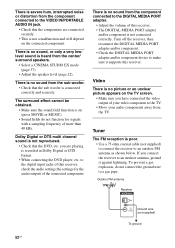
... function does not work for movie/music Press 2CH to select "A.F.D. To turn off the surround effect for signals with a sampling frequency of DVD software, etc., by looking at the logo on the package. • Sound fields with bass frequencies being output from the sub woofer. The front channel bass frequencies will be output from the front left/right speakers and the sub woofer. Using only the front speakers and sub woofer (2CH STEREO) In this mode, the receiver outputs...
... function does not work for movie/music Press 2CH to select "A.F.D. To turn off the surround effect for signals with a sampling frequency of DVD software, etc., by looking at the logo on the package. • Sound fields with bass frequencies being output from the sub woofer. The front channel bass frequencies will be output from the front left/right speakers and the sub woofer. Using only the front speakers and sub woofer (2CH STEREO) In this mode, the receiver outputs...
Operating Instructions
Page 41
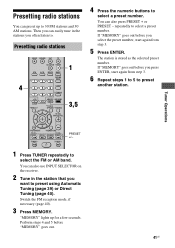
... MEMORY. The station is stored as the selected preset number. TUNING + m H M PRESET +/- 1 Press TUNER repeatedly to select a preset number. Tuner Operations O RETURN/EXIT MENU/HOME TV CH - MOVIE MUSIC DVD/BD MENU 123 4 D.SKIP 456 D.TUNING 789 >10 CLEAR DISPLAY MEMORY AMP MENU 0/10 ENTER TOOLS/ OPTIONS MUTING 3,5 TV VOL MASTER VOL 4 Press the numeric buttons to preset using Automatic Tuning (page 39) or Direct Tuning (page 40). You can also use INPUT SELECTOR on the receiver. 2 Tune in the stations you press...
... MEMORY. The station is stored as the selected preset number. TUNING + m H M PRESET +/- 1 Press TUNER repeatedly to select a preset number. Tuner Operations O RETURN/EXIT MENU/HOME TV CH - MOVIE MUSIC DVD/BD MENU 123 4 D.SKIP 456 D.TUNING 789 >10 CLEAR DISPLAY MEMORY AMP MENU 0/10 ENTER TOOLS/ OPTIONS MUTING 3,5 TV VOL MASTER VOL 4 Press the numeric buttons to preset using Automatic Tuning (page 39) or Direct Tuning (page 40). You can also use INPUT SELECTOR on the receiver. 2 Tune in the stations you press...
Operating Instructions
Page 47
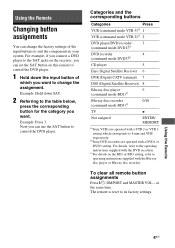
... change the factory settings of which corresponds to suit the components in your system. c)For details on this remote to control the DVD player. 1 Hold down SAT. 2 Referring to its factory settings. To clear all remote button assignments Press ?/1, DMPORT and MASTER VOL - Now you want to the operating instructions supplied with the Blu-ray disc player or Blu-ray disc recorder. Using the Remote 47US at the same time. b)Sony DVD recorders are operated...
... change the factory settings of which corresponds to suit the components in your system. c)For details on this remote to control the DVD player. 1 Hold down SAT. 2 Referring to its factory settings. To clear all remote button assignments Press ?/1, DMPORT and MASTER VOL - Now you want to the operating instructions supplied with the Blu-ray disc player or Blu-ray disc recorder. Using the Remote 47US at the same time. b)Sony DVD recorders are operated...
Operating Instructions
Page 51
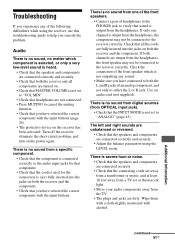
... sound from digital sources (from OPTICAL input jack). • Check that the connecting cords are dirty. If both the L and R jacks of the following difficulties while using the LEVEL menu. There is (are connected correctly and securely. • Adjust the balance parameters using the receiver, use this troubleshooting guide to the receiver correctly. There is no sound from a specific component. • Check that the component is connected correctly to the audio input jacks for that component. • Check that the cord(s) used...
... sound from digital sources (from OPTICAL input jack). • Check that the connecting cords are dirty. If both the L and R jacks of the following difficulties while using the LEVEL menu. There is (are connected correctly and securely. • Adjust the balance parameters using the receiver, use this troubleshooting guide to the receiver correctly. There is no sound from a specific component. • Check that the component is connected correctly to the audio input jacks for that component. • Check that the cord(s) used...
Operating Instructions
Page 52
.... to the digital input jacks of this receiver, check the audio setting (the settings for signals with a sampling frequency of your video component to the TV. • Move your audio components away from the TV. Video There is no sound from the component connected to the DIGITAL MEDIA PORT adapter. • Adjust the volume of the connected component. There is no sound from the sub woofer. • Check that the DVD, etc. Outdoor FM antenna Receiver ANTENNA AM Ground wire (not...
.... to the digital input jacks of this receiver, check the audio setting (the settings for signals with a sampling frequency of your video component to the TV. • Move your audio components away from the TV. Video There is no sound from the component connected to the DIGITAL MEDIA PORT adapter. • Adjust the volume of the connected component. There is no sound from the sub woofer. • Check that the DVD, etc. Outdoor FM antenna Receiver ANTENNA AM Ground wire (not...
Operating Instructions
Page 53
... connect an external antenna, if necessary. • The signal strength of the system by scanning preset stations). Remote commander The remote does not function. • Point the remote at the remote sensor on the power again. 53US Note that all the batteries in with automatic tuning). However, note that if service personnel changes some parts during repair, these parts may be reset to remedy the problem using the troubleshooting guide Clearing the receiver...
... connect an external antenna, if necessary. • The signal strength of the system by scanning preset stations). Remote commander The remote does not function. • Point the remote at the remote sensor on the power again. 53US Note that all the batteries in with automatic tuning). However, note that if service personnel changes some parts during repair, these parts may be reset to remedy the problem using the troubleshooting guide Clearing the receiver...
Operating Instructions
Page 54
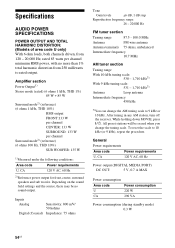
... Area code Power requirements U, CA 120 V AC, 60 Hz Power output (DIGITAL MEDIA PORT) DC OUT: 5 V, 0.7 A MAX Power consumption Area code Power consumption U 220 W CA 290 VA Power consumption (during standby mode) 0.3 W 54US Inputs Analog Digital (Coaxial) Sensitivity: 800 mV/ 50 kohms Impedance: 75 ohms Tone Gain levels ±6 dB, 1 dB step Reproduction frequency range: 28 - 20,000 Hz FM tuner section Tuning range 87.5 - 108.0 MHz Antenna FM wire antenna Antenna terminals 75 ohms, unbalanced Intermediate frequency 10.7 MHz AM tuner section Tuning range...
... Area code Power requirements U, CA 120 V AC, 60 Hz Power output (DIGITAL MEDIA PORT) DC OUT: 5 V, 0.7 A MAX Power consumption Area code Power consumption U 220 W CA 290 VA Power consumption (during standby mode) 0.3 W 54US Inputs Analog Digital (Coaxial) Sensitivity: 800 mV/ 50 kohms Impedance: 75 ohms Tone Gain levels ±6 dB, 1 dB step Reproduction frequency range: 28 - 20,000 Hz FM tuner section Tuning range 87.5 - 108.0 MHz Antenna FM wire antenna Antenna terminals 75 ohms, unbalanced Intermediate frequency 10.7 MHz AM tuner section Tuning range...
Operating Instructions
Page 56
... Dolby Digital 48 DTS 48 DVD player connecting 18 playback 26 DVD recorder connecting 18 E Error messages 53 I Initial setup 21 INPUT MODE 43 M Menu AUDIO 32 LEVEL 30 SUR 31 SYSTEM 33 TONE 31 TUNER 32 Muting 24 N Naming 42, 45 P Portable audio connecting 16 R Remote commander 9 S Satellite tuner/Set-top box connecting 18 Selecting component 24 sound field 36 Sleep Timer 46 Sound fields resetting 39 selecting 36 Speakers connecting 14 installing 12 Super Audio CD player connecting 16 playback 25 T TEST TONE 22 Tuner connecting 20 Tuning...
... Dolby Digital 48 DTS 48 DVD player connecting 18 playback 26 DVD recorder connecting 18 E Error messages 53 I Initial setup 21 INPUT MODE 43 M Menu AUDIO 32 LEVEL 30 SUR 31 SYSTEM 33 TONE 31 TUNER 32 Muting 24 N Naming 42, 45 P Portable audio connecting 16 R Remote commander 9 S Satellite tuner/Set-top box connecting 18 Selecting component 24 sound field 36 Sleep Timer 46 Sound fields resetting 39 selecting 36 Speakers connecting 14 installing 12 Super Audio CD player connecting 16 playback 25 T TEST TONE 22 Tuner connecting 20 Tuning...
Marketing Specifications (HTDDWG700)
Page 2
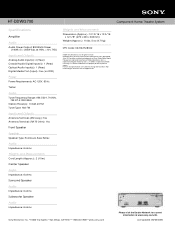
HT-DDWG700 Component Home Theater System Specifications Amplifier Audio Audio Power Output: 800 Watts Power (140W x 5 + 200W Sub,at 1KHz,
HT-DDWG700 Component Home Theater System Specifications Amplifier Audio Audio Power Output: 800 Watts Power (140W x 5 + 200W Sub,at 1KHz,


