
HT5950DP Instructions (entire HT system)
Page 2
... built-in cabinet. These limits are cautioned that interference will not occur in a residential installation. Reorient or relocate the receiving antenna. - CAUTION You are designed to operate this manual could void your authority to provide reasonable protection against harmful interference in... try to CATV system installer: This reminder is connected. - As an ENERGY STAR® partner, Sony Corporation has determined that this equipment does cause harmful interference to radio or television reception, which the receiver is provided to call CATV system installer's attention to...
... built-in cabinet. These limits are cautioned that interference will not occur in a residential installation. Reorient or relocate the receiving antenna. - CAUTION You are designed to operate this manual could void your authority to provide reasonable protection against harmful interference in... try to CATV system installer: This reminder is connected. - As an ENERGY STAR® partner, Sony Corporation has determined that this equipment does cause harmful interference to radio or television reception, which the receiver is provided to call CATV system installer's attention to...
HT5950DP Instructions (entire HT system)
Page 3
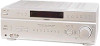
...- Center speaker - Front speaker (left ) - Front speaker (right) - Surround speaker (left ) - For details on the use of Digital Theater Systems, Inc. Front speaker (left ) - Front speaker (right) - Center speaker - Surround back speaker - Front speaker (right) - Surround speaker... (right) - Surround back speaker - Sub woofer • DVD player STR-K9900P SS-MSP69L SS-MSP69R SS-CNP69 SS-MSP69SL SS-MSP69SR SS-MSP69SB SA-WMSP69 DVP-NC60P The HT-5950DP consists of : • Receiver • Speaker system - Center speaker - Surround back speaker - SURROUND BACK R L - ...
...- Center speaker - Front speaker (left ) - Front speaker (right) - Surround speaker (left ) - For details on the use of Digital Theater Systems, Inc. Front speaker (left ) - Front speaker (right) - Center speaker - Surround back speaker - Front speaker (right) - Surround speaker... (right) - Surround back speaker - Sub woofer • DVD player STR-K9900P SS-MSP69L SS-MSP69R SS-CNP69 SS-MSP69SL SS-MSP69SR SS-MSP69SB SA-WMSP69 DVP-NC60P The HT-5950DP consists of : • Receiver • Speaker system - Center speaker - Surround back speaker - SURROUND BACK R L - ...
HT5950DP Instructions (entire HT system)
Page 5
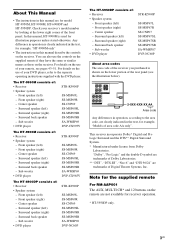
...is used to output the audio decoded by the component's internal multi channel decoder through 1c beginning on page 7 describe how to hook up all your components to "2: Connecting the antennas" (page 14). After hooking up your components, proceed to this receiver. Page 7-8 10-11 7-8 8 or 11 ...13 7-8 7-8 9 10 12 12 10 13 a) Model with component video (Y, PB/CB/B-Y, PR/CR/R-Y) input jacks. ...
...is used to output the audio decoded by the component's internal multi channel decoder through 1c beginning on page 7 describe how to hook up all your components to "2: Connecting the antennas" (page 14). After hooking up your components, proceed to this receiver. Page 7-8 10-11 7-8 8 or 11 ...13 7-8 7-8 9 10 12 12 10 13 a) Model with component video (Y, PB/CB/B-Y, PR/CR/R-Y) input jacks. ...

HT5950DP Instructions (entire HT system)
Page 7
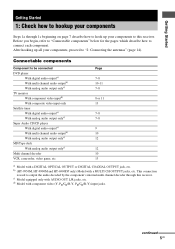
Getting Started . 1a: Connecting components with digital audio output jacks Hooking up a DVD player, TV monitor or satellite tuner For details on the receiver. In this case, do not connect the TV's video output jack to the VIDEO 2 AUDIO IN jacks on the receiver. DVD player OUTPUT DIGITAL COAXIAL E OUTPUT AUDIO... OUT L R A DIGITAL OPTICAL VIDEO 2 IN SA-CD/ CD IN DVD IN COAXIAL ANTENNA AM COMPONENT VIDEO ASSIGNABLE Y MONITOR PB/CB /B-Y VIDEO IN VIDEO IN VIDEO OUT ...
Getting Started . 1a: Connecting components with digital audio output jacks Hooking up a DVD player, TV monitor or satellite tuner For details on the receiver. In this case, do not connect the TV's video output jack to the VIDEO 2 AUDIO IN jacks on the receiver. DVD player OUTPUT DIGITAL COAXIAL E OUTPUT AUDIO... OUT L R A DIGITAL OPTICAL VIDEO 2 IN SA-CD/ CD IN DVD IN COAXIAL ANTENNA AM COMPONENT VIDEO ASSIGNABLE Y MONITOR PB/CB /B-Y VIDEO IN VIDEO IN VIDEO OUT ...

HT5950DP Instructions (entire HT system)
Page 8
...connect a TV or satellite tuner and a DVD player with component video input jacks allows you to component video signals (or vice versa). 8US Satellite tuner OUTPUT VIDEO OUTPUT COMPONENT PR/CR/R-Y PB/CB/B-Y Y TV monitor INPUT VIDEO INPUT COMPONENT PR/CR/R-Y PB/CB/B-Y Y C G C G DIGITAL ...AUDIO OUT AUDIO IN DVD VIDEO 2 VIDEO 1 R SUB FRONT SURROUND WOOFER SUB MULTI CH IN WOOFER C OUTPUT VIDEO G OUTPUT COMPONENT PR/CR/R-Y PB/CB/B-Y Y DVD player Note On this receiver, the standard video signals cannot be converted to enjoy higher quality video. Connecting a TV with...
...connect a TV or satellite tuner and a DVD player with component video input jacks allows you to component video signals (or vice versa). 8US Satellite tuner OUTPUT VIDEO OUTPUT COMPONENT PR/CR/R-Y PB/CB/B-Y Y TV monitor INPUT VIDEO INPUT COMPONENT PR/CR/R-Y PB/CB/B-Y Y C G C G DIGITAL ...AUDIO OUT AUDIO IN DVD VIDEO 2 VIDEO 1 R SUB FRONT SURROUND WOOFER SUB MULTI CH IN WOOFER C OUTPUT VIDEO G OUTPUT COMPONENT PR/CR/R-Y PB/CB/B-Y Y DVD player Note On this receiver, the standard video signals cannot be converted to enjoy higher quality video. Connecting a TV with...

HT5950DP Instructions (entire HT system)
Page 9
... with 32 kHz, 44.1 kHz, 48 kHz and 96 kHz sampling frequencies. DIGITAL OPTICAL VIDEO 2 IN SA-CD/ CD IN DVD IN COAXIAL ANTENNA AM COMPONENT VIDEO ASSIGNABLE Y MONITOR PB/CB /B-Y VIDEO IN VIDEO IN VIDEO OUT VIDEO IN VIDEO OUT DVD IN VIDEO 2 IN PR/CR /R-Y MONITOR OUT L L R IN SA... digital audio jacks are compatible with the Super Audio CD player. 9US Connect the player to the SA-CD/CD OPTICAL IN jack on this receiver. Note No sound is output when you play a Super Audio CD on the required cords (A-G), see page 6. Getting Started Hooking up a Super Audio CD/CD...
... with 32 kHz, 44.1 kHz, 48 kHz and 96 kHz sampling frequencies. DIGITAL OPTICAL VIDEO 2 IN SA-CD/ CD IN DVD IN COAXIAL ANTENNA AM COMPONENT VIDEO ASSIGNABLE Y MONITOR PB/CB /B-Y VIDEO IN VIDEO IN VIDEO OUT VIDEO IN VIDEO OUT DVD IN VIDEO 2 IN PR/CR /R-Y MONITOR OUT L L R IN SA... digital audio jacks are compatible with the Super Audio CD player. 9US Connect the player to the SA-CD/CD OPTICAL IN jack on this receiver. Note No sound is output when you play a Super Audio CD on the required cords (A-G), see page 6. Getting Started Hooking up a Super Audio CD/CD...

HT5950DP Instructions (entire HT system)
Page 10
... speakers and sub woofer using the controls on the required cords (A-G), see page 6. For details on the connected component. 10US DIGITAL OPTICAL VIDEO 2 IN SA-CD/ CD IN DVD IN COAXIAL ANTENNA AM COMPONENT VIDEO ASSIGNABLE Y MONITOR PB/CB /B-Y VIDEO IN VIDEO IN VIDEO OUT VIDEO IN VIDEO OUT DVD IN VIDEO... MULTI CH IN jacks, you will need to connect an external multi channel decoder. Alternatively, the multi channel input jacks can connect it to this receiver's MULTI CH IN jacks to enjoy software with multi channel audio recorded in formats other than the Dolby Digital and DTS.
... speakers and sub woofer using the controls on the required cords (A-G), see page 6. For details on the connected component. 10US DIGITAL OPTICAL VIDEO 2 IN SA-CD/ CD IN DVD IN COAXIAL ANTENNA AM COMPONENT VIDEO ASSIGNABLE Y MONITOR PB/CB /B-Y VIDEO IN VIDEO IN VIDEO OUT VIDEO IN VIDEO OUT DVD IN VIDEO... MULTI CH IN jacks, you will need to connect an external multi channel decoder. Alternatively, the multi channel input jacks can connect it to this receiver's MULTI CH IN jacks to enjoy software with multi channel audio recorded in formats other than the Dolby Digital and DTS.

HT5950DP Instructions (entire HT system)
Page 11
...jacks. Getting Started 2 Connect the video jacks. DVD player OUTPUT VIDEO OUTPUT COMPONENT PR/CR/R-Y PB/CB/B-Y Y C G TV monitor INPUT VIDEO INPUT COMPONENT PR/CR/R-Y PB/CB/B-Y Y C G DIGITAL OPTICAL VIDEO 2 IN SA-CD/ CD IN DVD IN COAXIAL ANTENNA AM COMPONENT VIDEO ASSIGNABLE Y MONITOR PB/CB /B-Y VIDEO IN VIDEO IN VIDEO OUT VIDEO...OUT L L L CENTER R R AUDIO IN AUDIO IN AUDIO OUT AUDIO IN DVD VIDEO 2 VIDEO 1 R SUB FRONT SURROUND WOOFER SUB MULTI CH IN WOOFER Note On this receiver, the standard video signals cannot be converted to enjoy higher quality video.
...jacks. Getting Started 2 Connect the video jacks. DVD player OUTPUT VIDEO OUTPUT COMPONENT PR/CR/R-Y PB/CB/B-Y Y C G TV monitor INPUT VIDEO INPUT COMPONENT PR/CR/R-Y PB/CB/B-Y Y C G DIGITAL OPTICAL VIDEO 2 IN SA-CD/ CD IN DVD IN COAXIAL ANTENNA AM COMPONENT VIDEO ASSIGNABLE Y MONITOR PB/CB /B-Y VIDEO IN VIDEO IN VIDEO OUT VIDEO...OUT L L L CENTER R R AUDIO IN AUDIO IN AUDIO OUT AUDIO IN DVD VIDEO 2 VIDEO 1 R SUB FRONT SURROUND WOOFER SUB MULTI CH IN WOOFER Note On this receiver, the standard video signals cannot be converted to enjoy higher quality video.

HT5950DP Instructions (entire HT system)
Page 14
...Connect the supplied AM loop antenna and FM wire antenna. Notes • To prevent noise pickup, keep the AM loop antenna away from the receiver and other components. • Be sure to fully extend the FM wire antenna. • After connecting the FM wire antenna, keep it as horizontal as ...possible. 14US AM loop antenna (supplied) DIGITAL OPTICAL VIDEO 2 IN SA-CD/ CD IN DVD IN COAXIAL ANTENNA AM FM wire antenna (supplied) COMPONENT VIDEO ASSIGNABLE Y MONITOR PB/CB /B-Y VIDEO IN VIDEO IN VIDEO OUT VIDEO IN VIDEO OUT DVD IN VIDEO 2 IN PR/CR /R-Y MONITOR OUT L L ...
...Connect the supplied AM loop antenna and FM wire antenna. Notes • To prevent noise pickup, keep the AM loop antenna away from the receiver and other components. • Be sure to fully extend the FM wire antenna. • After connecting the FM wire antenna, keep it as horizontal as ...possible. 14US AM loop antenna (supplied) DIGITAL OPTICAL VIDEO 2 IN SA-CD/ CD IN DVD IN COAXIAL ANTENNA AM FM wire antenna (supplied) COMPONENT VIDEO ASSIGNABLE Y MONITOR PB/CB /B-Y VIDEO IN VIDEO IN VIDEO OUT VIDEO IN VIDEO OUT DVD IN VIDEO 2 IN PR/CR /R-Y MONITOR OUT L L ...
HT5950DP Instructions (entire HT system)
Page 15
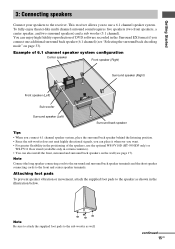
...theater-like multi channel surround sound requires five speakers (two front speakers, a center speaker, and two surround speakers) and a sub woofer (5.1 channel). Note Connect the long speaker connecting cords to the surround and surround back speaker terminals and the short speaker connecting cords to the receiver. This receiver... 3: Connecting speakers Connect your speakers to the front and center speaker terminals. Example of 6.1 channel speaker system configuration Center speaker Front speaker (Right) Surround speaker (Right) Front speaker (Left) Sub woofer Surround speaker...
...theater-like multi channel surround sound requires five speakers (two front speakers, a center speaker, and two surround speakers) and a sub woofer (5.1 channel). Note Connect the long speaker connecting cords to the surround and surround back speaker terminals and the short speaker connecting cords to the receiver. This receiver... 3: Connecting speakers Connect your speakers to the front and center speaker terminals. Example of 6.1 channel speaker system configuration Center speaker Front speaker (Right) Surround speaker (Right) Front speaker (Left) Sub woofer Surround speaker...
HT5950DP Instructions (entire HT system)
Page 18
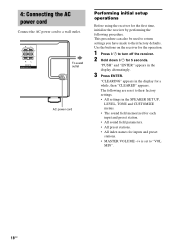
... you have made to "VOL MIN". 18US 4: Connecting the AC power cord Connect the AC power cord to turn off the receiver. 2 Hold down ?/1 for 5 seconds. R L R L FRONT B b To a wall outlet AC power cord Performing initial setup operations Before using the... receiver for the first time, initialize the receiver by performing the following are reset to their factory settings. • All settings in the SPEAKER SET UP, LEVEL, TONE and CUSTOMIZE menus. ...
... you have made to "VOL MIN". 18US 4: Connecting the AC power cord Connect the AC power cord to turn off the receiver. 2 Hold down ?/1 for 5 seconds. R L R L FRONT B b To a wall outlet AC power cord Performing initial setup operations Before using the... receiver for the first time, initialize the receiver by performing the following are reset to their factory settings. • All settings in the SPEAKER SET UP, LEVEL, TONE and CUSTOMIZE menus. ...
HT5950DP Instructions (entire HT system)
Page 19
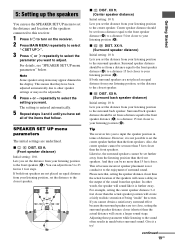
... up the speakers You can use the SPEAKER SET UP menu to set the distance and location of the speakers connected to this receiver. 1 Press ?/1 to turn on the receiver. 2 Press MAIN MENU repeatedly to select " SET UP ". 3 Press or repeatedly to select the parameter you want to adjust.... other speaker settings or may appear dimmed in terms of surround sound. Give it is not conducive to the front speakers (A). Tip The receiver lets you set the distance from your listening position to the center speaker. continued 19US Getting Started Lets you set the distance from your listening...
... up the speakers You can use the SPEAKER SET UP menu to set the distance and location of the speakers connected to this receiver. 1 Press ?/1 to turn on the receiver. 2 Press MAIN MENU repeatedly to select " SET UP ". 3 Press or repeatedly to select the parameter you want to adjust.... other speaker settings or may appear dimmed in terms of surround sound. Give it is not conducive to the front speakers (A). Tip The receiver lets you set the distance from your listening position to the center speaker. continued 19US Getting Started Lets you set the distance from your listening...
HT5950DP Instructions (entire HT system)
Page 21
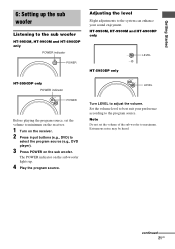
...enjoyment. LEVEL Turn LEVEL to the program source. Set the volume level to maximum. Note Do not set the volume to minimum on the receiver. 1 Turn on the receiver. 2 Press input buttons (e.g., DVD) to select the program source (e.g., DVD player). 3 Press POWER on the sub woofer lights up ...the sub woofer Listening to the sub woofer HT-9950M, HT-9900M and HT-6900DP only POWER indicator POWER Adjusting the level Slight adjustments to the system can...
...enjoyment. LEVEL Turn LEVEL to the program source. Set the volume level to maximum. Note Do not set the volume to minimum on the receiver. 1 Turn on the receiver. 2 Press input buttons (e.g., DVD) to select the program source (e.g., DVD player). 3 Press POWER on the sub woofer lights up ...the sub woofer Listening to the sub woofer HT-9950M, HT-9900M and HT-6900DP only POWER indicator POWER Adjusting the level Slight adjustments to the system can...

HT5950DP Instructions (entire HT system)
Page 22
...using the LEVEL menu (when the test tone is output from each speaker in the display and the test tone is output, the receiver switches to the LEVEL menu automatically), we recommend you follow the procedure described above and adjust the speaker levels from your listening position ... TONE. TEST TONE Adjust the speaker levels and balance while listening to turn MASTER VOLUME -/+ on the LEVEL menu settings, see page 36. Tip The receiver employs a test tone with a frequency centered at the same time, press MASTER VOL +/- Use the remote for the operation. Front (left) t Center t Front ...
...using the LEVEL menu (when the test tone is output from each speaker in the display and the test tone is output, the receiver switches to the LEVEL menu automatically), we recommend you follow the procedure described above and adjust the speaker levels from your listening position ... TONE. TEST TONE Adjust the speaker levels and balance while listening to turn MASTER VOLUME -/+ on the LEVEL menu settings, see page 36. Tip The receiver employs a test tone with a frequency centered at the same time, press MASTER VOL +/- Use the remote for the operation. Front (left) t Center t Front ...
HT5950DP Instructions (entire HT system)
Page 23
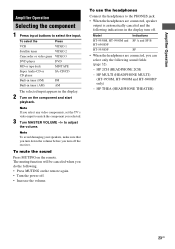
...following indications in the display. 2 Turn on the component and start playback. HP 2CH (HEADPHONE 2CH) - HP THEA (HEADPHONE THEATER) 23US To mute the sound Press MUTING on the remote again. • Turn the power off the receiver. The muting function will be canceled when you turn...AM The selected input appears in the display turn off . • Increase the volume. Note If you select any video components, set the TV's video input to match the component you can select only the following sound fields (page 32). - Amplifier Operation Amplifier Operation Selecting the...
...following indications in the display. 2 Turn on the component and start playback. HP 2CH (HEADPHONE 2CH) - HP THEA (HEADPHONE THEATER) 23US To mute the sound Press MUTING on the remote again. • Turn the power off the receiver. The muting function will be canceled when you turn...AM The selected input appears in the display turn off . • Increase the volume. Note If you select any video components, set the TV's video input to match the component you can select only the following sound fields (page 32). - Amplifier Operation Amplifier Operation Selecting the...

HT5950DP Instructions (entire HT system)
Page 24
... scanning whenever a station is selected, the tone and sound field cannot be changed (see page 14). When MULTI CH IN is received. However, this system, we recommend that you can be used. For details on the area code as follows: Speaker type Settings FRONT SMALL CENTER SMALL SURROUND/REAR ... 56). The last received station is poor, press FM MODE to change to multi channel sound - Press again to FM and AM broadcasts through the built-in the display and the FM stereo reception is tuned in the following table. Press TUNING + to scan from the components connected to high; ...
... scanning whenever a station is selected, the tone and sound field cannot be changed (see page 14). When MULTI CH IN is received. However, this system, we recommend that you can be used. For details on the area code as follows: Speaker type Settings FRONT SMALL CENTER SMALL SURROUND/REAR ... 56). The last received station is poor, press FM MODE to change to multi channel sound - Press again to FM and AM broadcasts through the built-in the display and the FM stereo reception is tuned in the following table. Press TUNING + to scan from the components connected to high; ...

HT5950DP Instructions (entire HT system)
Page 25
The last received station is stored to the selected preset number. Presetting radio stations You can select the ...enter the last "0" when the tuning scale is set to 10 kHz.) If you can also use FM or AM on the receiver. 2 Press D.TUNING. 3 Press the numeric buttons to enter the frequency. Then you have entered the right frequency. Tip ... If you cannot tune in a station and the entered numbers flash Make sure you have tuned in your area. The last received station is not used in an AM station, adjust the direction of the station you want directly. Do steps 4 to preset...
The last received station is stored to the selected preset number. Presetting radio stations You can select the ...enter the last "0" when the tuning scale is set to 10 kHz.) If you can also use FM or AM on the receiver. 2 Press D.TUNING. 3 Press the numeric buttons to enter the frequency. Then you have entered the right frequency. Tip ... If you cannot tune in a station and the entered numbers flash Make sure you have tuned in your area. The last received station is not used in an AM station, adjust the direction of the station you want directly. Do steps 4 to preset...
HT5950DP Instructions (entire HT system)
Page 26
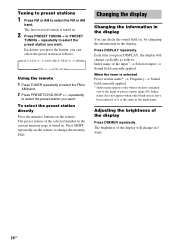
... the sound field etc. Tuning to preset stations 1 Press FM or AM to select the FM or AM band. 2 Press PRESET/CH/D.SKIP +/- The last received station is tuned in . 2 Press PRESET TUNING + or PRESET TUNING - The preset station of the display will change the memory page. Index name does not...
... the sound field etc. Tuning to preset stations 1 Press FM or AM to select the FM or AM band. 2 Press PRESET/CH/D.SKIP +/- The last received station is tuned in . 2 Press PRESET TUNING + or PRESET TUNING - The preset station of the display will change the memory page. Index name does not...
HT5950DP Instructions (entire HT system)
Page 27
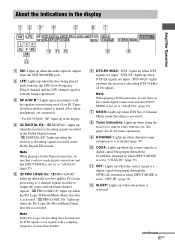
... set to tune in the display. DIGITAL EX" lights up when the receiver is set to output the center and surround channel signals. See pages 24-26 for signals with the speaker system being reproduced. "DTS 96/24" lights up when the source signal is a digital signal being input... through the OPTICAL terminal or when INPUT MODE is decoding signals recorded in the Dolby Digital format. DIGITAL EX: "; E ; K OPT: Lights up when the receiver is output from ...
... set to tune in the display. DIGITAL EX" lights up when the receiver is set to output the center and surround channel signals. See pages 24-26 for signals with the speaker system being reproduced. "DTS 96/24" lights up when the source signal is a digital signal being input... through the OPTICAL terminal or when INPUT MODE is decoding signals recorded in the Dolby Digital format. DIGITAL EX: "; E ; K OPT: Lights up when the receiver is output from ...
HT5950DP Instructions (entire HT system)
Page 28
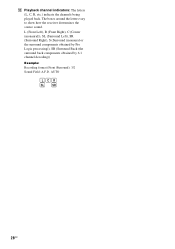
M Playback channel indicators: The letters (L, C, R, etc.) indicate the channels being played back. The boxes around the letters vary to show how the receiver downmixes the source sound. L (Front Left), R (Front Right), C (Center (monaural)), SL (Surround Left), SR (Surround Right), S (Surround (monaural or the surround components obtained by Pro Logic processing)), SB (Surround Back (the surround back components obtained by 6.1 channel decoding)) Example: Recording format (Front /Surround): 3/2 Sound Field: A.F.D. AUTO LCR SL SR 28US
M Playback channel indicators: The letters (L, C, R, etc.) indicate the channels being played back. The boxes around the letters vary to show how the receiver downmixes the source sound. L (Front Left), R (Front Right), C (Center (monaural)), SL (Surround Left), SR (Surround Right), S (Surround (monaural or the surround components obtained by Pro Logic processing)), SB (Surround Back (the surround back components obtained by 6.1 channel decoding)) Example: Recording format (Front /Surround): 3/2 Sound Field: A.F.D. AUTO LCR SL SR 28US


