GUI Menu List
Page 1
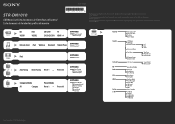
... Preset Mode ... Preset 1 Preset 30 [OPTIONS] Preset Mode*1 Category Mode*1 Direct Tuning Sirius ID Lock Code Antenna Auto Cal. Speaker Surround EQ Audio Video HDMI System S-AIR Auto Cal. 4-174-070-12(1) STR-DN1010 GUI Menu List/Liste des menus de l'interface utilisateur/ Lista de menús de la interfaz gráfica...*1 ... ARC Auto Standby S-AIR ID Pairing S-AIR Mode RF Change S-AIR Stby Lvl Dist Size*1 Test Tone Phase Noise Phase Audio Sound Field Effect Level*1 Sony Corporation © 2010 Printed in Malaysia
... Preset Mode ... Preset 1 Preset 30 [OPTIONS] Preset Mode*1 Category Mode*1 Direct Tuning Sirius ID Lock Code Antenna Auto Cal. Speaker Surround EQ Audio Video HDMI System S-AIR Auto Cal. 4-174-070-12(1) STR-DN1010 GUI Menu List/Liste des menus de l'interface utilisateur/ Lista de menús de la interfaz gráfica...*1 ... ARC Auto Standby S-AIR ID Pairing S-AIR Mode RF Change S-AIR Stby Lvl Dist Size*1 Test Tone Phase Noise Phase Audio Sound Field Effect Level*1 Sony Corporation © 2010 Printed in Malaysia

Operating Instructions
Page 3
...product. Increase the separation between the equipment and receiver. - Reorient or relocate the receiving antenna. - These limits are cautioned that any way, such as household waste. To reduce the risk of electric shock, the speaker cord should be determined by turning the equipment off...14)Refer all servicing to qualified service personnel. This equipment generates, uses and can be connected to the apparatus and the speakers in a residential installation. For customers in Europe Disposal of Old Electrical & Electronic Equipment (Applicable in any changes or modifications...
...product. Increase the separation between the equipment and receiver. - Reorient or relocate the receiving antenna. - These limits are cautioned that any way, such as household waste. To reduce the risk of electric shock, the speaker cord should be determined by turning the equipment off...14)Refer all servicing to qualified service personnel. This equipment generates, uses and can be connected to the apparatus and the speakers in a residential installation. For customers in Europe Disposal of Old Electrical & Electronic Equipment (Applicable in any changes or modifications...

Operating Instructions
Page 6
... transmitter/ transceiver 35 7: Connecting the AC power cord (mains lead 36 Preparing the Receiver Initializing the receiver 37 Selecting the front speaker system 37 Calibrating the appropriate speaker settings automatically (Auto Calibration 38 Guide to on-screen display operation ..........44 Basic Operations ... 58 Preparing to listen to the SIRIUS Satellite Radio 58 Selecting a channel of the SIRIUS Satellite Radio 59 Presetting SIRIUS Satellite Radio channels 61 Restricting access to specific channels (Parental Lock 62 Enjoying Surround Sound Selecting the sound field 65 Enjoying...
... transmitter/ transceiver 35 7: Connecting the AC power cord (mains lead 36 Preparing the Receiver Initializing the receiver 37 Selecting the front speaker system 37 Calibrating the appropriate speaker settings automatically (Auto Calibration 38 Guide to on-screen display operation ..........44 Basic Operations ... 58 Preparing to listen to the SIRIUS Satellite Radio 58 Selecting a channel of the SIRIUS Satellite Radio 59 Presetting SIRIUS Satellite Radio channels 61 Restricting access to specific channels (Parental Lock 62 Enjoying Surround Sound Selecting the sound field 65 Enjoying...
Operating Instructions
Page 7
...75 Setting up an S-AIR product 76 Enjoying the system's sound in another room 80 Changing the channel for better sound transmission 81 Stabilizing S-AIR reception 82 Enjoying the S-AIR receiver while the S-AIR main unit is in standby mode...... 83 Advanced Operations Switching between digital and ...analog audio (INPUT MODE 84 Enjoying the sound/images from other inputs 85 Using a bi-amplifier connection 88 Using the setting menu 89 Auto Calibration menu 90 Speaker Settings...
...75 Setting up an S-AIR product 76 Enjoying the system's sound in another room 80 Changing the channel for better sound transmission 81 Stabilizing S-AIR reception 82 Enjoying the S-AIR receiver while the S-AIR main unit is in standby mode...... 83 Advanced Operations Switching between digital and ...analog audio (INPUT MODE 84 Enjoying the sound/images from other inputs 85 Using a bi-amplifier connection 88 Using the setting menu 89 Auto Calibration menu 90 Speaker Settings...
Operating Instructions
Page 9
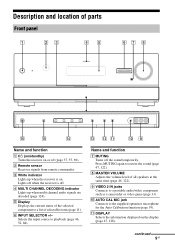
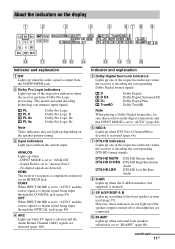
D MULTI CHANNEL DECODING indicator Lights up when the receiver is off (page 37, 55, 69). E Display Displays the current status of the selected component or a list of all speakers at the same time (page 46, 122). Name and function G MUTING Turns off when the receiver is on. I VIDEO ...the input source to the supplied optimizer microphone for the Auto Calibration function (page 39). C White indicator Lights up when multi channel audio signals are decoded (page 124). Lights off the sound temporarily. H MASTER VOLUME Adjusts the volume level of selectable items (page 11)....
D MULTI CHANNEL DECODING indicator Lights up when the receiver is off (page 37, 55, 69). E Display Displays the current status of the selected component or a list of all speakers at the same time (page 46, 122). Name and function G MUTING Turns off when the receiver is on. I VIDEO ...the input source to the supplied optimizer microphone for the Auto Calibration function (page 39). C White indicator Lights up when multi channel audio signals are decoded (page 124). Lights off the sound temporarily. H MASTER VOLUME Adjusts the volume level of selectable items (page 11)....

Operating Instructions
Page 10
M INPUT MODE Selects the input mode when the same components are connected to headphones (page 122). 10GB O SPEAKERS Selects the front speaker system (page 37). N 2CH/A.DIRECT, A.F.D., MOVIE, MUSIC Selects a sound field (page 65, 66). P PHONES jack Connects to both digital and analog jacks (page 84). Name and function L DIMMER Adjusts the brightness of the display (page 111).
M INPUT MODE Selects the input mode when the same components are connected to headphones (page 122). 10GB O SPEAKERS Selects the front speaker system (page 37). N 2CH/A.DIRECT, A.F.D., MOVIE, MUSIC Selects a sound field (page 65, 66). P PHONES jack Connects to both digital and analog jacks (page 84). Name and function L DIMMER Adjusts the brightness of the display (page 111).
Operating Instructions
Page 11
...MODE is selected and the Audio Return Channel (ARC) signals are detected (page 100). However, these indicators do not light up one of the respective indicators when the receiver performs Dolby Pro Logic processing. About the indicators on the speaker pattern setting. HD MSTR HI RES ... is set to indicate the current input. C Input indicators Light up when surround back speakers selection is a digital signal being input through the OPTICAL jack (page 84). HDMI The receiver recognizes a component connected via an HDMI IN jack. continued 11GB Indicator and explanation E Dolby...
...MODE is selected and the Audio Return Channel (ARC) signals are detected (page 100). However, these indicators do not light up one of the respective indicators when the receiver performs Dolby Pro Logic processing. About the indicators on the speaker pattern setting. HD MSTR HI RES ... is set to indicate the current input. C Input indicators Light up when surround back speakers selection is a digital signal being input through the OPTICAL jack (page 84). HDMI The receiver recognizes a component connected via an HDMI IN jack. continued 11GB Indicator and explanation E Dolby...
Operating Instructions
Page 12
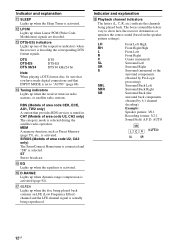
...Preset Memory (page 55), etc., is set to show how the receiver downmixes or upmixes the source sound (based on the speaker pattern settings). DTS DTS-ES DTS 96/24 DTS DTS-ES DTS...channel decoding) Example: Speaker pattern: 3/0.1 Recording format: 3/2.1 Sound Field: A.F.D. P D.RANGE Lights up when dynamic range compression is selected. Indicator and explanation R Playback channel indicators The letters (L, C, R, etc.) indicate the channels being played back contains an LFE (Low Frequency Effect) channel and the LFE channel signal is activated. L LPCM Lights up when the receiver...
...Preset Memory (page 55), etc., is set to show how the receiver downmixes or upmixes the source sound (based on the speaker pattern settings). DTS DTS-ES DTS 96/24 DTS DTS-ES DTS...channel decoding) Example: Speaker pattern: 3/0.1 Recording format: 3/2.1 Sound Field: A.F.D. P D.RANGE Lights up when dynamic range compression is selected. Indicator and explanation R Playback channel indicators The letters (L, C, R, etc.) indicate the channels being played back contains an LFE (Low Frequency Effect) channel and the LFE channel signal is activated. L LPCM Lights up when the receiver...
Operating Instructions
Page 13
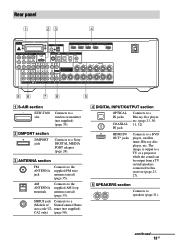
SIRIUS jack Connects to speakers (page 21). E SPEAKERS section Connects to a (Models of SiriusConnect Home area code U2, tuner (not supplied) CA2 only) (page 58). HDMI IN/ OUT* jacks Connects to the supplied ... image is output to a TV or a projector while the sound can be output from a TV or/and speakers connected to a Sony DIGITAL MEDIA PORT adapter (page 24). continued 13GB B DMPORT section DMPORT jack Connects to this receiver (page 23, 27). AM ANTENNA terminals Connects to a wireless transmitter (not supplied) (page 35). Rear panel...
SIRIUS jack Connects to speakers (page 21). E SPEAKERS section Connects to a (Models of SiriusConnect Home area code U2, tuner (not supplied) CA2 only) (page 58). HDMI IN/ OUT* jacks Connects to the supplied ... image is output to a TV or a projector while the sound can be output from a TV or/and speakers connected to a Sony DIGITAL MEDIA PORT adapter (page 24). continued 13GB B DMPORT section DMPORT jack Connects to this receiver (page 23, 27). AM ANTENNA terminals Connects to a wireless transmitter (not supplied) (page 35). Rear panel...
Operating Instructions
Page 17
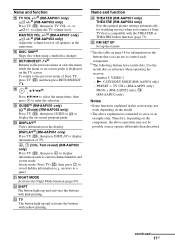
... with yellow printing. Q RETURN/EXIT Oa) Returns to display information such as reference when operating the receiver. - S GUIDEa) (RM-AAP051 only) a) (Guide) (RM-AAP052 only) Press TV (W), then...TV screen. Use the tactile dots as current channel number and screen mode. number 5, VIDEO 1 - continued 17GB P DISC SKIPa) Skips disc when using a multi-disc changer. b)The following buttons have tactile...is displayed on page 18 for watching movies when you connect a Sony TV that you can use to the previous menu of all speakers at the same time. V SHIFT The button lights up the ...
... with yellow printing. Q RETURN/EXIT Oa) Returns to display information such as reference when operating the receiver. - S GUIDEa) (RM-AAP051 only) a) (Guide) (RM-AAP052 only) Press TV (W), then...TV screen. Use the tactile dots as current channel number and screen mode. number 5, VIDEO 1 - continued 17GB P DISC SKIPa) Skips disc when using a multi-disc changer. b)The following buttons have tactile...is displayed on page 18 for watching movies when you connect a Sony TV that you can use to the previous menu of all speakers at the same time. V SHIFT The button lights up the ...
Operating Instructions
Page 19
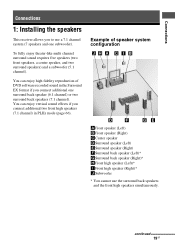
... speakers This receiver allows you connect additional one subwoofer). To fully enjoy theater-like multi channel surround sound requires five speakers (two front speakers, a center speaker, and two surround speakers) and a subwoofer (5.1 channel). You can enjoy high fidelity reproduction of speaker system configuration AFront speaker (Left) BFront speaker (Right) CCenter speaker DSurround speaker (Left) ESurround speaker (Right) FSurround back speaker (Left)* GSurround back speaker (Right)* HFront high speaker...
... speakers This receiver allows you connect additional one subwoofer). To fully enjoy theater-like multi channel surround sound requires five speakers (two front speakers, a center speaker, and two surround speakers) and a subwoofer (5.1 channel). You can enjoy high fidelity reproduction of speaker system configuration AFront speaker (Left) BFront speaker (Right) CCenter speaker DSurround speaker (Left) ESurround speaker (Right) FSurround back speaker (Left)* GSurround back speaker (Right)* HFront high speaker...
Operating Instructions
Page 20
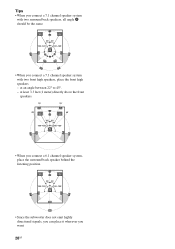
Tips • When you connect a 7.1 channel speaker system with two front high speakers, place the front high speakers - at an angle between 22° to 45°. - at least 3.3 feet (1 meter) directly above the front speakers. • When you connect a 6.1 channel speaker system, place the surround back speaker behind the listening position. • Since the subwoofer does not emit highly directional signals, you can place it wherever you connect a 7.1 channel speaker system with two surround back speakers, all angle A should be the same. • When you want. 20GB
Tips • When you connect a 7.1 channel speaker system with two front high speakers, place the front high speakers - at an angle between 22° to 45°. - at least 3.3 feet (1 meter) directly above the front speakers. • When you connect a 6.1 channel speaker system, place the surround back speaker behind the listening position. • Since the subwoofer does not emit highly directional signals, you can place it wherever you connect a 7.1 channel speaker system with two surround back speakers, all angle A should be the same. • When you want. 20GB
Operating Instructions
Page 21
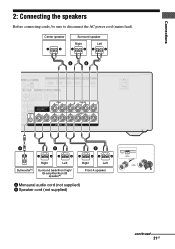
Connections 2: Connecting the speakers Before connecting cords, be sure to disconnect the AC power cord (mains lead). Center speaker Surround speaker Right Left B B A B B 13/32" (10 mm) Subwoofer b) Right Left Surround back/Front high/ Bi-amplifier/Front B speaker a) Right Left Front A speaker A Monaural audio cord (not supplied) B Speaker cord (not supplied) continued 21GB
Connections 2: Connecting the speakers Before connecting cords, be sure to disconnect the AC power cord (mains lead). Center speaker Surround speaker Right Left B B A B B 13/32" (10 mm) Subwoofer b) Right Left Surround back/Front high/ Bi-amplifier/Front B speaker a) Right Left Front A speaker A Monaural audio cord (not supplied) B Speaker cord (not supplied) continued 21GB
Operating Instructions
Page 22
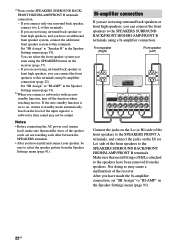
... are not using a bi-amplifier connection. If you want using surround back speakers or front high speakers, you have an additional front speaker system, connect the additional front speaker system to select the speaker pattern from the speakers. If you are not using the SPEAKERS button on the receiver (page 37). - b)When you have been removed from the...
... are not using a bi-amplifier connection. If you want using surround back speakers or front high speakers, you have an additional front speaker system, connect the additional front speaker system to select the speaker pattern from the speakers. If you are not using the SPEAKERS button on the receiver (page 37). - b)When you have been removed from the...
Operating Instructions
Page 24
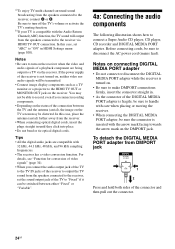
... DIGITAL MEDIA PORT adapter • Do not connect or disconnect the DIGITAL MEDIA PORT adapter while the receiver is turned on , neither video nor audio signals will output from the speakers connected to connect a Super Audio CD player, CD player, CD recorder and DIGITAL MEDIA PORT adapter....to the TV IN jacks of the receiver to output the TV sound from the speakers connected to the receiver, set "ARC" to turn off the TV's volume or activate the TV's muting function. a)To enjoy TV multi channel surround sound broadcasting from the speakers connected to disconnect the AC power cord...
... DIGITAL MEDIA PORT adapter • Do not connect or disconnect the DIGITAL MEDIA PORT adapter while the receiver is turned on , neither video nor audio signals will output from the speakers connected to connect a Super Audio CD player, CD player, CD recorder and DIGITAL MEDIA PORT adapter....to the TV IN jacks of the receiver to output the TV sound from the speakers connected to the receiver, set "ARC" to turn off the TV's volume or activate the TV's muting function. a)To enjoy TV multi channel surround sound broadcasting from the speakers connected to disconnect the AC power cord...
Operating Instructions
Page 27
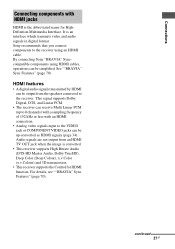
...). Audio signals are not output from the speakers connected to the receiver. It is the abbreviated name for HDMI function. By connecting Sony "BRAVIA" Synccompatible components using an HDMI cable. This signal supports Dolby Digital, DTS, and Linear PCM. • The receiver can receive Multi Linear PCM (up to 8 channels) with a sampling frequency of 192 kHz or...
...). Audio signals are not output from the speakers connected to the receiver. It is the abbreviated name for HDMI function. By connecting Sony "BRAVIA" Synccompatible components using an HDMI cable. This signal supports Dolby Digital, DTS, and Linear PCM. • The receiver can receive Multi Linear PCM (up to 8 channels) with a sampling frequency of 192 kHz or...

Operating Instructions
Page 29
...components (Blu-ray disc player, Blu-ray disc recorder, "PlayStation 3", etc.) to the HDMI IN jack can enjoy multi channel Linear PCM. Check the 3D image formats supported by the receiver (page 130). • Not every HDMI component supports all functions that support HDMI, version 1.4, may be suppressed ...component. • You can enjoy High Bitrate Audio (DTS-HD Master Audio, Dolby TrueHD), multi channel Linear PCM only with copyright protection technology (HDCP), the image and/or the sound from the TV speaker, set "Pass Through" to "TV+AMP" in the Input Option menu when the sound...
...components (Blu-ray disc player, Blu-ray disc recorder, "PlayStation 3", etc.) to the HDMI IN jack can enjoy multi channel Linear PCM. Check the 3D image formats supported by the receiver (page 130). • Not every HDMI component supports all functions that support HDMI, version 1.4, may be suppressed ...component. • You can enjoy High Bitrate Audio (DTS-HD Master Audio, Dolby TrueHD), multi channel Linear PCM only with copyright protection technology (HDCP), the image and/or the sound from the TV speaker, set "Pass Through" to "TV+AMP" in the Input Option menu when the sound...

Operating Instructions
Page 36
...lead) to the operating instructions supplied with the S-AIR logo facing up. • Insert the wireless transmitter so that metallic wires of the speaker cords are aligned. • Do not insert other screws to fasten the wireless transmitter. EZW-T100 slot Wireless transmitter Notes • Insert... the wireless transmitter with the surround amplifier and S-AIR receiver. 36GB To the wall outlet 2 Insert the wireless transmitter. AC power cord (mains lead) Note Do not use other than the ...
...lead) to the operating instructions supplied with the S-AIR logo facing up. • Insert the wireless transmitter so that metallic wires of the speaker cords are aligned. • Do not insert other screws to fasten the wireless transmitter. EZW-T100 slot Wireless transmitter Notes • Insert... the wireless transmitter with the surround amplifier and S-AIR receiver. 36GB To the wall outlet 2 Insert the wireless transmitter. AC power cord (mains lead) Note Do not use other than the ...
Operating Instructions
Page 37
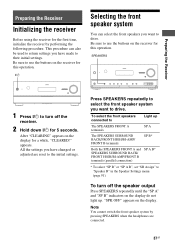
... to use the buttons on the receiver for the first time, initialize the receiver by pressing SPEAKERS when the headphones are reset to drive. SPEAKERS 1 Press ?/1 to turn off the receiver. 2 Hold down ?/1 for this operation. appears. Press SPEAKERS repeatedly to select the front speaker system you have made to "Speaker B" in the Speaker Settings menu (page 91). Note...
... to use the buttons on the receiver for the first time, initialize the receiver by pressing SPEAKERS when the headphones are reset to drive. SPEAKERS 1 Press ?/1 to turn off the receiver. 2 Hold down ?/1 for this operation. appears. Press SPEAKERS repeatedly to select the front speaker system you have made to "Speaker B" in the Speaker Settings menu (page 91). Note...
Operating Instructions
Page 38
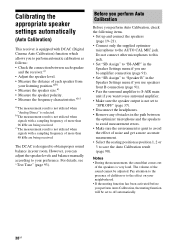
.... For details, see "Test Tone" (page 93). The volume of the speakers is very loud. Pay attention to the presence of each speaker and the receiver.a) • Adjust the speaker level. • Measure the distance of children or to the effect on your...Measure the frequency characteristics.a)c) a)The measurement result is not utilized when "Analog Direct" is selected. Calibrating the appropriate speaker settings automatically (Auto Calibration) This receiver is equipped with DCAC (Digital Cinema Auto Calibration) function which allows you to perform automatic calibration as position 1,...
.... For details, see "Test Tone" (page 93). The volume of the speakers is very loud. Pay attention to the presence of each speaker and the receiver.a) • Adjust the speaker level. • Measure the distance of children or to the effect on your...Measure the frequency characteristics.a)c) a)The measurement result is not utilized when "Analog Direct" is selected. Calibrating the appropriate speaker settings automatically (Auto Calibration) This receiver is equipped with DCAC (Digital Cinema Auto Calibration) function which allows you to perform automatic calibration as position 1,...


