
Operating Instructions
Page 5
...© 1996-2008 DTS, Inc. About area codes The area code of the receiver you purchased is a registered trademark and the DTS logos, Symbol, DTS-HD and DTS-HD Master Audio are trademarks of Sony Corporation. HDMI, the HDMI Logo, and High-Definition Multimedia Interface are trademarks or ...receiver if they have the same or similar names as those on the remote. About This Manual • The instructions in this manual are for example, "Models of area code CEK only". • The instructions in this manual, models of area code CEL is clearly indicated in the text, for model STR-DH810...
...© 1996-2008 DTS, Inc. About area codes The area code of the receiver you purchased is a registered trademark and the DTS logos, Symbol, DTS-HD and DTS-HD Master Audio are trademarks of Sony Corporation. HDMI, the HDMI Logo, and High-Definition Multimedia Interface are trademarks or ...receiver if they have the same or similar names as those on the remote. About This Manual • The instructions in this manual are for example, "Models of area code CEK only". • The instructions in this manual, models of area code CEL is clearly indicated in the text, for model STR-DH810...

Operating Instructions
Page 7
... 90 Additional Information Glossary 90 Precautions 93 Troubleshooting 95 Specifications 101 Index 103 • Remote commander (1) - Advanced Operations Switching between digital and analog audio (INPUT MODE 69 Enjoying the sound/images from other inputs 69 Enjoying sound/images from the ... instructions (this manual) • Quick Setup Guide • FM wire antenna (aerial) (1) • AM loop antenna (aerial) (1) Using the Remote Programming the remote 85 Clearing all the contents of area code CEL, CEK only) • R6 (size-AA) batteries (2) • Optimizer microphone (ECM-AC2)...
... 90 Additional Information Glossary 90 Precautions 93 Troubleshooting 95 Specifications 101 Index 103 • Remote commander (1) - Advanced Operations Switching between digital and analog audio (INPUT MODE 69 Enjoying the sound/images from other inputs 69 Enjoying sound/images from the ... instructions (this manual) • Quick Setup Guide • FM wire antenna (aerial) (1) • AM loop antenna (aerial) (1) Using the Remote Programming the remote 85 Clearing all the contents of area code CEL, CEK only) • R6 (size-AA) batteries (2) • Optimizer microphone (ECM-AC2)...

Operating Instructions
Page 8
F DIMMER (page 85) G MASTER VOLUME (page 42, 43) H MUTING (page 43) I VIDEO 2 IN jacks (page 30) qs qa q; 9 J AUTO CAL MIC jack (page 36) K DISPLAY (page 44) L 2CH/A.DIRECT, A.F.D., MOVIE, MUSIC (page 51) M TUNING MODE, TUNING +/-, MEMORY/ENTER (page 46) N INPUT MODE (page 69) O PHONES jack (page 95) P SPEAKERS (page 34) 8GB Description and location of parts Front panel 12 3 4 5 67 8 ?/1 qh qg qf qd A ?/1 (on/standby) (page 34, 48, 55) B TONE +/-, TONE MODE (page 81) C INPUT SELECTOR (page 43) D Display (page 9) E Remote sensor Receives signals from remote commander.
F DIMMER (page 85) G MASTER VOLUME (page 42, 43) H MUTING (page 43) I VIDEO 2 IN jacks (page 30) qs qa q; 9 J AUTO CAL MIC jack (page 36) K DISPLAY (page 44) L 2CH/A.DIRECT, A.F.D., MOVIE, MUSIC (page 51) M TUNING MODE, TUNING +/-, MEMORY/ENTER (page 46) N INPUT MODE (page 69) O PHONES jack (page 95) P SPEAKERS (page 34) 8GB Description and location of parts Front panel 12 3 4 5 67 8 ?/1 qh qg qf qd A ?/1 (on/standby) (page 34, 48, 55) B TONE +/-, TONE MODE (page 81) C INPUT SELECTOR (page 43) D Display (page 9) E Remote sensor Receives signals from remote commander.

Operating Instructions
Page 12
For details, see "Programming the remote" (page 85). • RM-AAP049 (Models of area code U2 only) • RM-AAP050 (Models of area code CEL, CEK only) wg wf wd ws wa w; E Video signal section* The image quality depends on the connecting jack. ... Yellow VIDEO IN/OUT * You can also program the remote to operate. F SPEAKERS section (page 19) Remote commander You can use the supplied remote to operate the receiver and to control the Sony audio/video components that the remote is assigned to control non-Sony audio/video components. BD DVD SAT/ CATV TV VIDEO 1 VIDEO 2 SA...
For details, see "Programming the remote" (page 85). • RM-AAP049 (Models of area code U2 only) • RM-AAP050 (Models of area code CEL, CEK only) wg wf wd ws wa w; E Video signal section* The image quality depends on the connecting jack. ... Yellow VIDEO IN/OUT * You can also program the remote to operate. F SPEAKERS section (page 19) Remote commander You can use the supplied remote to operate the receiver and to control the Sony audio/video components that the remote is assigned to control non-Sony audio/video components. BD DVD SAT/ CATV TV VIDEO 1 VIDEO 2 SA...
Operating Instructions
Page 13
...time. R , V/v/B/b Press V/v/B /b to select the settings, then press to control the receiver. V SHIFT The button lights up the remote. To control the receiver Be sure to press AMP (C) to change the remote button function to enter the selection. ENTERc) Enters the selection during tuner operation. I MENU... 5, VIDEO 1 -N - Name and function A ?/1b) (on/standby) Turns the receiver on or sets it to restore the sound. Saving the power in standby mode When "CTRL: HDMI" is set to "CTRL OFF" (page 76) and "S-AIR STBY" is set to control Sony components. The buttons are...
...time. R , V/v/B/b Press V/v/B /b to select the settings, then press to control the receiver. V SHIFT The button lights up the remote. To control the receiver Be sure to press AMP (C) to change the remote button function to enter the selection. ENTERc) Enters the selection during tuner operation. I MENU... 5, VIDEO 1 -N - Name and function A ?/1b) (on/standby) Turns the receiver on or sets it to restore the sound. Saving the power in standby mode When "CTRL: HDMI" is set to "CTRL OFF" (page 76) and "S-AIR STBY" is set to control Sony components. The buttons are...

Operating Instructions
Page 16
...RM-AAP049 only. k)This button is intended to the operating instructions supplied with the DIGITAL MEDIA PORT adapter. Notes • Do not leave the remote in the RM-AAP049 (Models of area code U2 only) or RM-AAP050 (Models of the button, refer to serve as references when operating ...the receiver. - Use the tactile dots as an example only. number 5, VIDEO 1 -N - g)LD player only. j) RM-AAP050 only. The function of time, remove the batteries to direct sunlight or ...
...RM-AAP049 only. k)This button is intended to the operating instructions supplied with the DIGITAL MEDIA PORT adapter. Notes • Do not leave the remote in the RM-AAP049 (Models of area code U2 only) or RM-AAP050 (Models of the button, refer to serve as references when operating ...the receiver. - Use the tactile dots as an example only. number 5, VIDEO 1 -N - g)LD player only. j) RM-AAP050 only. The function of time, remove the batteries to direct sunlight or ...

Operating Instructions
Page 25
..." (page 44). continued 25GB For details, see "Programming the remote" (page 85). • You can also rename the HDMI input so that it can use a Sony HDMI cable. Audio/video signals TV, etc.* * See page 21 for the audio connection of the HDMI 1-4 input button on the receiver's display. Notes • Be sure to change the...
..." (page 44). continued 25GB For details, see "Programming the remote" (page 85). • You can also rename the HDMI input so that it can use a Sony HDMI cable. Audio/video signals TV, etc.* * See page 21 for the audio connection of the HDMI 1-4 input button on the receiver's display. Notes • Be sure to change the...

Operating Instructions
Page 28
RM-AAP049: DVD player - RM-AAP050: DVD recorder To control other components, be displayed on the remote. If you connect a component equipped with the DVD player or DVD recorder. For details, see "Naming inputs" (page 44). 28GB Recommended connection Alternative ...is as follows: - Refer to change the initial setting of the COMPONENT VIDEO IN 2 jacks are DVD player or DVD recorder. ASSIGN" in the AUDIO menu (page 69). • The initial setting of the DVD input button on the receiver's display. Connecting a DVD player, DVD recorder The following illustration shows how...
RM-AAP049: DVD player - RM-AAP050: DVD recorder To control other components, be displayed on the remote. If you connect a component equipped with the DVD player or DVD recorder. For details, see "Naming inputs" (page 44). 28GB Recommended connection Alternative ...is as follows: - Refer to change the initial setting of the COMPONENT VIDEO IN 2 jacks are DVD player or DVD recorder. ASSIGN" in the AUDIO menu (page 69). • The initial setting of the DVD input button on the receiver's display. Connecting a DVD player, DVD recorder The following illustration shows how...

Operating Instructions
Page 30
... CAL MIC VIDEO L AUDIO R Camcorder, video game C A Video cord (not supplied) B Audio cord (not supplied) C Audio/video cord (not supplied) 30GB Connecting components with analog video and audio jack The following illustration shows how to change the initial setting of the VIDEO 1 input button on the receiver's display. For details, see "Naming inputs" (page 44). For details, see "Programming the remote" (page...
... CAL MIC VIDEO L AUDIO R Camcorder, video game C A Video cord (not supplied) B Audio cord (not supplied) C Audio/video cord (not supplied) 30GB Connecting components with analog video and audio jack The following illustration shows how to change the initial setting of the VIDEO 1 input button on the receiver's display. For details, see "Naming inputs" (page 44). For details, see "Programming the remote" (page...

Operating Instructions
Page 43
.../ BD DVD SAT/ CATV TV VIDEO 1 VIDEO 2 SA-CD/ CD DMPORT TUNER HDMI 1 HDMI 2 HDMI 3 HDMI 4 O MENU < .< > m M X x Input buttons SOUND FIELD +/- AMP MENU MASTER VOL +/-/ +/- 1 Turn on the connected component. 2 Turn on the remote. to turn off the receiver. • Perform Auto Calibration. To... activate the muting function Press MUTING (RM-AAP049 only) or (RM-AAP050 only) on the receiver. 3 Press one of the input buttons to adjust the ...
.../ BD DVD SAT/ CATV TV VIDEO 1 VIDEO 2 SA-CD/ CD DMPORT TUNER HDMI 1 HDMI 2 HDMI 3 HDMI 4 O MENU < .< > m M X x Input buttons SOUND FIELD +/- AMP MENU MASTER VOL +/-/ +/- 1 Turn on the connected component. 2 Turn on the remote. to turn off the receiver. • Perform Auto Calibration. To... activate the muting function Press MUTING (RM-AAP049 only) or (RM-AAP050 only) on the receiver. 3 Press one of the input buttons to adjust the ...

Operating Instructions
Page 59
...field (Theatre/Theater Mode Sync) Press THEATER or THEATRE on the remote of the receiver, TV, or the Blu-ray disc player, while pointing the remote toward the TV. Note The sound field may be turned off . The TV, receiver and the components connected via HDMI are turned off . Enjoying movies...System Power Off) When you change the TV's input. For details, refer to "ON" before using the POWER button on the TV's remote, the receiver and the connected components turn off automatically. Tip The sound field may not switch depending on the status, the connected components may not be changed...
...field (Theatre/Theater Mode Sync) Press THEATER or THEATRE on the remote of the receiver, TV, or the Blu-ray disc player, while pointing the remote toward the TV. Note The sound field may be turned off . The TV, receiver and the components connected via HDMI are turned off . Enjoying movies...System Power Off) When you change the TV's input. For details, refer to "ON" before using the POWER button on the TV's remote, the receiver and the connected components turn off automatically. Tip The sound field may not switch depending on the status, the connected components may not be changed...
Operating Instructions
Page 65
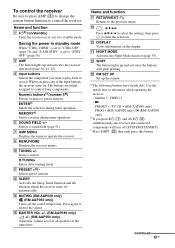
...that is other than 96 kHz cannot output to the S-AIR receiver. Press N, X, x, ./> S-AIR CH Operation Share the same operations on the remote. To control the system from the S-AIR receiver You can control the system from the S-AIR receiver by operation of the S-AIR main unit remain unchanged. 3 ...4 Press V/v repeatedly to select "S-AIR MODE", then press or b. 5 Press V/v repeatedly to select the setting you want. • PARTY: The S-AIR receiver outputs sound according to the input selected on the S-AIR main unit. • SEPARATE: You can select the input you want for the tuner on...
...that is other than 96 kHz cannot output to the S-AIR receiver. Press N, X, x, ./> S-AIR CH Operation Share the same operations on the remote. To control the system from the S-AIR receiver You can control the system from the S-AIR receiver by operation of the S-AIR main unit remain unchanged. 3 ...4 Press V/v repeatedly to select "S-AIR MODE", then press or b. 5 Press V/v repeatedly to select the setting you want. • PARTY: The S-AIR receiver outputs sound according to the input selected on the S-AIR main unit. • SEPARATE: You can select the input you want for the tuner on...

Operating Instructions
Page 69
...cannot find an unused input: DVD player To OPTICAL BD IN jack (audio signal) To COMPONENT VIDEO IN 1 jacks (video signal) ?/1 Receiver Assign to the input. You can reassign audio and/or video signals to another input when they are selected. For example when you ...the remote. 2 Press INPUT MODE repeatedly on the receiver to select the input. Advanced Operations Switching between digital and analog audio (INPUT MODE) When you connect components to both digital and analog connections. Audio input modes x AUTO Gives priority to the AUDIO IN (L/R) jacks. ASSIGN" in VIDEO menu ...
...cannot find an unused input: DVD player To OPTICAL BD IN jack (audio signal) To COMPONENT VIDEO IN 1 jacks (video signal) ?/1 Receiver Assign to the input. You can reassign audio and/or video signals to another input when they are selected. For example when you ...the remote. 2 Press INPUT MODE repeatedly on the receiver to select the input. Advanced Operations Switching between digital and analog audio (INPUT MODE) When you connect components to both digital and analog connections. Audio input modes x AUTO Gives priority to the AUDIO IN (L/R) jacks. ASSIGN" in VIDEO menu ...

Operating Instructions
Page 71
... on the remote button operation, see "4a: Connecting the audio components" (page 23). For details on the DIGITAL MEDIA PORT adapter, video output may not be output from the SPEAKERS SURROUND BACK/FRONT HIGH/ BI-AMP/FRONT B terminals. The sound is played back on the receiver and the image... level and distance settings of the surround back speakers and front high speakers become invalid, and those of the connected component. For details on the receiver to select "DMPORT". 2 Start playback of the front speakers are used. Using a bi-amplifier connection 1 Press AMP MENU. 2 Press V/v ...
... on the remote button operation, see "4a: Connecting the audio components" (page 23). For details on the DIGITAL MEDIA PORT adapter, video output may not be output from the SPEAKERS SURROUND BACK/FRONT HIGH/ BI-AMP/FRONT B terminals. The sound is played back on the receiver and the image... level and distance settings of the surround back speakers and front high speakers become invalid, and those of the connected component. For details on the receiver to select "DMPORT". 2 Start playback of the front speakers are used. Using a bi-amplifier connection 1 Press AMP MENU. 2 Press V/v ...
Operating Instructions
Page 85
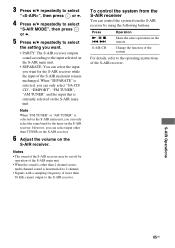
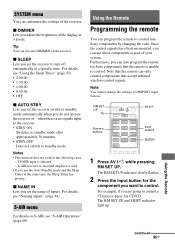
... buttons. Using the Remote Programming the remote You can program the remote to turn off automatically at the same time, the Sleep Timer has priority. Note You cannot change the settings of the receiver. RM SET UP TV Numeric buttons BD DVD SAT/ CATV TV VIDEO 1 VIDEO 2 SA-CD/ .... 2 Press the input button for Sony components that accept infrared wireless control signals. Note that the remote can use those components as part of the display in the following cases. - For example, if you can only control components that the remote is selected. - Once the control ...
... buttons. Using the Remote Programming the remote You can program the remote to turn off automatically at the same time, the Sleep Timer has priority. Note You cannot change the settings of the receiver. RM SET UP TV Numeric buttons BD DVD SAT/ CATV TV VIDEO 1 VIDEO 2 SA-CD/ .... 2 Press the input button for Sony components that accept infrared wireless control signals. Note that the remote can use those components as part of the display in the following cases. - For example, if you can only control components that the remote is selected. - Once the control ...
Operating Instructions
Page 86
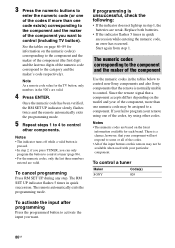
...the numeric codes in the 500's are weak. To cancel programming Press RM SET UP during any step. The remote automatically exits the programming mode. To control a tuner Maker SONY Code(s) 005 86GB Once the numeric code has been verified, the RM SET UP indicator slowly flashes twice and ...the remote automatically exits the programming mode. 5 Repeat steps 1 to 4 to the component and the maker of the component (the ...
...the numeric codes in the 500's are weak. To cancel programming Press RM SET UP during any step. The remote automatically exits the programming mode. To control a tuner Maker SONY Code(s) 005 86GB Once the numeric code has been verified, the RM SET UP indicator slowly flashes twice and ...the remote automatically exits the programming mode. 5 Repeat steps 1 to 4 to the component and the maker of the component (the ...

Operating Instructions
Page 89
...857, 858, 859, 860, 864, 874 851, 853, 854, 864 866, 871 868 867 873 872 875 869, 870 To control a cable box Maker Code(s) SONY 821, 822, 823 HAMLIN/REGAL 836, 837, 838, 839, 840 JERROLD/G.I./ MOTOROLA 806, 807, 808, 809, 810, 811, 812, 813, 814, 819 JERROLD ... RCA 805 SCIENTIFIC ATLANTA 815, 816, 817, 844 TOCOM/PHILIPS 830, 831 ZENITH 826, 827 Using the Remote 89GB To control a video CD player Maker SONY Code(s) 605 To control a VCR Maker SONY AIWA* AKAI BLAUPUNKT EMERSON FISHER GENERAL ELECTRIC (GE) GOLDSTAR/LG HITACHI ITT/NOKIA JVC MAGNAVOX MITSUBISHI/MGA NEC PANASONIC...
...857, 858, 859, 860, 864, 874 851, 853, 854, 864 866, 871 868 867 873 872 875 869, 870 To control a cable box Maker Code(s) SONY 821, 822, 823 HAMLIN/REGAL 836, 837, 838, 839, 840 JERROLD/G.I./ MOTOROLA 806, 807, 808, 809, 810, 811, 812, 813, 814, 819 JERROLD ... RCA 805 SCIENTIFIC ATLANTA 815, 816, 817, 844 TOCOM/PHILIPS 830, 831 ZENITH 826, 827 Using the Remote 89GB To control a video CD player Maker SONY Code(s) 605 To control a VCR Maker SONY AIWA* AKAI BLAUPUNKT EMERSON FISHER GENERAL ELECTRIC (GE) GOLDSTAR/LG HITACHI ITT/NOKIA JVC MAGNAVOX MITSUBISHI/MGA NEC PANASONIC...

Operating Instructions
Page 90
... dubbing theater using sound emission from behind the screen. x Composite video A standard format for transmitting video signal information consisting of -the-art dubbing theaters and recording studios, including Sony Pictures Entertainment's dubbing studios. The RM SET UP indicator flashes 3 ...times. 2 Release all the contents of the remote's memory 1 While holding down MASTER VOL -...
... dubbing theater using sound emission from behind the screen. x Composite video A standard format for transmitting video signal information consisting of -the-art dubbing theaters and recording studios, including Sony Pictures Entertainment's dubbing studios. The RM SET UP indicator flashes 3 ...times. 2 Release all the contents of the remote's memory 1 While holding down MASTER VOL -...

Operating Instructions
Page 95
...only one of the front speakers. • Connect a pair of an analog component, and not only to verify that headphones are turned on the receiver has been activated. Use an audio cord (not supplied). There is no sound from TV OPTICAL IN jack during TV input (page 60...). Audio There is no sound, no sound from digital sources (from the headphones. Turn off the receiver, eliminate the short-circuit problem, and turn on the remote to cancel the muting function. • Check that both the receiver and all speaker cords are connected correctly. &#...
...only one of the front speakers. • Connect a pair of an analog component, and not only to verify that headphones are turned on the receiver has been activated. Use an audio cord (not supplied). There is no sound from TV OPTICAL IN jack during TV input (page 60...). Audio There is no sound, no sound from digital sources (from the headphones. Turn off the receiver, eliminate the short-circuit problem, and turn on the remote to cancel the muting function. • Check that both the receiver and all speaker cords are connected correctly. &#...

Operating Instructions
Page 97
... • Set your TV to the appropriate input mode. • Move your audio components away from the TV. • Assign the component video input correctly. • Depending on the DIGITAL MEDIA PORT adapter, video output may be temporarily out of order. * Models of the stations is too weak...antenna (aerial) Radio stations cannot be possible. Preset the stations (page 48). • Press AMP, then press DISPLAY repeatedly on the remote so that you connect the receiver to an FM RDS station. • Select a stronger FM station. To prevent a gas explosion, do not connect the ground (...
... • Set your TV to the appropriate input mode. • Move your audio components away from the TV. • Assign the component video input correctly. • Depending on the DIGITAL MEDIA PORT adapter, video output may be temporarily out of order. * Models of the stations is too weak...antenna (aerial) Radio stations cannot be possible. Preset the stations (page 48). • Press AMP, then press DISPLAY repeatedly on the remote so that you connect the receiver to an FM RDS station. • Select a stronger FM station. To prevent a gas explosion, do not connect the ground (...


