Operating Instructions
Page 6
... 7: Connecting the AC power cord (mains lead 33 Preparing the Receiver Initializing the receiver 34 Selecting the speaker system 34 Calibrating the appropriate speaker settings automatically (AUTO CALIBRATION 35 Adjusting the speaker levels (TEST TONE 42 Basic Operations Playback 43 Viewing information on the display 44 Using the Sleep Timer 45 Recording 45 Tuner Operations Listening to FM/AM radio 46 Presetting FM/AM radio stations 48 Using the Radio Data System (RDS) ..........50 (Models of area code...
... 7: Connecting the AC power cord (mains lead 33 Preparing the Receiver Initializing the receiver 34 Selecting the speaker system 34 Calibrating the appropriate speaker settings automatically (AUTO CALIBRATION 35 Adjusting the speaker levels (TEST TONE 42 Basic Operations Playback 43 Viewing information on the display 44 Using the Sleep Timer 45 Recording 45 Tuner Operations Listening to FM/AM radio 46 Presetting FM/AM radio stations 48 Using the Radio Data System (RDS) ..........50 (Models of area code...

Operating Instructions
Page 12
... TUNER HDMI 1 HDMI 2 HDMI 3 HDMI 4 ql qk 1 2 3 4 5 6 7 qj O 8 MENU 9 < .< > m M q; DIGITAL INPUT/OUTPUT jacks (page 21, 24) HDMI IN/OUT COMPONENT VIDEO INPUT/OUTPUT jacks (page 21, 27, 28, 29) Green (Y) Blue (PB/CB) Red (PR/CR) Y, PB/CB, PR/CR IN/OUT COMPOSITE VIDEO INPUT/ OUTPUT jacks (page 21, 27, 29, 30) High quality image Yellow VIDEO IN/OUT * You can also program the remote to control non-Sony audio/video components. You can watch the selected input image when you connect...
... TUNER HDMI 1 HDMI 2 HDMI 3 HDMI 4 ql qk 1 2 3 4 5 6 7 qj O 8 MENU 9 < .< > m M q; DIGITAL INPUT/OUTPUT jacks (page 21, 24) HDMI IN/OUT COMPONENT VIDEO INPUT/OUTPUT jacks (page 21, 27, 28, 29) Green (Y) Blue (PB/CB) Red (PR/CR) Y, PB/CB, PR/CR IN/OUT COMPOSITE VIDEO INPUT/ OUTPUT jacks (page 21, 27, 29, 30) High quality image Yellow VIDEO IN/OUT * You can also program the remote to control non-Sony audio/video components. You can watch the selected input image when you connect...
Operating Instructions
Page 13
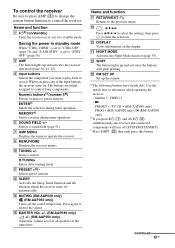
... same time. The buttons are initial assigned to restore the sound. E SOUND FIELD +/- Press again to control Sony components. T DISPLAY Views information on or sets it to play back or record. a)The following buttons have tactile dots. number 5, VIDEO 1 -N - continued 13GB C AMP The button lights up and activates the buttons with pink printing. J TUNING +/- Selects preset stations. O MASTER VOL +/- (RM-AAP049 only) +/- (RM-AAP050 only) Adjust the volume level of the input buttons, the receiver turns on. Saving the power in standby mode...
... same time. The buttons are initial assigned to restore the sound. E SOUND FIELD +/- Press again to control Sony components. T DISPLAY Views information on or sets it to play back or record. a)The following buttons have tactile dots. number 5, VIDEO 1 -N - continued 13GB C AMP The button lights up and activates the buttons with pink printing. J TUNING +/- Selects preset stations. O MASTER VOL +/- (RM-AAP049 only) +/- (RM-AAP050 only) Adjust the volume level of the input buttons, the receiver turns on. Saving the power in standby mode...

Operating Instructions
Page 20
... Make sure that metalic wires of the speaker cords are not using surround back speaker or front high speakers, you can select the front speaker system you want using a bi-amplifier connection. a)Notes on the SPEAKERS SURROUND BACK/ FRONT HIGH/BI-AMP/FRONT B terminals connection. • If you connect only one surround back speaker, connect it turns to standby mode automatically based on the level of the input signal to a subwoofer, then sound may cause a malfunction of the receiver.
... Make sure that metalic wires of the speaker cords are not using surround back speaker or front high speakers, you can select the front speaker system you want using a bi-amplifier connection. a)Notes on the SPEAKERS SURROUND BACK/ FRONT HIGH/BI-AMP/FRONT B terminals connection. • If you connect only one surround back speaker, connect it turns to standby mode automatically based on the level of the input signal to a subwoofer, then sound may cause a malfunction of the receiver.
Operating Instructions
Page 21
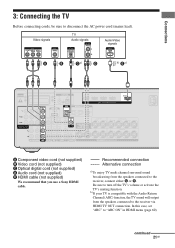
... AUDIO MONITOR IN AUDIO OUT SURROUND BACK/ FRONT HIGH/ BI-AMP/ FRONT B R SA-CD/CD/CD-R TV SAT/CATV BD VIDEO 1 SUBWOOFER IN 2 IN 1 HDMI ASSIGNABLE (INPUT ONLY) TV OUT ARC CENTER L SPEAKERS SURROUND R L FRONT A R L A Component video cord (not supplied) B Video cord (not supplied) C Optical digital cord (not supplied) D Audio cord (not supplied) E HDMI cable (not supplied) We recommend that you use a Sony HDMI cable. In this case, set "ARC" to the receiver, connect either C or E. Recommended connection Alternative connection a)To enjoy TV multi channel surround sound...
... AUDIO MONITOR IN AUDIO OUT SURROUND BACK/ FRONT HIGH/ BI-AMP/ FRONT B R SA-CD/CD/CD-R TV SAT/CATV BD VIDEO 1 SUBWOOFER IN 2 IN 1 HDMI ASSIGNABLE (INPUT ONLY) TV OUT ARC CENTER L SPEAKERS SURROUND R L FRONT A R L A Component video cord (not supplied) B Video cord (not supplied) C Optical digital cord (not supplied) D Audio cord (not supplied) E HDMI cable (not supplied) We recommend that you use a Sony HDMI cable. In this case, set "ARC" to the receiver, connect either C or E. Recommended connection Alternative connection a)To enjoy TV multi channel surround sound...

Operating Instructions
Page 25
... OPTICAL VIDEO IN VIDEO OUT BD DVD IN IN COAXIAL AUDIO MONITOR IN AUDIO OUT SURROUND BACK/ FRONT HIGH/ BI-AMP/ FRONT B R SA-CD/CD/CD-R TV SAT/CATV BD VIDEO 1 SUBWOOFER IN 2 IN 1 HDMI ASSIGNABLE (INPUT ONLY) TV OUT ARC CENTER L SPEAKERS SURROUND R L FRONT A R L A A HDMI cable (not supplied) We recommend that you can be displayed on the remote so that it can use a Sony HDMI cable. Audio/video signals TV, etc.* * See page 21 for the audio connection of the HDMI 1-4 input button...
... OPTICAL VIDEO IN VIDEO OUT BD DVD IN IN COAXIAL AUDIO MONITOR IN AUDIO OUT SURROUND BACK/ FRONT HIGH/ BI-AMP/ FRONT B R SA-CD/CD/CD-R TV SAT/CATV BD VIDEO 1 SUBWOOFER IN 2 IN 1 HDMI ASSIGNABLE (INPUT ONLY) TV OUT ARC CENTER L SPEAKERS SURROUND R L FRONT A R L A A HDMI cable (not supplied) We recommend that you can be displayed on the remote so that it can use a Sony HDMI cable. Audio/video signals TV, etc.* * See page 21 for the audio connection of the HDMI 1-4 input button...

Operating Instructions
Page 26
... audio jacks. • Video signals input to the HDMI IN jack can enjoy multi channel Linear PCM. If you cannot play back multi channel software, set "A. In this case, check the specification of the connected component. • Be sure to a TV through this receiver. If you want to listen to the sound from the TV speaker, set "PASS THRU" to enjoy High Bitrate Audio (DTS-HD Master Audio, Dolby TrueHD). • The image resolution of channels or audio output signals...
... audio jacks. • Video signals input to the HDMI IN jack can enjoy multi channel Linear PCM. If you cannot play back multi channel software, set "A. In this case, check the specification of the connected component. • Be sure to a TV through this receiver. If you want to listen to the sound from the TV speaker, set "PASS THRU" to enjoy High Bitrate Audio (DTS-HD Master Audio, Dolby TrueHD). • The image resolution of channels or audio output signals...

Operating Instructions
Page 27
... IN OPTICAL VIDEO IN VIDEO OUT BD DVD IN IN COAXIAL AUDIO MONITOR IN AUDIO OUT SURROUND BACK/ FRONT HIGH/ BI-AMP/ FRONT B R SA-CD/CD/CD-R TV SAT/CATV BD VIDEO 1 SUBWOOFER IN 2 IN 1 HDMI ASSIGNABLE (INPUT ONLY) TV OUT ARC CENTER L SPEAKERS SURROUND R L FRONT A R L A Component video cord (not supplied) B Video cord (not supplied) C Optical digital cord (not supplied) D Coaxial digital cord (not supplied) E Audio cord (not supplied) Notes • The initial setting of the COMPONENT VIDEO IN 1 jacks are Blu-ray disc player. Connections Connecting a Blu-ray disc player...
... IN OPTICAL VIDEO IN VIDEO OUT BD DVD IN IN COAXIAL AUDIO MONITOR IN AUDIO OUT SURROUND BACK/ FRONT HIGH/ BI-AMP/ FRONT B R SA-CD/CD/CD-R TV SAT/CATV BD VIDEO 1 SUBWOOFER IN 2 IN 1 HDMI ASSIGNABLE (INPUT ONLY) TV OUT ARC CENTER L SPEAKERS SURROUND R L FRONT A R L A Component video cord (not supplied) B Video cord (not supplied) C Optical digital cord (not supplied) D Coaxial digital cord (not supplied) E Audio cord (not supplied) Notes • The initial setting of the COMPONENT VIDEO IN 1 jacks are Blu-ray disc player. Connections Connecting a Blu-ray disc player...

Operating Instructions
Page 28
...-AMP/ FRONT B R SA-CD/CD/CD-R TV SAT/CATV BD VIDEO 1 SUBWOOFER IN 2 IN 1 HDMI ASSIGNABLE (INPUT ONLY) TV OUT ARC CENTER L SPEAKERS SURROUND R L FRONT A R L A Component video cord (not supplied) B Optical digital cord (not supplied) C Coaxial digital cord (not supplied) Notes • The initial setting for the DVD input button is as follows: - For details, see "Naming inputs" (page 44). 28GB Recommended connection Alternative connection * When you want to connect your DVD player or DVD recorder to change the initial setting...
...-AMP/ FRONT B R SA-CD/CD/CD-R TV SAT/CATV BD VIDEO 1 SUBWOOFER IN 2 IN 1 HDMI ASSIGNABLE (INPUT ONLY) TV OUT ARC CENTER L SPEAKERS SURROUND R L FRONT A R L A Component video cord (not supplied) B Optical digital cord (not supplied) C Coaxial digital cord (not supplied) Notes • The initial setting for the DVD input button is as follows: - For details, see "Naming inputs" (page 44). 28GB Recommended connection Alternative connection * When you want to connect your DVD player or DVD recorder to change the initial setting...

Operating Instructions
Page 30
... BD VIDEO 1 SUBWOOFER IN 2 IN 1 HDMI ASSIGNABLE (INPUT ONLY) TV OUT ARC CENTER L SPEAKERS SURROUND R L FRONT A R L (On the front panel) VIDEO 2 IN AUTO CAL MIC VIDEO L AUDIO R Camcorder, video game C A Video cord (not supplied) B Audio cord (not supplied) C Audio/video cord (not supplied) 30GB For details, see "Programming the remote" (page 85). • You can also rename the VIDEO 1 input so that you can be displayed on the receiver's display. Connecting components with analog video and audio jack The following illustration shows how to control your DVD...
... BD VIDEO 1 SUBWOOFER IN 2 IN 1 HDMI ASSIGNABLE (INPUT ONLY) TV OUT ARC CENTER L SPEAKERS SURROUND R L FRONT A R L (On the front panel) VIDEO 2 IN AUTO CAL MIC VIDEO L AUDIO R Camcorder, video game C A Video cord (not supplied) B Audio cord (not supplied) C Audio/video cord (not supplied) 30GB For details, see "Programming the remote" (page 85). • You can also rename the VIDEO 1 input so that you can be displayed on the receiver's display. Connecting components with analog video and audio jack The following illustration shows how to control your DVD...

Operating Instructions
Page 34
... on the receiver for the first time, initialize the receiver by pressing SPEAKERS when the headphones are reset to the initial settings. Note You cannot switch the front speaker system by performing the following procedure. This procedure can select the front speakers you have changed or adjusted are connected. 34GB Preparing the Receiver Initializing the receiver Before using the receiver for this operation. ?/1 ?/1 1 Press ?/1 to turn off the receiver. 2 Hold...
... on the receiver for the first time, initialize the receiver by pressing SPEAKERS when the headphones are reset to the initial settings. Note You cannot switch the front speaker system by performing the following procedure. This procedure can select the front speakers you have changed or adjusted are connected. 34GB Preparing the Receiver Initializing the receiver Before using the receiver for this operation. ?/1 ?/1 1 Press ?/1 to turn off the receiver. 2 Hold...

Operating Instructions
Page 36
... are using, the setup distance value may be further away from the actual position. Use a stool or tripod so that the optimizer microphone remains at your ears. 36GB 1: Setting up the Auto Calibration ?/1 AUTO CAL MIC When using surround back speakers On setting up the active subwoofer • When a subwoofer is connected, turn on the characteristics of the subwoofer you connect a subwoofer with a crossover frequency function, set this function to the AUTO CAL MIC jack. 2 Set up the volume...
... are using, the setup distance value may be further away from the actual position. Use a stool or tripod so that the optimizer microphone remains at your ears. 36GB 1: Setting up the Auto Calibration ?/1 AUTO CAL MIC When using surround back speakers On setting up the active subwoofer • When a subwoofer is connected, turn on the characteristics of the subwoofer you connect a subwoofer with a crossover frequency function, set this function to the AUTO CAL MIC jack. 2 Set up the volume...

Operating Instructions
Page 43
...TUNER, "FM TUNER" or "AM TUNER" appears for a while, then frequency appears on the remote. Note When you want. You can also use INPUT SELECTOR on the receiver. 6 Press SOUND FIELD +/- You can also use MASTER VOLUME on the receiver. Basic Operations Basic Operations Playback , V/v/B/b MUTING/ BD DVD SAT/ CATV TV VIDEO 1 VIDEO 2 SA-CD/ CD DMPORT TUNER HDMI 1 HDMI 2 HDMI 3 HDMI 4 O MENU < .< > m M X x Input buttons SOUND FIELD +/- AMP MENU MASTER VOL +/-/ +/- 1 Turn on the connected component. 2 Turn on the receiver. 3 Press one of the input buttons to adjust...
...TUNER, "FM TUNER" or "AM TUNER" appears for a while, then frequency appears on the remote. Note When you want. You can also use INPUT SELECTOR on the receiver. 6 Press SOUND FIELD +/- You can also use MASTER VOLUME on the receiver. Basic Operations Basic Operations Playback , V/v/B/b MUTING/ BD DVD SAT/ CATV TV VIDEO 1 VIDEO 2 SA-CD/ CD DMPORT TUNER HDMI 1 HDMI 2 HDMI 3 HDMI 4 O MENU < .< > m M X x Input buttons SOUND FIELD +/- AMP MENU MASTER VOL +/-/ +/- 1 Turn on the connected component. 2 Turn on the receiver. 3 Press one of the input buttons to adjust...

Operating Instructions
Page 58
... sound You can also use the System Audio Control function as follows. • If you turn off the receiver, the sound will output from the TV speakers. • When you adjust the TV volume, the receiver's volume is adjusted simultaneously. 58GB Enjoying the TV sound from the speakers connected to the receiver (System Audio Control) You can enjoy the TV sound from the speakers connected to "CTRL ON", the "AUDIO OUT" settings in standby mode) • Switches to appropriate HDMI input...
... sound You can also use the System Audio Control function as follows. • If you turn off the receiver, the sound will output from the TV speakers. • When you adjust the TV volume, the receiver's volume is adjusted simultaneously. 58GB Enjoying the TV sound from the speakers connected to the receiver (System Audio Control) You can enjoy the TV sound from the speakers connected to "CTRL ON", the "AUDIO OUT" settings in standby mode) • Switches to appropriate HDMI input...

Operating Instructions
Page 83
... 1080p. x PASS THRU Lets you select a resolution that is set to enjoy the connected component's source on the receiver to "AUTO" or "ON". ASSIGN Lets you use a TV that the connected TV does not support in the standby mode, the receiver outputs HDMI signals from other input source. x RESOLUTION Lets you turn the Control for the image and sound to be output correctly. Video signals are upconverted and output through the receiver. • 1080i The resolution is...
... 1080p. x PASS THRU Lets you select a resolution that is set to enjoy the connected component's source on the receiver to "AUTO" or "ON". ASSIGN Lets you use a TV that the connected TV does not support in the standby mode, the receiver outputs HDMI signals from other input source. x RESOLUTION Lets you turn the Control for the image and sound to be output correctly. Video signals are upconverted and output through the receiver. • 1080i The resolution is...

Operating Instructions
Page 96
... receiver. • The DIGITAL MEDIA PORT adapter and/or component is heard from the center/ surround/surround back/front high speakers. • Select a CINEMA STUDIO EX mode (page 51). • Check that the subwoofer is output from the component connected to the DIGITAL MEDIA PORT adapter. • Adjust the volume of more than 48 kHz. Then check that the speakers and components are connected correctly and securely. • Adjust the level parameters using "TEST TONE...
... receiver. • The DIGITAL MEDIA PORT adapter and/or component is heard from the center/ surround/surround back/front high speakers. • Select a CINEMA STUDIO EX mode (page 51). • Check that the subwoofer is output from the component connected to the DIGITAL MEDIA PORT adapter. • Adjust the volume of more than 48 kHz. Then check that the speakers and components are connected correctly and securely. • Adjust the level parameters using "TEST TONE...

Operating Instructions
Page 97
.... • Assign the component video input correctly. • Depending on the display. Adjust the antennas (aerials) and connect an external antenna (aerial), if necessary. • The signal strength of area code CEL, CEK only. Outdoor FM antenna (aerial) Radio stations cannot be temporarily out of order. * Models of the stations is poor. • Use a 75-ohm coaxial cable (not supplied) to connect the receiver to an FM RDS station. • Select a stronger FM station. Use direct tuning. •...
.... • Assign the component video input correctly. • Depending on the display. Adjust the antennas (aerials) and connect an external antenna (aerial), if necessary. • The signal strength of area code CEL, CEK only. Outdoor FM antenna (aerial) Radio stations cannot be temporarily out of order. * Models of the stations is poor. • Use a 75-ohm coaxial cable (not supplied) to connect the receiver to an FM RDS station. • Select a stronger FM station. Use direct tuning. •...

Operating Instructions
Page 100
... troubleshooting guide Clearing the receiver's memory may be reset to their initial settings and you perform Auto Calibration, see "When error codes appear" (page 39) to restore sound from the headphones. If the problem persist Consult your nearest Sony dealer. In these parts may remedy the problem (page 34). However, note that if service personnel changes some parts during repair, these cases, check the radio reception and adjust the volume level...
... troubleshooting guide Clearing the receiver's memory may be reset to their initial settings and you perform Auto Calibration, see "When error codes appear" (page 39) to restore sound from the headphones. If the problem persist Consult your nearest Sony dealer. In these parts may remedy the problem (page 34). However, note that if service personnel changes some parts during repair, these cases, check the radio reception and adjust the volume level...

Marketing Specifications
Page 1
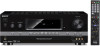
... video and audio. STR-DH810 7.1 channel Blu-ray Disc™ A/V Receiver Key Features 7.1 Channel A/V Receiver (110W x7 @ 8 ohms 1kHz 1% THD) 7 HD Inputs (4 HDMI, 3 Component) Upconvert/Upscale from analog to 1080p via HDMI1 Dolby® TrueHD and dts® HD Enhanced Audio Codecs2 Wireless 2nd Zone audio (S-AIR™ multi-room capability)3 Digital Cinema Audio Calibration for Quick Speaker Set-Up Audio Return Channel uses just one cable for TV audio4 Standby pass-through of Audio & Video via HDMI™ Improve image quality of analog connected...
... video and audio. STR-DH810 7.1 channel Blu-ray Disc™ A/V Receiver Key Features 7.1 Channel A/V Receiver (110W x7 @ 8 ohms 1kHz 1% THD) 7 HD Inputs (4 HDMI, 3 Component) Upconvert/Upscale from analog to 1080p via HDMI1 Dolby® TrueHD and dts® HD Enhanced Audio Codecs2 Wireless 2nd Zone audio (S-AIR™ multi-room capability)3 Digital Cinema Audio Calibration for Quick Speaker Set-Up Audio Return Channel uses just one cable for TV audio4 Standby pass-through of Audio & Video via HDMI™ Improve image quality of analog connected...

Marketing Specifications
Page 2
... Auto Tuning, Direct Tuning, Station Name A/V Sync: Yes (Variable)-300msec/96kHz Equalizer: BASS and Treble control Sub Woofer Crossover: 17 Point (40-200Hz) Bi-AMP: Yes Bravia® Sync™ : Yes Convenience Preset Memory: 60 (30 FM, 30 AM) AM/FM Memory Presets: 30 AM, 30 FM Auto Tuning: Yes Direct Tuning: Yes (Remote) Sleep Timer: Yes Station Name Display: Yes Inputs and Outputs Digital Media Port: 1 (Rear) HDMI™ Connection Output(s): 1 (Rear) HDMI™ Connection Input(s): 4 (Rear) Optical Audio Input(s): 3 (Rear) Coaxial Audio Digital Input(s): 1 (Rear) HD Component Video Input...
... Auto Tuning, Direct Tuning, Station Name A/V Sync: Yes (Variable)-300msec/96kHz Equalizer: BASS and Treble control Sub Woofer Crossover: 17 Point (40-200Hz) Bi-AMP: Yes Bravia® Sync™ : Yes Convenience Preset Memory: 60 (30 FM, 30 AM) AM/FM Memory Presets: 30 AM, 30 FM Auto Tuning: Yes Direct Tuning: Yes (Remote) Sleep Timer: Yes Station Name Display: Yes Inputs and Outputs Digital Media Port: 1 (Rear) HDMI™ Connection Output(s): 1 (Rear) HDMI™ Connection Input(s): 4 (Rear) Optical Audio Input(s): 3 (Rear) Coaxial Audio Digital Input(s): 1 (Rear) HD Component Video Input...


