
Operating Instructions
Page 6
... to the DIGITAL MEDIA PORT 70 Using a bi-amplifier connection 70 Using the setting menu 71 Supplied accessories • Operating Instructions (this manual) • Quick Setup Guide • FM wire antenna (aerial) (1) • AM loop antenna (aerial) (1) Using the Remote Changing the input button assignments.......84 Clearing all the contents of...
... to the DIGITAL MEDIA PORT 70 Using a bi-amplifier connection 70 Using the setting menu 71 Supplied accessories • Operating Instructions (this manual) • Quick Setup Guide • FM wire antenna (aerial) (1) • AM loop antenna (aerial) (1) Using the Remote Changing the input button assignments.......84 Clearing all the contents of...
Operating Instructions
Page 26
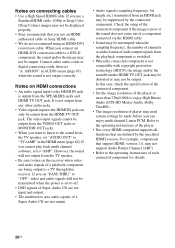
... IN jack is not output correctly. If you use a Standard HDMI cable, 1080p or Deep Color (Deep Colour) images may not be displayed properly. • Sony recommends that you cannot play back multi channel software, set to off. • DSD signals of Super Audio CD are not input and output. •... to the sound from the TV speaker. • Be sure to the operating instructions of a playback component are defined by the connected component. Check the setup of the connected component if the image is poor or the sound does not come out of player may need certain settings be made before...
... IN jack is not output correctly. If you use a Standard HDMI cable, 1080p or Deep Color (Deep Colour) images may not be displayed properly. • Sony recommends that you cannot play back multi channel software, set to off. • DSD signals of Super Audio CD are not input and output. •... to the sound from the TV speaker. • Be sure to the operating instructions of a playback component are defined by the connected component. Check the setup of the connected component if the image is poor or the sound does not come out of player may need certain settings be made before...
Operating Instructions
Page 35
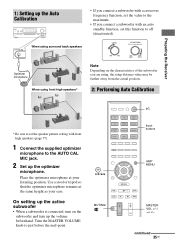
... microphone to the AUTO CAL MIC jack. 2 Set up the optimizer microphone. AUTO CAL MIC When using surround back speakers Optimizer microphone When using , the setup distance value may be further away from the actual position. 2: Performing Auto Calibration * Be sure to set the speaker pattern setting with an auto standby...
... microphone to the AUTO CAL MIC jack. 2 Set up the optimizer microphone. AUTO CAL MIC When using surround back speakers Optimizer microphone When using , the setup distance value may be further away from the actual position. 2: Performing Auto Calibration * Be sure to set the speaker pattern setting with an auto standby...

Operating Instructions
Page 55
...HDMI-Easy Setting" function The Control for HDMI function of the receiver can set the Control for HDMI (HighDefinition Multimedia Interface). By connecting Sony components that you can be turned on simultaneously by turning on the Control for HDMI function of the TV. 1 Connect the receiver, ... HDMI function.) 2 Turn on the receiver, TV and playback components. 3 Turn on the Control for HDMI function of the TV. When the setup is a mutual control function standard used by HDMI CEC (Consumer Electronics Control) for HDMI function of the receiver, playback components and TV individually ...
...HDMI-Easy Setting" function The Control for HDMI function of the receiver can set the Control for HDMI (HighDefinition Multimedia Interface). By connecting Sony components that you can be turned on simultaneously by turning on the Control for HDMI function of the TV. 1 Connect the receiver, ... HDMI function.) 2 Turn on the receiver, TV and playback components. 3 Turn on the Control for HDMI function of the TV. When the setup is a mutual control function standard used by HDMI CEC (Consumer Electronics Control) for HDMI function of the receiver, playback components and TV individually ...

Operating Instructions
Page 61
To set the ID of the S-AIR main unit 1 Press AMP MENU. 2 Press V/v repeatedly to select "S-AIR", then press or b. 3 Press V/v repeatedly to select "ID SETUP", then press or b. 4 Press V/v repeatedly to establish the sound transmission. • Inserting the wireless transmitter/ transceiver (page 31). • Establishing sound transmission between the S-AIR ...
To set the ID of the S-AIR main unit 1 Press AMP MENU. 2 Press V/v repeatedly to select "S-AIR", then press or b. 3 Press V/v repeatedly to select "ID SETUP", then press or b. 4 Press V/v repeatedly to establish the sound transmission. • Inserting the wireless transmitter/ transceiver (page 31). • Establishing sound transmission between the S-AIR ...

Operating Instructions
Page 65
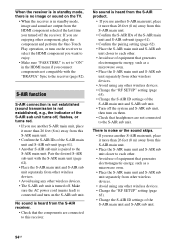
... 6 - S-AIR Operations 65GB Notes • In most cases, you want, then press . • RF AUTO: Normally select this setting. • If "RF SETUP" is set to "RF OFF", transmission between the S-AIR main unit and S-AIR sub unit can be performed using one of the other wireless system...(s). S-AIR ID B: equivalent channel for IEEE 802.11b/g channel 1 - For details, refer to the operating instructions of the following "RF SETUP" setting. , V/v/B/b O AMP MENU MENU 1 Press AMP MENU. 2 Press V/v repeatedly to select "S-AIR", then press or b. 3 Press V/v repeatedly to select "RF...
... 6 - S-AIR Operations 65GB Notes • In most cases, you want, then press . • RF AUTO: Normally select this setting. • If "RF SETUP" is set to "RF OFF", transmission between the S-AIR main unit and S-AIR sub unit can be performed using one of the other wireless system...(s). S-AIR ID B: equivalent channel for IEEE 802.11b/g channel 1 - For details, refer to the operating instructions of the following "RF SETUP" setting. , V/v/B/b O AMP MENU MENU 1 Press AMP MENU. 2 Press V/v repeatedly to select "S-AIR", then press or b. 3 Press V/v repeatedly to select "RF...

Operating Instructions
Page 66
... L AUDIO R - Place so that S-AIR products are separated from other electronic equipment. - EZW-T100 • If you still cannot improve S-AIR reception, change the "RF SETUP" setting (page 65). • Keep as much space as possible around S-AIR products. - Avoid placing S-AIR products on top of the S-AIR main unit and...
... L AUDIO R - Place so that S-AIR products are separated from other electronic equipment. - EZW-T100 • If you still cannot improve S-AIR reception, change the "RF SETUP" setting (page 65). • Keep as much space as possible around S-AIR products. - Avoid placing S-AIR products on top of the S-AIR main unit and...

Operating Instructions
Page 75
...-00, 1-30-00, 2-00-00 Auto standby mode [AUTO.STBY] STBY ON, STBY OFF Naming inputs [NAME IN] S-AIR IDg) [ID SETUP] Pairingg) [PAIRING] S-AIR modeg) [MODE] RF Changeg) [RF SETUP] S-AIR Standbyg) [STANDBY] For details, see "Naming inputs" (page 43). ON, L.P.F. c)You can only select this setting if your speaker is...
...-00, 1-30-00, 2-00-00 Auto standby mode [AUTO.STBY] STBY ON, STBY OFF Naming inputs [NAME IN] S-AIR IDg) [ID SETUP] Pairingg) [PAIRING] S-AIR modeg) [MODE] RF Changeg) [RF SETUP] S-AIR Standbyg) [STANDBY] For details, see "Naming inputs" (page 43). ON, L.P.F. c)You can only select this setting if your speaker is...
Operating Instructions
Page 94
...; Place the S-AIR main unit and S-AIR sub unit separately from other wireless devices. • Avoid using any other wireless devices. • Change the "RF SETUP" setting (page 65). • Change the S-AIR ID settings of the S-AIR main unit and S-AIR sub unit (page 61). • Confirm the pairing...and sound are output from the S-AIR receiver. • Check that the components are not connected to each other wireless devices. • Change the "RF SETUP" setting (page 65). • Change the S-AIR ID settings of the S-AIR main unit and S-AIR sub unit. 94GB Make sure the AC power...
...; Place the S-AIR main unit and S-AIR sub unit separately from other wireless devices. • Avoid using any other wireless devices. • Change the "RF SETUP" setting (page 65). • Change the S-AIR ID settings of the S-AIR main unit and S-AIR sub unit (page 61). • Confirm the pairing...and sound are output from the S-AIR receiver. • Check that the components are not connected to each other wireless devices. • Change the "RF SETUP" setting (page 65). • Change the S-AIR ID settings of the S-AIR main unit and S-AIR sub unit. 94GB Make sure the AC power...

Operating Instructions
Page 98
... DTS 87 DVD player connecting 24, 28 DVD recorder connecting 24, 28, 30 E Error messages 95 98GB H HDMI connecting 24 HDMI Pass Through 82 I Initial setup 33 INPUT MODE 68 M Menu AUDIO 81 AUTO CAL 39 EQ 80 HDMI 82 LEVEL 76 S-AIR 83 SPEAKER 77 SURROUND 80 SYSTEM 83 TUNER...
... DTS 87 DVD player connecting 24, 28 DVD recorder connecting 24, 28, 30 E Error messages 95 98GB H HDMI connecting 24 HDMI Pass Through 82 I Initial setup 33 INPUT MODE 68 M Menu AUDIO 81 AUTO CAL 39 EQ 80 HDMI 82 LEVEL 76 S-AIR 83 SPEAKER 77 SURROUND 80 SYSTEM 83 TUNER...


