
Operating Instructions
Page 5
... the appropriate speaker settings automatically (AUTO CALIBRATION 34 Adjusting the speaker levels (TEST TONE 40 Basic Operations Playback 42 Viewing information on the display 43 Using the Sleep Timer 44 Recording 44 Tuner Operations Listening to FM/AM radio 45 Presetting FM/AM radio stations 47 Using the Radio Data System (RDS) ..........49 (Models of area code AU1, TW2 only) Enjoying Surround Sound Selecting the sound field 50 Enjoying the surround effect at low volume levels (NIGHT MODE 54 Resetting sound fields...
... the appropriate speaker settings automatically (AUTO CALIBRATION 34 Adjusting the speaker levels (TEST TONE 40 Basic Operations Playback 42 Viewing information on the display 43 Using the Sleep Timer 44 Recording 44 Tuner Operations Listening to FM/AM radio 45 Presetting FM/AM radio stations 47 Using the Radio Data System (RDS) ..........49 (Models of area code AU1, TW2 only) Enjoying Surround Sound Selecting the sound field 50 Enjoying the surround effect at low volume levels (NIGHT MODE 54 Resetting sound fields...
Operating Instructions
Page 12
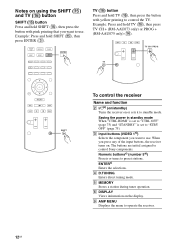
...-AAU075 only) (N). .X x> TV CH / PROG TV O MENU m .X M x> SHIFT To control the receiver Name and function B ?/1b) (on/standby) Turns the receiver on or sets it to preset stations. E MEMORY Stores a station during tuner operation. Numeric buttonsc) (number 5a)) Presets or tunes to standby mode. C Input buttons (VIDEO 1a)) Selects the component you want to use . The buttons are initial assigned to control the TV. SA-CD/ CD DMPORT TUNER HDMI 1 HDMI 2 HDMI 3 ENTER TV (P) button Press and hold SHIFT (O), then press ENTER...
...-AAU075 only) (N). .X x> TV CH / PROG TV O MENU m .X M x> SHIFT To control the receiver Name and function B ?/1b) (on/standby) Turns the receiver on or sets it to preset stations. E MEMORY Stores a station during tuner operation. Numeric buttonsc) (number 5a)) Presets or tunes to standby mode. C Input buttons (VIDEO 1a)) Selects the component you want to use . The buttons are initial assigned to control the TV. SA-CD/ CD DMPORT TUNER HDMI 1 HDMI 2 HDMI 3 ENTER TV (P) button Press and hold SHIFT (O), then press ENTER...

Operating Instructions
Page 20
.../ CB VIDEO IN PR/ CR COMPONENT VIDEO AUDIO ASSIGNABLE (INPUT ONLY) OUT L AUDIO IN AUDIO IN AUDIO IN R VIDEO IN AUDIO IN IN SAT/ CATV IN DVD IN OPTICAL OPTICAL COAXIAL TV DIGITAL (ASSIGNABLE) VIDEO OUT VIDEO IN VIDEO OUT AUDIO OUT MONITOR AUDIO IN SURROUND BACK/ FRONT HIGH/ BI-AMP/ FRONT B R L AUDIO OUT SA-CD/CD/CD-R TV SAT/CATV BD VIDEO 1 SUBWOOFER CENTER SURROUND R L SPEAKERS TV OUT ARC FRONT A L R SURROUND BACK/ FRONT HIGH/ BI-AMP/ FRONT B R L CENTER SURROUND R L SPEAKERS FRONT A L R Hi Lo Connect the jacks on...
.../ CB VIDEO IN PR/ CR COMPONENT VIDEO AUDIO ASSIGNABLE (INPUT ONLY) OUT L AUDIO IN AUDIO IN AUDIO IN R VIDEO IN AUDIO IN IN SAT/ CATV IN DVD IN OPTICAL OPTICAL COAXIAL TV DIGITAL (ASSIGNABLE) VIDEO OUT VIDEO IN VIDEO OUT AUDIO OUT MONITOR AUDIO IN SURROUND BACK/ FRONT HIGH/ BI-AMP/ FRONT B R L AUDIO OUT SA-CD/CD/CD-R TV SAT/CATV BD VIDEO 1 SUBWOOFER CENTER SURROUND R L SPEAKERS TV OUT ARC FRONT A L R SURROUND BACK/ FRONT HIGH/ BI-AMP/ FRONT B R L CENTER SURROUND R L SPEAKERS FRONT A L R Hi Lo Connect the jacks on...
Operating Instructions
Page 26
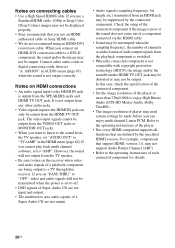
... OUT jack. Connect other audio jacks. • Video signals input to "TV+AMP" in AUDIO menu (page 81) when the sound is output from the TV speaker, set to "AMP". If you want to listen to the sound from the SPEAKERS jacks and HDMI TV OUT jack. In this case, check the specification of the connected component. • Set the image resolution of the player to more than 720p/1080i to enjoy High Bitrate Audio (DTS-HD Master Audio, Dolby...
... OUT jack. Connect other audio jacks. • Video signals input to "TV+AMP" in AUDIO menu (page 81) when the sound is output from the TV speaker, set to "AMP". If you want to listen to the sound from the SPEAKERS jacks and HDMI TV OUT jack. In this case, check the specification of the connected component. • Set the image resolution of the player to more than 720p/1080i to enjoy High Bitrate Audio (DTS-HD Master Audio, Dolby...

Operating Instructions
Page 27
...-AMP/ FRONT B R L AUDIO OUT SA-CD/CD/CD-R TV SAT/CATV BD VIDEO 1 SUBWOOFER CENTER SURROUND R L SPEAKERS TV OUT ARC FRONT A L R A Component video cord (not supplied) B Video cord (not supplied) C Optical digital cord (not supplied) D Coaxial digital cord (not supplied) E Audio cord (not supplied) Notes • The initial setting of the COMPONENT VIDEO IN 1 jacks are Blu-ray disc player. Refer to the COMPONENT VIDEO IN 2 or IN 3 jacks, set "V. ASSIGN" in the VIDEO menu (page 81). • To input multi channel digital audio from the Blu-ray disc player, set "A. Connections...
...-AMP/ FRONT B R L AUDIO OUT SA-CD/CD/CD-R TV SAT/CATV BD VIDEO 1 SUBWOOFER CENTER SURROUND R L SPEAKERS TV OUT ARC FRONT A L R A Component video cord (not supplied) B Video cord (not supplied) C Optical digital cord (not supplied) D Coaxial digital cord (not supplied) E Audio cord (not supplied) Notes • The initial setting of the COMPONENT VIDEO IN 1 jacks are Blu-ray disc player. Refer to the COMPONENT VIDEO IN 2 or IN 3 jacks, set "V. ASSIGN" in the VIDEO menu (page 81). • To input multi channel digital audio from the Blu-ray disc player, set "A. Connections...
Operating Instructions
Page 28
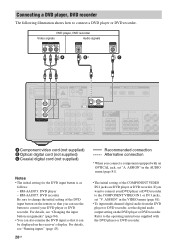
... initial setting of the DVD input button on the remote so that it can use the button to control your DVD player or DVD recorder to the operating instructions supplied with an OPTICAL jack, set "A. RM-AAU073: DVD player - Refer to the COMPONENT VIDEO IN 1 or IN 3 jacks, set the digital audio output setting on the receiver's display. ASSIGN" in the VIDEO menu (page 81). • To input multi channel digital audio from the DVD player or DVD recorder, set "V. RM-AAU075: DVD recorder Be sure to connect a DVD player or DVD recorder. Connecting a DVD player, DVD recorder The...
... initial setting of the DVD input button on the remote so that it can use the button to control your DVD player or DVD recorder to the operating instructions supplied with an OPTICAL jack, set "A. RM-AAU073: DVD player - Refer to the COMPONENT VIDEO IN 1 or IN 3 jacks, set the digital audio output setting on the receiver's display. ASSIGN" in the VIDEO menu (page 81). • To input multi channel digital audio from the DVD player or DVD recorder, set "V. RM-AAU075: DVD recorder Be sure to connect a DVD player or DVD recorder. Connecting a DVD player, DVD recorder The...
Operating Instructions
Page 30
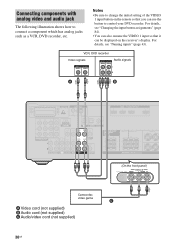
... setting of the VIDEO 1 input button on the receiver's display. For details, see "Changing the input button assignments" (page 84). • You can also rename the VIDEO 1 input so that you can be displayed on the remote so that it can use the button to connect a component which has analog jacks such as a VCR, DVD recorder, etc. Connecting components with analog video and audio jack The following illustration shows how to control your DVD recorder. VCR, DVD recorder Video signals Audio signals A B EZW-T100 ANTENNA HDMI ASSIGNABLE (INPUT...
... setting of the VIDEO 1 input button on the receiver's display. For details, see "Changing the input button assignments" (page 84). • You can also rename the VIDEO 1 input so that you can be displayed on the remote so that it can use the button to connect a component which has analog jacks such as a VCR, DVD recorder, etc. Connecting components with analog video and audio jack The following illustration shows how to control your DVD recorder. VCR, DVD recorder Video signals Audio signals A B EZW-T100 ANTENNA HDMI ASSIGNABLE (INPUT...
Operating Instructions
Page 33
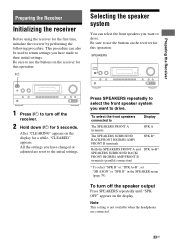
... system You can also be used to return settings you want to their initial settings. Preparing the Receiver Preparing the Receiver Initializing the receiver Before using the receiver for this operation. ?/1 ?/1 SPEAKERS TONE INPUT SELECTOR PHONES TONE MODE INPUT MODE TUNING MODE TUNING MEMORY/ 2CH/ ENTER A.DIRECT A.F.D. This procedure can select the front speakers you have changed or adjusted are connected. 33GB MOVIE MUSIC MASTER VOLUME DISPLAY DIMMER MUTING VIDEO 2 IN AUTO CAL MIC VIDEO L AUDIO R 1 Press ?/1 to "SPK B" in the SPEAKER menu (page 79).
... system You can also be used to return settings you want to their initial settings. Preparing the Receiver Preparing the Receiver Initializing the receiver Before using the receiver for this operation. ?/1 ?/1 SPEAKERS TONE INPUT SELECTOR PHONES TONE MODE INPUT MODE TUNING MODE TUNING MEMORY/ 2CH/ ENTER A.DIRECT A.F.D. This procedure can select the front speakers you have changed or adjusted are connected. 33GB MOVIE MUSIC MASTER VOLUME DISPLAY DIMMER MUTING VIDEO 2 IN AUTO CAL MIC VIDEO L AUDIO R 1 Press ?/1 to "SPK B" in the SPEAKER menu (page 79).
Operating Instructions
Page 35
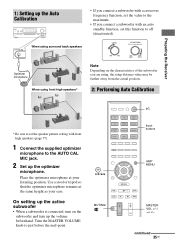
... BD DVD SAT/ CATV TV VIDEO1 VIDEO2 SA-CD/ CD DMPORT TUNER HDMI 1 HDMI 2 HDMI 3 ?/1 Input buttons , V/v/B/b O MENU m .X M x> MUTING/ AMP MENU MASTER VOL +/-/ 2 +/- On setting up the active subwoofer • When a subwoofer is connected, turn on the characteristics of the subwoofer you connect a subwoofer with an auto standby function, set the speaker pattern setting with front high speakers (page 77). 1 Connect the supplied optimizer microphone to just before the mid-point. Turn the MASTER VOLUME knob to the AUTO CAL MIC jack. 2 Set up the volume...
... BD DVD SAT/ CATV TV VIDEO1 VIDEO2 SA-CD/ CD DMPORT TUNER HDMI 1 HDMI 2 HDMI 3 ?/1 Input buttons , V/v/B/b O MENU m .X M x> MUTING/ AMP MENU MASTER VOL +/-/ 2 +/- On setting up the active subwoofer • When a subwoofer is connected, turn on the characteristics of the subwoofer you connect a subwoofer with an auto standby function, set the speaker pattern setting with front high speakers (page 77). 1 Connect the supplied optimizer microphone to just before the mid-point. Turn the MASTER VOLUME knob to the AUTO CAL MIC jack. 2 Set up the volume...
Operating Instructions
Page 42
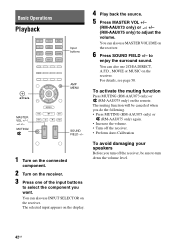
... the volume level. 42GB The selected input appears on the receiver. The muting function will be canceled when you do the following. • Press MUTING (RM-AAU073 only) or (RM-AAU075 only) again. • Increase the volume. • Turn off the receiver, be sure to enjoy the surround sound. Basic Operations Playback BD DVD SAT/ CATV TV VIDEO1 VIDEO2 SA-CD/ CD DMPORT TUNER HDMI 1 HDMI 2 HDMI 3 Input buttons , V/v/B/b MASTER...
... the volume level. 42GB The selected input appears on the receiver. The muting function will be canceled when you do the following. • Press MUTING (RM-AAU073 only) or (RM-AAU075 only) again. • Increase the volume. • Turn off the receiver, be sure to enjoy the surround sound. Basic Operations Playback BD DVD SAT/ CATV TV VIDEO1 VIDEO2 SA-CD/ CD DMPORT TUNER HDMI 1 HDMI 2 HDMI 3 Input buttons , V/v/B/b MASTER...

Operating Instructions
Page 57
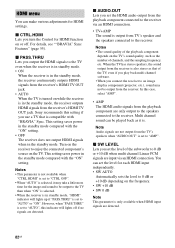
... Audio Control) You can operate System Audio Control function using the TV menu. Notes • If System Audio Control does not function according to your TV setting, refer to appropriate HDMI input • When you turn on , the System Audio Control function will output from the speakers connected to the receiver. For details, refer to the operating instructions of the TV. • When "CTRL.HDMI" is set to "CTRL ON", the "AUDIO.OUT" settings in standby mode) • Switches to the operating instructions...
... Audio Control) You can operate System Audio Control function using the TV menu. Notes • If System Audio Control does not function according to your TV setting, refer to appropriate HDMI input • When you turn on , the System Audio Control function will output from the speakers connected to the receiver. For details, refer to the operating instructions of the TV. • When "CTRL.HDMI" is set to "CTRL ON", the "AUDIO.OUT" settings in standby mode) • Switches to the operating instructions...
Operating Instructions
Page 82
... the standby mode, the receiver continuously outputs HDMI signals from the receiver's HDMI TV OUT jack. • AUTO When the TV is set to "AMP". Notes • The sound quality of channels, and the sampling frequency, etc. HDMI menu You can set the level for each HDMI input independently. • SW AUTO Automatically sets the level to 0 dB or +10 dB when multi channel Linear PCM signals are detected. 82GB Note Audio signals are only output to the speakers connected to the receiver. Sony recommends...
... the standby mode, the receiver continuously outputs HDMI signals from the receiver's HDMI TV OUT jack. • AUTO When the TV is set to "AMP". Notes • The sound quality of channels, and the sampling frequency, etc. HDMI menu You can set the level for each HDMI input independently. • SW AUTO Automatically sets the level to 0 dB or +10 dB when multi channel Linear PCM signals are detected. 82GB Note Audio signals are only output to the speakers connected to the receiver. Sony recommends...
Operating Instructions
Page 84
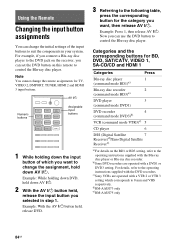
... the input button of the input buttons to control the Blu-ray disc player. b)Sony DVD recorders are operated with the Blu-ray disc player or Blu-ray disc recorder. For details, refer to the operating instructions supplied with a VTR 2 or VTR 3 setting which you selected in your system. Now you want to change the remote assignments for BD, DVD, SAT/CATV, VIDEO 1, SA-CD/CD and HDMI 1 Categories Press Blu-ray disc player 1 (command mode...
... the input button of the input buttons to control the Blu-ray disc player. b)Sony DVD recorders are operated with the Blu-ray disc player or Blu-ray disc recorder. For details, refer to the operating instructions supplied with a VTR 2 or VTR 3 setting which you selected in your system. Now you want to change the remote assignments for BD, DVD, SAT/CATV, VIDEO 1, SA-CD/CD and HDMI 1 Categories Press Blu-ray disc player 1 (command mode...

Operating Instructions
Page 91
... DVD, etc. There is no sound from digital sources (from COAXIAL or OPTICAL input jack). • Check that the INPUT MODE is not set to "ANALOG" (page 68). • Check that the Analog Direct function is no sound from the subwoofer. • Check "PATTERN" setting (page 77). The surround effect cannot be carried out. • Check that the speakers and components are connected correctly. • Select the source component using the LEVEL menu. There is no sound from the subwoofer...
... DVD, etc. There is no sound from digital sources (from COAXIAL or OPTICAL input jack). • Check that the INPUT MODE is not set to "ANALOG" (page 68). • Check that the Analog Direct function is no sound from the subwoofer. • Check "PATTERN" setting (page 77). The surround effect cannot be carried out. • Check that the speakers and components are connected correctly. • Select the source component using the LEVEL menu. There is no sound from the subwoofer...

Operating Instructions
Page 92
... display. Use direct tuning. • Make sure you are connected securely. Turn off the receiver, then reconnect the DIGITAL MEDIA PORT adapter and/or component. • Check the DIGITAL MEDIA PORT adapter and/or component device to the DIGITAL MEDIA PORT adapter. • Adjust the volume of the stations is too weak (when tuning in . • Check that the components are connected correctly. • Select the source component using the input buttons. • Set your audio components...
... display. Use direct tuning. • Make sure you are connected securely. Turn off the receiver, then reconnect the DIGITAL MEDIA PORT adapter and/or component. • Check the DIGITAL MEDIA PORT adapter and/or component device to the DIGITAL MEDIA PORT adapter. • Adjust the volume of the stations is too weak (when tuning in . • Check that the components are connected correctly. • Select the source component using the input buttons. • Set your audio components...
Operating Instructions
Page 93
....* • Contact the radio station and find out whether they actually provide the service in question. "AMP" if you want to set up the component. Change the TV channel when you cannot listen to the sound of a component connected to "CTRL ON" in HDMI menu to the receiver. - continued 93GB Additional Information No sound is output from the receiver and TV speaker while using the System Audio Control function. • Make sure...
....* • Contact the radio station and find out whether they actually provide the service in question. "AMP" if you want to set up the component. Change the TV channel when you cannot listen to the sound of a component connected to "CTRL ON" in HDMI menu to the receiver. - continued 93GB Additional Information No sound is output from the receiver and TV speaker while using the System Audio Control function. • Make sure...
Operating Instructions
Page 94
... and S-AIR sub unit, then turn on them. • Check that the components are connected to this receiver. Make sure the AC power cord (mains lead) is connected and turn on the receiver to select the HDMI component you want to enjoy. • Make sure "PASS.THRU" is set to "ON" in standby mode, image and sound are not connected to each other. • Avoid use of equipment that...
... and S-AIR sub unit, then turn on them. • Check that the components are connected to this receiver. Make sure the AC power cord (mains lead) is connected and turn on the receiver to select the HDMI component you want to enjoy. • Make sure "PASS.THRU" is set to "ON" in standby mode, image and sound are not connected to each other. • Avoid use of equipment that...

Operating Instructions
Page 95
... the remote with S-AIR function, have a Sony dealer check the entire system together (S-AIR main unit and S-AIR sub unit). If you select the correct input on the receiver. However, note that if service personnel changes some parts during repair, these cases, check the radio reception and adjust the volume level to solve the problem. If the problem persist Consult your nearest Sony dealer. Note that all memorized settings...
... the remote with S-AIR function, have a Sony dealer check the entire system together (S-AIR main unit and S-AIR sub unit). If you select the correct input on the receiver. However, note that if service personnel changes some parts during repair, these cases, check the radio reception and adjust the volume level to solve the problem. If the problem persist Consult your nearest Sony dealer. Note that all memorized settings...
Marketing Specifications
Page 1
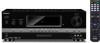
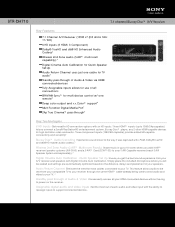
... HD inputs. STR-DH710 7.1 channel Blu-ray Disc™ A/V Receiver Key Features 7.1 Channel A/V Receiver (105W x7 @ 8 ohms 1kHz 1% THD) 6 HD Inputs (3 HDMI, 3 Component) Dolby® TrueHD and dts® HD Enhanced Audio Codecs2 Wireless 2nd Zone audio (S-AIR™ multi-room capability).3 Digital Cinema Auto Calibration for Quick Speaker Set-Up Audio Return Channel uses just one cable for TV audio4 Standby pass-through of Audio & Video Conveniently access all connections BRAVIA® Sync™ for multi-device control w/ one remote5 Deep color output and...
... HD inputs. STR-DH710 7.1 channel Blu-ray Disc™ A/V Receiver Key Features 7.1 Channel A/V Receiver (105W x7 @ 8 ohms 1kHz 1% THD) 6 HD Inputs (3 HDMI, 3 Component) Dolby® TrueHD and dts® HD Enhanced Audio Codecs2 Wireless 2nd Zone audio (S-AIR™ multi-room capability).3 Digital Cinema Auto Calibration for Quick Speaker Set-Up Audio Return Channel uses just one cable for TV audio4 Standby pass-through of Audio & Video Conveniently access all connections BRAVIA® Sync™ for multi-device control w/ one remote5 Deep color output and...
Marketing Specifications
Page 2
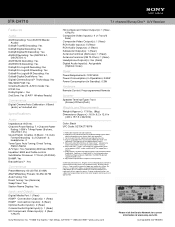
...: BASS and Treble control Sub Woofer Crossover: 17 Point (40-200Hz) Bi-AMP: Yes Bravia® Sync™ : Yes Convenience Preset Memory: 60 (30 FM, 30 AM) AM/FM Memory Presets: 30 AM, 30 FM Auto Tuning: Yes Direct Tuning: Yes (Remote) Sleep Timer: Yes Station Name Display: Yes Inputs and Outputs Digital Media Port: 1 (Rear) HDMI™ Connection Output(s): 1 (Rear) HDMI™ Connection Input(s): 3 (Rear) Optical Audio Input(s): 2 (Rear) Coaxial Audio Digital Input(s): 1 (Rear) HD Component Video Input(s): 3 (Rear - Reproduction in whole or in (430 x 157.5 x 322mm) Color: Black UPC Code...
...: BASS and Treble control Sub Woofer Crossover: 17 Point (40-200Hz) Bi-AMP: Yes Bravia® Sync™ : Yes Convenience Preset Memory: 60 (30 FM, 30 AM) AM/FM Memory Presets: 30 AM, 30 FM Auto Tuning: Yes Direct Tuning: Yes (Remote) Sleep Timer: Yes Station Name Display: Yes Inputs and Outputs Digital Media Port: 1 (Rear) HDMI™ Connection Output(s): 1 (Rear) HDMI™ Connection Input(s): 3 (Rear) Optical Audio Input(s): 2 (Rear) Coaxial Audio Digital Input(s): 1 (Rear) HD Component Video Input(s): 3 (Rear - Reproduction in whole or in (430 x 157.5 x 322mm) Color: Black UPC Code...


