HDMI Control Guide
Page 2
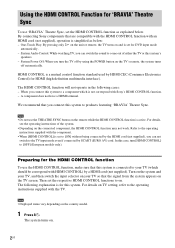
... the remote while the HDMI CONTROL function is active. By connecting Sony components that this system to the operating instructions supplied with HDMI CONTROL) by using the POWER button on the country model. 1 Press "/1. A component does not have a HDMI terminal. Then set for DVD input mode automatically. - Note • Displayed items vary depending on the TV's remote, the system turns off by a HDMI cord (not supplied). In this system. The following cases: - We recommend that the signal...
... the remote while the HDMI CONTROL function is active. By connecting Sony components that this system to the operating instructions supplied with HDMI CONTROL) by using the POWER button on the country model. 1 Press "/1. A component does not have a HDMI terminal. Then set for DVD input mode automatically. - Note • Displayed items vary depending on the TV's remote, the system turns off by a HDMI cord (not supplied). In this system. The following cases: - We recommend that the signal...
HDMI Control Guide
Page 3
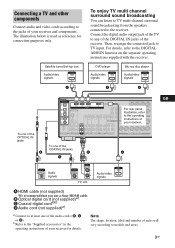
... TV multi channel surround sound broadcasting from the speakers connected to models and areas. 3GB Note The shape, location, label and number of jacks will vary according to the receiver. COMPONENT VIDEO L L L L DMPORT R IN OUT R IN IN AUX SA-CD/CD/CD-R TV R R R AUDIO IN AUDIO IN AUDIO OUT AUDIO IN AUDIO OUT AUDIO IN AUDIO OUT SAT DVD VIDEO 2/BD VIDEO 1 SUB WOOFER CENTER R SURROUND BACK SPEAKERS R SURROUND To one of your receiver for connection purposes only. b)Refer to the DIGITAL ASSIGN function...
... TV multi channel surround sound broadcasting from the speakers connected to models and areas. 3GB Note The shape, location, label and number of jacks will vary according to the receiver. COMPONENT VIDEO L L L L DMPORT R IN OUT R IN IN AUX SA-CD/CD/CD-R TV R R R AUDIO IN AUDIO IN AUDIO OUT AUDIO IN AUDIO OUT AUDIO IN AUDIO OUT SAT DVD VIDEO 2/BD VIDEO 1 SUB WOOFER CENTER R SURROUND BACK SPEAKERS R SURROUND To one of your receiver for connection purposes only. b)Refer to the DIGITAL ASSIGN function...
HDMI Control Guide
Page 5
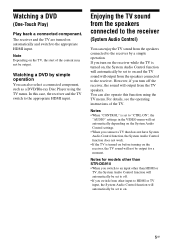
... System Audio Control settings. • When you switch from the speakers connected to the appropriate HDMI input. Enjoying the TV sound from the speakers connected to the receiver (System Audio Control) You can also select a connected component, such as a DVD/Blu-ray Disc Player using the TV menu. You can also operate this case, the receiver and the TV switch to the receiver by simple operation You can enjoy the TV sound from other than STR-DG910 • When you turn...
... System Audio Control settings. • When you switch from the speakers connected to the appropriate HDMI input. Enjoying the TV sound from the speakers connected to the receiver (System Audio Control) You can also select a connected component, such as a DVD/Blu-ray Disc Player using the TV menu. You can also operate this case, the receiver and the TV switch to the receiver by simple operation You can enjoy the TV sound from other than STR-DG910 • When you turn...

Limited Warranty (U.S. Only)
Page 1
... DURATION OF THIS WARRANTY. 4-557-173-02 General Stereo/Hifi Components/Tape Decks ® CD Players/Mini Disc Players/Audio Systems Hifi Audio LIMITED WARRANTY Sony Electronics Inc. ("Sony") warrants this Product is determined to be presented to obtain warranty service. PARTS: In addition, Sony will repair or replace the Product, at its original packaging or packaging affording an equal degree of sale or receipted invoice which vary from the Product...
... DURATION OF THIS WARRANTY. 4-557-173-02 General Stereo/Hifi Components/Tape Decks ® CD Players/Mini Disc Players/Audio Systems Hifi Audio LIMITED WARRANTY Sony Electronics Inc. ("Sony") warrants this Product is determined to be presented to obtain warranty service. PARTS: In addition, Sony will repair or replace the Product, at its original packaging or packaging affording an equal degree of sale or receipted invoice which vary from the Product...
Instructions Manual
Page 4
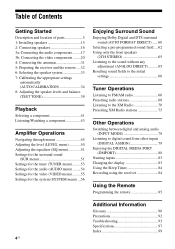
...video (VIDEO menu).........55 Settings for the system (SYSTEM menu) ...56 Enjoying Surround Sound Enjoying Dolby Digital and DTS surround sound (AUTO FORMAT DIRECT) ...... 60 Selecting a pre-programmed sound field .... 62 Using only the front speakers (2CH STEREO 65 Listening to the sound without any adjustment (ANALOG DIRECT).......... 65 Resetting sound fields to the initial settings 66 Tuner Operations Listening to FM/AM radio 66 Presetting radio stations 68 Listening to the XM Radio 70 Presetting XM Radio stations 75 Other Operations Switching between digital and analog audio (INPUT...
...video (VIDEO menu).........55 Settings for the system (SYSTEM menu) ...56 Enjoying Surround Sound Enjoying Dolby Digital and DTS surround sound (AUTO FORMAT DIRECT) ...... 60 Selecting a pre-programmed sound field .... 62 Using only the front speakers (2CH STEREO 65 Listening to the sound without any adjustment (ANALOG DIRECT).......... 65 Resetting sound fields to the initial settings 66 Tuner Operations Listening to FM/AM radio 66 Presetting radio stations 68 Listening to the XM Radio 70 Presetting XM Radio stations 75 Other Operations Switching between digital and analog audio (INPUT...

Instructions Manual
Page 5
.... G MULTI Lights up when multi CHANNEL channel audio signals are connected to select the speaker system (page 33). H Remote sensor Receives signals from remote commander. Press TONE MODE repeatedly to turn TONE +/- Function Press to select bass or treble level, then turn the receiver on /standby) B SPEAKERS (OFF/A/B/A+B) C TONE MODE TONE +/- Adjusts the tonal quality (bass/treble level) of selectable items appears here (page 7). Getting Started Getting Started Description and location of parts Front panel 12 3 4 5 67 8 9 q; MOVIE MUSIC AUTO CAL DIRECT wa...
.... G MULTI Lights up when multi CHANNEL channel audio signals are connected to select the speaker system (page 33). H Remote sensor Receives signals from remote commander. Press TONE MODE repeatedly to turn TONE +/- Function Press to select bass or treble level, then turn the receiver on /standby) B SPEAKERS (OFF/A/B/A+B) C TONE MODE TONE +/- Adjusts the tonal quality (bass/treble level) of selectable items appears here (page 7). Getting Started Getting Started Description and location of parts Front panel 12 3 4 5 67 8 9 q; MOVIE MUSIC AUTO CAL DIRECT wa...

Instructions Manual
Page 10
... TV CH MASTER VOL PRESET MUTING DVD TOP MENU MENU F1 F2 TV INPUT WIDE 1 2 3 4 5 6 7 8 9 q; D SPEAKERS section Connects to the video and audio jacks of a VCR, DVD player, etc. (page 25 - 28). F AUDIO INPUT/OUTPUT section AUDIO IN/ White (L) OUT jacks Red (R) Connects to a Super Audio CD player, CD recorder, etc. (page 18, 19, 23). * You can watch the selected input image when you connect the HDMI OUT or MONITOR OUT jack to operate. MOVIE MUSIC CATEGORY SLEEP MODE D.TUNING AUTO CAL 123...
... TV CH MASTER VOL PRESET MUTING DVD TOP MENU MENU F1 F2 TV INPUT WIDE 1 2 3 4 5 6 7 8 9 q; D SPEAKERS section Connects to the video and audio jacks of a VCR, DVD player, etc. (page 25 - 28). F AUDIO INPUT/OUTPUT section AUDIO IN/ White (L) OUT jacks Red (R) Connects to a Super Audio CD player, CD recorder, etc. (page 18, 19, 23). * You can watch the selected input image when you connect the HDMI OUT or MONITOR OUT jack to operate. MOVIE MUSIC CATEGORY SLEEP MODE D.TUNING AUTO CAL 123...
Instructions Manual
Page 11
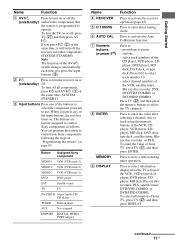
... ?/1 switch changes automatically each time you press any of the VCR, VCD player, LD player, DVD player, CD player, MD deck, Blu-ray disc recorder, PSX, satellite tuner, DVD/VHS COMBO, or DVD/HDD COMBO. When you press the input buttons (C). The buttons are factory assigned to enter direct tuning mode. You can program the remote to control non-Sony components following the steps in tuner AUX Not assigned DMPORT DIGITAL MEDIA PORT adapter Name D RECEIVER E D.TUNING F AUTO CAL G Numeric buttons (number 5a)) H ENTER MEMORY I DISPLAY Function...
... ?/1 switch changes automatically each time you press any of the VCR, VCD player, LD player, DVD player, CD player, MD deck, Blu-ray disc recorder, PSX, satellite tuner, DVD/VHS COMBO, or DVD/HDD COMBO. When you press the input buttons (C). The buttons are factory assigned to enter direct tuning mode. You can program the remote to control non-Sony components following the steps in tuner AUX Not assigned DMPORT DIGITAL MEDIA PORT adapter Name D RECEIVER E D.TUNING F AUTO CAL G Numeric buttons (number 5a)) H ENTER MEMORY I DISPLAY Function...
Instructions Manual
Page 22
... TV speaker, set to control your Bluray disc player. If you cannot play back multi channel software, set "AUDIO" to 720p or 1080i when you output 96 kHz multi channel sound over a HDMI connection. • We do not recommend using a HDMI-DVI conversion cable. If you connect a Blu-ray disc player • Be sure to change the factory setting of the VIDEO 2 input button on the remote so that it can be displayed on , neither video nor audio is transmitted. • Audio signals (sampling frequency...
... TV speaker, set to control your Bluray disc player. If you cannot play back multi channel software, set "AUDIO" to 720p or 1080i when you output 96 kHz multi channel sound over a HDMI connection. • We do not recommend using a HDMI-DVI conversion cable. If you connect a Blu-ray disc player • Be sure to change the factory setting of the VIDEO 2 input button on the remote so that it can be displayed on , neither video nor audio is transmitted. • Audio signals (sampling frequency...

Instructions Manual
Page 24
...'s volume. 24US connect the audio output jacks of the TV to the TV IN jacks of the receiver is not turned on the TV screen when you connect only the COMPONENT VIDEO MONITOR OUT jacks to your TV. Tips • You can watch the selected input image when you connect the MONITOR OUT jack to a TV. • You can also display the amplifier menus and the sound field on , neither video nor audio is...
...'s volume. 24US connect the audio output jacks of the TV to the TV IN jacks of the receiver is not turned on the TV screen when you connect only the COMPONENT VIDEO MONITOR OUT jacks to your TV. Tips • You can watch the selected input image when you connect the MONITOR OUT jack to a TV. • You can also display the amplifier menus and the sound field on , neither video nor audio is...
Instructions Manual
Page 26
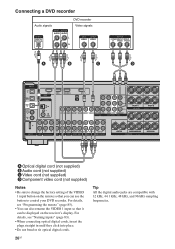
... bend or tie optical digital cords. For details, see "Programming the remote" (page 85). • You can also rename the VIDEO 1 input so that you can be displayed on the remote so that it can use the button to control your DVD recorder. Connecting a DVD recorder Audio signals DVD recorder Video signals A B C D DIGITAL (ASSIGNABLE) SAT IN VIDEO 2/ BD IN VIDEO 1 IN OPTICAL SA-CD/ CD/CD-R IN DVD IN COAXIAL SAT IN HDMI ANTENNA AM DVD IN VIDEO 2/BD IN OUT...
... bend or tie optical digital cords. For details, see "Programming the remote" (page 85). • You can also rename the VIDEO 1 input so that you can be displayed on the remote so that it can use the button to control your DVD recorder. Connecting a DVD recorder Audio signals DVD recorder Video signals A B C D DIGITAL (ASSIGNABLE) SAT IN VIDEO 2/ BD IN VIDEO 1 IN OPTICAL SA-CD/ CD/CD-R IN DVD IN COAXIAL SAT IN HDMI ANTENNA AM DVD IN VIDEO 2/BD IN OUT...
Instructions Manual
Page 32
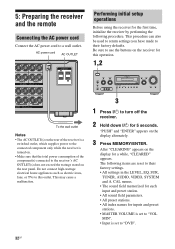
... wattage stated on the rear of the component(s) connected to turn off the receiver. 2 Hold down ?/1 for the first time, initialize the receiver by performing the following items are reset to their factory settings. • All settings in the LEVEL, EQ, SUR, TUNER, AUDIO, VIDEO, SYSTEM and A. Performing initial setup operations Before using the receiver for 5 seconds. AC power cord AC OUTLET L L AC OUTLET R FRONT A SPEAKERS L R FRONT B L R SURROUND BACK EAKERS R SURROUND To the wall...
... wattage stated on the rear of the component(s) connected to turn off the receiver. 2 Hold down ?/1 for the first time, initialize the receiver by performing the following items are reset to their factory settings. • All settings in the LEVEL, EQ, SUR, TUNER, AUDIO, VIDEO, SYSTEM and A. Performing initial setup operations Before using the receiver for 5 seconds. AC power cord AC OUTLET L L AC OUTLET R FRONT A SPEAKERS L R FRONT B L R SURROUND BACK EAKERS R SURROUND To the wall...
Instructions Manual
Page 41
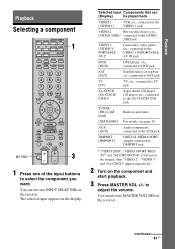
...CH MASTER VOL PRESET MUTING 3 1 Press one of the input buttons to adjust the volume. to select the component you want. Playback Playback Selecting a component MUTING SYSTEM STANDBY VIDEO 1 VIDEO 2 VIDEO 3 DVD SAT TV SA-CD/CD TUNER 1 AUX DMPORT RECEIVER 2CH A.F.D. Selected input Components that can also use INPUT SELECTOR on the display. You can [Display] be played back VIDEO 1 [VIDEO 1] VCR, etc., connected to the VIDEO 1 jack VIDEO 2 Blu-ray disc player, etc., [VIDEO 2/BD]* connected to the VIDEO 2/BD jack VIDEO 3 [VIDEO 3/ PORTABLE AV]* Camcorder, video...
...CH MASTER VOL PRESET MUTING 3 1 Press one of the input buttons to adjust the volume. to select the component you want. Playback Playback Selecting a component MUTING SYSTEM STANDBY VIDEO 1 VIDEO 2 VIDEO 3 DVD SAT TV SA-CD/CD TUNER 1 AUX DMPORT RECEIVER 2CH A.F.D. Selected input Components that can also use INPUT SELECTOR on the display. You can [Display] be played back VIDEO 1 [VIDEO 1] VCR, etc., connected to the VIDEO 1 jack VIDEO 2 Blu-ray disc player, etc., [VIDEO 2/BD]* connected to the VIDEO 2/BD jack VIDEO 3 [VIDEO 3/ PORTABLE AV]* Camcorder, video...
Instructions Manual
Page 55
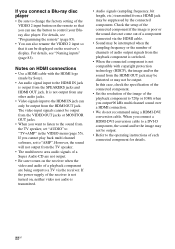
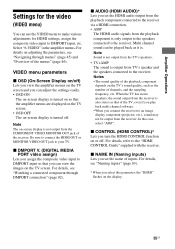
... inputs. VIDEO menu parameters x OSD (On-Screen Display on the TV screen. Be sure to connect the HDMI OUT or MONITOR VIDEO OUT jack to the "HDMI CONTROL Guide" supplied with the receiver. When the TV has stereo speakers, the sound output from the playback component is also stereo as it is output from the COMPONENT VIDEO MONITOR OUT jack of channels, and the sampling frequency, etc. For details, refer to your TV. Amplifier Operations Settings for HDMI settings, assign the composite video input to DMPORT input...
... inputs. VIDEO menu parameters x OSD (On-Screen Display on the TV screen. Be sure to connect the HDMI OUT or MONITOR VIDEO OUT jack to the "HDMI CONTROL Guide" supplied with the receiver. When the TV has stereo speakers, the sound output from the playback component is also stereo as it is output from the COMPONENT VIDEO MONITOR OUT jack of channels, and the sampling frequency, etc. For details, refer to your TV. Amplifier Operations Settings for HDMI settings, assign the composite video input to DMPORT input...
Instructions Manual
Page 62
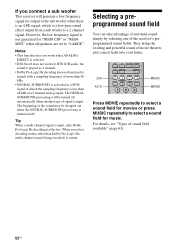
... function for output to the sub woofer when there is no LFE signal, which the sampling frequency is activated as a PCM signal of the receiver's preprogrammed sound fields. SAT TV SA-CD/CD TUNER AUX DMPORT RECEIVER 2CH A.F.D. The NEURAL SURROUND processing will generate a low frequency signal for signals with a sampling frequency of more than 48 kHz. • NEURAL SURROUND is less than Dolby Pro Logic IIx, multi channel sound (being encoded) is output. MOVIE MUSIC CATEGORY SLEEP MODE D.TUNING AUTO...
... function for output to the sub woofer when there is no LFE signal, which the sampling frequency is activated as a PCM signal of the receiver's preprogrammed sound fields. SAT TV SA-CD/CD TUNER AUX DMPORT RECEIVER 2CH A.F.D. The NEURAL SURROUND processing will generate a low frequency signal for signals with a sampling frequency of more than 48 kHz. • NEURAL SURROUND is less than Dolby Pro Logic IIx, multi channel sound (being encoded) is output. MOVIE MUSIC CATEGORY SLEEP MODE D.TUNING AUTO...
Instructions Manual
Page 65
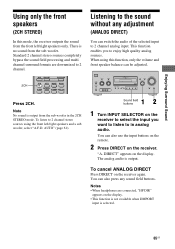
... analog audio. Enjoying Surround Sound Using only the front speakers (2CH STEREO) In this function, only the volume and front speaker balance can be adjusted. ?/1 SPEAKERS (OFF/A/B/A+B) TONE MODE TONE TUNING MODE TUNING AUTO CAL MIC PHONES VIDEO 3 IN/PORTABLE AV IN VIDEO L AUDIO R MULTI CHANNEL DECODING DISPLAY INPUT MODE INPUT SELECTOR MASTER VOLUME MEMORY/ CATEGORY ENTER MODE CATEGORY 2CH A.F.D. Note No sound is output. There is selected. 65US You can also press any adjustment (ANALOG DIRECT) You can switch the audio of the selected input to 2 channel. 2CH AUX...
... analog audio. Enjoying Surround Sound Using only the front speakers (2CH STEREO) In this function, only the volume and front speaker balance can be adjusted. ?/1 SPEAKERS (OFF/A/B/A+B) TONE MODE TONE TUNING MODE TUNING AUTO CAL MIC PHONES VIDEO 3 IN/PORTABLE AV IN VIDEO L AUDIO R MULTI CHANNEL DECODING DISPLAY INPUT MODE INPUT SELECTOR MASTER VOLUME MEMORY/ CATEGORY ENTER MODE CATEGORY 2CH A.F.D. Note No sound is output. There is selected. 65US You can also press any adjustment (ANALOG DIRECT) You can switch the audio of the selected input to 2 channel. 2CH AUX...
Instructions Manual
Page 86
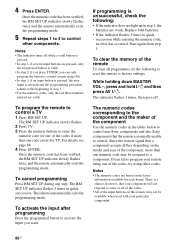
... step 1. Replace both batteries. • If the indicator flashes 5 times in quick succession. Since the remote signal that your remote using one of the component, more than one code exists) for each brand. To cancel programming Press RM SET UP during any step. The remote automatically exits the programming mode. The RM SET UP indicator slowly flashes. 2 Press TV. 3 Press the numeric buttons to control other codes. If programming is...
... step 1. Replace both batteries. • If the indicator flashes 5 times in quick succession. Since the remote signal that your remote using one of the component, more than one code exists) for each brand. To cancel programming Press RM SET UP during any step. The remote automatically exits the programming mode. The RM SET UP indicator slowly flashes. 2 Press TV. 3 Press the numeric buttons to control other codes. If programming is...
Instructions Manual
Page 96
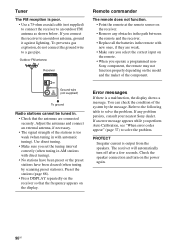
... connect the ground wire to solve the problem. Outdoor FM antenna Receiver ANTENNA AM Ground wire (not supplied) To ground Radio stations cannot be tuned in. • Check that the frequency appears on the power again. 96US Error messages If there is output from the speakers. If any obstacles in the path between the remote and the receiver. • Replace all the batteries in the remote with direct tuning). • No stations...
... connect the ground wire to solve the problem. Outdoor FM antenna Receiver ANTENNA AM Ground wire (not supplied) To ground Radio stations cannot be tuned in. • Check that the frequency appears on the power again. 96US Error messages If there is output from the speakers. If any obstacles in the path between the remote and the receiver. • Replace all the batteries in the remote with direct tuning). • No stations...
Marketing Specifications
Page 1
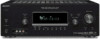
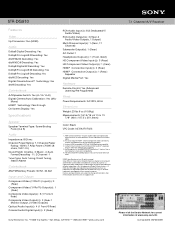
... . STR-DG910 7.1 Channel A/V Receiver Key Features 7.1 Channel Audio/Video Receiver 110 Watts X 7 Amplifier Power (8 ohms, 1Khz, 1.0 % THD) Video Up-conversion to HDMI™ only On Screen Display (Composite and S-Video output only) Accepts up to 8ch Linear PCM through HDMI HDMI Active Intelligence: 3 Inputs / 1 output (Video and Audio)2 Key Technologies Optimized for lip sync delay to adjust to match the refresh rates of today's advanced flat panel televisions and microdisplays. With "One Touch Play," operations that are all connected components with convenience of digital radio...
... . STR-DG910 7.1 Channel A/V Receiver Key Features 7.1 Channel Audio/Video Receiver 110 Watts X 7 Amplifier Power (8 ohms, 1Khz, 1.0 % THD) Video Up-conversion to HDMI™ only On Screen Display (Composite and S-Video output only) Accepts up to 8ch Linear PCM through HDMI HDMI Active Intelligence: 3 Inputs / 1 output (Video and Audio)2 Key Technologies Optimized for lip sync delay to adjust to match the refresh rates of today's advanced flat panel televisions and microdisplays. With "One Touch Play," operations that are all connected components with convenience of digital radio...
Marketing Specifications
Page 2
...trademarks of Dolby Laboratories. Mono) HDMI™ Technology: Pass-through On-Screen Display: Yes Specifications Speaker Speaker Terminal Type: Screw Binding Posts (A & B) Audio Impedance: 8 Ohms Channel Power Rating: 7.1 Channel Power Rating: 100W x 7 Amp Power (700W) (8 ohms, THD 1.0%) Sound Fields: Cinema - 3; Auto Format Decoding - 11; 2 Channel - 1 Tuner Type: Auto Tuning, Direct Tuning, Station Name Convenience AM/FM Memory Presets: 30 FM - 30 AM Inputs and Outputs Component Video (Y/Pb/Pr ) Input(s): 3 (Rear) Component Video (Y/Pb/Pr) Output(s): 1 (Rear) Composite Video Input...
...trademarks of Dolby Laboratories. Mono) HDMI™ Technology: Pass-through On-Screen Display: Yes Specifications Speaker Speaker Terminal Type: Screw Binding Posts (A & B) Audio Impedance: 8 Ohms Channel Power Rating: 7.1 Channel Power Rating: 100W x 7 Amp Power (700W) (8 ohms, THD 1.0%) Sound Fields: Cinema - 3; Auto Format Decoding - 11; 2 Channel - 1 Tuner Type: Auto Tuning, Direct Tuning, Station Name Convenience AM/FM Memory Presets: 30 FM - 30 AM Inputs and Outputs Component Video (Y/Pb/Pr ) Input(s): 3 (Rear) Component Video (Y/Pb/Pr) Output(s): 1 (Rear) Composite Video Input...


