
Operating Instructions
Page 5
... Presetting radio stations 54 Using the Radio Data System (RDS) ..........57 (Models of parts 6 1: Installing speakers 14 2: Connecting speakers 15 3a: Connecting the audio components ........ 16 3b: Connecting the video components ........ 17 4: Connecting the antennas (aerials 25 5: Preparing the receiver and the remote..... 26 6: Selecting the speaker system 27 7: Calibrating the appropriate settings automatically (AUTO CALIBRATION 28 8: Adjusting the...
... Presetting radio stations 54 Using the Radio Data System (RDS) ..........57 (Models of parts 6 1: Installing speakers 14 2: Connecting speakers 15 3a: Connecting the audio components ........ 16 3b: Connecting the video components ........ 17 4: Connecting the antennas (aerials 25 5: Preparing the receiver and the remote..... 26 6: Selecting the speaker system 27 7: Calibrating the appropriate settings automatically (AUTO CALIBRATION 28 8: Adjusting the...

Operating Instructions
Page 6
... input mode when the same components are connected to activate the Auto Calibration function (page 29). Name G MASTER VOLUME H DIRECT I AUTO CAL J INPUT SELECTOR K 2CH A.F.D. Getting Started Description and location of all speakers at the same time (page 32, 33, 34, 35). D Remote sensor Receives signals from remote commander. Press to both digital and analog...
... input mode when the same components are connected to activate the Auto Calibration function (page 29). Name G MASTER VOLUME H DIRECT I AUTO CAL J INPUT SELECTOR K 2CH A.F.D. Getting Started Description and location of all speakers at the same time (page 32, 33, 34, 35). D Remote sensor Receives signals from remote commander. Press to both digital and analog...

Operating Instructions
Page 19
...remote so that it can be displayed on the receiver when the video and audio signals of a playback component are connected via the HDMI jack. Unless the power is poor or the sound does not come out of a component connected via the receiver. The input video signals cannot be output from the TV speaker... only when a playback component and this receiver, as well as this receiver and the TV are being output to a TV via the HDMI ...
...remote so that it can be displayed on the receiver when the video and audio signals of a playback component are connected via the HDMI jack. Unless the power is poor or the sound does not come out of a component connected via the receiver. The input video signals cannot be output from the TV speaker... only when a playback component and this receiver, as well as this receiver and the TV are being output to a TV via the HDMI ...

Operating Instructions
Page 22
... you can be displayed on the remote so that it can use the button to change the factory setting of the VIDEO 1 input button on the receiver's display. For details, see "Naming inputs" (page 59). 22GB R R SPEAKERS RL FRONT B SPEAKERS A Video cord (not supplied) ...B Audio cord (not supplied) Notes • Be sure to control your DVD recorder. CENTER SURROUND L FRONT A L + - + - Connecting a DVD recorder Video signals...
... you can be displayed on the remote so that it can use the button to change the factory setting of the VIDEO 1 input button on the receiver's display. For details, see "Naming inputs" (page 59). 22GB R R SPEAKERS RL FRONT B SPEAKERS A Video cord (not supplied) ...B Audio cord (not supplied) Notes • Be sure to control your DVD recorder. CENTER SURROUND L FRONT A L + - + - Connecting a DVD recorder Video signals...

Operating Instructions
Page 26
... power supply voltage. This procedure can also be used to return settings you have made to turn off the receiver. 2 Hold down ?/1 for this operation. 1,2 ?/1 SPEAKERS (OFF/A/B) AUTO CAL MIC PHONES DISPLAY INPUT MODE INPUT SELECTOR MASTER VOLUME MEMORY/ TUNING ENTER MODE TUNING 2CH... cord to a wall outlet. 120V 220V 240V VOLTAGE SELECTOR Connecting the AC power cord (mains lead) Connect the AC power cord (mains lead) to "DVD". 26GB 5: Preparing the receiver and the remote Setting the voltage selector If your receiver has a voltage selector on the display alternately. 3 Press ...
... power supply voltage. This procedure can also be used to return settings you have made to turn off the receiver. 2 Hold down ?/1 for this operation. 1,2 ?/1 SPEAKERS (OFF/A/B) AUTO CAL MIC PHONES DISPLAY INPUT MODE INPUT SELECTOR MASTER VOLUME MEMORY/ TUNING ENTER MODE TUNING 2CH... cord to a wall outlet. 120V 220V 240V VOLTAGE SELECTOR Connecting the AC power cord (mains lead) Connect the AC power cord (mains lead) to "DVD". 26GB 5: Preparing the receiver and the remote Setting the voltage selector If your receiver has a voltage selector on the display alternately. 3 Press ...
Operating Instructions
Page 27
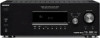
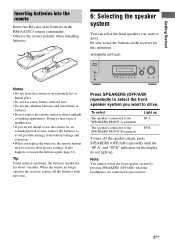
... TUNING 2CH A.F.D. Note You cannot switch the front speaker system by pressing SPEAKERS (OFF/A/B) when the headphones are connected to the SPEAKERS FRONT B terminals Light up . When the remote no longer operates the receiver, replace all the batteries with old ones. •... the speaker output, press SPEAKERS (OFF/A/B) repeatedly until the "SP A" and "SP B" indicators on the receiver for an extended period of batteries. • Do not expose the remote sensor to drive. To select The speakers connected to the SPEAKERS FRONT A terminals The speakers connected to the receiver. 27GB...
... TUNING 2CH A.F.D. Note You cannot switch the front speaker system by pressing SPEAKERS (OFF/A/B) when the headphones are connected to the SPEAKERS FRONT B terminals Light up . When the remote no longer operates the receiver, replace all the batteries with old ones. •... the speaker output, press SPEAKERS (OFF/A/B) repeatedly until the "SP A" and "SP B" indicators on the receiver for an extended period of batteries. • Do not expose the remote sensor to drive. To select The speakers connected to the SPEAKERS FRONT A terminals The speakers connected to the receiver. 27GB...

Operating Instructions
Page 51
...buttons on the remote. 2 Press DIRECT on the receiver again. AUTO" (page 47). To cancel ANALOG DIRECT Press DIRECT on the receiver. Standard 2 channel stereo sources completely bypass the sound field processing and multi channel surround formats are connected, "HP DIR" appears on the receiver to select ...the input you to 2 channel. 2CH SAT TV SA-CD/CD TUNER 2CH A.F.D. When using the front left /right speakers only. Enjoying Surround Sound Using only the front speakers (2CH STEREO) In this ...
...buttons on the remote. 2 Press DIRECT on the receiver again. AUTO" (page 47). To cancel ANALOG DIRECT Press DIRECT on the receiver. Standard 2 channel stereo sources completely bypass the sound field processing and multi channel surround formats are connected, "HP DIR" appears on the receiver to select ...the input you to 2 channel. 2CH SAT TV SA-CD/CD TUNER 2CH A.F.D. When using the front left /right speakers only. Enjoying Surround Sound Using only the front speakers (2CH STEREO) In this ...

Marketing Specifications
Page 2
...connectivity. HDMI, the HDMI logo and High-Definition Multimedia Interface are subject to 1080i Hardware Remote Control: Yes Power Power Requirements: AC120V, 60 Hz 1. Features and specifications are trademarks or registered trademarks of HDMI Licensing LLC. All Weights and measures are property of Dolby Laboratories. STR-DG510...; Technology: Yes dts® Decoding: Yes Convenience A/B Speaker Switch: Yes (A / B) Digital Cinema Auto Calibration: Yes (Mic- Music - 3; Requires compatible HDTV for current information at www.sony.com/dn Last Updated: 06/20/2008 Requires HDTV with...
...connectivity. HDMI, the HDMI logo and High-Definition Multimedia Interface are subject to 1080i Hardware Remote Control: Yes Power Power Requirements: AC120V, 60 Hz 1. Features and specifications are trademarks or registered trademarks of HDMI Licensing LLC. All Weights and measures are property of Dolby Laboratories. STR-DG510...; Technology: Yes dts® Decoding: Yes Convenience A/B Speaker Switch: Yes (A / B) Digital Cinema Auto Calibration: Yes (Mic- Music - 3; Requires compatible HDTV for current information at www.sony.com/dn Last Updated: 06/20/2008 Requires HDTV with...


