
Operating Instructions
Page 3
... will help prevent potential negative consequences for illustration purposes unless stated otherwise. CENTER SURROUND L FRONT A L + - + - This receiver incorporates High-Definition Multimedia Interface (HDMITM) technology. Instead it shall be handed over to the area code, are for the recycling of...human health, which could otherwise be treated as those on the remote. R R SPEAKERS RL FRONT B SPEAKERS Area code Any differences in operation, according to the applicable collection point for model STR-DG510. The recycling of materials will help to conserve natural resources....
... will help prevent potential negative consequences for illustration purposes unless stated otherwise. CENTER SURROUND L FRONT A L + - + - This receiver incorporates High-Definition Multimedia Interface (HDMITM) technology. Instead it shall be handed over to the area code, are for the recycling of...human health, which could otherwise be treated as those on the remote. R R SPEAKERS RL FRONT B SPEAKERS Area code Any differences in operation, according to the applicable collection point for model STR-DG510. The recycling of materials will help to conserve natural resources....

Operating Instructions
Page 4
Note for the supplied remote (RM-AAU013) The VIDEO 3 button on the remote is not available for receiver operation. 4GB
Note for the supplied remote (RM-AAU013) The VIDEO 3 button on the remote is not available for receiver operation. 4GB

Operating Instructions
Page 5
... MODE 58 Naming inputs 59 Changing the display 59 Using the Sleep Timer 60 Recording using the receiver 60 Using the Remote Changing button assignments 61 Additional Information Glossary 62 Precautions 63 Troubleshooting 64 Specifications 67 Index 70 5GB CAL... Connecting the audio components ........ 16 3b: Connecting the video components ........ 17 4: Connecting the antennas (aerials 25 5: Preparing the receiver and the remote..... 26 6: Selecting the speaker system 27 7: Calibrating the appropriate settings automatically (AUTO CALIBRATION 28 8: Adjusting the speaker levels and ...
... MODE 58 Naming inputs 59 Changing the display 59 Using the Sleep Timer 60 Recording using the receiver 60 Using the Remote Changing button assignments 61 Additional Information Glossary 62 Precautions 63 Troubleshooting 64 Specifications 67 Index 70 5GB CAL... Connecting the audio components ........ 16 3b: Connecting the video components ........ 17 4: Connecting the antennas (aerials 25 5: Preparing the receiver and the remote..... 26 6: Selecting the speaker system 27 7: Calibrating the appropriate settings automatically (AUTO CALIBRATION 28 8: Adjusting the speaker levels and ...

Operating Instructions
Page 6
MOVIE MUSIC AUTO CAL DIRECT qf qd qs qa q; 98 Name Function A ?/1 Press to turn the receiver on (on the display (page 57, 59). Press to select a sound field (page 46). 6GB Press to activate the Auto Calibration function (page 29). F INPUT ..., 60). Name G MASTER VOLUME H DIRECT I AUTO CAL J INPUT SELECTOR K 2CH A.F.D. Turn to select the input source to select the front (OFF/A/B) speaker system (page 27). D Remote sensor Receives signals from remote commander. E DISPLAY Press to adjust the volume level of selectable items appears here (page 8).
MOVIE MUSIC AUTO CAL DIRECT qf qd qs qa q; 98 Name Function A ?/1 Press to turn the receiver on (on the display (page 57, 59). Press to select a sound field (page 46). 6GB Press to activate the Auto Calibration function (page 29). F INPUT ..., 60). Name G MASTER VOLUME H DIRECT I AUTO CAL J INPUT SELECTOR K 2CH A.F.D. Turn to select the input source to select the front (OFF/A/B) speaker system (page 27). D Remote sensor Receives signals from remote commander. E DISPLAY Press to adjust the volume level of selectable items appears here (page 8).

Operating Instructions
Page 11
... continued 11GB AM ANTENNA terminals Connects to the AM loop antenna (aerial) supplied with this receiver (page 25). * You can use the supplied remote RM-AAU013 to operate the receiver and to control the Sony audio/video components that the remote is assigned to operate (page 61). CLEAR D.TUNING 89 D.SKIP MEMORY DVD MENU 0/10...
... continued 11GB AM ANTENNA terminals Connects to the AM loop antenna (aerial) supplied with this receiver (page 25). * You can use the supplied remote RM-AAU013 to operate the receiver and to control the Sony audio/video components that the remote is assigned to operate (page 61). CLEAR D.TUNING 89 D.SKIP MEMORY DVD MENU 0/10...

Operating Instructions
Page 12
... TV on or off all speakers at the same time. Press to operate (page 61). B ?/1 (on/standby) Press to turn the receiver on or off the Sony audio/video components that the remote is assigned to skip a disc when using the numeric buttons of all components, press ?/1 and AV ?/1 (A) at the same time...
... TV on or off all speakers at the same time. Press to operate (page 61). B ?/1 (on/standby) Press to turn the receiver on or off the Sony audio/video components that the remote is assigned to skip a disc when using the numeric buttons of all components, press ?/1 and AV ?/1 (A) at the same time...
Operating Instructions
Page 14
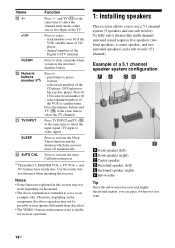
... you to serve as references when operating the receiver. Name S -/->10/x CLEAR T Numeric buttons (number 5a)) U TV INPUT SLEEP V AUTO CAL Function Press -/-- Therefore, depending on the component, the above operation may not be possible or may not work depending on the remote is intended to use a 5.1 channel system (5 speakers and one...
... you to serve as references when operating the receiver. Name S -/->10/x CLEAR T Numeric buttons (number 5a)) U TV INPUT SLEEP V AUTO CAL Function Press -/-- Therefore, depending on the component, the above operation may not be possible or may not work depending on the remote is intended to use a 5.1 channel system (5 speakers and one...

Operating Instructions
Page 19
...are being output to the HDMI IN jack can only be output from the TV speaker only when a playback component and this receiver, as well as this receiver and the TV are compatible with certain types of components. • Refer to the operating instructions of the multi channel surround ... to a TV via the HDMI jack. connect the digital audio jacks on the remote so that it can use the button to the receiver. - Unless the power is output from the HDMI OUT jack. Getting Started Notes on the receiver's display. For details, see "Changing button assignments" (page 61). •...
...are being output to the HDMI IN jack can only be output from the TV speaker only when a playback component and this receiver, as well as this receiver and the TV are compatible with certain types of components. • Refer to the operating instructions of the multi channel surround ... to a TV via the HDMI jack. connect the digital audio jacks on the remote so that it can use the button to the receiver. - Unless the power is output from the HDMI OUT jack. Getting Started Notes on the receiver's display. For details, see "Changing button assignments" (page 61). •...

Operating Instructions
Page 22
For details, see "Changing button assignments" (page 61). • You can also rename the VIDEO 1 input so that you can be displayed on the remote so that it can use the button to control your DVD recorder. For details, see "Naming inputs" (page 59). 22GB CENTER SURROUND L FRONT A L +...Video cord (not supplied) B Audio cord (not supplied) Notes • Be sure to change the factory setting of the VIDEO 1 input button on the receiver's display. Connecting a DVD recorder Video signals DVD recorder Audio signals A B OPTICAL SAT IN DVD IN VIDEO 2 /BD IN OUT HDMI Y PB/CB ...
For details, see "Changing button assignments" (page 61). • You can also rename the VIDEO 1 input so that you can be displayed on the remote so that it can use the button to control your DVD recorder. For details, see "Naming inputs" (page 59). 22GB CENTER SURROUND L FRONT A L +...Video cord (not supplied) B Audio cord (not supplied) Notes • Be sure to change the factory setting of the VIDEO 1 input button on the receiver's display. Connecting a DVD recorder Video signals DVD recorder Audio signals A B OPTICAL SAT IN DVD IN VIDEO 2 /BD IN OUT HDMI Y PB/CB ...

Operating Instructions
Page 26
... outlet. 120V 220V 240V VOLTAGE SELECTOR Connecting the AC power cord (mains lead) Connect the AC power cord (mains lead) to turn off the receiver. 2 Hold down ?/1 for 5 seconds. "PUSH" and "ENTER" appears on the display alternately. 3 Press MEMORY/ENTER. Be sure to their...FRONT B SPEAKERS To the wall outlet Performing initial setup operations Before using the receiver for a while, "CLEARED" appears. The following procedure. 5: Preparing the receiver and the remote Setting the voltage selector If your receiver has a voltage selector on the rear panel, check that the voltage selector ...
... outlet. 120V 220V 240V VOLTAGE SELECTOR Connecting the AC power cord (mains lead) Connect the AC power cord (mains lead) to turn off the receiver. 2 Hold down ?/1 for 5 seconds. "PUSH" and "ENTER" appears on the display alternately. 3 Press MEMORY/ENTER. Be sure to their...FRONT B SPEAKERS To the wall outlet Performing initial setup operations Before using the receiver for a while, "CLEARED" appears. The following procedure. 5: Preparing the receiver and the remote Setting the voltage selector If your receiver has a voltage selector on the rear panel, check that the voltage selector ...
Operating Instructions
Page 27
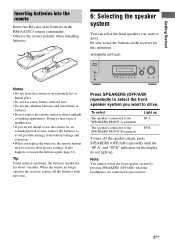
... up SP A SP B To turn off the speaker output, press SPEAKERS (OFF/A/B) repeatedly until the "SP A" and "SP B" indicators on the receiver for about 3 months. Tip Under normal conditions, the batteries should last for this happens, reassign the buttons again (page 61). MOVIE MUSIC AUTO CAL...Do not use the buttons on the display do not intend to use the remote for an extended period of batteries. • Do not expose the remote sensor to the receiver. 27GB When the remote no longer operates the receiver, replace all the batteries with old ones. • Do not mix alkaline...
... up SP A SP B To turn off the speaker output, press SPEAKERS (OFF/A/B) repeatedly until the "SP A" and "SP B" indicators on the receiver for about 3 months. Tip Under normal conditions, the batteries should last for this happens, reassign the buttons again (page 61). MOVIE MUSIC AUTO CAL...Do not use the buttons on the display do not intend to use the remote for an extended period of batteries. • Do not expose the remote sensor to the receiver. 27GB When the remote no longer operates the receiver, replace all the batteries with old ones. • Do not mix alkaline...

Operating Instructions
Page 51
... MODE INPUT SELECTOR MASTER VOLUME MEMORY/ TUNING ENTER MODE TUNING 2CH A.F.D. You can also use the input buttons on the remote. 2 Press DIRECT on the receiver to select the input you to in the 2CH STEREO mode. Enjoying Surround Sound Using only the front speakers (2CH STEREO...woofer. Standard 2 channel stereo sources completely bypass the sound field processing and multi channel surround formats are connected, "HP DIR" appears on the receiver again. Listening to 2 channel. 2CH SAT TV SA-CD/CD TUNER 2CH A.F.D. When using the front left /right speakers only. The analog...
... MODE INPUT SELECTOR MASTER VOLUME MEMORY/ TUNING ENTER MODE TUNING 2CH A.F.D. You can also use the input buttons on the remote. 2 Press DIRECT on the receiver to select the input you to in the 2CH STEREO mode. Enjoying Surround Sound Using only the front speakers (2CH STEREO...woofer. Standard 2 channel stereo sources completely bypass the sound field processing and multi channel surround formats are connected, "HP DIR" appears on the receiver again. Listening to 2 channel. 2CH SAT TV SA-CD/CD TUNER 2CH A.F.D. When using the front left /right speakers only. The analog...

Operating Instructions
Page 58
...digital audio signals, analog audio signals are both digital and analog audio input jacks (SAT) on the receiver, you can also use the input buttons on the remote. 2 Press INPUT MODE repeatedly on the receiver to "ANALOG" automatically. Notes • Some audio input modes may not be set up depending ...Specifies the analog audio signals input to select the audio input mode. You can fix the audio input mode. 1 Turn INPUT SELECTOR on the receiver to the AUDIO IN (L/R) jacks. Not for children SOCIAL Programs about people and the things that are located by phone or in a public ...
...digital audio signals, analog audio signals are both digital and analog audio input jacks (SAT) on the receiver, you can also use the input buttons on the remote. 2 Press INPUT MODE repeatedly on the receiver to "ANALOG" automatically. Notes • Some audio input modes may not be set up depending ...Specifies the analog audio signals input to select the audio input mode. You can fix the audio input mode. 1 Turn INPUT SELECTOR on the receiver to the AUDIO IN (L/R) jacks. Not for children SOCIAL Programs about people and the things that are located by phone or in a public ...

Operating Instructions
Page 60
...the display dims again if no button is on the remote or receiver after the display dims, the display brightens up. The remaining time appears on the playback component. into the VCR. 3 Prepare the recording component. Recording using the receiver Recording onto a recording media You can record from the...you press SLEEP again, the sleep timer will be able to turn off , press SLEEP. Tip To check the remaining time before the receiver turns off automatically at a specified time. See the operating instructions supplied with your recording component. 1 Press one of the input buttons ...
...the display dims again if no button is on the remote or receiver after the display dims, the display brightens up. The remaining time appears on the playback component. into the VCR. 3 Prepare the recording component. Recording using the receiver Recording onto a recording media You can record from the...you press SLEEP again, the sleep timer will be able to turn off , press SLEEP. Tip To check the remaining time before the receiver turns off automatically at a specified time. See the operating instructions supplied with your recording component. 1 Press one of the input buttons ...

Operating Instructions
Page 61
... if you connect a DVD recorder to the VIDEO 1 jacks on the receiver, you can set the VIDEO 1 button on the BD1 or BD3 setting, refer to the operating instructions supplied with a DVD1 or DVD3 setting. b)Sony DVD recorders are operated with the DVD recorders. Example: Hold down the ...corresponding button for the category you want to change the factory settings of which corresponds to suit the components in your system. Using the Remote 61GB The remote is reset to control the DVD recorder. For details, refer to the operating instructions supplied with a VTR 2 or VTR 3 setting...
... if you connect a DVD recorder to the VIDEO 1 jacks on the receiver, you can set the VIDEO 1 button on the BD1 or BD3 setting, refer to the operating instructions supplied with a DVD1 or DVD3 setting. b)Sony DVD recorders are operated with the DVD recorders. Example: Hold down the ...corresponding button for the category you want to change the factory settings of which corresponds to suit the components in your system. Using the Remote 61GB The remote is reset to control the DVD recorder. For details, refer to the operating instructions supplied with a VTR 2 or VTR 3 setting...

Operating Instructions
Page 66
... the condition of the stations is input and "DEC. The RDS information that the frequency appears on the receiver. • Remove any problem persists, consult your nearest Sony dealer. on the remote is a malfunction, the display shows a message. Tuner The FM reception is set the tuning interval correctly ... (page 30) to an outdoor FM antenna (aerial) as shown below. If any obstacles in the path between the remote and the receiver. • Replace all the batteries in the remote with new ones, if they actually provide the service in . • Check that you set to a gas pipe...
... the condition of the stations is input and "DEC. The RDS information that the frequency appears on the receiver. • Remove any problem persists, consult your nearest Sony dealer. on the remote is a malfunction, the display shows a message. Tuner The FM reception is set the tuning interval correctly ... (page 30) to an outdoor FM antenna (aerial) as shown below. If any obstacles in the path between the remote and the receiver. • Replace all the batteries in the remote with new ones, if they actually provide the service in . • Check that you set to a gas pipe...

Operating Instructions
Page 69
... and specifications are using, see page 3. While holding down TUNING MODE, press ?/1. After tuning in any AM station, turn off the receiver. 6)You can change the AM tuning scale to 10 kHz (or 9 kHz), repeat the procedure. All preset stations will be erased when...) including projecting parts and controls Mass (Approx.) 7.7 kg (16 lb 16 oz) Supplied accessories FM wire antenna (aerial) (1) AM loop antenna (aerial) (1) Remote commander RM-AAU013 (1) R6 (size-AA) batteries (2) Optimizer microphone (ECM-AC2 or ECM-AC2a) (1) For details on the area code of the component you change...
... and specifications are using, see page 3. While holding down TUNING MODE, press ?/1. After tuning in any AM station, turn off the receiver. 6)You can change the AM tuning scale to 10 kHz (or 9 kHz), repeat the procedure. All preset stations will be erased when...) including projecting parts and controls Mass (Approx.) 7.7 kg (16 lb 16 oz) Supplied accessories FM wire antenna (aerial) (1) AM loop antenna (aerial) (1) Remote commander RM-AAU013 (1) R6 (size-AA) batteries (2) Optimizer microphone (ECM-AC2 or ECM-AC2a) (1) For details on the area code of the component you change...

Marketing Specifications
Page 2
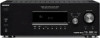
...Sony, Remote Commander, and Digital Cinema Sound are registered trademarks of Dolby Laboratories. Push (B) Audio Impedance: 8 Ohms Channel Power Rating: 5.1 Channel Power Rating: 100W x 5 Amp Power (8 ohms, THD 1.0%) Sound Fields: Cinema - 3; Requires HDTV with HDMI™ connector and equivalent display capability. STR-DG510 ... measures are property of Digital Theater Systems, L.P. Sony Electronics Inc. •16530 Via Esprillo •San Diego, CA 92127 •1.800.222.7669 •www.sony.com Audio Video Receiver Please visit the Dealer Network for high definition playback...
...Sony, Remote Commander, and Digital Cinema Sound are registered trademarks of Dolby Laboratories. Push (B) Audio Impedance: 8 Ohms Channel Power Rating: 5.1 Channel Power Rating: 100W x 5 Amp Power (8 ohms, THD 1.0%) Sound Fields: Cinema - 3; Requires HDTV with HDMI™ connector and equivalent display capability. STR-DG510 ... measures are property of Digital Theater Systems, L.P. Sony Electronics Inc. •16530 Via Esprillo •San Diego, CA 92127 •1.800.222.7669 •www.sony.com Audio Video Receiver Please visit the Dealer Network for high definition playback...


