
Limited Warranty (U.S. Only)
Page 1
4-557-173-02 General Stereo/Hifi Components/Tape Decks ® CD Players/Mini Disc Players/Audio Systems Hifi Audio LIMITED WARRANTY Sony Electronics Inc. ("Sony") warrants this Product is within the Warranty period must pay for all labor charges. 2. PARTS: In addition, Sony will repair or replace the Product, at its original packaging or packaging affording an equal degree of sale, the limitation on how long an implied warranty lasts, so...
4-557-173-02 General Stereo/Hifi Components/Tape Decks ® CD Players/Mini Disc Players/Audio Systems Hifi Audio LIMITED WARRANTY Sony Electronics Inc. ("Sony") warrants this Product is within the Warranty period must pay for all labor charges. 2. PARTS: In addition, Sony will repair or replace the Product, at its original packaging or packaging affording an equal degree of sale, the limitation on how long an implied warranty lasts, so...
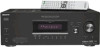
Operating Instructions
Page 4
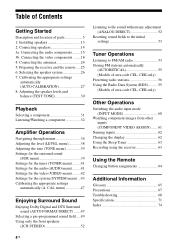
... 63 Recording using the receiver 63 Using the Remote Changing button assignments 64 Additional Information Glossary 65 Precautions 67 Troubleshooting 68 Specifications 71 Index 74 4GB CAL menu 47 Enjoying Surround Sound Enjoying Dolby Digital and DTS Surround sound (AUTO FORMAT DIRECT) .......47 Selecting a pre-programmed sound field.....49 Using only the front speakers (2CH STEREO 52 Listening to the sound without any adjustment (ANALOG DIRECT 52 Resetting sound fields to the initial settings 53 Tuner Operations Listening to FM/AM radio 53 Storing FM stations automatically...
... 63 Recording using the receiver 63 Using the Remote Changing button assignments 64 Additional Information Glossary 65 Precautions 67 Troubleshooting 68 Specifications 71 Index 74 4GB CAL menu 47 Enjoying Surround Sound Enjoying Dolby Digital and DTS Surround sound (AUTO FORMAT DIRECT) .......47 Selecting a pre-programmed sound field.....49 Using only the front speakers (2CH STEREO 52 Listening to the sound without any adjustment (ANALOG DIRECT 52 Resetting sound fields to the initial settings 53 Tuner Operations Listening to FM/AM radio 53 Storing FM stations automatically...
Operating Instructions
Page 10
... /standby) switch VIDEO 1 VIDEO 2 VIDEO 3 DVD wd MD/TAPE SA-CD/CD TUNER AMP MENU 3 ws 2CH A.F.D. F TV VOL MASTER VOL qh G g qa qg f qf RETURN/EXIT MENU TV CH - TV CH + PRESET - If you press the input buttons (W). 10GB F SPEAKER section Connects to a TV monitor (page 19). REPLAY ADVANCE PRESET + .< > < TUNING - E COMPONENT VIDEO INPUT/ OUTPUT section Green Blue Red COMPONENT Connects to turn off the Sony audio/video components that the remote is assigned to operate (page 64). MOVIE MUSIC 4 wa DUAL MONO 123 5 FM MODE...
... /standby) switch VIDEO 1 VIDEO 2 VIDEO 3 DVD wd MD/TAPE SA-CD/CD TUNER AMP MENU 3 ws 2CH A.F.D. F TV VOL MASTER VOL qh G g qa qg f qf RETURN/EXIT MENU TV CH - TV CH + PRESET - If you press the input buttons (W). 10GB F SPEAKER section Connects to a TV monitor (page 19). REPLAY ADVANCE PRESET + .< > < TUNING - E COMPONENT VIDEO INPUT/ OUTPUT section Green Blue Red COMPONENT Connects to turn off the Sony audio/video components that the remote is assigned to operate (page 64). MOVIE MUSIC 4 wa DUAL MONO 123 5 FM MODE...

Operating Instructions
Page 12
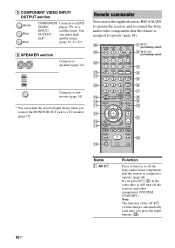
... Function After pressing AMP MENU (C), DVD MENU (H), or MENU (N), press the control button V, v, B or b to activate the Sleep Timer function and the duration which the receiver turns off automatically. audio settings during recording), or multiple items on the TV screen of the buttons to select the component you press the incorrect numeric button. - Button Assigned Sony component VIDEO 1 VCR (VTR mode 3) VIDEO 2 VCR (VTR mode 2) VIDEO 3 Not assigned DVD DVD player MD/TAPE MD deck SA-CD/CD Super Audio CD/CD player TUNER Built-in "Changing button assignments...
... Function After pressing AMP MENU (C), DVD MENU (H), or MENU (N), press the control button V, v, B or b to activate the Sleep Timer function and the duration which the receiver turns off automatically. audio settings during recording), or multiple items on the TV screen of the buttons to select the component you press the incorrect numeric button. - Button Assigned Sony component VIDEO 1 VCR (VTR mode 3) VIDEO 2 VCR (VTR mode 2) VIDEO 3 Not assigned DVD DVD player MD/TAPE MD deck SA-CD/CD Super Audio CD/CD player TUNER Built-in "Changing button assignments...
Operating Instructions
Page 19
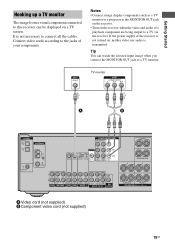
... selected input image when you connect the MONITOR OUT jack to connect all the cables. R SURROUND SPEAKERS R FRONT A A Video cord (not supplied) B Component video cord (not supplied) 19GB If the power supply of the receiver is not necessary to a TV monitor. SURROUND BACK L L + - + - TV monitor A B DIGITAL OPTICAL VIDEO 1 IN VIDEO 2 IN ANTENNA AM COMPONENT VIDEO ASSIGNABLE Y MONITOR PB/CB /B-Y VIDEO IN VIDEO IN VIDEO OUT VIDEO IN VIDEO OUT DVD IN VIDEO 2 IN PR/CR /R-Y MONITOR OUT DVD IN COAXIAL L L R IN SA-CD/CD R OUT IN MD/TAPE L L R R AUDIO IN AUDIO...
... selected input image when you connect the MONITOR OUT jack to connect all the cables. R SURROUND SPEAKERS R FRONT A A Video cord (not supplied) B Component video cord (not supplied) 19GB If the power supply of the receiver is not necessary to a TV monitor. SURROUND BACK L L + - + - TV monitor A B DIGITAL OPTICAL VIDEO 1 IN VIDEO 2 IN ANTENNA AM COMPONENT VIDEO ASSIGNABLE Y MONITOR PB/CB /B-Y VIDEO IN VIDEO IN VIDEO OUT VIDEO IN VIDEO OUT DVD IN VIDEO 2 IN PR/CR /R-Y MONITOR OUT DVD IN COAXIAL L L R IN SA-CD/CD R OUT IN MD/TAPE L L R R AUDIO IN AUDIO...
Operating Instructions
Page 21
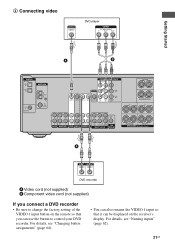
...you can be displayed on the remote so that you connect a DVD recorder • Be sure to control your DVD recorder. SURROUND BACK L L + - + - 2 Connecting video DVD player Getting Started A B DIGITAL OPTICAL VIDEO 1 IN VIDEO 2 IN ANTENNA AM COMPONENT VIDEO ASSIGNABLE Y MONITOR PB/CB /B-Y VIDEO IN VIDEO IN VIDEO OUT VIDEO IN VIDEO OUT DVD IN PR/CR /R-Y VIDEO 2 MONITOR IN OUT DVD IN COAXIAL L L R IN SA-CD/CD R OUT IN MD/TAPE L L R R AUDIO IN AUDIO IN AUDIO OUT AUDIO IN DVD VIDEO 2 VIDEO 1 L AUDIO CENTER OUT R SUB FRONT SURROUND WOOFER SUB MULTI CH IN...
...you can be displayed on the remote so that you connect a DVD recorder • Be sure to control your DVD recorder. SURROUND BACK L L + - + - 2 Connecting video DVD player Getting Started A B DIGITAL OPTICAL VIDEO 1 IN VIDEO 2 IN ANTENNA AM COMPONENT VIDEO ASSIGNABLE Y MONITOR PB/CB /B-Y VIDEO IN VIDEO IN VIDEO OUT VIDEO IN VIDEO OUT DVD IN PR/CR /R-Y VIDEO 2 MONITOR IN OUT DVD IN COAXIAL L L R IN SA-CD/CD R OUT IN MD/TAPE L L R R AUDIO IN AUDIO IN AUDIO OUT AUDIO IN DVD VIDEO 2 VIDEO 1 L AUDIO CENTER OUT R SUB FRONT SURROUND WOOFER SUB MULTI CH IN...

Operating Instructions
Page 25
... the LEVEL, TONE, SUR, TUNER, AUDIO, VIDEO and SYSTEM menus. • The sound field memorized for each input and preset station. • All sound field parameters. • All preset stations. • All index names for a while, "CLEARED" appears. SURROUND BACK L + - AC power cord CENTER + - R FRONT A RL RL FRONT B SPEAKERS To the wall outlet Note Install this operation. 1,2 ?/1 SPEAKERS (OFF/A/B /A+B) AUTO CAL MIC PHONES VIDEO 3 IN/PORTABLE AV IN VIDEO L AUDIO R MULTI CHANNEL DECODING DISPLAY INPUT MODE INPUT SELECTOR MASTER VOLUME MEMORY/ TUNING ENTER MODE TUNING...
... the LEVEL, TONE, SUR, TUNER, AUDIO, VIDEO and SYSTEM menus. • The sound field memorized for each input and preset station. • All sound field parameters. • All preset stations. • All index names for a while, "CLEARED" appears. SURROUND BACK L + - AC power cord CENTER + - R FRONT A RL RL FRONT B SPEAKERS To the wall outlet Note Install this operation. 1,2 ?/1 SPEAKERS (OFF/A/B /A+B) AUTO CAL MIC PHONES VIDEO 3 IN/PORTABLE AV IN VIDEO L AUDIO R MULTI CHANNEL DECODING DISPLAY INPUT MODE INPUT SELECTOR MASTER VOLUME MEMORY/ TUNING ENTER MODE TUNING...

Operating Instructions
Page 31
... ADVANCE PRESET + .< > MUTING 3 < 1 Press the input button to adjust the volume. The selected input appears on the receiver. to select a component. MOVIE MUSIC 1 4 7 >10/ - Selected input Components that can also use INPUT SELECTOR on the receiver. Playback Selecting a component SYSTEM STANDBY VIDEO 1 VIDEO 2 VIDEO 3 DVD 1 MD/TAPE SA-CD/CD TUNER AMP MENU 2CH A.F.D. Note The surround effect does not work when MULTI CH IN is connected, "HP MULTI" appears on the component and start playback. 3 Press MASTER VOL +/- CLEAR DISPLAY G DUAL MONO 23 FM MODE 56 D.TUNING...
... ADVANCE PRESET + .< > MUTING 3 < 1 Press the input button to adjust the volume. The selected input appears on the receiver. to select a component. MOVIE MUSIC 1 4 7 >10/ - Selected input Components that can also use INPUT SELECTOR on the receiver. Playback Selecting a component SYSTEM STANDBY VIDEO 1 VIDEO 2 VIDEO 3 DVD 1 MD/TAPE SA-CD/CD TUNER AMP MENU 2CH A.F.D. Note The surround effect does not work when MULTI CH IN is connected, "HP MULTI" appears on the component and start playback. 3 Press MASTER VOL +/- CLEAR DISPLAY G DUAL MONO 23 FM MODE 56 D.TUNING...

Operating Instructions
Page 33
... the DVD, eject the disc and turn off the receiver, TV and DVD player. 33GB Playback Watching a DVD TV/VIDEO AUTO SLEEP CAL AV ?/1 TV ?/1 ?/1 SYSTEM STANDBY VIDEO 1 VIDEO 2 VIDEO 3 DVD MD/TAPE SA-CD/CD TUNER AMP MENU 2CH A.F.D. TUNING + m H M TV X x 2 3 7 MULTI CHANNEL DECODING lamp ?/1 SPEAKERS (OFF/A/B /A+B) AUTO CAL MIC PHONES VIDEO 3 IN/PORTABLE AV IN VIDEO L AUDIO R MULTI CHANNEL DECODING DISPLAY INPUT MODE INPUT SELECTOR MASTER VOLUME MEMORY/ TUNING ENTER MODE TUNING 2CH A.F.D. Be sure the digital audio output of the DVD is displayed. 5 Set up properly...
... the DVD, eject the disc and turn off the receiver, TV and DVD player. 33GB Playback Watching a DVD TV/VIDEO AUTO SLEEP CAL AV ?/1 TV ?/1 ?/1 SYSTEM STANDBY VIDEO 1 VIDEO 2 VIDEO 3 DVD MD/TAPE SA-CD/CD TUNER AMP MENU 2CH A.F.D. TUNING + m H M TV X x 2 3 7 MULTI CHANNEL DECODING lamp ?/1 SPEAKERS (OFF/A/B /A+B) AUTO CAL MIC PHONES VIDEO 3 IN/PORTABLE AV IN VIDEO L AUDIO R MULTI CHANNEL DECODING DISPLAY INPUT MODE INPUT SELECTOR MASTER VOLUME MEMORY/ TUNING ENTER MODE TUNING 2CH A.F.D. Be sure the digital audio output of the DVD is displayed. 5 Set up properly...

Operating Instructions
Page 49
... A.F.D. VIDEO 1 VIDEO 2 VIDEO 3 DVD MD/TAPE SA-CD/CD TUNER AMP MENU 2CH A.F.D. MOVIE MUSIC DUAL MONO 123 FM MODE 456 MUSIC MOVIE Press MOVIE repeatedly to select a sound field for movies or press MUSIC repeatedly to select a sound field for output to the sub woofer when there is no LFE signal, which is a low-pass sound effect output from a sub woofer to "LARGE". Enjoying Surround Sound continued 49GB When you connect a sub woofer This receiver will generate a low frequency signal for music. Tip When a multi channel signal is input...
... A.F.D. VIDEO 1 VIDEO 2 VIDEO 3 DVD MD/TAPE SA-CD/CD TUNER AMP MENU 2CH A.F.D. MOVIE MUSIC DUAL MONO 123 FM MODE 456 MUSIC MOVIE Press MOVIE repeatedly to select a sound field for movies or press MUSIC repeatedly to select a sound field for output to the sub woofer when there is no LFE signal, which is a low-pass sound effect output from a sub woofer to "LARGE". Enjoying Surround Sound continued 49GB When you connect a sub woofer This receiver will generate a low frequency signal for music. Tip When a multi channel signal is input...

Operating Instructions
Page 52
.... The analog audio is output from the sub woofer. MOVIE MUSIC MULTI CH IN DIRECT 12 1 Turn INPUT SELECTOR on the receiver to select the input you to 2 channel stereo sources using this mode, the receiver outputs the sound from the front left /right speakers and a sub woofer, select "A.F.D. MD/TAPE SA-CD/CD TUNER AMP MENU 2CH 2CH A.F.D. Using only the front speakers (2CH STEREO) In this function, only the volume and front speaker balance can be adjusted. ?/1 SPEAKERS (OFF/A/B /A+B) AUTO CAL MIC PHONES VIDEO 3 IN/PORTABLE AV IN VIDEO L AUDIO R MULTI CHANNEL DECODING DISPLAY...
.... The analog audio is output from the sub woofer. MOVIE MUSIC MULTI CH IN DIRECT 12 1 Turn INPUT SELECTOR on the receiver to select the input you to 2 channel stereo sources using this mode, the receiver outputs the sound from the front left /right speakers and a sub woofer, select "A.F.D. MD/TAPE SA-CD/CD TUNER AMP MENU 2CH 2CH A.F.D. Using only the front speakers (2CH STEREO) In this function, only the volume and front speaker balance can be adjusted. ?/1 SPEAKERS (OFF/A/B /A+B) AUTO CAL MIC PHONES VIDEO 3 IN/PORTABLE AV IN VIDEO L AUDIO R MULTI CHANNEL DECODING DISPLAY...

Operating Instructions
Page 64
... corresponding button for playing. The analog audio signals of the input buttons to the MULTI CH IN jacks are output. Using the Remote Changing button assignments You can set the VIDEO 1 button on the receiver, you can change the factory settings of which you may not be able to record from the source. • The audio signals input to select the playback component. For example, if you connect a DVD recorder to the VIDEO 1 jacks on this case, you want . Insert a blank video tape, etc...
... corresponding button for playing. The analog audio signals of the input buttons to the MULTI CH IN jacks are output. Using the Remote Changing button assignments You can set the VIDEO 1 button on the receiver, you can change the factory settings of which you may not be able to record from the source. • The audio signals input to select the playback component. For example, if you connect a DVD recorder to the VIDEO 1 jacks on this case, you want . Insert a blank video tape, etc...

Operating Instructions
Page 69
... that the speakers and components are connected securely. • Check that the components are connected correctly. • Select the source component using the input buttons. Wipe them with a cloth slightly moistened with a sampling frequency of this case, select "SB ON" (page 35). Dolby Digital or DTS multi channel sound is not reproduced. • Check that the sub woofer is connected correctly and securely. • Make sure you connect the receiver to the digital input jacks of more...
... that the speakers and components are connected securely. • Check that the components are connected correctly. • Select the source component using the input buttons. Wipe them with a cloth slightly moistened with a sampling frequency of this case, select "SB ON" (page 35). Dolby Digital or DTS multi channel sound is not reproduced. • Check that the sub woofer is connected correctly and securely. • Make sure you connect the receiver to the digital input jacks of more...

Operating Instructions
Page 70
... screen or monitor. • Select the appropriate input using the input buttons. • Set your nearest Sony dealer. Use direct tuning. • Make sure you set to "DEC. Radio stations cannot be temporarily out of order. PCM". Adjust the antennas and connect an external antenna, if necessary. • The signal strength of the stations is selected properly on this receiver. • Check whether the input source of the system by scanning preset stations). The MULTI CHANNEL DECODING lamp does not light...
... screen or monitor. • Select the appropriate input using the input buttons. • Set your nearest Sony dealer. Use direct tuning. • Make sure you set to "DEC. Radio stations cannot be temporarily out of order. PCM". Adjust the antennas and connect an external antenna, if necessary. • The signal strength of the stations is selected properly on this receiver. • Check whether the input source of the system by scanning preset stations). The MULTI CHANNEL DECODING lamp does not light...

Marketing Specifications
Page 2
... Updated: 06/20/2008 Auto Format Decoding - 11; 2 Channel - 1 Zones: Single Tuner Type: Auto Tuning, Direct Tuning, Station Name Convenience AM/FM Memory Presets: 30 FM - 30 AM Inputs and Outputs Composite Video Input(s): 4 (1 Front/3 Rear) Composite Video Output(s): 1 (Rear) Optical Audio Input(s): 2 (Rear) Coaxial Audio Digital Input(s): 1 (Rear) RCA Audio Input(s): 6 (2 Dedicated Audio/4 Audio/Video) RCA Audio Output(s): 1 (Rear) Multi-Channel Input(s): 1 (Rear, 5.1 Channel) Subwoofer Output(s): 1 (Rear) Antenna Terminal (AM Loop): 1 (Rear) Antenna Terminal (FM 75 Ohm): 1 (Rear) Headphone...
... Updated: 06/20/2008 Auto Format Decoding - 11; 2 Channel - 1 Zones: Single Tuner Type: Auto Tuning, Direct Tuning, Station Name Convenience AM/FM Memory Presets: 30 FM - 30 AM Inputs and Outputs Composite Video Input(s): 4 (1 Front/3 Rear) Composite Video Output(s): 1 (Rear) Optical Audio Input(s): 2 (Rear) Coaxial Audio Digital Input(s): 1 (Rear) RCA Audio Input(s): 6 (2 Dedicated Audio/4 Audio/Video) RCA Audio Output(s): 1 (Rear) Multi-Channel Input(s): 1 (Rear, 5.1 Channel) Subwoofer Output(s): 1 (Rear) Antenna Terminal (AM Loop): 1 (Rear) Antenna Terminal (FM 75 Ohm): 1 (Rear) Headphone...

Service Manual
Page 5
...12 34 5 67 8 ?/1 SPEAKERS (OFF/A/B /A+B) AUTO CAL MIC PHONES VIDEO 3 IN/PORTABLE AV IN VIDEO L AUDIO R MULTI CHANNEL DECODING DISPLAY INPUT MODE INPUT SELECTOR MASTER VOLUME MEMORY/ TUNING ENTER MODE TUNING 2CH A.F.D. I A.DIRECT J Preset station indicators K Tuner indicators L D.RANGE M COAX N OPT O SLEEP Function Lights up when a memory function, such as Preset Memory (page 57), etc., is actually being reproduced. J MULTI CH IN Press to select the audio directly from the components connected to select A.F.D. M A.F.D. Press to the MULTI CH IN jacks (page 31). N 2CH...
...12 34 5 67 8 ?/1 SPEAKERS (OFF/A/B /A+B) AUTO CAL MIC PHONES VIDEO 3 IN/PORTABLE AV IN VIDEO L AUDIO R MULTI CHANNEL DECODING DISPLAY INPUT MODE INPUT SELECTOR MASTER VOLUME MEMORY/ TUNING ENTER MODE TUNING 2CH A.F.D. I A.DIRECT J Preset station indicators K Tuner indicators L D.RANGE M COAX N OPT O SLEEP Function Lights up when a memory function, such as Preset Memory (page 57), etc., is actually being reproduced. J MULTI CH IN Press to select the audio directly from the components connected to select A.F.D. M A.F.D. Press to the MULTI CH IN jacks (page 31). N 2CH...

Service Manual
Page 6
... not work depending on the TV screen. B ANTENNA section FM ANTENNA AM ANTENNA Connects to a Super Audio CD player or DVD player which the receiver turns off . White (L) Red (R) MULTI CHANNEL INPUT jack Black Connects to the FM wire antenna supplied with components in recording standby.) x Press to - F FM MODE Press to perform menu operations. Then, use the control buttons to a DVD VIDEO player, TV, or a INPUT/ satellite tuner. K TV VOL +a)/- MASTER VOL +a)/- Press to turn off all speakers at the same time to select the channel entry mode, either...
... not work depending on the TV screen. B ANTENNA section FM ANTENNA AM ANTENNA Connects to a Super Audio CD player or DVD player which the receiver turns off . White (L) Red (R) MULTI CHANNEL INPUT jack Black Connects to the FM wire antenna supplied with components in recording standby.) x Press to - F FM MODE Press to perform menu operations. Then, use the control buttons to a DVD VIDEO player, TV, or a INPUT/ satellite tuner. K TV VOL +a)/- MASTER VOL +a)/- Press to turn off all speakers at the same time to select the channel entry mode, either...

Service Manual
Page 7
... input. Name E ;PRO LOGIC (II)/ (IIx) F DTS (-ES)/ (96/24) G NEO:6 Function Lights up when Dolby Digital Surround EX signals are connected to output the center and surround channel signals. J MASTER VOLUME Turn to the MULTI CH IN jacks (page 37). S MEMORY/ ENTER Press to select A.F.D. "; Lights up when using the A.F.D. continued 7US Getting Started Getting Started STR-DG500/DG600 Ver. 1.1 Name Function E Display The current status of the selected component or a list of reach from the components connected to adjust the volume level...
... input. Name E ;PRO LOGIC (II)/ (IIx) F DTS (-ES)/ (96/24) G NEO:6 Function Lights up when Dolby Digital Surround EX signals are connected to output the center and surround channel signals. J MASTER VOLUME Turn to the MULTI CH IN jacks (page 37). S MEMORY/ ENTER Press to select A.F.D. "; Lights up when using the A.F.D. continued 7US Getting Started Getting Started STR-DG500/DG600 Ver. 1.1 Name Function E Display The current status of the selected component or a list of reach from the components connected to adjust the volume level...

Service Manual
Page 8
... the menu while the menu or on-screen guide of all components, press ?/1 and AV ?/1 (A) at the same time, it will turn off the receiver and other components (SYSTEM STANDBY). D SPEAKER section Connects to mute the sound. You can use the control buttons to operate. Press to speakers (page 16). White (L) Red (R) MULTI CHANNEL INPUT jack Black PRE OUT White (L) jack Red (R) Connects to a Super Audio CD player or DVD player which the receiver turns off the audio/video components that the remote is programmed to the XM Connect-and-Play antenna...
... the menu while the menu or on-screen guide of all components, press ?/1 and AV ?/1 (A) at the same time, it will turn off the receiver and other components (SYSTEM STANDBY). D SPEAKER section Connects to mute the sound. You can use the control buttons to operate. Press to speakers (page 16). White (L) Red (R) MULTI CHANNEL INPUT jack Black PRE OUT White (L) jack Red (R) Connects to a Super Audio CD player or DVD player which the receiver turns off the audio/video components that the remote is programmed to the XM Connect-and-Play antenna...

Service Manual
Page 9
... mode 2) DVD DVD player MD/TAPE MD deck SA-CD/CD Super Audio CD/CD player TUNER Built-in this section may not be output from the antenna terminal of the VCR or satellite tuner (TV signal or video signal). STR-DG500/DG600 Name S DISPLAY T Control buttons U TOP MENU/ GUIDE V AV MENU W Ha) XX Function Press to turn the TV on or off. After pressing AMP MENU (L), TOP MENU/GUIDE (U), or AV MENU (V), press the control button V, v, B or b to display the - Press to select the settings. Then, use . TUNING...
... mode 2) DVD DVD player MD/TAPE MD deck SA-CD/CD Super Audio CD/CD player TUNER Built-in this section may not be output from the antenna terminal of the VCR or satellite tuner (TV signal or video signal). STR-DG500/DG600 Name S DISPLAY T Control buttons U TOP MENU/ GUIDE V AV MENU W Ha) XX Function Press to turn the TV on or off. After pressing AMP MENU (L), TOP MENU/GUIDE (U), or AV MENU (V), press the control button V, v, B or b to display the - Press to select the settings. Then, use . TUNING...


