HDMI Control Guide
Page 4
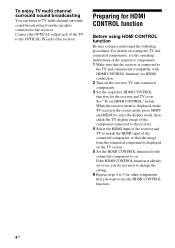
...the following procedures. To enjoy TV multi channel surround sound broadcasting You can listen to TV multi channel surround sound broadcasting from the connected component is connected to the TV and components (compatible with HDMI CONTROL function) via HDMI connection. 2 Turn on the receiver, TV and connected components. 3...SHIFT and MENU to enter the display mode, then check the TV display image of the component connected to the receiver. 4 Select the HDMI input of the receiver and TV to match the HDMI input of the connected component, so that the receiver is displayed on the TV screen. 5 ...
...the following procedures. To enjoy TV multi channel surround sound broadcasting You can listen to TV multi channel surround sound broadcasting from the connected component is connected to the TV and components (compatible with HDMI CONTROL function) via HDMI connection. 2 Turn on the receiver, TV and connected components. 3...SHIFT and MENU to enter the display mode, then check the TV display image of the component connected to the receiver. 4 Select the HDMI input of the receiver and TV to match the HDMI input of the connected component, so that the receiver is displayed on the TV screen. 5 ...

GUI Menu List
Page 1
... Impedance Speaker Pattern Sur Back Assign Manual Setup Crossover Freq Test Tone Multi Ch SW Level D. Preset 1 Category Mode ALL Category Preset Mode Preset 1 ... 3-274-909-11(1) STR-DG2100/STR-DG1100 GUI Menu List Video1-3 DVD/BD SAT/CATV TV MD/Tape... SA-CD/CD Phono Multi Ch In Network Client iPod Walkman Auto Tuning Direct Tuning ... EQ 5 Gain (Bass/Treble) [OPTIONS] Clear*1 A/V Sync Dual Mono Decode Priority Resolution HDMI Control HDMI Audio HDMI SW Level Screen Saver *1 Menu parameters displayed...
... Impedance Speaker Pattern Sur Back Assign Manual Setup Crossover Freq Test Tone Multi Ch SW Level D. Preset 1 Category Mode ALL Category Preset Mode Preset 1 ... 3-274-909-11(1) STR-DG2100/STR-DG1100 GUI Menu List Video1-3 DVD/BD SAT/CATV TV MD/Tape... SA-CD/CD Phono Multi Ch In Network Client iPod Walkman Auto Tuning Direct Tuning ... EQ 5 Gain (Bass/Treble) [OPTIONS] Clear*1 A/V Sync Dual Mono Decode Priority Resolution HDMI Control HDMI Audio HDMI SW Level Screen Saver *1 Menu parameters displayed...

Operating Instructions
Page 3
...Sony Corporation declares that this manual describe the controls on the GUI menu screen mean Neural-THX Surround. Other trademarks and trade names are those on the remote. • "Neural-THX" and "neural THX" introduced in the Operating Instructions and displayed in the display ... in the U.S. For details, please access the following URL: http://www.compliance.sony.de/ The Bluetooth word mark and logos are registered trademarks of Apple Inc., registered in this STR-DG2100 Multi Channel AV Receiver is under license from Dolby Laboratories. "M-crew Server" is a trademark of SIRIUS...
...Sony Corporation declares that this manual describe the controls on the GUI menu screen mean Neural-THX Surround. Other trademarks and trade names are those on the remote. • "Neural-THX" and "neural THX" introduced in the Operating Instructions and displayed in the display ... in the U.S. For details, please access the following URL: http://www.compliance.sony.de/ The Bluetooth word mark and logos are registered trademarks of Apple Inc., registered in this STR-DG2100 Multi Channel AV Receiver is under license from Dolby Laboratories. "M-crew Server" is a trademark of SIRIUS...

Operating Instructions
Page 4
... the audio components ........20 4b: Connecting the video components .......25 5: Connecting the antennas (aerials 35 6: Preparing the receiver and the remote ....36 7: Operating the receiver using the GUI (Graphical User Interface 38 8: Setting the speakers 41 9: Calibrating the appropriate speaker settings automatically (Auto ... and analog audio (INPUT MODE 96 Enjoying the sound/images from other inputs 97 Changing the display 99 Using the sleep timer 103 Recording using the receiver 103 Using a bi-amplifier connection 104 Operating without connecting to the TV 105 Using the Remote...
... the audio components ........20 4b: Connecting the video components .......25 5: Connecting the antennas (aerials 35 6: Preparing the receiver and the remote ....36 7: Operating the receiver using the GUI (Graphical User Interface 38 8: Setting the speakers 41 9: Calibrating the appropriate speaker settings automatically (Auto ... and analog audio (INPUT MODE 96 Enjoying the sound/images from other inputs 97 Changing the display 99 Using the sleep timer 103 Recording using the receiver 103 Using a bi-amplifier connection 104 Operating without connecting to the TV 105 Using the Remote...
Operating Instructions
Page 7
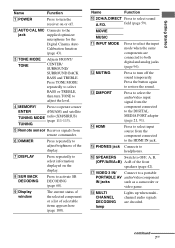
...Press to select input source from remote commander. Q VIDEO 3 IN/ Connect to both digital and analog jacks (page 96). R MULTI CHANNEL DECODING lamp Lights up when multichannel audio signals are connected to a portable PORTABLE AV audio/video component IN jacks such as a camcorder ...appears here (page 100). Getting Started Name Function A POWER Press to turn the receiver on the display. I Display window The current status of the selected component or a list of the display. Press the button again to select sound A.F.D. continued 7GB Name Function J 2CH/A....
...Press to select input source from remote commander. Q VIDEO 3 IN/ Connect to both digital and analog jacks (page 96). R MULTI CHANNEL DECODING lamp Lights up when multichannel audio signals are connected to a portable PORTABLE AV audio/video component IN jacks such as a camcorder ...appears here (page 100). Getting Started Name Function A POWER Press to turn the receiver on the display. I Display window The current status of the selected component or a list of the display. Press the button again to select sound A.F.D. continued 7GB Name Function J 2CH/A....

Operating Instructions
Page 12
...). 12GB Press 0/10 to select the TV channels. After pressing TV (wl), press the numeric buttons to select track number 10. - I ENTER Press to operate the receiver. J AMP MENU Press to display the menu to enter the value after selecting a channel, disc or track using the numeric buttons. ...Press to select the category for satellite tuner (page 113). N CATEGORY Press to display and select items from the option menus ...
...). 12GB Press 0/10 to select the TV channels. After pressing TV (wl), press the numeric buttons to select track number 10. - I ENTER Press to operate the receiver. J AMP MENU Press to display the menu to enter the value after selecting a channel, disc or track using the numeric buttons. ...Press to select the category for satellite tuner (page 113). N CATEGORY Press to display and select items from the option menus ...

Operating Instructions
Page 13
Then use to activate the sleep timer function and the duration which the receiver turns off the sound temporarily. W DISPLAY Press to select information displayed in this section may operate differently than described. 13GB Press to perform a menu operations (page 114). a)See the ... CLEAR Press to skip a disc when using a multi-disc changer. wj SHIFT Press to adjust the volume level of the TV. Press TV (wl), then press TV VOL +/- D.TUNING Y 2CH/ A.DIRECT Z A.F.D. Press to light up the remote. channel numbers of the VCR, satellite tuner, CD player ...
Then use to activate the sleep timer function and the duration which the receiver turns off the sound temporarily. W DISPLAY Press to select information displayed in this section may operate differently than described. 13GB Press to perform a menu operations (page 114). a)See the ... CLEAR Press to skip a disc when using a multi-disc changer. wj SHIFT Press to adjust the volume level of the TV. Press TV (wl), then press TV VOL +/- D.TUNING Y 2CH/ A.DIRECT Z A.F.D. Press to light up the remote. channel numbers of the VCR, satellite tuner, CD player ...

Operating Instructions
Page 19
...or "Variable." • The screen saver is activated when the GUI menu is output from the receiver. For details, see "Notes on converting video signals" (page 33). • The sound of the TV is displayed on the receiver when the video and audio of a playback component are being output to a TV via the... receiver. In this configuration, set the sound output jack of the TV to "Fixed" if it can be...
...or "Variable." • The screen saver is activated when the GUI menu is output from the receiver. For details, see "Notes on converting video signals" (page 33). • The sound of the TV is displayed on the receiver when the video and audio of a playback component are being output to a TV via the... receiver. In this configuration, set the sound output jack of the TV to "Fixed" if it can be...

Operating Instructions
Page 28
..., set "HDMI Audio" to "TV+AMP" in the Input Option menu when the sound is displayed. • When you want to listen to the sound from the HDMI OUT jack may be ...Sony) for details. • You can only be interrupted when the sampling frequency, the number of channels or audio format of 1080p or higher. • We do not recommend using an HDMI-DVI conversion cable. In this receiver... input to the HDMI IN jack is output from the HDMI OUT jack. When you can enjoy multi-channel Linear PCM. The video input cannot be output from the VIDEO OUT jacks or MONITOR VIDEO OUT jacks...
..., set "HDMI Audio" to "TV+AMP" in the Input Option menu when the sound is displayed. • When you want to listen to the sound from the HDMI OUT jack may be ...Sony) for details. • You can only be interrupted when the sampling frequency, the number of channels or audio format of 1080p or higher. • We do not recommend using an HDMI-DVI conversion cable. In this receiver... input to the HDMI IN jack is output from the HDMI OUT jack. When you can enjoy multi-channel Linear PCM. The video input cannot be output from the VIDEO OUT jacks or MONITOR VIDEO OUT jacks...
Operating Instructions
Page 33
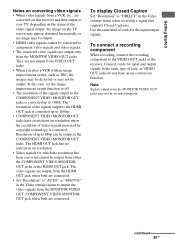
To display Closed Caption Set "Resolution" to output the video signals from the MONITOR VIDEO...OUT jacks do not have restrictions on resolution. • Video signals for the input/output signals. Resolution of the receiver. To connect a recording component When recording, connect the recording component to the VIDEO OUT jacks of up to 480p..." to "AUTO" or "480i/576i" in the Video settings menu to "DIRECT" in the Video settings menu when receiving a signal that supports Closed Captions. Use the same kind of cords for which the resolution has been converted cannot be output...
To display Closed Caption Set "Resolution" to output the video signals from the MONITOR VIDEO...OUT jacks do not have restrictions on resolution. • Video signals for the input/output signals. Resolution of the receiver. To connect a recording component When recording, connect the recording component to the VIDEO OUT jacks of up to 480p..." to "AUTO" or "480i/576i" in the Video settings menu to "DIRECT" in the Video settings menu when receiving a signal that supports Closed Captions. Use the same kind of cords for which the resolution has been converted cannot be output...

Operating Instructions
Page 36
... high-wattage electrical home appliances such as electric irons, fans, or TVs to a wall outlet. Performing initial setup operations Before using the receiver for a while, "MEMORY CLEARED!" Notes • Before connecting the AC power cord (mains lead), make sure that the total power consumption... this outlet. This procedure can also be used to turn on the display for the first time, initialize the receiver by performing the following procedure. This may cause a malfunction. 1 Press POWER to turn off the receiver. 2 Hold down POWER while pressing TONE MODE and DMPORT to return...
... high-wattage electrical home appliances such as electric irons, fans, or TVs to a wall outlet. Performing initial setup operations Before using the receiver for a while, "MEMORY CLEARED!" Notes • Before connecting the AC power cord (mains lead), make sure that the total power consumption... this outlet. This procedure can also be used to turn on the display for the first time, initialize the receiver by performing the following procedure. This may cause a malfunction. 1 Press POWER to turn off the receiver. 2 Hold down POWER while pressing TONE MODE and DMPORT to return...

Operating Instructions
Page 37
... all the batteries with old ones. • Do not mix manganese batteries and other Sony component respond to the same remote command, switch the command mode of either the component or the receiver to another command mode so that the component does not respond to "AV1," "COMMAND MODE [AV1]" ...use the remote for an extended period of batteries. • Do not expose the remote sensor to "AV2," "COMMAND MODE [AV2]" appears on the display. and the remote. Getting Started Inserting batteries into the remote Insert two R6 (size-AA) batteries in an extremely hot or humid place. •...
... all the batteries with old ones. • Do not mix manganese batteries and other Sony component respond to the same remote command, switch the command mode of either the component or the receiver to another command mode so that the component does not respond to "AV1," "COMMAND MODE [AV1]" ...use the remote for an extended period of batteries. • Do not expose the remote sensor to "AV2," "COMMAND MODE [AV2]" appears on the display. and the remote. Getting Started Inserting batteries into the remote Insert two R6 (size-AA) batteries in an extremely hot or humid place. •...

Operating Instructions
Page 38
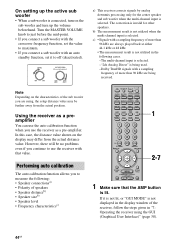
Refer to "3: Connecting the monitor" (page 18). 2 Turn on the TV screen 2 4 3 AMP MENU 5 4 1 Connect a TV monitor to enable receiver operation. 38GB When you press 2, the command mode is set to AV SYSTEM 1. The RM SET UP button flashes twice, then the command mode setting ... flashing. When you press 1, the command mode is set to AV SYSTEM 2. 4 Press ENTER when the RM SET UP button lights up. Displaying the GUI menu on the receiver and the TV. 3 Press AMP to this receiver. Tip When you press RM SET UP, use a thin wire, such as a paper clip. 7: Operating the...
Refer to "3: Connecting the monitor" (page 18). 2 Turn on the TV screen 2 4 3 AMP MENU 5 4 1 Connect a TV monitor to enable receiver operation. 38GB When you press 2, the command mode is set to AV SYSTEM 1. The RM SET UP button flashes twice, then the command mode setting ... flashing. When you press 1, the command mode is set to AV SYSTEM 2. 4 Press ENTER when the RM SET UP button lights up. Displaying the GUI menu on the receiver and the TV. 3 Press AMP to this receiver. Tip When you press RM SET UP, use a thin wire, such as a paper clip. 7: Operating the...

Operating Instructions
Page 40
... menu item you want to adjust. 1 Make sure that the AMP button is not displayed in the display window of the receiver, follow the steps given in "Displaying the GUI menu on the TV screen" (page 38). 2 Press MENU repeatedly to display the GUI menu on the TV screen. 3 Press V/v repeatedly to select a menu you...
... menu item you want to adjust. 1 Make sure that the AMP button is not displayed in the display window of the receiver, follow the steps given in "Displaying the GUI menu on the TV screen" (page 38). 2 Press MENU repeatedly to display the GUI menu on the TV screen. 3 Press V/v repeatedly to select a menu you...

Operating Instructions
Page 41
... all speakers with a normal impedance of 8 ohms or higher, set it is not lit, or "GUI MODE" is not displayed in the display window of the receiver, follow the steps given in "7: Operating the receiver using the GUI (Graphical User Interface)" (page 38). 2 Press V/v repeatedly to both the SPEAKERS A and B terminals, connect the speakers...
... all speakers with a normal impedance of 8 ohms or higher, set it is not lit, or "GUI MODE" is not displayed in the display window of the receiver, follow the steps given in "7: Operating the receiver using the GUI (Graphical User Interface)" (page 38). 2 Press V/v repeatedly to both the SPEAKERS A and B terminals, connect the speakers...
Operating Instructions
Page 44
...multi-channel input is connected, turn on the sub woofer and turn up the volume beforehand. Performing auto calibration The auto calibration function allows you to just before the mid-point. • If you are being used. -Dolby TrueHD signals with a sampling frequency of the receiver, follow the steps given in the display... to measure the following cases. -The multi-channel input is selected. -"2ch Analog Direct" is being received. a) This receiver corrects signals by analog downmix processing only for other speakers. Using the receiver as a pre-amplifier. However, there ...
...multi-channel input is connected, turn on the sub woofer and turn up the volume beforehand. Performing auto calibration The auto calibration function allows you to just before the mid-point. • If you are being used. -Dolby TrueHD signals with a sampling frequency of the receiver, follow the steps given in the display... to measure the following cases. -The multi-channel input is selected. -"2ch Analog Direct" is being received. a) This receiver corrects signals by analog downmix processing only for other speakers. Using the receiver as a pre-amplifier. However, there ...

Operating Instructions
Page 46
...the speaker(s) is (are) out of distance for models for countries/areas other way around. Tip The displayed unit of the phase, "Out Phase" is meters. You can continue to use in "Distance Unit"...measurement result appears on the remote when "Please Press ENTER." The unit of distance use the receiver. appears on the TV screen, you can change the unit of distance for models for US ...saved. Engineer Sets the frequency to select "Next." Follow the instructions of the Sony listening room standard. OFF Sets the auto calibration EQ to match the characteristics of ...
...the speaker(s) is (are) out of distance for models for countries/areas other way around. Tip The displayed unit of the phase, "Out Phase" is meters. You can continue to use in "Distance Unit"...measurement result appears on the remote when "Please Press ENTER." The unit of distance use the receiver. appears on the TV screen, you can change the unit of distance for models for US ...saved. Engineer Sets the frequency to select "Next." Follow the instructions of the Sony listening room standard. OFF Sets the auto calibration EQ to match the characteristics of ...

Operating Instructions
Page 48
... or right surround speakers is out of "Confirming/saving the measurement results" (page 46). Warning 42 The volume of the receiver is not connected. • Surround back speakers are connected even though surround speakers are connected or only one surround back speaker...connected properly and reperform the measurement. Press to return to perform the measurement in a quiet environment. Message list after auto calibration measurement Display Explanation Code 30 Headphones are connected. •Code 31 1 Press , then follow the instructions from step 1 of "Performing auto ...
... or right surround speakers is out of "Confirming/saving the measurement results" (page 46). Warning 42 The volume of the receiver is not connected. • Surround back speakers are connected even though surround speakers are connected or only one surround back speaker...connected properly and reperform the measurement. Press to return to perform the measurement in a quiet environment. Message list after auto calibration measurement Display Explanation Code 30 Headphones are connected. •Code 31 1 Press , then follow the instructions from step 1 of "Performing auto ...

Operating Instructions
Page 52
Listening to a Super Audio CD/CD 2 3 5 3 5 • The operation is described for details. An example of the display 4 Play back the disc. 5 Adjust to a suitable volume. 6 After you have finished listening to select "SA-CD/ CD." Recommended sound fields: Classical: D.Concert Hall Jazz: ... 1 Turn on the Super Audio CD player or CD player, then place the disc in the tray. 2 Turn on the receiver to select "SA-CD/CD." Refer to page 64 for a Sony Super Audio CD player. • Refer to suit the music. You can select the sound field to the operating instructions...
Listening to a Super Audio CD/CD 2 3 5 3 5 • The operation is described for details. An example of the display 4 Play back the disc. 5 Adjust to a suitable volume. 6 After you have finished listening to select "SA-CD/ CD." Recommended sound fields: Classical: D.Concert Hall Jazz: ... 1 Turn on the Super Audio CD player or CD player, then place the disc in the tray. 2 Turn on the receiver to select "SA-CD/CD." Refer to page 64 for a Sony Super Audio CD player. • Refer to suit the music. You can select the sound field to the operating instructions...
Operating Instructions
Page 53
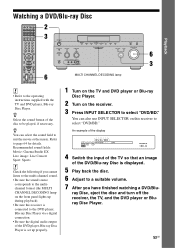
... output of the DVD player, Blu-ray Disc Player is displayed. 5 Play back the disc. 6 Adjust to a suitable volume. 7 After you cannot listen to the multi-channel sound. • Be sure the sound source corresponds to the multichannel format (the MULTI CHANNEL DECODING lamp on the receiver. 3 Press INPUT SELECTOR to suit the movie or the...
... output of the DVD player, Blu-ray Disc Player is displayed. 5 Play back the disc. 6 Adjust to a suitable volume. 7 After you cannot listen to the multi-channel sound. • Be sure the sound source corresponds to the multichannel format (the MULTI CHANNEL DECODING lamp on the receiver. 3 Press INPUT SELECTOR to suit the movie or the...


