
Operating Instructions
Page 3
... component hookups 10 Digital component hookups 11 Multi channel input hookups 13 Other hookups 14 Hooking Up and Setting Up the Speaker System Speaker system hookups 17 Performing initial setup operations ..... 19 Multi channel surround setup 19 Checking the connections 25 Basic Operations Selecting the component 26 Listening to the sound in another room1 28 Changing the display 28 Enjoying Surround Sound Automatically decoding the input audio signal 29 Selecting a sound field 29 Using only the front speakers (2 Channel Stereo 32 Enjoying stereo sound in multi channel (Dolby Pro...
... component hookups 10 Digital component hookups 11 Multi channel input hookups 13 Other hookups 14 Hooking Up and Setting Up the Speaker System Speaker system hookups 17 Performing initial setup operations ..... 19 Multi channel surround setup 19 Checking the connections 25 Basic Operations Selecting the component 26 Listening to the sound in another room1 28 Changing the display 28 Enjoying Surround Sound Automatically decoding the input audio signal 29 Selecting a sound field 29 Using only the front speakers (2 Channel Stereo 32 Enjoying stereo sound in multi channel (Dolby Pro...
Operating Instructions
Page 10
... TAPE R FRONT SURROUND SUB WOOFER MULTI CH IN 2 R FRONT SURROUND SURR BACK R SUB OUT WOOFER SUB WOOFER MULTI CH IN 1 2ND ROOM PRE OUT OUT IN B B B INPUT OUTPUT VIDEO VIDEO IN OUT Camcorder or video game AUDIO AUDIO IN OUT L R VCR Ç Ç Ç Ç OUT IN B INPUT OUTPUT VIDEO VIDEO IN OUT B AUDIO AUDIO IN OUT L R VCR C INPUT VIDEO IN TV monitor* * For STR-DE985, you are not compatible with COMPONENT VIDEO input jacks, use a 10US video cord (not supplied) to connect to the TV/SAT VIDEO IN jack...
... TAPE R FRONT SURROUND SUB WOOFER MULTI CH IN 2 R FRONT SURROUND SURR BACK R SUB OUT WOOFER SUB WOOFER MULTI CH IN 1 2ND ROOM PRE OUT OUT IN B B B INPUT OUTPUT VIDEO VIDEO IN OUT Camcorder or video game AUDIO AUDIO IN OUT L R VCR Ç Ç Ç Ç OUT IN B INPUT OUTPUT VIDEO VIDEO IN OUT B AUDIO AUDIO IN OUT L R VCR C INPUT VIDEO IN TV monitor* * For STR-DE985, you are not compatible with COMPONENT VIDEO input jacks, use a 10US video cord (not supplied) to connect to the TV/SAT VIDEO IN jack...
Operating Instructions
Page 11
... Hooking Up the Components Digital component hookups Connect the digital output jacks of your home. For details, see "Troubleshooting" on page 58. Note You cannot connect an LD player's DOLBY DIGITAL RF OUT jack directly to this unit's digital input jacks. Y R AUDIO IN AUDIO IN AUDIO OUT AUDIO IN AUDIO OUT AUDIO IN TV/SAT DVD/LD VIDEO 2 VIDEO 1 PR/R - For 6.1 channel surround sound, you will also need a surround back speaker (STR-DE985) or refer page 18 (STR-DE885). TV or satellite tuner OUTPUT VIDEO OUT OUTPUT DIGITAL OPTICAL AUDIO OUT L R D B To the front panel DIGITAL...
... Hooking Up the Components Digital component hookups Connect the digital output jacks of your home. For details, see "Troubleshooting" on page 58. Note You cannot connect an LD player's DOLBY DIGITAL RF OUT jack directly to this unit's digital input jacks. Y R AUDIO IN AUDIO IN AUDIO OUT AUDIO IN AUDIO OUT AUDIO IN TV/SAT DVD/LD VIDEO 2 VIDEO 1 PR/R - For 6.1 channel surround sound, you will also need a surround back speaker (STR-DE985) or refer page 18 (STR-DE885). TV or satellite tuner OUTPUT VIDEO OUT OUTPUT DIGITAL OPTICAL AUDIO OUT L R D B To the front panel DIGITAL...
Operating Instructions
Page 13
... VIDEO IN VIDEO OUT MD/DAT IN y MONITOR - Hooking Up the Components Multi channel input hookups Although this receiver incorporates a multi channel decoder, it is also equipped with your DVD player is equipped with multi channel output jacks, you can be used to enjoy the sound of the surround speakers and sub woofer from the DVD player or multi channel decoder. • See page 17 for details on speaker system hookup. Notes • When using the connections described below, adjust the level of the DVD player's multi channel...
... VIDEO IN VIDEO OUT MD/DAT IN y MONITOR - Hooking Up the Components Multi channel input hookups Although this receiver incorporates a multi channel decoder, it is also equipped with your DVD player is equipped with multi channel output jacks, you can be used to enjoy the sound of the surround speakers and sub woofer from the DVD player or multi channel decoder. • See page 17 for details on speaker system hookup. Notes • When using the connections described below, adjust the level of the DVD player's multi channel...
Operating Instructions
Page 15
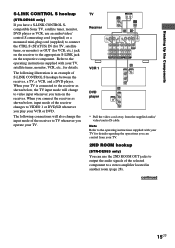
... to the operating instructions supplied with your TV for VCR, etc.) jack on the receiver to the appropriate S-LINK jack on the receiver. The following connections will change the input mode of the receiver to TV whenever you operate your TV. Hooking Up the Components S-LINK CONTROL S hookup (STR-DE985 only) If you have a S-LINK CONTROL Scompatible Sony TV, satellite tuner, monitor, DVD player or VCR, use an audio/video/ control S connecting cord (supplied) or a monaural mini-plug cord (supplied) to connect the CTRL...
... to the operating instructions supplied with your TV for VCR, etc.) jack on the receiver to the appropriate S-LINK jack on the receiver. The following connections will change the input mode of the receiver to TV whenever you operate your TV. Hooking Up the Components S-LINK CONTROL S hookup (STR-DE985 only) If you have a S-LINK CONTROL Scompatible Sony TV, satellite tuner, monitor, DVD player or VCR, use an audio/video/ control S connecting cord (supplied) or a monaural mini-plug cord (supplied) to connect the CTRL...

Operating Instructions
Page 18
... , make sure to take the following precautions when connecting the speakers. When you turn on another power amplifier with low maximum input rating, adjust the volume carefully to avoid excessive output on the use speakers with a monaural audio cord. Tip To enjoy the 6.1 channel surround sound, set the SURR BACK parameter to -. If no sound is heard from a speaker while outputting a test tone or a test tone is output from a speaker other due to excessive removal of another...
... , make sure to take the following precautions when connecting the speakers. When you turn on another power amplifier with low maximum input rating, adjust the volume carefully to avoid excessive output on the use speakers with a monaural audio cord. Tip To enjoy the 6.1 channel surround sound, set the SURR BACK parameter to -. If no sound is heard from a speaker while outputting a test tone or a test tone is output from a speaker other due to excessive removal of another...
Operating Instructions
Page 19
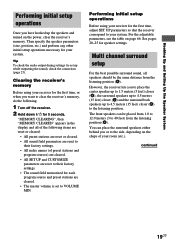
... (A). Multi channel surround setup For the best possible surround sound, all of the following . 1 Turn off the receiver. 2 Hold down ?/1 for the first time, adjust SET UP parameters so that the receiver correspond to your system. Hooking Up and Setting Up the Speaker System Performing initial setup operations Once you or to the side, depending on the shape of your room (etc.). Clearing the receiver's memory Before using your receiver for...
... (A). Multi channel surround setup For the best possible surround sound, all of the following . 1 Turn off the receiver. 2 Hold down ?/1 for the first time, adjust SET UP parameters so that the receiver correspond to your system. Hooking Up and Setting Up the Speaker System Performing initial setup operations Once you or to the side, depending on the shape of your room (etc.). Clearing the receiver's memory Before using your receiver for...

Operating Instructions
Page 24
... that best suits your environment. 24US Also, the center speaker cannot be affected. However, depending on the type of front speakers, the position of the sub woofer, and the cut off frequency of distance. Multi channel surround setup (continued) Tip The receiver allows you to input the speaker position in much better surround sound. x Front speaker crossover frequency (FRONT SP > XXX Hz) Lets you adjust the surround speaker bass crossover frequency when the surround speakers are set farther...
... that best suits your environment. 24US Also, the center speaker cannot be affected. However, depending on the type of front speakers, the position of the sub woofer, and the cut off frequency of distance. Multi channel surround setup (continued) Tip The receiver allows you to input the speaker position in much better surround sound. x Front speaker crossover frequency (FRONT SP > XXX Hz) Lets you adjust the surround speaker bass crossover frequency when the surround speakers are set farther...

Operating Instructions
Page 25
... same time. You can adjust the level of surround speakers from the speaker whose adjustment is selected (page 27). ** For STR-DE985, MULTI CH IN 1 or 2. 4 Adjust the LEVEL parameters so that you connected (e.g., CD player or tape deck). 3 Rotate FUNCTION to select the mode you can adjust the speaker levels while listening to adjust the level of speakers. Turn MASTER VOLUME on the connected component, start playback, then turn off the test tone. Press LEVEL to correct the problem. 25US on the remote. While adjusting, the test tone is output...
... same time. You can adjust the level of surround speakers from the speaker whose adjustment is selected (page 27). ** For STR-DE985, MULTI CH IN 1 or 2. 4 Adjust the LEVEL parameters so that you connected (e.g., CD player or tape deck). 3 Rotate FUNCTION to select the mode you can adjust the speaker levels while listening to adjust the level of speakers. Turn MASTER VOLUME on the connected component, start playback, then turn off the test tone. Press LEVEL to correct the problem. 25US on the remote. While adjusting, the test tone is output...

Operating Instructions
Page 26
... camcorder, video game, DVD player, or LD player, turn on the component you selected, select the component and play another video/audio source in tuner Turntable Rotate to a specific function using CUSTOMIZE menu (page 44), the followings are no digital signals, analog is assigned to light VIDEO 1* or VIDEO 2* VIDEO 3* DVD/LD* TV/SAT* TAPE (STR-DE985) MD/TAPE (STR-DE885) MD/DAT (STR-DE985) CD/SACD TUNER PHONO * VIDEO SELECT INDICATOR lights up when selected. Each time you press the button, the input mode of "AUTO 2CH" and "ANALOG 2CH FIXED". Select AUTO MULTI CH3) MULTI CH FIXED4...
... camcorder, video game, DVD player, or LD player, turn on the component you selected, select the component and play another video/audio source in tuner Turntable Rotate to a specific function using CUSTOMIZE menu (page 44), the followings are no digital signals, analog is assigned to light VIDEO 1* or VIDEO 2* VIDEO 3* DVD/LD* TV/SAT* TAPE (STR-DE985) MD/TAPE (STR-DE885) MD/DAT (STR-DE985) CD/SACD TUNER PHONO * VIDEO SELECT INDICATOR lights up when selected. Each time you press the button, the input mode of "AUTO 2CH" and "ANALOG 2CH FIXED". Select AUTO MULTI CH3) MULTI CH FIXED4...
Operating Instructions
Page 29
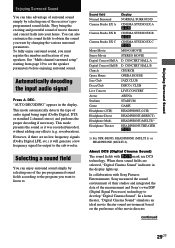
... (2CH) HEADPHONE (2CH) Headphone Direct Headphone Multi HEADPHONE (DIRECT) HEADPHONE (MULTI)1) Headphone Theater HEADPHONE THEATER DCS 1) For STR-DE985, HEADPHONE (MULTI 1) or HEADPHONE (MULTI 2). To fully enjoy surround sound, you must register the number and location of audio signal being input (Dolby Digital, DTS, or standard 2 channel stereo) and performs the proper decoding if necessary. DEC. "AUTO DECODING" appears in the display lights up. When these sound fields are no low frequency signals (Dolby Digital LFE, etc.) it was recorded/encoded...
... (2CH) HEADPHONE (2CH) Headphone Direct Headphone Multi HEADPHONE (DIRECT) HEADPHONE (MULTI)1) Headphone Theater HEADPHONE THEATER DCS 1) For STR-DE985, HEADPHONE (MULTI 1) or HEADPHONE (MULTI 2). To fully enjoy surround sound, you must register the number and location of audio signal being input (Dolby Digital, DTS, or standard 2 channel stereo) and performs the proper decoding if necessary. DEC. "AUTO DECODING" appears in the display lights up. When these sound fields are no low frequency signals (Dolby Digital LFE, etc.) it was recorded/encoded...

Operating Instructions
Page 32
...2 channel (stereo) sources using the CUSTOMIZE menu. Standard 2 channel (stereo) sources completely bypass the sound field processing. Tips • The receiver lets you to a program source whenever it is selected. Using only the front speakers (2 Channel Stereo) Press 2CH. DEC to 2 channel. x HEADPHONE (DIRECT) (Headphone Direct) Outputs the analog signals without digital processing by looking at its packaging. This mode outputs the sound from the front left and right speakers and a sub woofer, press A. Multi channel surround formats are downmixed to select "AUTO DECODING...
...2 channel (stereo) sources using the CUSTOMIZE menu. Standard 2 channel (stereo) sources completely bypass the sound field processing. Tips • The receiver lets you to a program source whenever it is selected. Using only the front speakers (2 Channel Stereo) Press 2CH. DEC to 2 channel. x HEADPHONE (DIRECT) (Headphone Direct) Outputs the analog signals without digital processing by looking at its packaging. This mode outputs the sound from the front left and right speakers and a sub woofer, press A. Multi channel surround formats are downmixed to select "AUTO DECODING...

Operating Instructions
Page 35
.... qh ;: Lights up when the equalizer functions. Adjusting the surround parameters The SURR menu contains parameters that INPUT MODE is displayed. 3 Press or to tune in each sound field. 1 Start playing a program source encoded with multi channel surround sound. 2 Press SURR. See page 38 to the parameters. qf DTS: Lights up when using the receiver to select the parameter you want . Enjoying Surround Sound 0 Tuner indicators: Lights up when DTS signals are input. The settings are stored individually for tuner operations. See pages...
.... qh ;: Lights up when the equalizer functions. Adjusting the surround parameters The SURR menu contains parameters that INPUT MODE is displayed. 3 Press or to tune in each sound field. 1 Start playing a program source encoded with multi channel surround sound. 2 Press SURR. See page 38 to the parameters. qf DTS: Lights up when using the receiver to select the parameter you want . Enjoying Surround Sound 0 Tuner indicators: Lights up when DTS signals are input. The settings are stored individually for tuner operations. See pages...

Operating Instructions
Page 38
... equalizer Press EQUALIZER. When you adjust the equalizer using the "MAX" setting. • To reproduce the sound track with no compression, select "OFF". • To reproduce the sound track with Dolby Digital sources only. The button lights up when the equalizer is entered automatically. The setting is turned on the equalizer. To turn on . Front speaker treble adjustment (Gain/Frequency*) Lets you adjust the gain and frequency of treble. * You can set "MENU EXPAND" to "ON" in the display lights...
... equalizer Press EQUALIZER. When you adjust the equalizer using the "MAX" setting. • To reproduce the sound track with no compression, select "OFF". • To reproduce the sound track with Dolby Digital sources only. The button lights up when the equalizer is entered automatically. The setting is turned on the equalizer. To turn on . Front speaker treble adjustment (Gain/Frequency*) Lets you adjust the gain and frequency of treble. * You can set "MENU EXPAND" to "ON" in the display lights...
Operating Instructions
Page 43
To record a digital audio signal, connect a digital component to the DIGITAL MD/DAT OUT jacks (STR-DE985) or the DIGITAL MD/TAPE OUT jacks (STRDE885). • Sound adjustments do not affect the signal output from the original medium, select the video source again. You can specify up in the display. 43US Analog recording is output from the REC OUT jacks. • When MULTI CH IN (for playing. Each time you press the button, the display changes cyclically as follows: 2 : 00 : 00...
To record a digital audio signal, connect a digital component to the DIGITAL MD/DAT OUT jacks (STR-DE985) or the DIGITAL MD/TAPE OUT jacks (STRDE885). • Sound adjustments do not affect the signal output from the original medium, select the video source again. You can specify up in the display. 43US Analog recording is output from the REC OUT jacks. • When MULTI CH IN (for playing. Each time you press the button, the display changes cyclically as follows: 2 : 00 : 00...

Operating Instructions
Page 49
... STR-DE985, press repeatedly to select tuner preset station numeric input during DIRECT TUNING or MEMORY mode. Remote Operations Function Button V/v Receiver Select a menu item. AV ?/1 TV/VCR/ Turns the audio and CD player/ video components on the TV screen. Satellite tuner continued 49US Select Dual Mono or Bilingual sound of the receiver. AV ?/1 player/VCD and ?/1 player/LD player/ at the DVD player/ same time) MD deck/DAT deck/Tape deck 1-9 and 0/10 Receiver Use with "SHIFT" button to select MULTI CH IN 1 or 2. Selects MULTI CH IN* source. Press to compact...
... STR-DE985, press repeatedly to select tuner preset station numeric input during DIRECT TUNING or MEMORY mode. Remote Operations Function Button V/v Receiver Select a menu item. AV ?/1 TV/VCR/ Turns the audio and CD player/ video components on the TV screen. Satellite tuner continued 49US Select Dual Mono or Bilingual sound of the receiver. AV ?/1 player/VCD and ?/1 player/LD player/ at the DVD player/ same time) MD deck/DAT deck/Tape deck 1-9 and 0/10 Receiver Use with "SHIFT" button to select MULTI CH IN 1 or 2. Selects MULTI CH IN* source. Press to compact...

Operating Instructions
Page 59
... MODE (SOUND FIELD)). Dolby Digital or DTS multi channel sound is set to the analog MD/DAT or TAPE terminals (STR-DE985) or the analog MD/TAPE terminals (STR-DE885). • Make sure that INPUT MODE is no sound or only a very low-level sound is heard from the center or/and surround speakers. • Make sure the sound field function is on both channels are dirty. Recording cannot be connected to the digital input jacks of this receiver, check the audio setting (settings for the audio output...
... MODE (SOUND FIELD)). Dolby Digital or DTS multi channel sound is set to the analog MD/DAT or TAPE terminals (STR-DE985) or the analog MD/TAPE terminals (STR-DE885). • Make sure that INPUT MODE is no sound or only a very low-level sound is heard from the center or/and surround speakers. • Make sure the sound field function is on both channels are dirty. Recording cannot be connected to the digital input jacks of this receiver, check the audio setting (settings for the audio output...
Operating Instructions
Page 60
... monitor. • Select the appropriate function on DOLBY DIGITAL RF hookups, see the operating instructions supplied with direct tuning). • No stations have been preset or the preset stations have been cleared (when tuning by scanning preset stations). Use a 75-ohm coaxial cable (not supplied) to connect the receiver to a gas pipe. Clearing the receiver's memory To clear See All memorized settings page 19 Customized sound fields page 39 60US Use direct tuning. • Make sure you set to the receiver's jack. Troubleshooting...
... monitor. • Select the appropriate function on DOLBY DIGITAL RF hookups, see the operating instructions supplied with direct tuning). • No stations have been preset or the preset stations have been cleared (when tuning by scanning preset stations). Use a 75-ohm coaxial cable (not supplied) to connect the receiver to a gas pipe. Clearing the receiver's memory To clear See All memorized settings page 19 Customized sound fields page 39 60US Use direct tuning. • Make sure you set to the receiver's jack. Troubleshooting...

Marketing Specifications
Page 1
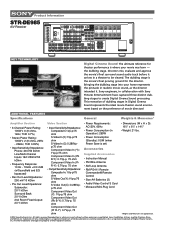
... EX Modes • dts® • Dolby® Pro Logic® II • Sound Field Programs: Cinema - 7 Music - 10 Auto Format Decoding - 1 • Matrix 6.1 Mode Amplifer Section • 6 Channel Power Rating: 100W x 6 (8 ohms, 1 kHz, THD 0.7%) • Stereo Power Rating: 100W x 2 (8 ohms, 20Hz 20kHz, THD 0.09%) • 8 ohm Rated Amplifer • Circuit Device: Discrete • A or B Speaker Switching for Front Speakers (8 - 16 ohms speakers only) • 2 Zone Receiver/2nd Room Fixed Passive Output with Independent Source Selection • 5.1 and 6.1 Multi-Channel Analog Inputs...
... EX Modes • dts® • Dolby® Pro Logic® II • Sound Field Programs: Cinema - 7 Music - 10 Auto Format Decoding - 1 • Matrix 6.1 Mode Amplifer Section • 6 Channel Power Rating: 100W x 6 (8 ohms, 1 kHz, THD 0.7%) • Stereo Power Rating: 100W x 2 (8 ohms, 20Hz 20kHz, THD 0.09%) • 8 ohm Rated Amplifer • Circuit Device: Discrete • A or B Speaker Switching for Front Speakers (8 - 16 ohms speakers only) • 2 Zone Receiver/2nd Room Fixed Passive Output with Independent Source Selection • 5.1 and 6.1 Multi-Channel Analog Inputs...
Marketing Specifications
Page 2
... a theater to create Digital Cinema Sound processing. All rights reserved. Dolby Digital is set) Accessories Supplied Accessories • Instruction Manual • FM Wire Antenna • AM Loop Antenna • RM-PG411 Remote Commander® Remote Control • Size AA Batteries (2) • Audio/Video Control S Cord • Monaural Mini-Plug Cord • Dimensions (W x H x D): 167/8" x 62/8" x 144/8" • Weight: 21 lbs. *Weights and Measures are approximate. ©2002 Sony Electronics Inc. Y TV/SAT IN DVD/LD IN MONITOR...
... a theater to create Digital Cinema Sound processing. All rights reserved. Dolby Digital is set) Accessories Supplied Accessories • Instruction Manual • FM Wire Antenna • AM Loop Antenna • RM-PG411 Remote Commander® Remote Control • Size AA Batteries (2) • Audio/Video Control S Cord • Monaural Mini-Plug Cord • Dimensions (W x H x D): 167/8" x 62/8" x 144/8" • Weight: 21 lbs. *Weights and Measures are approximate. ©2002 Sony Electronics Inc. Y TV/SAT IN DVD/LD IN MONITOR...


