Easy Setup Guide
Page 1
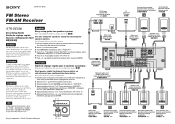
... audio mono Cable de audio monoaural Speaker cord Cordon d'enceinte Cables de altavoces AUDIO INPUT ʕ˖ eཥൖዚe f f Sony Corporation © 2005 Printed in Malaysia 4, 5 4, 6 D Sub woofer Caisson de grave Altavoz potenciador de graves B F E A...Receiver DVD player Lecteur DVD Reproductor de DVD COAXIAL DIGITAL OUT VIDEO OUTPUT TV Téléviseur Televisor ཥൖዚ INPUT VIDEO Surround back speaker Enceinte arrière surround Altavoz posterior envolvente G Center speaker Enceinte centrale Altavoz central C STR-DE598...
... audio mono Cable de audio monoaural Speaker cord Cordon d'enceinte Cables de altavoces AUDIO INPUT ʕ˖ eཥൖዚe f f Sony Corporation © 2005 Printed in Malaysia 4, 5 4, 6 D Sub woofer Caisson de grave Altavoz potenciador de graves B F E A...Receiver DVD player Lecteur DVD Reproductor de DVD COAXIAL DIGITAL OUT VIDEO OUTPUT TV Téléviseur Televisor ཥൖዚ INPUT VIDEO Surround back speaker Enceinte arrière surround Altavoz posterior envolvente G Center speaker Enceinte centrale Altavoz central C STR-DE598...
Operating Instructions
Page 1
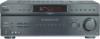
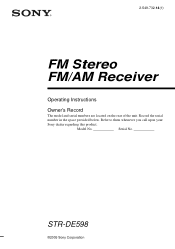
STR-DE598 ©2005 Sony Corporation Refer to them whenever you call upon your Sony dealer regarding this product. 2-549-732-14(1) FM Stereo FM/AM Receiver Operating Instructions Owner's Record The model and serial numbers are located on the rear of the unit. Model No. Serial No. Record the serial number in the space provided below.
STR-DE598 ©2005 Sony Corporation Refer to them whenever you call upon your Sony dealer regarding this product. 2-549-732-14(1) FM Stereo FM/AM Receiver Operating Instructions Owner's Record The model and serial numbers are located on the rear of the unit. Model No. Serial No. Record the serial number in the space provided below.

Operating Instructions
Page 2
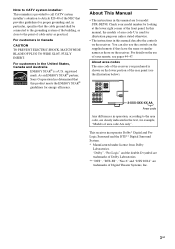
...be determined by one or more detailed information about recycling of the following measures: - Increase the separation between the equipment and receiver. - CAUTION You are designed to provide reasonable protection against harmful interference in the United States This symbol is intended to alert...the recycling of Old Electrical & Electronic Equipment (Applicable in cabinet. Reorient or relocate the receiving antenna. - WARNING To prevent fire or shock hazard, do not expose the unit to which the receiver is connected. - Do not install the appliance in a confined space, such as ...
...be determined by one or more detailed information about recycling of the following measures: - Increase the separation between the equipment and receiver. - CAUTION You are designed to provide reasonable protection against harmful interference in the United States This symbol is intended to alert...the recycling of Old Electrical & Electronic Equipment (Applicable in cabinet. Reorient or relocate the receiving antenna. - WARNING To prevent fire or shock hazard, do not expose the unit to which the receiver is connected. - Do not install the appliance in a confined space, such as ...
Operating Instructions
Page 3
... Laboratories. ** "DTS", "DTS-ES", "Neo:6" and "DTS 96/24" are trademarks of cable entry as those on the receiver. As an ENERGY STAR® partner, Sony Corporation has determined that the cable ground shall be connected to the grounding system of the building, as close to the area...40 of the NEC that provides guidelines for proper grounding and, in particular, specifies that this manual are for model STR-DE598. About area codes The area code of the receiver you purchased is used for energy efficiency. registered mark. Check your remote, see the illustration below). You can also...
... Laboratories. ** "DTS", "DTS-ES", "Neo:6" and "DTS 96/24" are trademarks of cable entry as those on the receiver. As an ENERGY STAR® partner, Sony Corporation has determined that the cable ground shall be connected to the grounding system of the building, as close to the area...40 of the NEC that provides guidelines for proper grounding and, in particular, specifies that this manual are for model STR-DE598. About area codes The area code of the receiver you purchased is used for energy efficiency. registered mark. Check your remote, see the illustration below). You can also...
Operating Instructions
Page 5
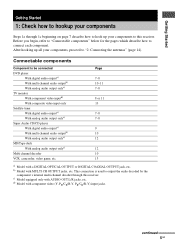
...jacks. Getting Started Getting Started 1: Check how to hookup your components, proceed to connect each component. This connection is used to this receiver. continued 5GB Before you begin, refer to "Connectable components" below for the pages which describe how to "2: Connecting the antennas" (page...internal multi channel decoder through 1c beginning on page 7 describe how to hook up all your components Steps 1a through this receiver. Connectable components Component to be connected DVD player With digital audio outputa) With multi channel audio outputb) With analog audio ...
...jacks. Getting Started Getting Started 1: Check how to hookup your components, proceed to connect each component. This connection is used to this receiver. continued 5GB Before you begin, refer to "Connectable components" below for the pages which describe how to "2: Connecting the antennas" (page...internal multi channel decoder through 1c beginning on page 7 describe how to hook up all your components Steps 1a through this receiver. Connectable components Component to be connected DVD player With digital audio outputa) With multi channel audio outputb) With analog audio ...
Operating Instructions
Page 7
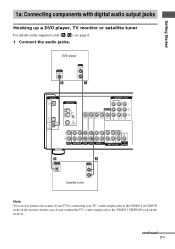
continued 7GB Getting Started . 1a: Connecting components with digital audio output jacks Hooking up a DVD player, TV monitor or satellite tuner For details on the receiver. DVD player OUTPUT DIGITAL COAXIAL E OUTPUT AUDIO OUT L R A DIGITAL OPTICAL VIDEO 2 IN SA-CD/ CD IN DVD IN COAXIAL ANTENNA AM COMPONENT VIDEO ... You can also listen to the sound of your TV by connecting your TV's audio output jacks to the VIDEO 2 VIDEO IN jack on the receiver. In this case, do not connect the TV's video output jack to the VIDEO 2 AUDIO IN jacks on the required cords (A-G), see page 6....
continued 7GB Getting Started . 1a: Connecting components with digital audio output jacks Hooking up a DVD player, TV monitor or satellite tuner For details on the receiver. DVD player OUTPUT DIGITAL COAXIAL E OUTPUT AUDIO OUT L R A DIGITAL OPTICAL VIDEO 2 IN SA-CD/ CD IN DVD IN COAXIAL ANTENNA AM COMPONENT VIDEO ... You can also listen to the sound of your TV by connecting your TV's audio output jacks to the VIDEO 2 VIDEO IN jack on the receiver. In this case, do not connect the TV's video output jack to the VIDEO 2 AUDIO IN jacks on the required cords (A-G), see page 6....
Operating Instructions
Page 8
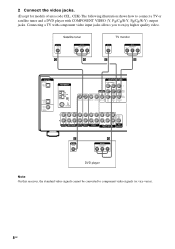
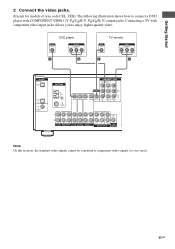
... DVD VIDEO 2 VIDEO 1 R SUB FRONT SURROUND WOOFER SUB MULTI CH IN WOOFER C OUTPUT VIDEO G OUTPUT COMPONENT PR/CR/R-Y PB/CB/B-Y Y DVD player Note On this receiver, the standard video signals cannot be converted to enjoy higher quality video. 2 Connect the video jacks. (Except for models of area code CEL, CEK) The...
... DVD VIDEO 2 VIDEO 1 R SUB FRONT SURROUND WOOFER SUB MULTI CH IN WOOFER C OUTPUT VIDEO G OUTPUT COMPONENT PR/CR/R-Y PB/CB/B-Y Y DVD player Note On this receiver, the standard video signals cannot be converted to enjoy higher quality video. 2 Connect the video jacks. (Except for models of area code CEL, CEK) The...
Operating Instructions
Page 9
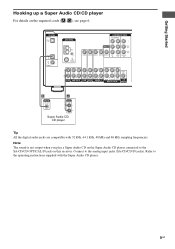
... with 32 kHz, 44.1 kHz, 48 kHz and 96 kHz sampling frequencies. Getting Started Hooking up a Super Audio CD/CD player For details on this receiver. DIGITAL OPTICAL VIDEO 2 IN SA-CD/ CD IN DVD IN COAXIAL ANTENNA AM COMPONENT VIDEO ASSIGNABLE Y MONITOR PB/CB /B-Y VIDEO IN VIDEO IN VIDEO OUT...
... with 32 kHz, 44.1 kHz, 48 kHz and 96 kHz sampling frequencies. Getting Started Hooking up a Super Audio CD/CD player For details on this receiver. DIGITAL OPTICAL VIDEO 2 IN SA-CD/ CD IN DVD IN COAXIAL ANTENNA AM COMPONENT VIDEO ASSIGNABLE Y MONITOR PB/CB /B-Y VIDEO IN VIDEO IN VIDEO OUT...
Operating Instructions
Page 10
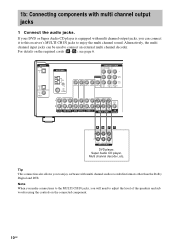
... WOOFER MULTI CH OUT DVD player, Super Audio CD player, Multi channel decoder, etc. Alternatively, the multi channel input jacks can connect it to this receiver's MULTI CH IN jacks to adjust the level of the speakers and sub woofer using the controls on the required cords (A-G), see page 6. For details...
... WOOFER MULTI CH OUT DVD player, Super Audio CD player, Multi channel decoder, etc. Alternatively, the multi channel input jacks can connect it to this receiver's MULTI CH IN jacks to adjust the level of the speakers and sub woofer using the controls on the required cords (A-G), see page 6. For details...
Operating Instructions
Page 11
... CENTER OUT R R AUDIO IN AUDIO IN AUDIO OUT AUDIO IN DVD VIDEO 2 VIDEO 1 R SUB FRONT SURROUND WOOFER SUB MULTI CH IN WOOFER Note On this receiver, the standard video signals cannot be converted to enjoy higher quality video. Getting Started 2 Connect the video jacks. (Except for models of area code CEL...
... CENTER OUT R R AUDIO IN AUDIO IN AUDIO OUT AUDIO IN DVD VIDEO 2 VIDEO 1 R SUB FRONT SURROUND WOOFER SUB MULTI CH IN WOOFER Note On this receiver, the standard video signals cannot be converted to enjoy higher quality video. Getting Started 2 Connect the video jacks. (Except for models of area code CEL...
Operating Instructions
Page 14
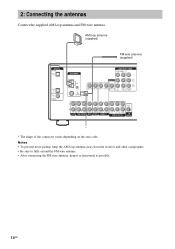
... antennas Connect the supplied AM loop antenna and FM wire antenna. Notes • To prevent noise pickup, keep the AM loop antenna away from the receiver and other components. • Be sure to fully extend the FM wire antenna. • After connecting the FM wire antenna, keep it as horizontal as...
... antennas Connect the supplied AM loop antenna and FM wire antenna. Notes • To prevent noise pickup, keep the AM loop antenna away from the receiver and other components. • Be sure to fully extend the FM wire antenna. • After connecting the FM wire antenna, keep it as horizontal as...
Operating Instructions
Page 15
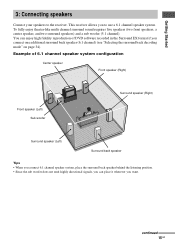
... (5.1 channel). You can place it wherever you connect one additional surround back speaker (6.1 channel) (see "Selecting the surround back decoding mode" on page 34). This receiver allows you to the...
... (5.1 channel). You can place it wherever you connect one additional surround back speaker (6.1 channel) (see "Selecting the surround back decoding mode" on page 34). This receiver allows you to the...
Operating Instructions
Page 17
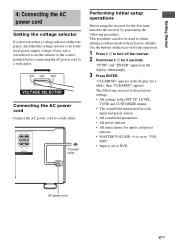
Getting Started 4: Connecting the AC power cord Setting the voltage selector If your receiver has a voltage selector on the receiver for the operation. 1 Press ?/1 to a wall outlet. This procedure can also be used to return settings you have made to the local power supply ... a wall outlet. 120V 220V 240V VOLTAGE SELECTOR Connecting the AC power cord Connect the AC power cord to turn off the receiver. 2 Hold down ?/1 for the first time, initialize the receiver by performing the following are reset to DVD. If not, use a screwdriver to set to their factory defaults. "PUSH" and ...
Getting Started 4: Connecting the AC power cord Setting the voltage selector If your receiver has a voltage selector on the receiver for the operation. 1 Press ?/1 to a wall outlet. This procedure can also be used to return settings you have made to the local power supply ... a wall outlet. 120V 220V 240V VOLTAGE SELECTOR Connecting the AC power cord Connect the AC power cord to turn off the receiver. 2 Hold down ?/1 for the first time, initialize the receiver by performing the following are reset to DVD. If not, use a screwdriver to set to their factory defaults. "PUSH" and ...
Operating Instructions
Page 18
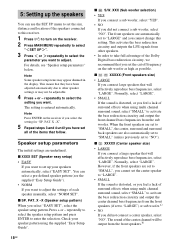
...Setup Guide"). • NORM If you select "EASY SET", select the speaker setup pattern. This means that you cannot change this receiver. 1 Press ?/1 to turn on the receiver. 2 Press MAIN MENU repeatedly to select " SET UP ". 3 Press or repeatedly to select the parameter you want to "...", you cannot set to enter the selection. PAT. Normally, select "LARGE". However, if the front speakers are underlined. Note Press ENTER on the receiver if you feel a lack of surround effects when using multi channel surround sound, select "SMALL" to this setting. Press + or - XXX (Sub...
...Setup Guide"). • NORM If you select "EASY SET", select the speaker setup pattern. This means that you cannot change this receiver. 1 Press ?/1 to turn on the receiver. 2 Press MAIN MENU repeatedly to select " SET UP ". 3 Press or repeatedly to select the parameter you want to "...", you cannot set to enter the selection. PAT. Normally, select "LARGE". However, if the front speakers are underlined. Note Press ENTER on the receiver if you feel a lack of surround effects when using multi channel surround sound, select "SMALL" to this setting. Press + or - XXX (Sub...
Operating Instructions
Page 20
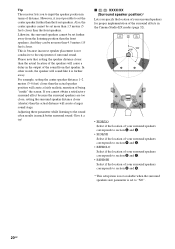
... that , setting the speaker distance closer than the actual location of the speakers will create a fairly realistic sensation of being "inside" the screen. Tip The receiver lets you to input the speaker position in the output of the sound from the listening position than the front speakers.
... that , setting the speaker distance closer than the actual location of the speakers will create a fairly realistic sensation of being "inside" the screen. Tip The receiver lets you to input the speaker position in the output of the sound from the listening position than the front speakers.
Operating Instructions
Page 21
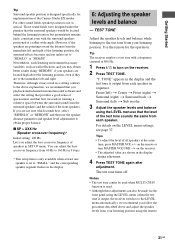
...setting that provides a good sense of the Cinema Studio EX modes. "T. TONE" appears in the display and the test tone is output, the receiver switches to the test tone from your listening position using the LEVEL menu (when the test tone is output from each listening environment has many... described above explanation, we recommend you may result in the display. 6: Adjusting the speaker levels and balance - on the remote or turn on the receiver. • The adjusted value are not sure which sounds best, select "BEHD/LO" or "BEHD/HI" and then use the speaker distance parameter ...
...setting that provides a good sense of the Cinema Studio EX modes. "T. TONE" appears in the display and the test tone is output, the receiver switches to the test tone from your listening position using the LEVEL menu (when the test tone is output from each listening environment has many... described above explanation, we recommend you may result in the display. 6: Adjusting the speaker levels and balance - on the remote or turn on the receiver. • The adjusted value are not sure which sounds best, select "BEHD/LO" or "BEHD/HI" and then use the speaker distance parameter ...
Operating Instructions
Page 22
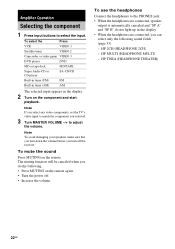
... input buttons to match the component you can select only the following . • Press MUTING on the remote again. • Turn the power off the receiver. HP 2CH (HEADPHONE 2CH) -
... input buttons to match the component you can select only the following . • Press MUTING on the remote again. • Turn the power off the receiver. HP 2CH (HEADPHONE 2CH) -
Operating Instructions
Page 23
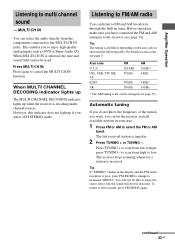
...you want, you have connected the FM and AM antennas to the MULTI CH IN jacks. to scan from the components connected to the receiver (see page 3. When MULTI CHANNEL DECODING indicator lights up The MULTI CHANNEL DECODING indicator lights up if you to monaural (MONO). press ...TUNING - To return to multi channel sound - This enables you select 2CH STEREO mode. MULTI CH IN You can be used. The last received station is decoding multi channel sources. Tip If "STEREO" flashes in the following table. Amplifier Operation Listening to stereo mode, press FM MODE again...
...you want, you have connected the FM and AM antennas to the MULTI CH IN jacks. to scan from the components connected to the receiver (see page 3. When MULTI CHANNEL DECODING indicator lights up The MULTI CHANNEL DECODING indicator lights up if you to monaural (MONO). press ...TUNING - To return to multi channel sound - This enables you select 2CH STEREO mode. MULTI CH IN You can be used. The last received station is decoding multi channel sources. Tip If "STEREO" flashes in the following table. Amplifier Operation Listening to stereo mode, press FM MODE again...
Operating Instructions
Page 24
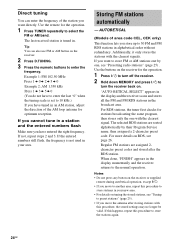
...MEMORY and press ?/1 to 10 kHz.) If you want to select the FM or AM band. Notes • Do not press any button on the receiver or supplied remote during autobetical operation, except ?/1. • If you move to another area, repeat this procedure to enter the last "0" when the ... 2-character preset code. If you cannot tune in a station and the entered numbers flash Make sure you have tuned in the display momentarily and the receiver returns to enter the frequency. If not, repeat steps 2 and 3. Additionally, it only stores the stations with this procedure to 30 FM and FM ...
...MEMORY and press ?/1 to 10 kHz.) If you want to select the FM or AM band. Notes • Do not press any button on the receiver or supplied remote during autobetical operation, except ?/1. • If you move to another area, repeat this procedure to enter the last "0" when the ... 2-character preset code. If you cannot tune in a station and the entered numbers flash Make sure you have tuned in the display momentarily and the receiver returns to enter the frequency. If not, repeat steps 2 and 3. Additionally, it only stores the stations with this procedure to 30 FM and FM ...

Operating Instructions
Page 25
... is tuned in the current memory page is stored to preset using automatic tuning (page 23) or direct tuning (page 24). 3 Press MEMORY. The last received station is tuned in. 2 Tune in . 2 Press PRESET TUNING + or PRESET TUNING - repeatedly to select the FM or AM band. To select the ...preset station directly Press the numeric buttons on the remote to 30 FM or AM stations. The last received station is tuned in the station that you can select the preset station as follows: tA1yA2y...yA0yB1yB2y...yB0T tC0y...yC2yC1T If "MEMORY" goes out...
... is tuned in the current memory page is stored to preset using automatic tuning (page 23) or direct tuning (page 24). 3 Press MEMORY. The last received station is tuned in. 2 Tune in . 2 Press PRESET TUNING + or PRESET TUNING - repeatedly to select the FM or AM band. To select the ...preset station directly Press the numeric buttons on the remote to 30 FM or AM stations. The last received station is tuned in the station that you can select the preset station as follows: tA1yA2y...yA0yB1yB2y...yB0T tC0y...yC2yC1T If "MEMORY" goes out...


