
Dimensions Diagram
Page 1
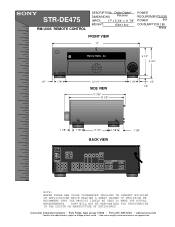
STR-DE475 RM-U305 REMOTE CONTROL DESCRIPTION: Dolby Digital DIMENSIONS Receiver (WHD): 17" x 5 3/4" x 11 7/8" WEIGHT: 15lbs 14oz POWER REQUIREMENTS:120V POWER 60H CONSUMPTION: 185 Watts FRONT VIEW 17" R FM102.7MHz A3 5 1/4" 5 3/4" 1/2" 1 7/8 " 12 1/4 " SIDE VIEW 11 7/8 " 10 1/2" 1 7/8 " 1/2" 1/2" 1 1/8" 1 7/8 " 5 1/4" 1 1/8 " BACK VIEW FM COAXIAL DIGITAL IN MONITOR AM. Consumer Integrated Systems • Park Ridge, New Jersey 07656 • FAX (201...
STR-DE475 RM-U305 REMOTE CONTROL DESCRIPTION: Dolby Digital DIMENSIONS Receiver (WHD): 17" x 5 3/4" x 11 7/8" WEIGHT: 15lbs 14oz POWER REQUIREMENTS:120V POWER 60H CONSUMPTION: 185 Watts FRONT VIEW 17" R FM102.7MHz A3 5 1/4" 5 3/4" 1/2" 1 7/8 " 12 1/4 " SIDE VIEW 11 7/8 " 10 1/2" 1 7/8 " 1/2" 1/2" 1 1/8" 1 7/8 " 5 1/4" 1 1/8 " BACK VIEW FM COAXIAL DIGITAL IN MONITOR AM. Consumer Integrated Systems • Park Ridge, New Jersey 07656 • FAX (201...
Operating Instructions
Page 3
...Descriptions 21 Enjoying Surround Sound 24 Selecting a Sound Field 25 Understanding the Multi-Channel Surround Displays 28 Customizing Sound Fields 30 Receiving Broadcasts 34 Direct Tuning 36 Automatic Tuning 36 Preset Tuning 37 Other Operations 38 Naming Preset Stations and Program Sources 39 ...44 Glossary 46 Settings Using SURR, LEVEL, and SET UP buttons 47 Remote Button Description 48 Index 51 3 Conventions • The instructions in this manual: z Indicates hints and tips for models STR-DE475 and STR-K402. About This Manual The instructions in this manual are registered trademarks...
...Descriptions 21 Enjoying Surround Sound 24 Selecting a Sound Field 25 Understanding the Multi-Channel Surround Displays 28 Customizing Sound Fields 30 Receiving Broadcasts 34 Direct Tuning 36 Automatic Tuning 36 Preset Tuning 37 Other Operations 38 Naming Preset Stations and Program Sources 39 ...44 Glossary 46 Settings Using SURR, LEVEL, and SET UP buttons 47 Remote Button Description 48 Index 51 3 Conventions • The instructions in this manual: z Indicates hints and tips for models STR-DE475 and STR-K402. About This Manual The instructions in this manual are registered trademarks...
Operating Instructions
Page 4
... 6 months. Be sure to avoid possible damage from battery leakage and corrosion. Before you received the following items with the receiver: • FM wire antenna (1) • AM loop antenna (1) • R6 (size-AA) batteries (2) • Remote Commander (remote) (1) Inserting batteries into the remote Insert R6 (size-AA) batteries with an old one. • Do not expose...
... 6 months. Be sure to avoid possible damage from battery leakage and corrosion. Before you received the following items with the receiver: • FM wire antenna (1) • AM loop antenna (1) • R6 (size-AA) batteries (2) • Remote Commander (remote) (1) Inserting batteries into the remote Insert R6 (size-AA) batteries with an old one. • Do not expose...
Operating Instructions
Page 18
... than the front speakers. Give it is set farther away from each speaker. Note This receiver incorporates a new test tone with a frequency centered at the same time Rotate MASTER VOLUME on the remote. 18 Likewise, the surround speakers cannot be no more that speaker. Please note that the... MULTI CH IN. However, it a try! Use MENU +/- And they can not be output when the receiver is not possible to turn on the receiver. 2 Press TEST TONE on the remote again to set more than the actual distance will sound like it is not conducive to select the surround...
... than the front speakers. Give it is set farther away from each speaker. Note This receiver incorporates a new test tone with a frequency centered at the same time Rotate MASTER VOLUME on the remote. 18 Likewise, the surround speakers cannot be no more that speaker. Please note that the... MULTI CH IN. However, it a try! Use MENU +/- And they can not be output when the receiver is not possible to turn on the receiver. 2 Press TEST TONE on the remote again to set more than the actual distance will sound like it is not conducive to select the surround...
Operating Instructions
Page 19
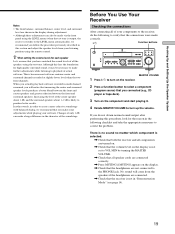
...- TUNING + MEMORY SHIFT FM MODE FM AM MENU NAME LEVEL SOUND CONTROL SURR SOUND FIELD ENTER A.F.D. When you have matched the sound levels of all of the soundstage. Before You Use Your Receiver Checking the connections After connecting all the speakers using the remote control. TREBLE + - ...these adjustments can make a huge difference in the character of your components to the LEVEL menu automatically), we recommend that the receiver is not in this section and adjust the speaker levels from the speakers if the headphones are connected correctly. , Press MUTING ...
...- TUNING + MEMORY SHIFT FM MODE FM AM MENU NAME LEVEL SOUND CONTROL SURR SOUND FIELD ENTER A.F.D. When you have matched the sound levels of all of the soundstage. Before You Use Your Receiver Checking the connections After connecting all the speakers using the remote control. TREBLE + - ...these adjustments can make a huge difference in the character of your components to the LEVEL menu automatically), we recommend that the receiver is not in this section and adjust the speaker levels from the speakers if the headphones are connected correctly. , Press MUTING ...
Operating Instructions
Page 31
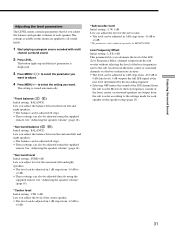
...• The level can be adjusted in 1 dB steps from -10 dB to +6 dB. • These settings can also be adjusted directly using the supplied remote. See "Adjusting the speaker volume" (page 18). *Surround level Initial setting : SURR 0 dB Lets you want to adjust. 4 Press MENU +/- See "Adjusting ...front left and right speakers. • The balance can be adjusted ±8 steps. • These settings can also be adjusted using the supplied remote. W. 0 dB Lets you attenuate the level of the LFE (Low Frequency Effect) channel output from the sub woofer without affecting the level of ...
...• The level can be adjusted in 1 dB steps from -10 dB to +6 dB. • These settings can also be adjusted directly using the supplied remote. See "Adjusting the speaker volume" (page 18). *Surround level Initial setting : SURR 0 dB Lets you want to adjust. 4 Press MENU +/- See "Adjusting ...front left and right speakers. • The balance can be adjusted ±8 steps. • These settings can also be adjusted using the supplied remote. W. 0 dB Lets you attenuate the level of the LFE (Low Frequency Effect) channel output from the sub woofer without affecting the level of ...
Operating Instructions
Page 34
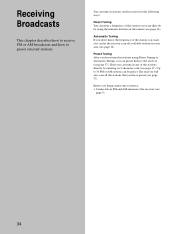
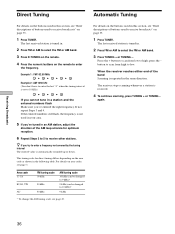
... the frequency of the station you want directly by entering its 2-character code (see page 36). Receiving Broadcasts This chapter describes how to receive FM or AM broadcasts and how to the receiver (see page 37). Then you can enter a frequency of the stations directly by using Direct Tuning...on this receiver in the following ways: Direct Tuning You can let the receiver scan all the stations that you can be preset. Preset Tuning After you have preset (see page 36). The receiver will also scan all available stations in stations using the numeric buttons on the remote (see...
... the frequency of the station you want directly by entering its 2-character code (see page 36). Receiving Broadcasts This chapter describes how to receive FM or AM broadcasts and how to the receiver (see page 37). Then you can enter a frequency of the stations directly by using Direct Tuning...on this receiver in the following ways: Direct Tuning You can let the receiver scan all the stations that you can be preset. Preset Tuning After you have preset (see page 36). The receiver will also scan all available stations in stations using the numeric buttons on the remote (see...
Operating Instructions
Page 35
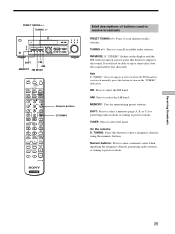
.../TAPE FN SHIFT AUX CD/SACD TUNER MENU 1 G 4 TITLE 7 F 23 ENTER g 56 f 89 SHIFT >10 - /- - FM MODE: If "STEREO" flashes in the display and the FM stereo reception is received normally, press this button to select the tuner. On the remote: D. MEMORY: Uses for presetting radio stations or tuning to select the AM band. TUNING + SET...
.../TAPE FN SHIFT AUX CD/SACD TUNER MENU 1 G 4 TITLE 7 F 23 ENTER g 56 f 89 SHIFT >10 - /- - FM MODE: If "STEREO" flashes in the display and the FM stereo reception is received normally, press this button to select the tuner. On the remote: D. MEMORY: Uses for presetting radio stations or tuning to select the AM band. TUNING + SET...
Operating Instructions
Page 36
... enter a frequency not covered by the tuning interval The entered value is set to receive other stations. For details on the remote to select the FM or AM band. 3 Press TUNING + or TUNING -. The last received station is tuned in this section, see "Brief descriptions of buttons used to... receive broadcasts" on page 35. 1 Press TUNER. The last received station is tuned in. 2 Press FM or AM to select the FM or AM band. 3 Press D.TUNING on the remote. 4 Press the numeric buttons on the buttons used in . 2 Press FM or AM to enter the frequency....
... enter a frequency not covered by the tuning interval The entered value is set to receive other stations. For details on the remote to select the FM or AM band. 3 Press TUNING + or TUNING -. The last received station is tuned in this section, see "Brief descriptions of buttons used to... receive broadcasts" on page 35. 1 Press TUNER. The last received station is tuned in. 2 Press FM or AM to select the FM or AM band. 3 Press D.TUNING on the remote. 4 Press the numeric buttons on the buttons used in . 2 Press FM or AM to enter the frequency....
Operating Instructions
Page 37
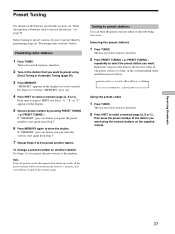
...number of the following two ways. Each time you want to preset using the numeric buttons on the supplied remote. Before tuning to preset stations, be cleared from the receiver's memory, and you want using Direct Tuning or Automatic Tuning (page 36). 3 Press MEMORY. repeatedly ...Press PRESET TUNING + or PRESET TUNING - Preset Tuning For details on the buttons used in this section, see "Brief descriptions of buttons used to receive broadcasts" on "Presetting radio stations" below. Tuning to preset stations You can store the station, start again from Step 3. 7 Repeat Steps 2 to...
...number of the following two ways. Each time you want to preset using the numeric buttons on the supplied remote. Before tuning to preset stations, be cleared from the receiver's memory, and you want using Direct Tuning or Automatic Tuning (page 36). 3 Press MEMORY. repeatedly ...Press PRESET TUNING + or PRESET TUNING - Preset Tuning For details on the buttons used in this section, see "Brief descriptions of buttons used to receive broadcasts" on "Presetting radio stations" below. Tuning to preset stations You can store the station, start again from Step 3. 7 Repeat Steps 2 to...
Operating Instructions
Page 40
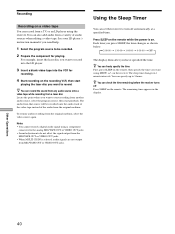
...can freely specify the time First, press SLEEP on . Notes • You cannot record a digital audio signal using MENU +/- You can set the receiver to start playback. To resume audio recording from the original medium. Other Operations 40 For example, insert the laser disc you want to turn off... up to be recorded onto the audio track of the video tape instead of audio sources when editing a video tape. Press SLEEP on the remote while the power is selected, audio signals are not output from that source will be recorded. 2 Prepare the component for recording. 4 Start ...
...can freely specify the time First, press SLEEP on . Notes • You cannot record a digital audio signal using MENU +/- You can set the receiver to start playback. To resume audio recording from the original medium. Other Operations 40 For example, insert the laser disc you want to turn off... up to be recorded onto the audio track of the video tape instead of audio sources when editing a video tape. Press SLEEP on the remote while the power is selected, audio signals are not output from that source will be recorded. 2 Prepare the component for recording. 4 Start ...
Operating Instructions
Page 43
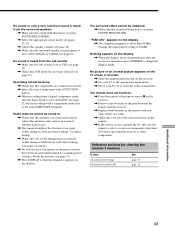
...external antenna if necessary. , The signal strength of the stations is turned on the receiver. , Set your TV to the analog MD/TAPE terminals. The surround effect cannot be tuned in the remote with a component connected to the appropriate input mode. , Move your TV away ...from the audio components. The remote does not function. , Point the remote at the remote sensor g on the receiver. , Remove any obstacles in the path between the remote and the receiver. , Replace both batteries in . , Check that the frequency appears in with a ...
...external antenna if necessary. , The signal strength of the stations is turned on the receiver. , Set your TV to the analog MD/TAPE terminals. The surround effect cannot be tuned in the remote with a component connected to the appropriate input mode. , Move your TV away ...from the audio components. The remote does not function. , Point the remote at the remote sensor g on the receiver. , Remove any obstacles in the path between the remote and the receiver. , Replace both batteries in . , Check that the frequency appears in with a ...
Operating Instructions
Page 48
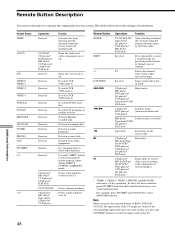
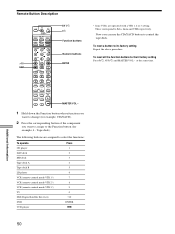
.../ VIDEO 1 VIDEO 2 VIDEO 3 DVD/LD TV/SAT MD/TAPE CD/SACD TUNER PHONO AUX FN SHIFT* 0-9 >10 Operations Receiver TV/VCR/ CD player/ DVD player/ MD deck/ VCD player/ LD player/ DAT deck Receiver Receiver Receiver Receiver Receiver Receiver Receiver Receiver Receiver Receiver Receiver Remote Receiver CD player/ MD deck/ VCD player/ LD player/ DAT deck TV/VCR/SAT CD player/ MD deck/ Tape...
.../ VIDEO 1 VIDEO 2 VIDEO 3 DVD/LD TV/SAT MD/TAPE CD/SACD TUNER PHONO AUX FN SHIFT* 0-9 >10 Operations Receiver TV/VCR/ CD player/ DVD player/ MD deck/ VCD player/ LD player/ DAT deck Receiver Receiver Receiver Receiver Receiver Receiver Receiver Receiver Receiver Receiver Receiver Remote Receiver CD player/ MD deck/ VCD player/ LD player/ DAT deck TV/VCR/SAT CD player/ MD deck/ Tape...
Operating Instructions
Page 49
Receiver TV/VCR/SAT CD player DISPLAY P IN P** JUMP TV/VCR/ LD player/ DVD player/ VCD player TV TV WIDE ANT TV/VTR TV VCR TV/VIDEO A. Selects preset channels for Sony TVs with multi-disc changer only). Selects information displayed on the component the... channels. Press to the previous menu or exits the menu. RETURN DVD Returns to output test tone. F. Selects sound field mode. Remote Button Operations Function MASTER VOL +/- MENU DVD Displays DVD menu. Notes • Some functions explained in -picture function. Selects input signal...
Receiver TV/VCR/SAT CD player DISPLAY P IN P** JUMP TV/VCR/ LD player/ DVD player/ VCD player TV TV WIDE ANT TV/VTR TV VCR TV/VIDEO A. Selects preset channels for Sony TVs with multi-disc changer only). Selects information displayed on the component the... channels. Press to the previous menu or exits the menu. RETURN DVD Returns to output test tone. F. Selects sound field mode. Remote Button Operations Function MASTER VOL +/- MENU DVD Displays DVD menu. Notes • Some functions explained in -picture function. Selects input signal...
Operating Instructions
Page 50
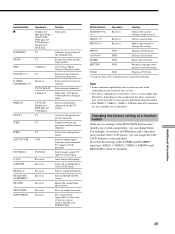
... the functions: To operate CD player DAT deck MD deck Tape deck A Tape deck B LD player VCR (remote control mode VTR 1*) VCR (remote control mode VTR 2*) VCR (remote control mode VTR 3*) TV DSS (Digital Satellite Receiver) DVD VCD player Press 1 2 3 4 5 6 7 8 9 0 >10 ENTER . * Sony VCRs are assigned to their factory setting Press ?/1, AV ?/1 and MASTER VOL...
... the functions: To operate CD player DAT deck MD deck Tape deck A Tape deck B LD player VCR (remote control mode VTR 1*) VCR (remote control mode VTR 2*) VCR (remote control mode VTR 3*) TV DSS (Digital Satellite Receiver) DVD VCD player Press 1 2 3 4 5 6 7 8 9 0 >10 ENTER . * Sony VCRs are assigned to their factory setting Press ?/1, AV ?/1 and MASTER VOL...
Service Manual
Page 2
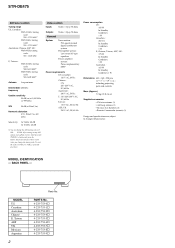
... the TUNING + button and press the button. BACK PANEL - STR-DE475 AM tuner section Tuning range US, Canadian : With 10-kHz ...; 145 × 298 mm (17 × 7 7/8 × 19 5/8 in any AM station, turn off the receiver. All preset stations will be erased when you change without notice. MODEL US Canadian Australian Chinese E, Taiwan AEP UK Mexican Argentina...(15 lb 14 oz) Supplied accessories • FM wire antenna (1) • AM loop antenna (1) • R6 (size-AA) batteries (2) • Remote Commander (remote) (1) Design and specifications are subject to change the tuning scale....
... the TUNING + button and press the button. BACK PANEL - STR-DE475 AM tuner section Tuning range US, Canadian : With 10-kHz ...; 145 × 298 mm (17 × 7 7/8 × 19 5/8 in any AM station, turn off the receiver. All preset stations will be erased when you change without notice. MODEL US Canadian Australian Chinese E, Taiwan AEP UK Mexican Argentina...(15 lb 14 oz) Supplied accessories • FM wire antenna (1) • AM loop antenna (1) • R6 (size-AA) batteries (2) • Remote Commander (remote) (1) Design and specifications are subject to change the tuning scale....
Service Manual
Page 10
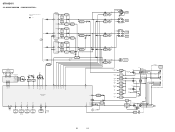
DISPLAY SECTION - • R-CH is omitted due to same as L-CH. • Signal Path : FM L SL A C SW FL101 FLUORESCENT INDICATOR TUBE FL1 FL2 14 29 42 31 SEG1-16 GRID1-12 STB CLK DIN 789...DRIVE Q550 RY550 RELAY DRIVE Q560 RY560 J253 SUB WOOFER AUDIO OUT 58 15 10 14 12 13 55 HP SW SIRCS 57 IC101 REMOTE 1 CONTROL 2 RECEIVER D109 VCC 23 VCC 84 RESET 77 HSTX 52 STOP 47 8 D101 B RESET D110 RESET Q100,101 POWER RY POWER AMP ... 8 CONTROL 5 IC950 6 D910-913 D914 T902 D915 RELAY DRIVE Q901 RY901 E MODEL VOLTAGE SELECTOR S901 AC IN 10 10 BLOCK DIAGRAM - STR-DE475 3-3.
DISPLAY SECTION - • R-CH is omitted due to same as L-CH. • Signal Path : FM L SL A C SW FL101 FLUORESCENT INDICATOR TUBE FL1 FL2 14 29 42 31 SEG1-16 GRID1-12 STB CLK DIN 789...DRIVE Q550 RY550 RELAY DRIVE Q560 RY560 J253 SUB WOOFER AUDIO OUT 58 15 10 14 12 13 55 HP SW SIRCS 57 IC101 REMOTE 1 CONTROL 2 RECEIVER D109 VCC 23 VCC 84 RESET 77 HSTX 52 STOP 47 8 D101 B RESET D110 RESET Q100,101 POWER RY POWER AMP ... 8 CONTROL 5 IC950 6 D910-913 D914 T902 D915 RELAY DRIVE Q901 RY901 E MODEL VOLTAGE SELECTOR S901 AC IN 10 10 BLOCK DIAGRAM - STR-DE475 3-3.
Service Manual
Page 24
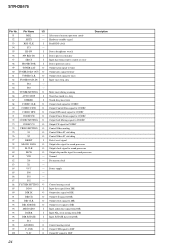
...O 61 TUNER CLK O 62 TUNER DATA IN I 63 P84 - 64 P85 - 65 TUNER MUTING O 66 AUTO STOP I 67 STEREO I 68 CODEC CLK O 69 CODEC CDT1 O 70 CODEC DFS O 71 CODEC PD O 72 CODEC MUTING O 73 CODEC CS ...data Description Mute tuner during scanning Tuner has tuned to tuner Input tuner freq. STR-DE475 Pin No. has stereo Output clock signal to CODEC Output Control Data signal to CODEC Output DFS mode ... Input PLL error muting from DIR Input XSTATE data from remote control receiver Detect protector status Output latch signal to tuner Output data signal to tuner Output clock signal...
...O 61 TUNER CLK O 62 TUNER DATA IN I 63 P84 - 64 P85 - 65 TUNER MUTING O 66 AUTO STOP I 67 STEREO I 68 CODEC CLK O 69 CODEC CDT1 O 70 CODEC DFS O 71 CODEC PD O 72 CODEC MUTING O 73 CODEC CS ...data Description Mute tuner during scanning Tuner has tuned to tuner Input tuner freq. STR-DE475 Pin No. has stereo Output clock signal to CODEC Output Control Data signal to CODEC Output DFS mode ... Input PLL error muting from DIR Input XSTATE data from remote control receiver Detect protector status Output latch signal to tuner Output data signal to tuner Output clock signal...
Service Manual
Page 39
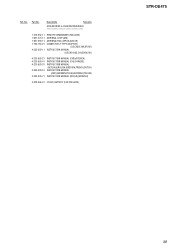
Description Remarks ACCESSORIES & PACKING MATERIALS 1-476-552-11 REMOTE COMMANDER (RM-U305) 1-501-374-11 ANTENNA, LOOP (AM) 1-501-594-11 ANTENNA (FM) (AEP,UK,AUS,CH) 1-793-184-21 CONNECTOR (F TYPE ADAPTOR) (US,CND,E,MX,BR,AR) 4-233-503-11 INSTRUCTION MANUAL (US,CND,AUS,CH)(ENGLISH) 4-...-503-61 INSTRUCTION MANUAL (AEP)(GERMAN,POLISH,SPANISH,ITALIAN) 4-233-503-71 INSTRUCTION MANUAL (MX,AR)(SPANISH) 4-228-696-01 COVER, BATTERY (FOR RM-U305) STR-DE475 39 Ref. No. Part No.
Description Remarks ACCESSORIES & PACKING MATERIALS 1-476-552-11 REMOTE COMMANDER (RM-U305) 1-501-374-11 ANTENNA, LOOP (AM) 1-501-594-11 ANTENNA (FM) (AEP,UK,AUS,CH) 1-793-184-21 CONNECTOR (F TYPE ADAPTOR) (US,CND,E,MX,BR,AR) 4-233-503-11 INSTRUCTION MANUAL (US,CND,AUS,CH)(ENGLISH) 4-...-503-61 INSTRUCTION MANUAL (AEP)(GERMAN,POLISH,SPANISH,ITALIAN) 4-233-503-71 INSTRUCTION MANUAL (MX,AR)(SPANISH) 4-228-696-01 COVER, BATTERY (FOR RM-U305) STR-DE475 39 Ref. No. Part No.


