
Operating Instructions
Page 3
... difference in operation is clearly indicated in this manual, the STR-DE345 and the remote RM-U304 are used for illustration purposes. For details on the receiver. are for models STR-DE345 and STR-DE245. In this manual are trademarks of Dolby Pro Logic Surround Sound 16 remote if they have the same or similar names as...
... difference in operation is clearly indicated in this manual, the STR-DE345 and the remote RM-U304 are used for illustration purposes. For details on the receiver. are for models STR-DE345 and STR-DE245. In this manual are trademarks of Dolby Pro Logic Surround Sound 16 remote if they have the same or similar names as...

Operating Instructions
Page 6
... section to connect video components to enjoy surround sound when watching/listening to the receiver. TV/SAT Receiver TV/SAT VIDEO IN TV tuner or Satellite receiver OUTPUT VIDEO AUDIO IN L R AUDIO L R * STR-DE345 only MONITOR (STR-DE345 only) Receiver MONITOR VIDEO OUT TV monitor INPUT VIDEO Overview This...signal. For specific locations of the jacks, see the illustration below. 5.1 CH (VIDEO IN) ((SSTTRR--DDEE334455 oonnllyy)) TV/SAT MONITOR (STR-DE345 only) Receiver VIDEO VIDEO OUT VIDEO IN AUDIO OUT AUDIO IN L R VCR OUTPUT INPUT VIDEO VIDEO AUDIO AUDIO L R 5.1 CH/DVD VIDEO ...
... section to connect video components to enjoy surround sound when watching/listening to the receiver. TV/SAT Receiver TV/SAT VIDEO IN TV tuner or Satellite receiver OUTPUT VIDEO AUDIO IN L R AUDIO L R * STR-DE345 only MONITOR (STR-DE345 only) Receiver MONITOR VIDEO OUT TV monitor INPUT VIDEO Overview This...signal. For specific locations of the jacks, see the illustration below. 5.1 CH (VIDEO IN) ((SSTTRR--DDEE334455 oonnllyy)) TV/SAT MONITOR (STR-DE345 only) Receiver VIDEO VIDEO OUT VIDEO IN AUDIO OUT AUDIO IN L R VCR OUTPUT INPUT VIDEO VIDEO AUDIO AUDIO L R 5.1 CH/DVD VIDEO ...

Operating Instructions
Page 7
... about 2/3 inch (15 mm). SPEAKERS REAR SPEAKERS FRONT SUB WOOFER SPEAKERS CENTER For optimum surround sound effect, place your speakers to + and - VIDEO * STR-DE345 only Where do I go next? Receiver 5.1 CH/DVD FRONT REAR L CENTER Dolby Digital decoder, etc. Speaker cord (not supplied) ...(1 for the 5.1 CH VIDEO IN jack) (STR-DE345 only) Yellow Yellow You can play decoded Dolby Digital...
... about 2/3 inch (15 mm). SPEAKERS REAR SPEAKERS FRONT SUB WOOFER SPEAKERS CENTER For optimum surround sound effect, place your speakers to + and - VIDEO * STR-DE345 only Where do I go next? Receiver 5.1 CH/DVD FRONT REAR L CENTER Dolby Digital decoder, etc. Speaker cord (not supplied) ...(1 for the 5.1 CH VIDEO IN jack) (STR-DE345 only) Yellow Yellow You can play decoded Dolby Digital...

Operating Instructions
Page 8
... outputting a test tone, refer to "AC Hookups" on next page. If no sound is heard from a speaker while outputting a test tone or a test tone is currently displayed on the receiver, the speaker may damage the receiver. If this , make sure to the speakers Make sure that you have connected rear... To avoid short-circuiting the speakers Short-circuiting of the speakers may be sure to press the 5.1 CH/DVD button and turn off sound field on the receiver before outputting a test tone so that all the components, speakers and AC power cord, output a test tone to ON. Active woofer...
... outputting a test tone, refer to "AC Hookups" on next page. If no sound is heard from a speaker while outputting a test tone or a test tone is currently displayed on the receiver, the speaker may damage the receiver. If this , make sure to the speakers Make sure that you have connected rear... To avoid short-circuiting the speakers Short-circuiting of the speakers may be sure to press the 5.1 CH/DVD button and turn off sound field on the receiver before outputting a test tone so that all the components, speakers and AC power cord, output a test tone to ON. Active woofer...

Operating Instructions
Page 9
...8226; The sound field memorized for each program source and preset station is set to the local power line voltage. If not, set the selector to the correct position using a screwdriver before connecting the AC power cord to a wall outlet. 120 V 240 V 220 V Before You Use Your Receiver Before turning on...models) , to a wall outlet Where do the procedure below: ?/1 (power) DIMMER Connecting the AC power cord Connect the AC power cord from this receiver and from your audio/video components to ON. Before you have: • Set the SPEAKERS button to a wall outlet. Before you use your...
...8226; The sound field memorized for each program source and preset station is set to the local power line voltage. If not, set the selector to the correct position using a screwdriver before connecting the AC power cord to a wall outlet. 120 V 240 V 220 V Before You Use Your Receiver Before turning on...models) , to a wall outlet Where do the procedure below: ?/1 (power) DIMMER Connecting the AC power cord Connect the AC power cord from this receiver and from your audio/video components to ON. Before you have: • Set the SPEAKERS button to a wall outlet. Before you use your...

Operating Instructions
Page 10
...Every time you operate the receiver and the Sony components that you turn on the receiver. 2 Press a function button to select the component you listen with the remote. To Mute the sound Reinforce the bass Adjust the balance Adjust the tone quality Do this receiver, see "Receiving Broadcasts" on page 12....remote (STR-DE245 only) The remote lets you turn MASTER VOLUME, the display changes as indicated on pages 5 to 9. 1/u (power) MENU LEVEL BASS BOOST indicator MASTER BASS VOLUME BOOST Function buttons BASS TREBLE +/- To tune in 2-dB steps. When you turn on the receiver, the ...
...Every time you operate the receiver and the Sony components that you turn on the receiver. 2 Press a function button to select the component you listen with the remote. To Mute the sound Reinforce the bass Adjust the balance Adjust the tone quality Do this receiver, see "Receiving Broadcasts" on page 12....remote (STR-DE245 only) The remote lets you turn MASTER VOLUME, the display changes as indicated on pages 5 to 9. 1/u (power) MENU LEVEL BASS BOOST indicator MASTER BASS VOLUME BOOST Function buttons BASS TREBLE +/- To tune in 2-dB steps. When you turn on the receiver, the ...

Operating Instructions
Page 14
Function buttons Playback component (program source) Recording component (MD deck, Tape deck, VCR) ç: Audio signal flow c: Video signal flow (STR-DE345 only) Recording on a MiniDisc or audio tape You can record on a video tape You can record and edit as shown below. Note...be recorded over the original audio. See the instruction manual of audio sources when editing a video tape. The sound from a TV or a satellite receiver using the receiver. To resume recording the original sound, press the TV/ SAT function button. See your MD deck or tape deck if you specify. For example,...
Function buttons Playback component (program source) Recording component (MD deck, Tape deck, VCR) ç: Audio signal flow c: Video signal flow (STR-DE345 only) Recording on a MiniDisc or audio tape You can record on a video tape You can record and edit as shown below. Note...be recorded over the original audio. See the instruction manual of audio sources when editing a video tape. The sound from a TV or a satellite receiver using the receiver. To resume recording the original sound, press the TV/ SAT function button. See your MD deck or tape deck if you specify. For example,...

Operating Instructions
Page 15
.... You can take advantage of the tuner, the sound fields for AM or FM band and for watching standard movies. To turn on the sound field. C. In the case of surround sound simply by looking at the packaging However, some videos...When using 5.1 CH/DVD only. The receiver memorizes the last sound field selected for soft acoustic sounds. * "DOLBY PL" appears in the display. ** When using 5.1 CH/DVD C. SOUND FIELD Sound field ON/OFF indicator CURSOR MODE +/- +/- VIRTUAL DOLBY V (STR-DE345 only) Uses front speakers to create surround sound effects. STUDIO y V SURR * "...
.... You can take advantage of the tuner, the sound fields for AM or FM band and for watching standard movies. To turn on the sound field. C. In the case of surround sound simply by looking at the packaging However, some videos...When using 5.1 CH/DVD only. The receiver memorizes the last sound field selected for soft acoustic sounds. * "DOLBY PL" appears in the display. ** When using 5.1 CH/DVD C. SOUND FIELD Sound field ON/OFF indicator CURSOR MODE +/- +/- VIRTUAL DOLBY V (STR-DE345 only) Uses front speakers to create surround sound effects. STUDIO y V SURR * "...

Operating Instructions
Page 16
...1 y EFFECT 2 y ... "EFFECT 6") appears on the sound field. 2 Press SOUND FIELD MODE +/- Each time you prefer. The effect level ("EFFECT 1" ... MENU SOUND FIELD MODE MENU Selecting the center mode The receiver offers you adjust the "presence" of speakers and/or one ...center speaker to select the Dolby surround sound field (PRO LOGIC or C.STUDIO mode). 3 Press SET UP. 4 Press MENU < or > repeatedly until the SUR indicator lights up. This control lets you four center modes: Phantom, Normal, Wide and 3 STEREO...
...1 y EFFECT 2 y ... "EFFECT 6") appears on the sound field. 2 Press SOUND FIELD MODE +/- Each time you prefer. The effect level ("EFFECT 1" ... MENU SOUND FIELD MODE MENU Selecting the center mode The receiver offers you adjust the "presence" of speakers and/or one ...center speaker to select the Dolby surround sound field (PRO LOGIC or C.STUDIO mode). 3 Press SET UP. 4 Press MENU < or > repeatedly until the SUR indicator lights up. This control lets you four center modes: Phantom, Normal, Wide and 3 STEREO...

Operating Instructions
Page 17
...3 STEREO speakers, no center speaker PHANTOM The sound of the sub woofer • Press LEVEL or CURSOR MODE on the sound field. You will be able to hear the difference in your listening position. 1 Press SOUND FIELD ON/OFF to turn off the receiver. • Hold down SOUND FIELD ...ON/OFF and then press ?/1 (power). Press +/- You can adjust all sound field settings to select "CTR xxdB" or "REAR xxdB". • Press +/- All sound field settings will hear the...
...3 STEREO speakers, no center speaker PHANTOM The sound of the sub woofer • Press LEVEL or CURSOR MODE on the sound field. You will be able to hear the difference in your listening position. 1 Press SOUND FIELD ON/OFF to turn off the receiver. • Hold down SOUND FIELD ...ON/OFF and then press ?/1 (power). Press +/- You can adjust all sound field settings to select "CTR xxdB" or "REAR xxdB". • Press +/- All sound field settings will hear the...

Operating Instructions
Page 18
... STEREO, NORMAL or WIDE (see page 16). DELAY CINEMA PRO LOGIC r C. C. The test tone output in the display. 3 Press +/- b) Adjustable only when the center mode is set to PHANTOM, NORMAL or WIDE (see page 16). MODE -- Note To adjust the speaker volume using 5.1 CH/DVD (STR-DE345 only) Sound field... mode Off On Type -- You can make the surround sound more effective by delaying the output from three delay times, S (15 mS), M (20 mS), and L (30 ...
... STEREO, NORMAL or WIDE (see page 16). DELAY CINEMA PRO LOGIC r C. C. The test tone output in the display. 3 Press +/- b) Adjustable only when the center mode is set to PHANTOM, NORMAL or WIDE (see page 16). MODE -- Note To adjust the speaker volume using 5.1 CH/DVD (STR-DE345 only) Sound field... mode Off On Type -- You can make the surround sound more effective by delaying the output from three delay times, S (15 mS), M (20 mS), and L (30 ...

Operating Instructions
Page 19
... AM stations with alcohol. No picture or an unclear picture is too weak (when you select the correct function on the receiver. / Place your nearest Sony dealer. The left and right sounds are unbalanced or reversed. / Check that the SPEAKERS button is heard from the audio components. Radio stations cannot be made. / Check...
... AM stations with alcohol. No picture or an unclear picture is too weak (when you select the correct function on the receiver. / Place your nearest Sony dealer. The left and right sounds are unbalanced or reversed. / Check that the SPEAKERS button is heard from the audio components. Radio stations cannot be made. / Check...

Operating Instructions
Page 20
...sound field are cleared after you make the procedure above. 20US Turn off the receiver...receiver and press ?/1 (power) for more than 0.09% total harmonic distortion) STR-DE345: 100 W + 100 W Australia, Singapore and Malaysia models: (8 ohms at 1 kHz, THD 0.7%) STR-DE345: 100 W + 100 W STR-DE245: 50 W + 50 W Other countries: (8 ohms at 1 kHz, THD 0.7%) STR-DE345: 100 W + 100 W STR-DE245: 50 W + 50 W Reference Power Canada model: Output (8 ohms at 1 kHz, THD 0.7%) Front: STR-DE345: 100 W/ch Center: STR-DE345...Tuner section FM stereo, FM/AM superheterodyne tuner FM tuner section Tuning ...
...sound field are cleared after you make the procedure above. 20US Turn off the receiver...receiver and press ?/1 (power) for more than 0.09% total harmonic distortion) STR-DE345: 100 W + 100 W Australia, Singapore and Malaysia models: (8 ohms at 1 kHz, THD 0.7%) STR-DE345: 100 W + 100 W STR-DE245: 50 W + 50 W Other countries: (8 ohms at 1 kHz, THD 0.7%) STR-DE345: 100 W + 100 W STR-DE245: 50 W + 50 W Reference Power Canada model: Output (8 ohms at 1 kHz, THD 0.7%) Front: STR-DE345: 100 W/ch Center: STR-DE345...Tuner section FM stereo, FM/AM superheterodyne tuner FM tuner section Tuning ...

Operating Instructions
Page 22
... the numeric buttons on the remote. These sound elements are combined in memory of the receiver. Preset station A radio broadcasting station that consists of three elements: direct sound, early reflected sound (early reflections) and reverberative sound (reverberation). Front speaker (L) Front speaker (R) Rear speaker (L) Rear speaker (R) • 3 STEREO mode Select 3 STEREO mode if you have front and rear...
... the numeric buttons on the remote. These sound elements are combined in memory of the receiver. Preset station A radio broadcasting station that consists of three elements: direct sound, early reflected sound (early reflections) and reverberative sound (reverberation). Front speaker (L) Front speaker (R) Rear speaker (L) Rear speaker (R) • 3 STEREO mode Select 3 STEREO mode if you have front and rear...
Operating Instructions
Page 23
... 5 Automatic tuning 12 C Center mode 16, 22 NORMAL mode 16, 22 PHANTOM mode 16, 22 3 STEREO mode 16, 22 WIDE mode 16, 22 Connecting. See Presetting Surround sound 16, 22 T Test tone 16, 22 3 STEREO mode 16, 22 Troubleshooting 19 Tuning. See Recording Effect level 16 H, I, J, K, L, M Hookups AC..., 22 Preset station 13 Presetting radio stations 13 Preset tuning 13 Program source selecting 9 Q Quick reference guide 26 R Rear panel 5, 6, 7, 9, 24 Receiving broadcasts directly 12 using preset stations 13 Recording on a MiniDisc 14 on a tape 14 on a video tape 14 Remote buttons 10, 14, 25 S Scanning...
... 5 Automatic tuning 12 C Center mode 16, 22 NORMAL mode 16, 22 PHANTOM mode 16, 22 3 STEREO mode 16, 22 WIDE mode 16, 22 Connecting. See Presetting Surround sound 16, 22 T Test tone 16, 22 3 STEREO mode 16, 22 Troubleshooting 19 Tuning. See Recording Effect level 16 H, I, J, K, L, M Hookups AC..., 22 Preset station 13 Presetting radio stations 13 Preset tuning 13 Program source selecting 9 Q Quick reference guide 26 R Rear panel 5, 6, 7, 9, 24 Receiving broadcasts directly 12 using preset stations 13 Recording on a MiniDisc 14 on a tape 14 on a video tape 14 Remote buttons 10, 14, 25 S Scanning...
Operating Instructions
Page 26
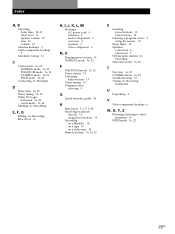
TUNING 10 Display 25 0 (on the VCR. Scanning Radio Receiving Preset Stations (automatic tuning) Stations Using Pre-programed Sound Fields Example: Scanning FM stations TUNER FM/AM Select FM. - Turn on remote) MHz Tune in the station you want. TUNING + Select A7. Start playing. PRESET - TUNING + To continue scanning. - MEMORY SHIFT Select A. MEMORY Selecting a ...
TUNING 10 Display 25 0 (on the VCR. Scanning Radio Receiving Preset Stations (automatic tuning) Stations Using Pre-programed Sound Fields Example: Scanning FM stations TUNER FM/AM Select FM. - Turn on remote) MHz Tune in the station you want. TUNING + Select A7. Start playing. PRESET - TUNING + To continue scanning. - MEMORY SHIFT Select A. MEMORY Selecting a ...

Operating Instructions
Page 48
... tuning 13 Program source selecting 9 Q Quick reference guide 26 R Rear panel 5, 6, 7, 9, 24 Receiving broadcasts directly 12 using preset stations 13 Recording on a MiniDisc 14 on a tape 14 on a video ... a program source 9 using the remote 10 Sleep Timer 14 Speakers connection 8 placement 7 Storing radio stations. See Receiving broadcasts U Unpacking 4 V Video component hookups 6 W, X, Y, Z Watching/listening to video programs 10 WIDE mode...tuning 12 C Center mode 16, 22 NORMAL mode 16, 22 PHANTOM mode 16, 22 3 STEREO mode 16, 22 WIDE mode 16, 22 Connecting. See Hookups D Delay time 18, 22...
... tuning 13 Program source selecting 9 Q Quick reference guide 26 R Rear panel 5, 6, 7, 9, 24 Receiving broadcasts directly 12 using preset stations 13 Recording on a MiniDisc 14 on a tape 14 on a video ... a program source 9 using the remote 10 Sleep Timer 14 Speakers connection 8 placement 7 Storing radio stations. See Receiving broadcasts U Unpacking 4 V Video component hookups 6 W, X, Y, Z Watching/listening to video programs 10 WIDE mode...tuning 12 C Center mode 16, 22 NORMAL mode 16, 22 PHANTOM mode 16, 22 3 STEREO mode 16, 22 WIDE mode 16, 22 Connecting. See Hookups D Delay time 18, 22...

Operating Instructions
Page 51
... A7. Start playing. Scanning Radio Receiving Preset Stations (automatic tuning) Stations Using Pre-programed Sound Fields Example: Scanning FM stations TUNER FM/AM Select FM. - Start playing. MODE + MODE Select PRO LOGIC. TUNING + 26US Example 2: Watching a video tape VIDEO Turn on remote) Scanning Preset Stations TUNER VIDEO SOUND FIELD ON/OFF SOUND FIELD - TUNING + To continue scanning...
... A7. Start playing. Scanning Radio Receiving Preset Stations (automatic tuning) Stations Using Pre-programed Sound Fields Example: Scanning FM stations TUNER FM/AM Select FM. - Start playing. MODE + MODE Select PRO LOGIC. TUNING + 26US Example 2: Watching a video tape VIDEO Turn on remote) Scanning Preset Stations TUNER VIDEO SOUND FIELD ON/OFF SOUND FIELD - TUNING + To continue scanning...


