Operating Instructions
Page 3
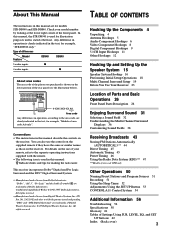
... 26 Front Panel Parts Description 26 Enjoying Surround Sound 31 Selecting a Sound Field 32 Understanding the Multi-Channel Surround Displays 36 Customizing Sound Fields 38 Receiving Broadcasts 43 Storing FM Stations Automatically (AUTOBETICAL)*** 44 Direct Tuning 45 Automatic...and "DTS Digital Surround" are for example, "Models of area code AA only". Type of differences Model Feature DB940 DB840 5 audio inputs z 4 audio inputs z About area codes The area code of the player you purchased is used ... (Back cover) 3 Any difference in the text, for models STR-DB940 and STR-DB840.
... 26 Front Panel Parts Description 26 Enjoying Surround Sound 31 Selecting a Sound Field 32 Understanding the Multi-Channel Surround Displays 36 Customizing Sound Fields 38 Receiving Broadcasts 43 Storing FM Stations Automatically (AUTOBETICAL)*** 44 Direct Tuning 45 Automatic...and "DTS Digital Surround" are for example, "Models of area code AA only". Type of differences Model Feature DB940 DB840 5 audio inputs z 4 audio inputs z About area codes The area code of the player you purchased is used ... (Back cover) 3 Any difference in the text, for models STR-DB940 and STR-DB840.
Operating Instructions
Page 8
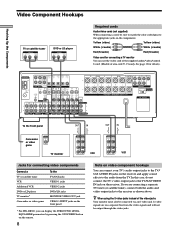
...DVD/LD jacks MONITOR VIDEO OUT jack VIDEO 3 INPUT jacks on the front panel 1) For STR-DB940, you are on the receiver. Ç Ç Hooking Up the Components Video Component Hookups TV or satellite tuner OUTPUT... your TV's audio output jacks to the TV/ SAT AUDIO IN jacks on the receiver and apply sound effects to the audio from the video signals and will not be sure to match ...DAT TV/SAT DVD/LD DVD/LD OPTICAL OPTICAL OPTICAL OPTICAL COAXIAL OUT IN IN IN IN CENTER B + U FM 75Ω COAXIAL R FRONT REAR SUB WOOFER 5.1CH INPUT CTRL S IN CTRL S STATUS IN DIGITAL CTRL S ...
...DVD/LD jacks MONITOR VIDEO OUT jack VIDEO 3 INPUT jacks on the front panel 1) For STR-DB940, you are on the receiver. Ç Ç Hooking Up the Components Video Component Hookups TV or satellite tuner OUTPUT... your TV's audio output jacks to the TV/ SAT AUDIO IN jacks on the receiver and apply sound effects to the audio from the video signals and will not be sure to match ...DAT TV/SAT DVD/LD DVD/LD OPTICAL OPTICAL OPTICAL OPTICAL COAXIAL OUT IN IN IN IN CENTER B + U FM 75Ω COAXIAL R FRONT REAR SUB WOOFER 5.1CH INPUT CTRL S IN CTRL S STATUS IN DIGITAL CTRL S ...
Operating Instructions
Page 9
... OPTICAL OPTICAL OPTICAL OPTICAL COAXIAL OUT IN IN IN IN CENTER B + U FM 75Ω COAXIAL R FRONT REAR SUB WOOFER 5.1CH INPUT CTRL S IN... LD player connected via an RF demodulator, like the Sony MOD-RF1 (not supplied). Connect the LD player to... 3 7 2 8 1 0 • • • 9 10 Note When making coaxial connections instead of multi channel surround sound, five speakers (two front speakers, two rear speakers, and a center speaker) and a sub woofer are required. This unit may not...receiver's digital input jacks to this unit's digital input jacks.
... OPTICAL OPTICAL OPTICAL OPTICAL COAXIAL OUT IN IN IN IN CENTER B + U FM 75Ω COAXIAL R FRONT REAR SUB WOOFER 5.1CH INPUT CTRL S IN... LD player connected via an RF demodulator, like the Sony MOD-RF1 (not supplied). Connect the LD player to... 3 7 2 8 1 0 • • • 9 10 Note When making coaxial connections instead of multi channel surround sound, five speakers (two front speakers, two rear speakers, and a center speaker) and a sub woofer are required. This unit may not...receiver's digital input jacks to this unit's digital input jacks.

Operating Instructions
Page 10
...output directly to the digital input on the components. The other jacks may result in intermittent sound. 10 These connections allow you cannot make a digital recording of a digital multi channel surround...supplied) When connecting a cord, be sure to match the color-coded pins to the receiver's digital output jack. Refer to the instructions supplied with your MD or DAT deck to .../SAT DVD/LD DVD/LD OPTICAL OPTICAL OPTICAL OPTICAL COAXIAL OUT IN IN IN IN CENTER B + U FM 75Ω COAXIAL R FRONT REAR SUB WOOFER 5.1CH INPUT CTRL S IN CTRL S STATUS IN DIGITAL...
...output directly to the digital input on the components. The other jacks may result in intermittent sound. 10 These connections allow you cannot make a digital recording of a digital multi channel surround...supplied) When connecting a cord, be sure to match the color-coded pins to the receiver's digital output jack. Refer to the instructions supplied with your MD or DAT deck to .../SAT DVD/LD DVD/LD OPTICAL OPTICAL OPTICAL OPTICAL COAXIAL OUT IN IN IN IN CENTER B + U FM 75Ω COAXIAL R FRONT REAR SUB WOOFER 5.1CH INPUT CTRL S IN CTRL S STATUS IN DIGITAL...

Operating Instructions
Page 11
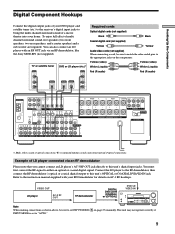
... DVD/LD DVD/LD OPTICAL OPTICAL OPTICAL OPTICAL COAXIAL OUT IN IN IN IN CENTER B + U FM 75Ω COAXIAL R FRONT REAR SUB WOOFER 5.1CH INPUT CTRL S IN CTRL S STATUS IN DIGITAL...Active Woofer 11 Hooking Up the Components 5.1CH Input Hookups Although this unit to enjoy the sound of a DVD player hookup using the connections described below, adjust the level of your ...'s multi channel decoder. Alternatively, the 5.1CH INPUT jacks can connect them directly to this receiver incorporates a multi channel decoder, it is equipped with 5.1CH OUTPUT jacks, you can be...
... DVD/LD DVD/LD OPTICAL OPTICAL OPTICAL OPTICAL COAXIAL OUT IN IN IN IN CENTER B + U FM 75Ω COAXIAL R FRONT REAR SUB WOOFER 5.1CH INPUT CTRL S IN CTRL S STATUS IN DIGITAL...Active Woofer 11 Hooking Up the Components 5.1CH Input Hookups Although this unit to enjoy the sound of a DVD player hookup using the connections described below, adjust the level of your ...'s multi channel decoder. Alternatively, the 5.1CH INPUT jacks can connect them directly to this receiver incorporates a multi channel decoder, it is equipped with 5.1CH OUTPUT jacks, you can be...

Operating Instructions
Page 15
...; 6• • 3 7 2 8 1 0 • • • 9 10 Jog dial Brief descriptions of each speaker, and how to set up your speakers to enjoy multi channel surround sound. Hooking Up and Setting Up the Speaker System Hooking Up and Setting Up the Speaker System This chapter describes how to hook up your speaker...
...; 6• • 3 7 2 8 1 0 • • • 9 10 Jog dial Brief descriptions of each speaker, and how to set up your speakers to enjoy multi channel surround sound. Hooking Up and Setting Up the Speaker System Hooking Up and Setting Up the Speaker System This chapter describes how to hook up your speaker...

Operating Instructions
Page 16
... IMPEDANCE SELECTOR ] ANTENNA AM L MD/DAT MD/DAT TV/SAT DVD/LD DVD/LD OPTICAL OPTICAL OPTICAL OPTICAL COAXIAL OUT IN IN IN IN CENTER B + U FM 75Ω COAXIAL R FRONT REAR SUB WOOFER 5.1CH INPUT CTRL S IN CTRL S STATUS IN DIGITAL CTRL S OUT CTRL S OUT SIGNAL GND U S-VIDEO OUT VIDEO ... VIDEO OUT VIDEO IN VIDEO S-VIDEO S-VIDEO OUT IN VIDEO VIDEO R - to the PRE OUT FRONT L and R jacks. If the cords are reversed, the sound will lack bass. • If you want to connect just the front speakers to either of the speaker cords about 2/3 inch (10 mm). Be sure...
... IMPEDANCE SELECTOR ] ANTENNA AM L MD/DAT MD/DAT TV/SAT DVD/LD DVD/LD OPTICAL OPTICAL OPTICAL OPTICAL COAXIAL OUT IN IN IN IN CENTER B + U FM 75Ω COAXIAL R FRONT REAR SUB WOOFER 5.1CH INPUT CTRL S IN CTRL S STATUS IN DIGITAL CTRL S OUT CTRL S OUT SIGNAL GND U S-VIDEO OUT VIDEO ... VIDEO OUT VIDEO IN VIDEO S-VIDEO S-VIDEO OUT IN VIDEO VIDEO R - to the PRE OUT FRONT L and R jacks. If the cords are reversed, the sound will lack bass. • If you want to connect just the front speakers to either of the speaker cords about 2/3 inch (10 mm). Be sure...

Operating Instructions
Page 17
... and Setting Up the Speaker System To avoid short-circuiting the speakers Short-circuiting of another speaker cord. For details on the receiver, the speaker may damage the receiver. If no sound is heard from a speaker while outputting a test tone or a test tone is output from a speaker other due to connect front speakers...
... and Setting Up the Speaker System To avoid short-circuiting the speakers Short-circuiting of another speaker cord. For details on the receiver, the speaker may damage the receiver. If no sound is heard from a speaker while outputting a test tone or a test tone is output from a speaker other due to connect front speakers...
Operating Instructions
Page 18
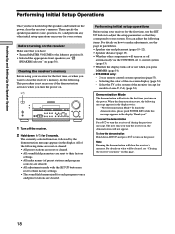
... reset to their factory settings. • The sound field memorized for each program source and preset stations are reset to turn on the power. This procedure is not necessary if the demonstration activates when you press DIMMER (page 54). • STR-DB940 only: - 2 way remote control system operation...system of the monitor (except for the first time, use the SET UP button to adjust the setup parameters so that you turn the receiver off the receiver. 2 Hold down SET UP and press ?/1 to their factory settings. • All index names (of the following message appears in...
... reset to their factory settings. • The sound field memorized for each program source and preset stations are reset to turn on the power. This procedure is not necessary if the demonstration activates when you press DIMMER (page 54). • STR-DB940 only: - 2 way remote control system operation...system of the monitor (except for the first time, use the SET UP button to adjust the setup parameters so that you turn the receiver off the receiver. 2 Hold down SET UP and press ?/1 to their factory settings. • All index names (of the following message appears in...
Operating Instructions
Page 19
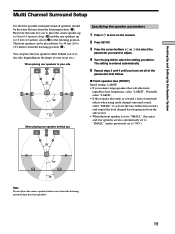
... the center speaker up to 5 feet (1.5 meters) closer (B) and the rear speakers up to 15 feet (4.5 meters) closer (C) to the side, depending on the receiver. 2 Press SET UP. 3 Press the cursor buttons ( or ) to select the parameter you want to adjust. 4 Turn the jog dial to "NO"). When ...either behind you B A A 45° Specifying the speaker parameters 1 Press ?/1 to turn on the shape of surround effects when using multi channel surround sound, select "SMALL" to activate the bass redirection circuitry and output the front channel bass frequencies from the listening position (A).
... the center speaker up to 5 feet (1.5 meters) closer (B) and the rear speakers up to 15 feet (4.5 meters) closer (C) to the side, depending on the receiver. 2 Press SET UP. 3 Press the cursor buttons ( or ) to select the parameter you want to adjust. 4 Turn the jog dial to "NO"). When ...either behind you B A A 45° Specifying the speaker parameters 1 Press ?/1 to turn on the shape of surround effects when using multi channel surround sound, select "SMALL" to activate the bass redirection circuitry and output the front channel bass frequencies from the listening position (A).

Operating Instructions
Page 20
...If you do not connect rear speakers, select "NO".*3 z *1~*3 correspond to the following Dolby Pro Logic modes *1 NORMAL *2 PHANTOM *3 3 STEREO z About speaker sizes (LARGE and SMALL) Internally, the LARGE and SMALL settings for proper implementation of directionality, it best not to cut them...a large speaker that will effectively reproduce bass frequencies, select "LARGE". However, if the front speakers are using multi channel surround sound, select "SMALL" to activate the bass redirection circuitry and output the center channel bass frequencies from a channel, the bass redirection...
...If you do not connect rear speakers, select "NO".*3 z *1~*3 correspond to the following Dolby Pro Logic modes *1 NORMAL *2 PHANTOM *3 3 STEREO z About speaker sizes (LARGE and SMALL) Internally, the LARGE and SMALL settings for proper implementation of directionality, it best not to cut them...a large speaker that will effectively reproduce bass frequencies, select "LARGE". However, if the front speakers are using multi channel surround sound, select "SMALL" to activate the bass redirection circuitry and output the center channel bass frequencies from a channel, the bass redirection...

Operating Instructions
Page 21
...a rather wide angle. z About the rear speaker position (SIDE, MIDDLE, and BEHIND) This setting is set in forming a cohesive space between the surround sound from your listening position to the rear (left or right) speaker (A on page 19). • Front speaker distance can be set in 1 foot*...and Setting Up the Speaker System x Rear speaker height (REAR HEIGHT)* Initial setting : LOW This parameter lets you are not sure which sounds best, select "BEHIND" and then use the speaker distance parameter and speaker level adjustments to obtain proper balance. This activates the bass redirection...
...a rather wide angle. z About the rear speaker position (SIDE, MIDDLE, and BEHIND) This setting is set in forming a cohesive space between the surround sound from your listening position to the rear (left or right) speaker (A on page 19). • Front speaker distance can be set in 1 foot*...and Setting Up the Speaker System x Rear speaker height (REAR HEIGHT)* Initial setting : LOW This parameter lets you are not sure which sounds best, select "BEHIND" and then use the speaker distance parameter and speaker level adjustments to obtain proper balance. This activates the bass redirection...

Operating Instructions
Page 22
...create a larger soundstage. Note The test tone cannot be adjusted in terms of area code U, CA only. And they can be output when the receiver is farther away. For example, setting the center speaker distance 3~6 feet* (1~2 m) closer than the front speakers. x Front speaker crossover frequency ... the actual location of the speakers will create a fairly realistic sensation of measure for easier speaker volume adjustment. 1 Press ?/1 to the sound often results in your listening position to "SMALL". x Rear speaker crossover frequency (REAR SP >) Initial setting : 120 Hz Lets you ...
...create a larger soundstage. Note The test tone cannot be adjusted in terms of area code U, CA only. And they can be output when the receiver is farther away. For example, setting the center speaker distance 3~6 feet* (1~2 m) closer than the front speakers. x Front speaker crossover frequency ... the actual location of the speakers will create a fairly realistic sensation of measure for easier speaker volume adjustment. 1 Press ?/1 to the sound often results in your listening position to "SMALL". x Rear speaker crossover frequency (REAR SP >) Initial setting : 120 Hz Lets you ...

Operating Instructions
Page 23
... you follow the procedure described above and adjust the speaker levels from your components to the receiver, do not obtain normal sound output after performing this procedure, look for the reason in the display during adjustment. •... position (0). • Selected the appropriate front speakers (see "wj SPEAKERS selector" on the component and start playing it. 4 Rotate MASTER VOLUME to turn on the receiver. FUNCTION 2 Rotate FUNCTION to select a component (program source) that the connections were made correctly. 1/u ?/1 - + - + MASTER VOLUME - + - + 4 •...
... you follow the procedure described above and adjust the speaker levels from your components to the receiver, do not obtain normal sound output after performing this procedure, look for the reason in the display during adjustment. •... position (0). • Selected the appropriate front speakers (see "wj SPEAKERS selector" on the component and start playing it. 4 Rotate MASTER VOLUME to turn on the receiver. FUNCTION 2 Rotate FUNCTION to select a component (program source) that the connections were made correctly. 1/u ?/1 - + - + MASTER VOLUME - + - + 4 •...
Operating Instructions
Page 24
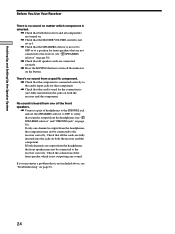
...that is not included above, see "Troubleshooting" on page 30). Hooking Up and Setting Up the Speaker System Before You Use Your Receiver There is no sound no sound from a specific component. , Check that the component is connected correctly to the audio input jacks for that component. , Check that ...not set the SPEAKERS selector to OFF to verify that all speaker cords are connected correctly. , Press the MUTING button to the receiver correctly. Check that sound is output from the headphones (see "wj SPEAKERS selector" and "PHONES jack" on page 56. 24 There's no matter which ...
...that is not included above, see "Troubleshooting" on page 30). Hooking Up and Setting Up the Speaker System Before You Use Your Receiver There is no sound no sound from a specific component. , Check that the component is connected correctly to the audio input jacks for that component. , Check that ...not set the SPEAKERS selector to OFF to verify that all speaker cords are connected correctly. , Press the MUTING button to the receiver correctly. Check that sound is output from the headphones (see "wj SPEAKERS selector" and "PHONES jack" on page 56. 24 There's no matter which ...
Operating Instructions
Page 26
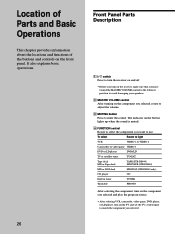
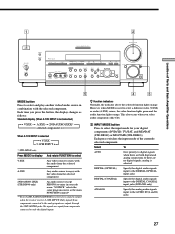
... the component you selected, rotate to adjust the volume. 3 MUTING button Press to mute the sound. It also explains basic operations. 26 Front Panel Parts Description 1 ?/1 switch Press to turn the receiver on and off. • Before you turn on the front panel. Location of Parts and ...STR-DB840) MD or DAT deck MD/DAT (STR-DB940 only) CD player CD Built in tuner TUNER Turntable PHONO After selecting the component, turn on the component you selected and play the program source. • After selecting VCR, camcorder, video game, DVD player, or LD player, turn on the receiver...
... the component you selected, rotate to adjust the volume. 3 MUTING button Press to mute the sound. It also explains basic operations. 26 Front Panel Parts Description 1 ?/1 switch Press to turn the receiver on and off. • Before you turn on the front panel. Location of Parts and ...STR-DB840) MD or DAT deck MD/DAT (STR-DB940 only) CD player CD Built in tuner TUNER Turntable PHONO After selecting the component, turn on the component you selected and play the program source. • After selecting VCR, camcorder, video game, DVD player, or LD player, turn on the receiver...
Operating Instructions
Page 27
...when MODE is set to enjoy with the selected component. Select To AUTO Give priority to digital signals when there are no sound is output when the receiver is used to the AUDIO IN (L and R) jacks 27 "SOURCE" selects the same program source as follows: Standard ...video/audio source in your digital components (DVD/LD, TV/SAT, and MD/DAT (STR-DB940) or MD/TAPE (STR-DB840)). 1 2 ?/1 SPEAKERS OFF• A• •B A+B • PHONES DIMMER DISPLAY MULTI CHANNEL DECODING BASS BOOST FM / AM SHIFT PRESET - Each press switches the input mode of Parts and Basic ...
...when MODE is set to enjoy with the selected component. Select To AUTO Give priority to digital signals when there are no sound is output when the receiver is used to the AUDIO IN (L and R) jacks 27 "SOURCE" selects the same program source as follows: Standard ...video/audio source in your digital components (DVD/LD, TV/SAT, and MD/DAT (STR-DB940) or MD/TAPE (STR-DB840)). 1 2 ?/1 SPEAKERS OFF• A• •B A+B • PHONES DIMMER DISPLAY MULTI CHANNEL DECODING BASS BOOST FM / AM SHIFT PRESET - Each press switches the input mode of Parts and Basic ...
Operating Instructions
Page 28
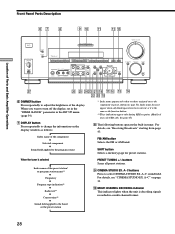
... a memory page for preset stations. A~C buttons Press to the band or the preset station PRESET TUNING +/- For details, see "Receiving Broadcasts" starting from page 43. qa qs qd ?/1 SPEAKERS OFF• A• •B A+B • PHONES DIMMER DISPLAY MULTI CHANNEL DECODING ...page 51). When you have been entered, or it is the same as follows: v Index name of area code CED only. FM MODE S-VIDEO VIDEO L AUDIO R + EQUALIZER SET UP LEVEL - A~C sound field. SUR INPUT MODE NAME EQ ANLG DIRECT 5.1CH INPUT + MASTER VOLUME 4 • • • • 5...
... a memory page for preset stations. A~C buttons Press to the band or the preset station PRESET TUNING +/- For details, see "Receiving Broadcasts" starting from page 43. qa qs qd ?/1 SPEAKERS OFF• A• •B A+B • PHONES DIMMER DISPLAY MULTI CHANNEL DECODING ...page 51). When you have been entered, or it is the same as follows: v Index name of area code CED only. FM MODE S-VIDEO VIDEO L AUDIO R + EQUALIZER SET UP LEVEL - A~C sound field. SUR INPUT MODE NAME EQ ANLG DIRECT 5.1CH INPUT + MASTER VOLUME 4 • • • • 5...
Operating Instructions
Page 29
...1CH INPUT is set the receiver to open the door on -screen (STR-DB940 only) display (page 54). qf DOOR OPEN button Press to automatically detect the type of the following parameters. qg ENTER button Press to an analog source without digital processing by the equalizer, sound field, etc. qk LEVEL...proper decoding (if necessary). wa SET UP button Press to activate the setup mode, then use the cursor buttons (qh) to output sound from page 31. Auto Function Specify whether or not Sony components connected via Control A1 cords will turn off when selected using the jog dial (qj).
...1CH INPUT is set the receiver to open the door on -screen (STR-DB940 only) display (page 54). qf DOOR OPEN button Press to automatically detect the type of the following parameters. qg ENTER button Press to an analog source without digital processing by the equalizer, sound field, etc. qk LEVEL...proper decoding (if necessary). wa SET UP button Press to activate the setup mode, then use the cursor buttons (qh) to output sound from page 31. Auto Function Specify whether or not Sony components connected via Control A1 cords will turn off when selected using the jog dial (qj).
Operating Instructions
Page 30
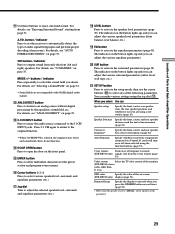
...can be reproduced whenever you turn the equalizer on . wf The following buttons operate the built-in the display and the FM stereo reception is turned on or off. buttons Scans all the available radio stations. Models of Parts and Basic Amplifier Operations Front... stations broadcasting traffic announcements, news, or information program. You will not have the stereo effect but the sound is set the receiver to automatically switch to the headphones. • To enjoy surround sound from page 43. buttons Scans all the available radio stations. The EON button does...
...can be reproduced whenever you turn the equalizer on . wf The following buttons operate the built-in the display and the FM stereo reception is turned on or off. buttons Scans all the available radio stations. Models of Parts and Basic Amplifier Operations Front... stations broadcasting traffic announcements, news, or information program. You will not have the stereo effect but the sound is set the receiver to automatically switch to the headphones. • To enjoy surround sound from page 43. buttons Scans all the available radio stations. The EON button does...

