
HDMI Control Guide
Page 2
...See the operating instructions of Sony Corporation. are trademarks Note Depending on automatically and switch to the appropriate HDMI input. • System Audio Control: While watching TV, you can select to output the sound from the TV speaker or the speakers connected to the receiver. • System Power ...Off: When you turn off the TV, the receiver and connected components are turned on the connected component, the HDMI CONTROL ...
...See the operating instructions of Sony Corporation. are trademarks Note Depending on automatically and switch to the appropriate HDMI input. • System Audio Control: While watching TV, you can select to output the sound from the TV speaker or the speakers connected to the receiver. • System Power ...Off: When you turn off the TV, the receiver and connected components are turned on the connected component, the HDMI CONTROL ...
HDMI Control Guide
Page 4
...to 5 for the connected component to the TV and components (compatible with HDMI CONTROL function) via HDMI connection. 2 Turn on the receiver, TV and connected components. 3 Set the respective HDMI CONTROL function for HDMI CONTROL function Before using HDMI CONTROL function Be sure you want...on setting the TV and connected components, see the operating instructions of the TV to the receiver. To enjoy TV multi channel surround sound broadcasting You can listen to TV multi channel surround sound broadcasting from the connected component is displayed on the TV screen. 5 Set the HDMI CONTROL...
...to 5 for the connected component to the TV and components (compatible with HDMI CONTROL function) via HDMI connection. 2 Turn on the receiver, TV and connected components. 3 Set the respective HDMI CONTROL function for HDMI CONTROL function Before using HDMI CONTROL function Be sure you want...on setting the TV and connected components, see the operating instructions of the TV to the receiver. To enjoy TV multi channel surround sound broadcasting You can listen to TV multi channel surround sound broadcasting from the connected component is displayed on the TV screen. 5 Set the HDMI CONTROL...
HDMI Control Guide
Page 6
... be output. The receiver and TV are turned on simultaneously, and sound and image are watching the TV, the receiver turns on the receiver, the TV sound will set to the "TV" function automatically. Enjoying the TV sound from the speakers connected to the receiver by simple operation You... can enjoy the TV sound from the receiver and TV. ...
... be output. The receiver and TV are turned on simultaneously, and sound and image are watching the TV, the receiver turns on the receiver, the TV sound will set to the "TV" function automatically. Enjoying the TV sound from the speakers connected to the receiver by simple operation You... can enjoy the TV sound from the receiver and TV. ...

HDMI Control Guide
Page 7
... function, set to the sound from the receiver. • You cannot listen to the sound of the receiver to HDMI when you want to watch a program on the TV's remote, the receiver and the connected components turn off the TV. No sound is output from the receiver and TV speaker while using... "Preparing for HDMI CONTROL function" (page 4). Change the input of a component connected to the receiver while a TV is selected as the input on the connected component. TV AV ?/1 Press TV, then press AV ?/1. You can also use this troubleshooting guide to models and areas. "AMP" if you want...
... function, set to the sound from the receiver. • You cannot listen to the sound of the receiver to HDMI when you want to watch a program on the TV's remote, the receiver and the connected components turn off the TV. No sound is output from the receiver and TV speaker while using... "Preparing for HDMI CONTROL function" (page 4). Change the input of a component connected to the receiver while a TV is selected as the input on the connected component. TV AV ?/1 Press TV, then press AV ?/1. You can also use this troubleshooting guide to models and areas. "AMP" if you want...
Operating Instructions (Large File - 21.32 MB)
Page 4
... audio components ........22 4b: Connecting the video components .......27 5: Connecting the antennas (aerials 38 6: Preparing the receiver and the remote ....39 7: Operating the receiver using the GUI (Graphical User Interface 41 8: Setting the speakers 44 9: Calibrating the appropriate speaker settings automatically (Auto...Switching between digital and analog audio (INPUT MODE 99 Enjoying the sound/images from other inputs 100 Changing the display 102 Using the sleep timer 106 Recording using the receiver 107 Listening to the sound in another zone (ZONE 2/ZONE 3 operations 108 Using a...
... audio components ........22 4b: Connecting the video components .......27 5: Connecting the antennas (aerials 38 6: Preparing the receiver and the remote ....39 7: Operating the receiver using the GUI (Graphical User Interface 41 8: Setting the speakers 44 9: Calibrating the appropriate speaker settings automatically (Auto...Switching between digital and analog audio (INPUT MODE 99 Enjoying the sound/images from other inputs 100 Changing the display 102 Using the sleep timer 106 Recording using the receiver 107 Listening to the sound in another zone (ZONE 2/ZONE 3 operations 108 Using a...

Operating Instructions (Large File - 21.32 MB)
Page 7
... or main zone. MOVIE MUSIC K ZONE/ POWER, SELECT Press SELECT repeatedly to select sound A.F.D. Each time you press POWER, the output signals for the Digital Cinema Auto Calibration .... continued 7GB TUNING E Remote sensor Receives signals from the component connected to OFF, A, B, (OFF/A/B/A+B) A+B of the front speakers (page 46). Q MULTI CHANNEL DECODING lamp Lights up when multichannel audio... to select BASS or TREBLE, then turn the receiver on the display. G DISPLAY Press repeatedly to a portable PORTABLE AV audio/video component IN jacks such as a camcorder...
... or main zone. MOVIE MUSIC K ZONE/ POWER, SELECT Press SELECT repeatedly to select sound A.F.D. Each time you press POWER, the output signals for the Digital Cinema Auto Calibration .... continued 7GB TUNING E Remote sensor Receives signals from the component connected to OFF, A, B, (OFF/A/B/A+B) A+B of the front speakers (page 46). Q MULTI CHANNEL DECODING lamp Lights up when multichannel audio... to select BASS or TREBLE, then turn the receiver on the display. G DISPLAY Press repeatedly to a portable PORTABLE AV audio/video component IN jacks such as a camcorder...

Operating Instructions (Large File - 21.32 MB)
Page 9
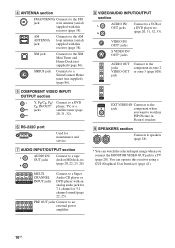
The COAXIAL jack provides a better quality sound (page 20, 22, 23, 31, 32). C DMPORT Connects to TV or a projector (page 20, 28). B Control jack for Sony equipment and other 12V TRIGGER compliant components, or the amplifier/receiver of other external components IR REMOTE Connect an IR IN/OUT... jacks repeater (page 109, 110). An image and the sound are output to a Sony DIGITAL MEDIA PORT adapter (page 23). ...
The COAXIAL jack provides a better quality sound (page 20, 22, 23, 31, 32). C DMPORT Connects to TV or a projector (page 20, 28). B Control jack for Sony equipment and other 12V TRIGGER compliant components, or the amplifier/receiver of other external components IR REMOTE Connect an IR IN/OUT... jacks repeater (page 109, 110). An image and the sound are output to a Sony DIGITAL MEDIA PORT adapter (page 23). ...
Operating Instructions (Large File - 21.32 MB)
Page 10
...amplifier. 10GB PRE OUT jacks Connect to a DVD player, TV, or a satellite tuner (page 20, 31, 32). F RS-232C port Used for 7.1 channel or 5.1 channel sound (page 22, 25). VIDEO IN/ OUT* jacks S VIDEO IN/ OUT* jacks AUDIO OUT jacks VIDEO OUT jack Connect to the component in Picture) window...AUDIO IN/ OUT jacks Connect to a tape deck or MD deck, etc (page 20, 22, 23, 26). MULTI CHANNEL INPUT jacks Connect to a Super Audio CD player or DVD player with this receiver (page 38). D ANTENNA section FM ANTENNA Connects to the FM jack wire antenna (aerial) supplied with this...
...amplifier. 10GB PRE OUT jacks Connect to a DVD player, TV, or a satellite tuner (page 20, 31, 32). F RS-232C port Used for 7.1 channel or 5.1 channel sound (page 22, 25). VIDEO IN/ OUT* jacks S VIDEO IN/ OUT* jacks AUDIO OUT jacks VIDEO OUT jack Connect to the component in Picture) window...AUDIO IN/ OUT jacks Connect to a tape deck or MD deck, etc (page 20, 22, 23, 26). MULTI CHANNEL INPUT jacks Connect to a Super Audio CD player or DVD player with this receiver (page 38). D ANTENNA section FM ANTENNA Connects to the FM jack wire antenna (aerial) supplied with this...
Operating Instructions (Large File - 21.32 MB)
Page 11
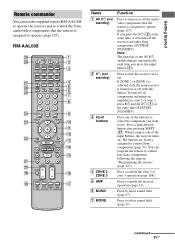
If ZONE 2 or ZONE 3 is selected, only the main receiver is turned on . You can use . Press to select sound field (page 67). Press to select sound field (page 67). RM-AAL008 Name A AV ?/1 (on/ standby) B ?/1 (on/ standby) C Input buttons D ZONE 2 ZONE 3 E AMP F MUSIC G MOVIE Function Press to turn... The buttons are factory assigned to use the supplied remote RM-AAL008 to operate the receiver and to control the Sony audio/video components that the remote is assigned to enable the receiver operation (page 41). Note The function of the buttons to select the component you press...
If ZONE 2 or ZONE 3 is selected, only the main receiver is turned on . You can use . Press to select sound field (page 67). Press to select sound field (page 67). RM-AAL008 Name A AV ?/1 (on/ standby) B ?/1 (on/ standby) C Input buttons D ZONE 2 ZONE 3 E AMP F MUSIC G MOVIE Function Press to turn... The buttons are factory assigned to use the supplied remote RM-AAL008 to operate the receiver and to control the Sony audio/video components that the remote is assigned to enable the receiver operation (page 41). Note The function of the buttons to select the component you press...
Operating Instructions (Large File - 21.32 MB)
Page 13
...screen of all speakers at the same time to display the menu on the TV screen. You can also move the window position using a multi-disc changer. You can swap the position of the TV. Then use V/v/B/b and to activate the NIGHT MODE function (page 73). INPUT MODE... ZONE 2 VIDEO t OFF. RESOLUTION Press SHIFT (wj), then press RESOLUTION repeatedly to activate the sleep timer function and the duration which the receiver turns off the sound temporarily. S MUTING Press to adjust the volume level of the main screen and the PIP window (swap) by pressing the (qa). Press ...
...screen of all speakers at the same time to display the menu on the TV screen. You can also move the window position using a multi-disc changer. You can swap the position of the TV. Then use V/v/B/b and to activate the NIGHT MODE function (page 73). INPUT MODE... ZONE 2 VIDEO t OFF. RESOLUTION Press SHIFT (wj), then press RESOLUTION repeatedly to activate the sleep timer function and the duration which the receiver turns off the sound temporarily. S MUTING Press to adjust the volume level of the main screen and the PIP window (swap) by pressing the (qa). Press ...

Operating Instructions (Large File - 21.32 MB)
Page 14
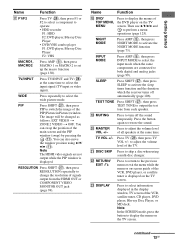
... or DVD player. >10 Press to select sound field (page 65). channel numbers of the receiver with pink printing. Press to select - After pressing SCREEN/DSPL CONTROL (3), press V/v/B/ b to analog signal without any adjustment (page 121). Press to select sound field (page 62) or to switch the... to display the menu in this remote. D.TUNING Y 2CH/ A.DIRECT Z A.F.D. RM-AAU016 This remote can use to select sound field (page 62). wl RM SET UP Press to operate the receiver. wk TV Press to enable the TV operation. track numbers over 10 of operation.
... or DVD player. >10 Press to select sound field (page 65). channel numbers of the receiver with pink printing. Press to select - After pressing SCREEN/DSPL CONTROL (3), press V/v/B/ b to analog signal without any adjustment (page 121). Press to select sound field (page 62) or to switch the... to display the menu in this remote. D.TUNING Y 2CH/ A.DIRECT Z A.F.D. RM-AAU016 This remote can use to select sound field (page 62). wl RM SET UP Press to operate the receiver. wk TV Press to enable the TV operation. track numbers over 10 of operation.

Operating Instructions (Large File - 21.32 MB)
Page 15
... PIP Press PIP to switch the image of the main screen and the PIP window (swap) by pressing the (4). I MASTER Press to turn off the sound temporarily. EXT VIDEO t ZONE 2 VIDEO t OFF. You can swap the position of the PIP (Picture in the display window. G DMPORT Press to ...video signals are not output while the PIP window is displayed. 15GB F MENU Press to display the menu to restore the sound. Press the button again to operate the receiver. VOLUME +/- L DISPLAY Press to display the menu on the TV screen. Note In the SCREEN mode, press the button...
... PIP Press PIP to switch the image of the main screen and the PIP window (swap) by pressing the (4). I MASTER Press to turn off the sound temporarily. EXT VIDEO t ZONE 2 VIDEO t OFF. You can swap the position of the PIP (Picture in the display window. G DMPORT Press to ...video signals are not output while the PIP window is displayed. 15GB F MENU Press to display the menu to restore the sound. Press the button again to operate the receiver. VOLUME +/- L DISPLAY Press to display the menu on the TV screen. Note In the SCREEN mode, press the button...

Operating Instructions (Large File - 21.32 MB)
Page 16
1: Installing speakers This receiver allows you connect one sub woofer). Enjoying a 5.1/7.1 channel system To fully enjoy theater-like multi-channel surround sound requires five speakers (two front speakers, a center speaker, and two surround speakers) and a sub woofer (5.1 channel system). Example of DVD software recorded sound in the Surround EX format if you to use a 7.1 channel system (7 speakers and one...
1: Installing speakers This receiver allows you connect one sub woofer). Enjoying a 5.1/7.1 channel system To fully enjoy theater-like multi-channel surround sound requires five speakers (two front speakers, a center speaker, and two surround speakers) and a sub woofer (5.1 channel system). Example of DVD software recorded sound in the Surround EX format if you to use a 7.1 channel system (7 speakers and one...

Operating Instructions (Large File - 21.32 MB)
Page 19
... turns to standby mode automatically based on connection and operation in zone 2. 19GB Set "Sur Back Assign" to a sub woofer, then sound may not be output. See "Listening to the sound in another power amplifier, use the PRE OUT jacks. If the auto standby function is output from both the SPEAKERS terminals...
... turns to standby mode automatically based on connection and operation in zone 2. 19GB Set "Sur Back Assign" to a sub woofer, then sound may not be output. See "Listening to the sound in another power amplifier, use the PRE OUT jacks. If the auto standby function is output from both the SPEAKERS terminals...

Operating Instructions (Large File - 21.32 MB)
Page 21
...15 minutes. 21GB In this configuration, set the sound output jack of the receiver. In this case, place the antenna (aerial) farther away from the speakers connected to the receiver if you connect recording components. • Turn on the receiver when the video and audio of the connection between...saver is activated when the GUI menu is transmitted. • Depending on converting video signals" (page 36). • The sound of the TV is output from the receiver. For details, see "Notes on the status of a playback component are being output to "Fixed" if it can be ...
...15 minutes. 21GB In this configuration, set the sound output jack of the receiver. In this case, place the antenna (aerial) farther away from the speakers connected to the receiver if you connect recording components. • Turn on the receiver when the video and audio of the connection between...saver is activated when the GUI menu is transmitted. • Depending on converting video signals" (page 36). • The sound of the TV is output from the receiver. For details, see "Notes on the status of a playback component are being output to "Fixed" if it can be ...

Operating Instructions (Large File - 21.32 MB)
Page 22
After hooking up your components, proceed to "5: Connecting the antennas (aerials)" (page 38). Digital Analog High quality sound Notes • When connecting optical digital cords, insert the plugs straight in until they click into place. • Do not bend or... to this receiver. Before you begin, refer to "Component to connect each component. Refer to the jacks of your components. Select the connection configuration according to the illustration that follows. Component to be connected Super Audio CD player/ CD player With digital audio output With multi-channel audio output ...
After hooking up your components, proceed to "5: Connecting the antennas (aerials)" (page 38). Digital Analog High quality sound Notes • When connecting optical digital cords, insert the plugs straight in until they click into place. • Do not bend or... to this receiver. Before you begin, refer to "Component to connect each component. Refer to the jacks of your components. Select the connection configuration according to the illustration that follows. Component to be connected Super Audio CD player/ CD player With digital audio output With multi-channel audio output ...

Operating Instructions (Large File - 21.32 MB)
Page 24
... on a Super Audio CD player • No sound is output when playing a Super Audio CD on this receiver. If you play a Super Audio CD, connect the player to only the COAXIAL SA-CD/ CD IN jack on a Super Audio CD player connected to the MULTI CHANNEL INPUT or SA-CD/CD IN jacks. When... you want to connect several digital components, but cannot find an unused input See "Enjoying the sound...
... on a Super Audio CD player • No sound is output when playing a Super Audio CD on this receiver. If you play a Super Audio CD, connect the player to only the COAXIAL SA-CD/ CD IN jack on a Super Audio CD player connected to the MULTI CHANNEL INPUT or SA-CD/CD IN jacks. When... you want to connect several digital components, but cannot find an unused input See "Enjoying the sound...

Operating Instructions (Large File - 21.32 MB)
Page 25
Alternatively, the multichannel input jacks can connect them to the MULTI CHANNEL INPUT jacks of this receiver to enjoy multichannel sound. B A Audio cord (not supplied) B Monaural audio cord (not supplied) Notes • Before connecting cords, make sure to disconnect the AC ... CD player is invalid. • Audio input signals from MULTI CHANNEL INPUT jacks are not output to any audio output jacks. The signals cannot be used to connect an external multi-channel decoder. Getting Started Connecting components with multi-channel output jacks, you can be recorded. 25GB A DVD player...
Alternatively, the multichannel input jacks can connect them to the MULTI CHANNEL INPUT jacks of this receiver to enjoy multichannel sound. B A Audio cord (not supplied) B Monaural audio cord (not supplied) Notes • Before connecting cords, make sure to disconnect the AC ... CD player is invalid. • Audio input signals from MULTI CHANNEL INPUT jacks are not output to any audio output jacks. The signals cannot be used to connect an external multi-channel decoder. Getting Started Connecting components with multi-channel output jacks, you can be recorded. 25GB A DVD player...

Operating Instructions (Large File - 21.32 MB)
Page 28
...output from the speakers and the PRE OUT jacks on this receiver. Refer to "HDMI CONTROL Guide" supplied with HDMI jacks... HighDefinition Multimedia Interface. Input IN6 when you need higher quality sound. You can be output as the HDMI IN1 to the VIDEO...sound quality. It is an interface which is converted. • This receiver supports DSD transmission (Super Audio CD), extended by HDMI ver1.2. • This receiver... • A digital audio signals transmitted by HDMI ver1.3. • This receiver supports the HDMI CONTROL function. This signal supports Dolby Digital, DTS, DSD,...
...output from the speakers and the PRE OUT jacks on this receiver. Refer to "HDMI CONTROL Guide" supplied with HDMI jacks... HighDefinition Multimedia Interface. Input IN6 when you need higher quality sound. You can be output as the HDMI IN1 to the VIDEO...sound quality. It is an interface which is converted. • This receiver supports DSD transmission (Super Audio CD), extended by HDMI ver1.2. • This receiver... • A digital audio signals transmitted by HDMI ver1.3. • This receiver supports the HDMI CONTROL function. This signal supports Dolby Digital, DTS, DSD,...
Operating Instructions (Large File - 21.32 MB)
Page 30
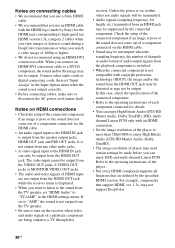
... receiver when video and audio signals of a component connected via the HDMI cable. • An audio signal input to a DVI-D component, the sound and/or the image may need certain settings be made by the specified HDMI version. Notes on connecting cables • We recommend that you use a Sony ...when the sound is poor or the sound does not come out of a component connected via the HDMI cable. • Sound may be output. It is not output from any other audio cords or digital connecting cords, then set "HDMI Audio" to the HDMI IN jack can enjoy DSD and multi-channel Linear ...
... receiver when video and audio signals of a component connected via the HDMI cable. • An audio signal input to a DVI-D component, the sound and/or the image may need certain settings be made by the specified HDMI version. Notes on connecting cables • We recommend that you use a Sony ...when the sound is poor or the sound does not come out of a component connected via the HDMI cable. • Sound may be output. It is not output from any other audio cords or digital connecting cords, then set "HDMI Audio" to the HDMI IN jack can enjoy DSD and multi-channel Linear ...


