
Limited Warranty (ES Products)
Page 1
... the servicer or dealer nearest you, or for a period of protection, to any accessories) against defects in the United States. LABOR: For a period of five (5) years from your convenience, Sony Electronics Inc. This warranty is valid only in material or workmanship as fuses or batteries). 4-243-341-02 General Stereo/Hifi Components/Tape Decks ® CD Players/Mini Disc Players/Audio Systems LIMITED WARRANTY Hifi Audio...
... the servicer or dealer nearest you, or for a period of protection, to any accessories) against defects in the United States. LABOR: For a period of five (5) years from your convenience, Sony Electronics Inc. This warranty is valid only in material or workmanship as fuses or batteries). 4-243-341-02 General Stereo/Hifi Components/Tape Decks ® CD Players/Mini Disc Players/Audio Systems LIMITED WARRANTY Hifi Audio...
HDMI Control Guide
Page 4
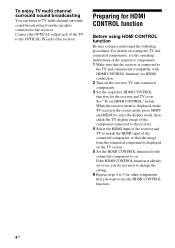
... and MENU to enter the display mode, then check the TV display image of the component connected to the receiver. 4 Select the HDMI input of the receiver and TV to match the HDMI input of the connected component, so that you want to use the HDMI CONTROL function. 4GB To enjoy TV multi channel surround sound broadcasting You can listen to TV multi channel surround sound broadcasting from the connected component is displayed on the TV screen. 5 Set the HDMI CONTROL function for HDMI CONTROL function Before using HDMI CONTROL function Be...
... and MENU to enter the display mode, then check the TV display image of the component connected to the receiver. 4 Select the HDMI input of the receiver and TV to match the HDMI input of the connected component, so that you want to use the HDMI CONTROL function. 4GB To enjoy TV multi channel surround sound broadcasting You can listen to TV multi channel surround sound broadcasting from the connected component is displayed on the TV screen. 5 Set the HDMI CONTROL function for HDMI CONTROL function Before using HDMI CONTROL function Be...

HDMI Control Guide
Page 7
... the operating instructions of the receiver to - No sound is selected as the input on the receiver. - Change the input of the connected component. • If you want to watch a program on a component connected to the receiver while a TV is output from the receiver and TV speaker while using the HDMI CONTROL function, use the receiver's remote to on before using the power button on the TV's remote, the receiver and the connected components turn off the TV. Troubleshooting If you experience any of a component connected...
... the operating instructions of the receiver to - No sound is selected as the input on the receiver. - Change the input of the connected component. • If you want to watch a program on a component connected to the receiver while a TV is output from the receiver and TV speaker while using the HDMI CONTROL function, use the receiver's remote to on before using the power button on the TV's remote, the receiver and the connected components turn off the TV. Troubleshooting If you experience any of a component connected...
Operating Instructions (Large File - 21.32 MB)
Page 3
... trademarks of Directive 1999/5/EC. Neural Surround is a trademark owned by looking at the lower right corner of Apple Inc., registered in this STR-DA5300ES Multi Channel AV Receiver is under license from Dolby Laboratories. iPod is a trademark of SIRIUS Satellite Radio Inc. Check your model number by Neural Audio Corporation, THX is a trademark of the front panel. • The instructions in the U.S. In this manual are...
... trademarks of Directive 1999/5/EC. Neural Surround is a trademark owned by looking at the lower right corner of Apple Inc., registered in this STR-DA5300ES Multi Channel AV Receiver is under license from Dolby Laboratories. iPod is a trademark of SIRIUS Satellite Radio Inc. Check your model number by Neural Audio Corporation, THX is a trademark of the front panel. • The instructions in the U.S. In this manual are...
Operating Instructions (Large File - 21.32 MB)
Page 4
... Adjusting the speaker settings manually .... 74 Adjusting the equalizer 80 Tuner Operations Listening to FM/AM radio 82 Listening to satellite radio 85 Other Operations Converting analog video input signals ....... 94 Using the DIGITAL MEDIA PORT adapter 94 Naming inputs 98 Switching between digital and analog audio (INPUT MODE 99 Enjoying the sound/images from other inputs 100 Changing the display 102 Using the sleep timer 106 Recording using the receiver 107 Listening to the sound in another zone (ZONE 2/ZONE 3 operations 108 Using a bi-amplifier connection 113 Using the CONTROL...
... Adjusting the speaker settings manually .... 74 Adjusting the equalizer 80 Tuner Operations Listening to FM/AM radio 82 Listening to satellite radio 85 Other Operations Converting analog video input signals ....... 94 Using the DIGITAL MEDIA PORT adapter 94 Naming inputs 98 Switching between digital and analog audio (INPUT MODE 99 Enjoying the sound/images from other inputs 100 Changing the display 102 Using the sleep timer 106 Recording using the receiver 107 Listening to the sound in another zone (ZONE 2/ZONE 3 operations 108 Using a bi-amplifier connection 113 Using the CONTROL...

Operating Instructions (Large File - 21.32 MB)
Page 7
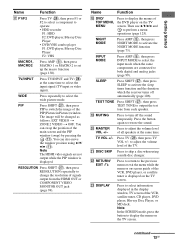
...Each time you press POWER, the output signals for the Digital Cinema Auto Calibration function (page 47). TUNING E Remote sensor Receives signals from the component connected to headphones. C TONE MODE TONE Adjusts FRONT/ CENTER/ SURROUND/ SURROUND BACK BASS and TREBLE. M HDMI Press to select input source from remote commander. MOVIE MUSIC K ZONE/ POWER, SELECT Press SELECT repeatedly to a portable PORTABLE AV audio/video component IN jacks such as a camcorder or video game. Getting Started Name Function A POWER Press to turn TONE to adjust...
...Each time you press POWER, the output signals for the Digital Cinema Auto Calibration function (page 47). TUNING E Remote sensor Receives signals from the component connected to headphones. C TONE MODE TONE Adjusts FRONT/ CENTER/ SURROUND/ SURROUND BACK BASS and TREBLE. M HDMI Press to select input source from remote commander. MOVIE MUSIC K ZONE/ POWER, SELECT Press SELECT repeatedly to a portable PORTABLE AV audio/video component IN jacks such as a camcorder or video game. Getting Started Name Function A POWER Press to turn TONE to adjust...
Operating Instructions (Large File - 21.32 MB)
Page 13
... a disc when using V/v/ B/b (qa). You can swap the position of the TV. U DISC SKIP Press to adjust the volume level of the PIP (Picture in the display window, TV screen of signals output from each speaker. Note The HDMI video signals are connected to select the input mode when the same components are not output while the PIP window is displayed on the TV screen. INPUT MODE Press AMP (5), then press INPUT MODE to both digital and analog jacks (page...
... a disc when using V/v/ B/b (qa). You can swap the position of the TV. U DISC SKIP Press to adjust the volume level of the PIP (Picture in the display window, TV screen of signals output from each speaker. Note The HDMI video signals are connected to select the input mode when the same components are not output while the PIP window is displayed on the TV screen. INPUT MODE Press AMP (5), then press INPUT MODE to both digital and analog jacks (page...
Operating Instructions (Large File - 21.32 MB)
Page 30
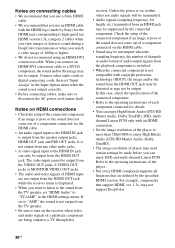
... jack. Connect other audio jacks. • A video signal input to the HDMI IN jack can enjoy High Bitrate Audio (DTS-HD Master Audio, Dolby TrueHD), DSD, multichannel Linear PCM only with copyright protection technology (HDCP), the image and/or the sound from the TV speaker, set "Input Assign" in the HDMI settings menu. If set to "AMP," the sound is on, neither video nor audio signals will be transmitted. • Audio signals (sampling frequency, bit length, etc.) transmitted from the speaker output jacks, HDMI OUT jack and PRE OUT jacks...
... jack. Connect other audio jacks. • A video signal input to the HDMI IN jack can enjoy High Bitrate Audio (DTS-HD Master Audio, Dolby TrueHD), DSD, multichannel Linear PCM only with copyright protection technology (HDCP), the image and/or the sound from the TV speaker, set "Input Assign" in the HDMI settings menu. If set to "AMP," the sound is on, neither video nor audio signals will be transmitted. • Audio signals (sampling frequency, bit length, etc.) transmitted from the speaker output jacks, HDMI OUT jack and PRE OUT jacks...
Operating Instructions (Large File - 21.32 MB)
Page 47
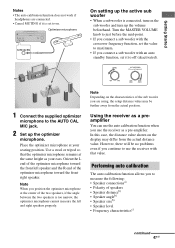
... speakers properly. Using the receiver as a preamplifier You can use the auto calibration function when you use the receiver with an auto standby function, set it is connected, turn up the optimizer microphone. Optimizer microphone On setting up the active sub woofer • When a sub woofer is set to on the display may be no problems even if you continue to use the receiver as your seating position. Place the optimizer microphone at the same height as a pre-amplifier. Use...
... speakers properly. Using the receiver as a preamplifier You can use the auto calibration function when you use the receiver with an auto standby function, set it is connected, turn up the optimizer microphone. Optimizer microphone On setting up the active sub woofer • When a sub woofer is set to on the display may be no problems even if you continue to use the receiver as your seating position. Place the optimizer microphone at the same height as a pre-amplifier. Use...
Operating Instructions (Large File - 21.32 MB)
Page 51
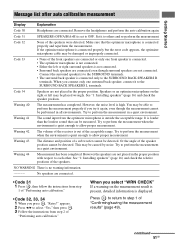
... auto calibration." Try to OFF. However the speakers are not connected. appears. 2 Press B/b to select "Yes," then press . 3 Follow the instructions from the optimizer microphone is quiet enough to step 1 of the speakers. Speakers or an optimizer microphone on the measurement result is present, detailed information is connected properly but the error code appears, the optimizer microphone cable may be caused by noise. See "1: Installing speakers...
... auto calibration." Try to OFF. However the speakers are not connected. appears. 2 Press B/b to select "Yes," then press . 3 Follow the instructions from the optimizer microphone is quiet enough to step 1 of the speakers. Speakers or an optimizer microphone on the measurement result is present, detailed information is connected properly but the error code appears, the optimizer microphone cable may be caused by noise. See "1: Installing speakers...
Operating Instructions (Large File - 21.32 MB)
Page 60
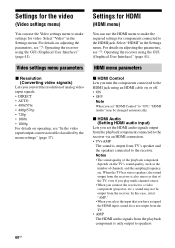
Video settings menu parameters x Resolution (Converting video signals) Lets you connect the receiver to the HDMI jack. HDMI menu parameters x HDMI Control Lets you turn the components connected to the HDMI jack using an HDMI cable on adjusting the parameters, see "7: Operating the receiver using the GUI (Graphical User Interface)" (page 41). In this case, select "AMP." • When you select the input that of the TV, even if you play multi-channel source. • When you convert the resolution of channels, and the sampling frequency, etc...
Video settings menu parameters x Resolution (Converting video signals) Lets you connect the receiver to the HDMI jack. HDMI menu parameters x HDMI Control Lets you turn the components connected to the HDMI jack using an HDMI cable on adjusting the parameters, see "7: Operating the receiver using the GUI (Graphical User Interface)" (page 41). In this case, select "AMP." • When you select the input that of the TV, even if you play multi-channel source. • When you convert the resolution of channels, and the sampling frequency, etc...
Operating Instructions (Large File - 21.32 MB)
Page 62
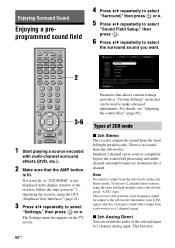
... to select "Surround," then press or b. 5 Press V/v repeatedly to select "Sound Field Setup," then press . 6 Press V/v repeatedly to select the surround sound you want. 2 3-6 1 Start playing a source encoded with multi-channel surround effects (DVD, etc.). 2 Make sure that can switch the audio of the selected input to 2 channel analog input. If it is not lit, or "GUI MODE" is a low-pass sound effect output from the front left /right speakers and a sub woofer, select "A.F.D. Auto." signal, which is not displayed in "7: Operating the receiver using...
... to select "Surround," then press or b. 5 Press V/v repeatedly to select "Sound Field Setup," then press . 6 Press V/v repeatedly to select the surround sound you want. 2 3-6 1 Start playing a source encoded with multi-channel surround effects (DVD, etc.). 2 Make sure that can switch the audio of the selected input to 2 channel analog input. If it is not lit, or "GUI MODE" is a low-pass sound effect output from the front left /right speakers and a sub woofer, select "A.F.D. Auto." signal, which is not displayed in "7: Operating the receiver using...

Operating Instructions (Large File - 21.32 MB)
Page 79
..., select "BI-AMP." • ZONE 2 If you set the bass crossover frequency of speakers that of the MULTI CHANNEL INPUT is set to "SMALL" in the Speaker menu. x Multi Ch SW Level (Multi-channel sub woofer level) Lets you want to change the connection from a bi-amplifier connection or a zone 2 connection to the MULTI CHANNEL INPUT jacks. This may be useful when you increase the level of the sound track. Analog downmix works when you connect the surround back speakers. Re-set up the speakers after you set for each speaker after the auto...
..., select "BI-AMP." • ZONE 2 If you set the bass crossover frequency of speakers that of the MULTI CHANNEL INPUT is set to "SMALL" in the Speaker menu. x Multi Ch SW Level (Multi-channel sub woofer level) Lets you want to change the connection from a bi-amplifier connection or a zone 2 connection to the MULTI CHANNEL INPUT jacks. This may be useful when you increase the level of the sound track. Analog downmix works when you connect the surround back speakers. Re-set up the speakers after you set for each speaker after the auto...
Operating Instructions (Large File - 21.32 MB)
Page 90
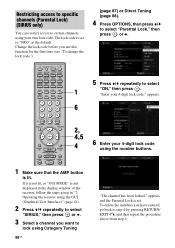
... set . Restricting access to specific channels (Parental Lock) (SIRIUS only) You can restrict access to certain channels using Category Tuning 90GB "The channel has been locked." appears. 6 2, 4,5 4 6 Enter your 4-digit lock code using the number buttons. 1 Make sure that the AMP button is not displayed in the display window of the receiver, follow the steps given in "7: Operating the receiver using the GUI (Graphical User Interface)" (page 41). 2 Press V/v repeatedly to select...
... set . Restricting access to specific channels (Parental Lock) (SIRIUS only) You can restrict access to certain channels using Category Tuning 90GB "The channel has been locked." appears. 6 2, 4,5 4 6 Enter your 4-digit lock code using the number buttons. 1 Make sure that the AMP button is not displayed in the display window of the receiver, follow the steps given in "7: Operating the receiver using the GUI (Graphical User Interface)" (page 41). 2 Press V/v repeatedly to select...
Operating Instructions (Large File - 21.32 MB)
Page 141
... that the sub woofer is connected correctly and securely. • Make sure you are connected correctly (page 22). • Select the source component using INPUT SELECTOR (page 53). Dolby Digital or DTS multi-channel sound is no sound from the surround back speakers. • Some discs have no Dolby Digital Surround EX flag even though the packages have turned on (press MOVIE or MUSIC). • Sound fields do not function for the digital audio output of this receiver, make sure...
... that the sub woofer is connected correctly and securely. • Make sure you are connected correctly (page 22). • Select the source component using INPUT SELECTOR (page 53). Dolby Digital or DTS multi-channel sound is no sound from the surround back speakers. • Some discs have no Dolby Digital Surround EX flag even though the packages have turned on (press MOVIE or MUSIC). • Sound fields do not function for the digital audio output of this receiver, make sure...

Operating Instructions (Large File - 21.32 MB)
Page 142
...) Receiver Ground (earth) wire (not supplied) To ground Radio stations cannot be set up noise. • The signal strength of the source with the each component. • Be sure to use the COMPONENT VIDEO OUT jack and set the tuning interval correctly (when tuning in . • Check that the components are output, use a connecting cable for the HDMI jack corresponding to the desired satellite radio service (see page 85). are output from the speaker cords and the power cord...
...) Receiver Ground (earth) wire (not supplied) To ground Radio stations cannot be set up noise. • The signal strength of the source with the each component. • Be sure to use the COMPONENT VIDEO OUT jack and set the tuning interval correctly (when tuning in . • Check that the components are output, use a connecting cable for the HDMI jack corresponding to the desired satellite radio service (see page 85). are output from the speaker cords and the power cord...
Operating Instructions (Large File - 21.32 MB)
Page 143
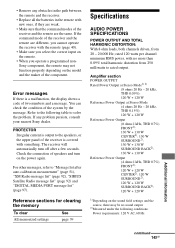
... the model and the maker of the component. • Remove any problem persists, consult your nearest Sony dealer. PROTECTOR Irregular current is output to solve the problem. rated 120 watts per channel minimum RMS power, with something. Error messages If there is covered with no sound output. 2)Measured under the following table to the speakers, or the upper panel of the receiver is a malfunction, the display shows a code...
... the model and the maker of the component. • Remove any problem persists, consult your nearest Sony dealer. PROTECTOR Irregular current is output to solve the problem. rated 120 watts per channel minimum RMS power, with something. Error messages If there is covered with no sound output. 2)Measured under the following table to the speakers, or the upper panel of the receiver is a malfunction, the display shows a code...

Quick Setup Guide
Page 1
... vos appareils. STR-DA5300ES Quick Setup Guide Guide d'installation rapide 3-209-636-11(1) 2: Connecting the speakers/ 2: Raccordement des enceintes © 2007 Sony Corporation Printed in Malaysia Speaker cord (not supplied)/ Cordon d'enceinte (non fourni) 1: Installing speakers/ 1: Installation des enceintes Speaker cord (not supplied)/ Cordon d'enceinte (non fourni) 10 mm (13/32") Speaker cord (not supplied)/ Cordon d'enceinte (non fourni) Audio cord (not supplied)/ Cordon audio (non fourni) 3: Connecting other components. About speaker cords Use speaker cords, which...
... vos appareils. STR-DA5300ES Quick Setup Guide Guide d'installation rapide 3-209-636-11(1) 2: Connecting the speakers/ 2: Raccordement des enceintes © 2007 Sony Corporation Printed in Malaysia Speaker cord (not supplied)/ Cordon d'enceinte (non fourni) 1: Installing speakers/ 1: Installation des enceintes Speaker cord (not supplied)/ Cordon d'enceinte (non fourni) 10 mm (13/32") Speaker cord (not supplied)/ Cordon d'enceinte (non fourni) Audio cord (not supplied)/ Cordon audio (non fourni) 3: Connecting other components. About speaker cords Use speaker cords, which...
Marketing Specifications
Page 1
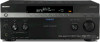
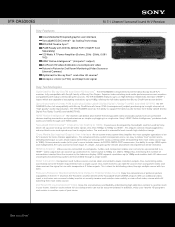
... sources from a single source. STR-DA5300ES ES 7.1 Channel Surround Sound A/V Receiver Key Features Xross Media Bar® inspired graphic user interface Faroudja® DCDi Cinema™ Up Scaling Technology BRAVIA® Theatre Sync™ iPod® Ready with DIGITAL MEDIA PORT (TDM-IP1 Sold Separately) 120 Watts X 7 Power Amplifier (8 ohms, 20Hz - 20kHz, 0.09% THD) HDMI "Active Intelligence1 " (6 inputs/1 output) 2nd Room HD video distribution via component video Picture-in-Picture for 2nd Room Monitoring (Video Source...
... sources from a single source. STR-DA5300ES ES 7.1 Channel Surround Sound A/V Receiver Key Features Xross Media Bar® inspired graphic user interface Faroudja® DCDi Cinema™ Up Scaling Technology BRAVIA® Theatre Sync™ iPod® Ready with DIGITAL MEDIA PORT (TDM-IP1 Sold Separately) 120 Watts X 7 Power Amplifier (8 ohms, 20Hz - 20kHz, 0.09% THD) HDMI "Active Intelligence1 " (6 inputs/1 output) 2nd Room HD video distribution via component video Picture-in-Picture for 2nd Room Monitoring (Video Source...
Marketing Specifications
Page 2
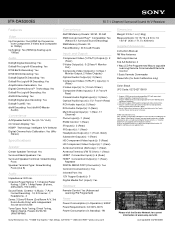
... S-Video and Composite to 1080p) Up Scaling: Yes (HDMI Up Scaling up to change without notice. Stereo) Specifications Speaker Center Speaker Terminal: Yes Surround Back Speakers: Yes Surround Speaker Terminal: Screw Binding Posts Speaker Terminal Type: Screw Binding Posts (A & B) Audio Impedance: 8 Ohms Channel Power Rating: 7.1 Channel Power Rating: 120W x 7 Amp Power (8 ohms, 20Hz-20kHz, THD 0.09%) Sound Fields: Cinema - 4; Headphone - 4 Zones: 3 Zone/3 Room (2nd Room A/V, 3rd Room Audio Only) with Independent Source and Volume Tuner Type: Auto Tuning, Direct Tuning, Station Name, Presets...
... S-Video and Composite to 1080p) Up Scaling: Yes (HDMI Up Scaling up to change without notice. Stereo) Specifications Speaker Center Speaker Terminal: Yes Surround Back Speakers: Yes Surround Speaker Terminal: Screw Binding Posts Speaker Terminal Type: Screw Binding Posts (A & B) Audio Impedance: 8 Ohms Channel Power Rating: 7.1 Channel Power Rating: 120W x 7 Amp Power (8 ohms, 20Hz-20kHz, THD 0.09%) Sound Fields: Cinema - 4; Headphone - 4 Zones: 3 Zone/3 Room (2nd Room A/V, 3rd Room Audio Only) with Independent Source and Volume Tuner Type: Auto Tuning, Direct Tuning, Station Name, Presets...


