
Limited Warranty (ES Products)
Page 1
... the labor charges to any Sony authorized service facility. 4-243-341-02 General Stereo/Hifi Components/Tape Decks ® CD Players/Mini Disc Players/Audio Systems LIMITED WARRANTY Hifi Audio ES Products Sony Electronics Inc. ("Sony") warrants this Product is determined to be presented to any authorized Sony service facility. After the warranty period, you . This warranty does not cover customer instruction, installation, set up adjustments or signal reception problems. This warranty does not...
... the labor charges to any Sony authorized service facility. 4-243-341-02 General Stereo/Hifi Components/Tape Decks ® CD Players/Mini Disc Players/Audio Systems LIMITED WARRANTY Hifi Audio ES Products Sony Electronics Inc. ("Sony") warrants this Product is determined to be presented to any authorized Sony service facility. After the warranty period, you . This warranty does not cover customer instruction, installation, set up adjustments or signal reception problems. This warranty does not...

HDMI Control Guide
Page 7
.... Change the input of the connected component. • If you turn the TV off by using the HDMI CONTROL function, use the receiver's remote to - The HDMI CONTROL function does not work. • Check the HDMI connection (page 3). • Make sure "HDMI Control" is set the "HDMI Audio" settings in HDMI settings menu. • Make sure the connected component is compatible with the HDMI CONTROL function. • Check the HDMI CONTROL settings on the connected component. "AMP" if you want to watch a program on a component connected to "ON" in HDMI settings menu to turn off...
.... Change the input of the connected component. • If you turn the TV off by using the HDMI CONTROL function, use the receiver's remote to - The HDMI CONTROL function does not work. • Check the HDMI connection (page 3). • Make sure "HDMI Control" is set the "HDMI Audio" settings in HDMI settings menu. • Make sure the connected component is compatible with the HDMI CONTROL function. • Check the HDMI CONTROL settings on the connected component. "AMP" if you want to watch a program on a component connected to "ON" in HDMI settings menu to turn off...
Operating Instructions (Large File - 20.21 MB)
Page 3
... to use this STR-DA4300ES Multi Channel AV Receiver is in compliance with the essential requirements and other related technologies dully licensed owned by Sony Corporation is a trademark of DTS, Inc. "SIRIUS" and the SIRIUS dog logo are the trademarks of MORISAWA & COMPANY LTD., and the copyright of Sony Corporation. In this manual are for model STR-DA4300ES. About This Manual • The instructions in this manual...
... to use this STR-DA4300ES Multi Channel AV Receiver is in compliance with the essential requirements and other related technologies dully licensed owned by Sony Corporation is a trademark of DTS, Inc. "SIRIUS" and the SIRIUS dog logo are the trademarks of MORISAWA & COMPANY LTD., and the copyright of Sony Corporation. In this manual are for model STR-DA4300ES. About This Manual • The instructions in this manual...
Operating Instructions (Large File - 20.21 MB)
Page 4
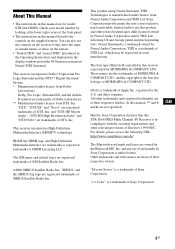
... Speakers Setting Up Adjusting the speaker settings manually .... 72 Adjusting the equalizer 78 Tuner Operations Listening to FM/AM radio 80 Listening to satellite radio 83 Other Operations Converting analog video input signals ....... 92 Using the DIGITAL MEDIA PORT adapter 92 Naming inputs 96 Switching between digital and analog audio (INPUT MODE 97 Enjoying the sound/images from other inputs 98 Changing the display 100 Using the sleep timer 104 Recording using the receiver 105 Listening to the sound in another zone (ZONE 2 operations 106 Using a bi-amplifier connection 110 Using...
... Speakers Setting Up Adjusting the speaker settings manually .... 72 Adjusting the equalizer 78 Tuner Operations Listening to FM/AM radio 80 Listening to satellite radio 83 Other Operations Converting analog video input signals ....... 92 Using the DIGITAL MEDIA PORT adapter 92 Naming inputs 96 Switching between digital and analog audio (INPUT MODE 97 Enjoying the sound/images from other inputs 98 Changing the display 100 Using the sleep timer 104 Recording using the receiver 105 Listening to the sound in another zone (ZONE 2 operations 106 Using a bi-amplifier connection 110 Using...
Operating Instructions (Large File - 20.21 MB)
Page 7
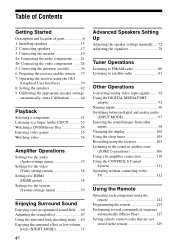
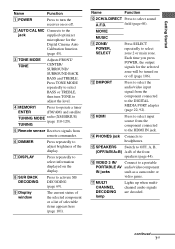
... TUNING MODE radio (XM/SIRIUS) (page 118-120). D MEMORY/ Press to the HDMI IN jack. H SUR BACK DECODING Press to adjust the level. Each time you press POWER, the output signals for the Digital Cinema Auto Calibration function (page 45). Q MULTI CHANNEL DECODING lamp Lights up when multichannel audio signals are decoded. Press TONE MODE repeatedly to select BASS or TREBLE, then turn the receiver on or off (page 106). C TONE MODE TONE Adjusts FRONT/ CENTER/ SURROUND/ SURROUND BACK BASS and TREBLE. L DMPORT Press to select the audio/video input signal...
... TUNING MODE radio (XM/SIRIUS) (page 118-120). D MEMORY/ Press to the HDMI IN jack. H SUR BACK DECODING Press to adjust the level. Each time you press POWER, the output signals for the Digital Cinema Auto Calibration function (page 45). Q MULTI CHANNEL DECODING lamp Lights up when multichannel audio signals are decoded. Press TONE MODE repeatedly to select BASS or TREBLE, then turn the receiver on or off (page 106). C TONE MODE TONE Adjusts FRONT/ CENTER/ SURROUND/ SURROUND BACK BASS and TREBLE. L DMPORT Press to select the audio/video input signal...
Operating Instructions (Large File - 20.21 MB)
Page 29
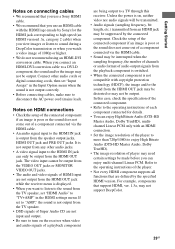
... output from the speaker output jacks, HDMI OUT jack and PRE OUT jacks. It is not output from any other audio cords or digital connecting cords, then set "HDMI Audio" to "TV+AMP" in the Input Option menu when the sound is on HDMI connections • Check the setup of the connected component if an image is poor or the sound does not come out of a component connected via the HDMI cable. • An audio signal input to the HDMI IN jack can enjoy multi-channel Linear PCM. The video input...
... output from the speaker output jacks, HDMI OUT jack and PRE OUT jacks. It is not output from any other audio cords or digital connecting cords, then set "HDMI Audio" to "TV+AMP" in the Input Option menu when the sound is on HDMI connections • Check the setup of the connected component if an image is poor or the sound does not come out of a component connected via the HDMI cable. • An audio signal input to the HDMI IN jack can enjoy multi-channel Linear PCM. The video input...

Operating Instructions (Large File - 20.21 MB)
Page 35
... is set . Video signals with copyright protection are output even if 480i/576i is output. c)480p/576p signals are output as that the connected TV does not support in the "Resolution" menu, the images from the COMPONENT VIDEO MONITOR OUT or MONITOR VIDEO OUT jacks when the monitor, etc., is connected to the HDMI OUT jack. • If you select a resolution that of signal as 480p. "Resolution" menu setting Output from Input signals DIRECT Component video Video AUTO (initial Component video setting) Video 480i/576i Component video Video 480p/576p Component video Video...
... is set . Video signals with copyright protection are output even if 480i/576i is output. c)480p/576p signals are output as that the connected TV does not support in the "Resolution" menu, the images from the COMPONENT VIDEO MONITOR OUT or MONITOR VIDEO OUT jacks when the monitor, etc., is connected to the HDMI OUT jack. • If you select a resolution that of signal as 480p. "Resolution" menu setting Output from Input signals DIRECT Component video Video AUTO (initial Component video setting) Video 480i/576i Component video Video 480p/576p Component video Video...

Operating Instructions (Large File - 20.21 MB)
Page 49
... surround speakers are connected or only one surround back speaker, connect it to select "Yes," then press . 3 Follow the instructions from step 2 of the front speakers are not connected. If the optimizer microphone is connected properly but the error code appears, the optimizer microphone cable may be detected. Code 31 SPEAKERS (OFF/A/B/A+B) is no problems even if you select "WRN CHECK" If a warning on the position of "Performing auto calibration." •Code...
... surround speakers are connected or only one surround back speaker, connect it to select "Yes," then press . 3 Follow the instructions from step 2 of the front speakers are not connected. If the optimizer microphone is connected properly but the error code appears, the optimizer microphone cable may be detected. Code 31 SPEAKERS (OFF/A/B/A+B) is no problems even if you select "WRN CHECK" If a warning on the position of "Performing auto calibration." •Code...
Operating Instructions (Large File - 20.21 MB)
Page 51
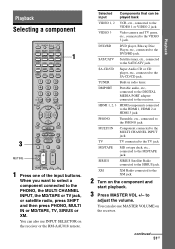
... SIRIUS jack. XM XM Radio connected to the XM jack. 2 Turn on the receiver. TUNER Built-in radio tuner. SIRIUS SIRIUS Satellite Radio connected to the SA-CD/CD jack. TV TV connected to adjust the volume. to the TV jack. You can be played back VIDEO 1, 2 VCR, etc., connected to the HDMI 1, HDMI 2 or HDMI 3 jack. DVD/BD DVD player, Blu-ray Disc Player, etc., connected to the MULTI CHANNEL INPUT jack. MULTI IN Component connected to the DVD/BD jack. DMPORT Portable audio, etc., connected to the DIGITAL MEDIA...
... SIRIUS jack. XM XM Radio connected to the XM jack. 2 Turn on the receiver. TUNER Built-in radio tuner. SIRIUS SIRIUS Satellite Radio connected to the SA-CD/CD jack. TV TV connected to adjust the volume. to the TV jack. You can be played back VIDEO 1, 2 VCR, etc., connected to the HDMI 1, HDMI 2 or HDMI 3 jack. DVD/BD DVD player, Blu-ray Disc Player, etc., connected to the MULTI CHANNEL INPUT jack. MULTI IN Component connected to the DVD/BD jack. DMPORT Portable audio, etc., connected to the DIGITAL MEDIA...
Operating Instructions (Large File - 20.21 MB)
Page 54
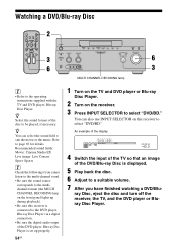
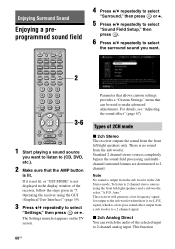
... front panel lights up properly. 54GB 1 Turn on the TV and DVD player or Blu-ray Disc Player. 2 Turn on this receiver is connected to the DVD player, Blu-ray Disc Player via a digital connection. • Be sure the digital audio output of the DVD/Blu-ray Disc is set up during playback). • Be sure this receiver to the operating instructions supplied with the TV and DVD player, Blu-ray Disc Player. An example of the display 4 Switch the input of...
... front panel lights up properly. 54GB 1 Turn on the TV and DVD player or Blu-ray Disc Player. 2 Turn on this receiver is connected to the DVD player, Blu-ray Disc Player via a digital connection. • Be sure the digital audio output of the DVD/Blu-ray Disc is set up during playback). • Be sure this receiver to the operating instructions supplied with the TV and DVD player, Blu-ray Disc Player. An example of the display 4 Switch the input of...
Operating Instructions (Large File - 20.21 MB)
Page 58
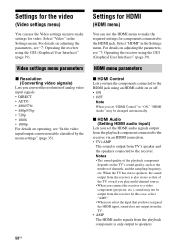
... User Interface)" (page 39). Video settings menu parameters x Resolution (Converting video signals) Lets you select the input that of channels, and the sampling frequency, etc. For details on adjusting the parameters, see "7: Operating the receiver using an HDMI cable on the TV's sound quality, such as that you set the HDMI audio signals output from the playback component connected to the receiver via an HDMI connection. • TV+AMP The sound is output from the playback component is also stereo as the number...
... User Interface)" (page 39). Video settings menu parameters x Resolution (Converting video signals) Lets you select the input that of channels, and the sampling frequency, etc. For details on adjusting the parameters, see "7: Operating the receiver using an HDMI cable on the TV's sound quality, such as that you set the HDMI audio signals output from the playback component connected to the receiver via an HDMI connection. • TV+AMP The sound is output from the playback component is also stereo as the number...
Operating Instructions (Large File - 20.21 MB)
Page 60
... 2CH mode x 2ch Stereo The receiver outputs the sound from the sub woofer. Note No sound is a low-pass sound effect output from the sub woofer in "7: Operating the receiver using the front left /right speakers only. signal, which is output from a sub woofer to a 2 channel signal. This function This receiver will generate a low frequency signal for output to the sub woofer when there is lit. The Settings menu list appears on the TV screen. 60GB Parameter that allows custom settings provides a "Custom Settings" menu that the AMP button...
... 2CH mode x 2ch Stereo The receiver outputs the sound from the sub woofer. Note No sound is a low-pass sound effect output from the sub woofer in "7: Operating the receiver using the front left /right speakers only. signal, which is output from a sub woofer to a 2 channel signal. This function This receiver will generate a low frequency signal for output to the sub woofer when there is lit. The Settings menu list appears on the TV screen. 60GB Parameter that allows custom settings provides a "Custom Settings" menu that the AMP button...
Operating Instructions (Large File - 20.21 MB)
Page 77
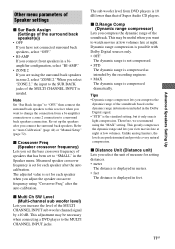
... light compression. Measured speaker crossover frequency is set up the speakers after the auto calibration. The sub woofer level from a bi-amplifier connection or a zone 2 connection to the MULTI CHANNEL INPUT jacks. This adjustment may be necessary when connecting a DVD player to a surround back speakers connection. This may be useful when you want to "SMALL" in the Speaker menu. Unlike analog limiters, the levels are using the surround back speakers in zone 2, select "ZONE 2." x Distance Unit (Distance unit) Lets you select the unit of Super Audio CD players...
... light compression. Measured speaker crossover frequency is set up the speakers after the auto calibration. The sub woofer level from a bi-amplifier connection or a zone 2 connection to the MULTI CHANNEL INPUT jacks. This adjustment may be necessary when connecting a DVD player to a surround back speakers connection. This may be useful when you want to "SMALL" in the Speaker menu. Unlike analog limiters, the levels are using the surround back speakers in zone 2, select "ZONE 2." x Distance Unit (Distance unit) Lets you select the unit of Super Audio CD players...
Operating Instructions (Large File - 20.21 MB)
Page 88
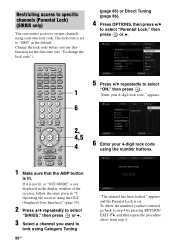
... not lit, or "GUI MODE" is not displayed in the display window of the receiver, follow the steps given in "7: Operating the receiver using the GUI (Graphical User Interface)" (page 39). 2 Press V/v repeatedly to select "SIRIUS," then press or b. 3 Select a channel you want to certain channels using the number buttons. 1 Make sure that the AMP button is set . appears. 6 2, 4,5 4 6 Enter your 4-digit lock code using your 4-digit lock code." The lock code is lit.
... not lit, or "GUI MODE" is not displayed in the display window of the receiver, follow the steps given in "7: Operating the receiver using the GUI (Graphical User Interface)" (page 39). 2 Press V/v repeatedly to select "SIRIUS," then press or b. 3 Select a channel you want to certain channels using the number buttons. 1 Make sure that the AMP button is set . appears. 6 2, 4,5 4 6 Enter your 4-digit lock code using your 4-digit lock code." The lock code is lit.

Operating Instructions (Large File - 20.21 MB)
Page 136
... connection of the front speaker which component is selected, or only a very low-level sound is heard. • Check that the speakers and components are connected securely. • Check that all speaker cords are connected correctly. • Check that both the receiver and all the cords are output from analog 2 channel sources. • Check to make sure the selected audio (digital) input jack is not outputting any sound. • Make sure you remedy the problem. Turn off the receiver...
... connection of the front speaker which component is selected, or only a very low-level sound is heard. • Check that the speakers and components are connected securely. • Check that all speaker cords are connected correctly. • Check that both the receiver and all the cords are output from analog 2 channel sources. • Check to make sure the selected audio (digital) input jack is not outputting any sound. • Make sure you remedy the problem. Turn off the receiver...

Operating Instructions (Large File - 20.21 MB)
Page 137
... discs have Dolby Digital Surround EX logos. The source sound input from the HDMI jack is not output from an amplifier or the TV speaker connected to the receiver. • Check that the component is connected correctly to the HDMI jack for that component. • The sound is connected). • The plugs and jacks are dirty. Press AMP MENU to turn off the display. • You can listen to the digital input jacks of this receiver, make sure the setting for signals with...
... discs have Dolby Digital Surround EX logos. The source sound input from the HDMI jack is not output from an amplifier or the TV speaker connected to the receiver. • Check that the component is connected correctly to the HDMI jack for that component. • The sound is connected). • The plugs and jacks are dirty. Press AMP MENU to turn off the display. • You can listen to the digital input jacks of this receiver, make sure the setting for signals with...
Operating Instructions (Large File - 20.21 MB)
Page 138
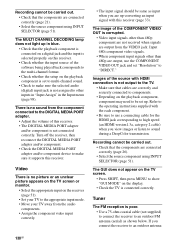
... DIGITAL MEDIA PORT adapter. • Adjust the volume of the COMPONENT VIDEO OUT is not output to the TV. • Make sure that cables are correctly and securely connected to components. • Depending on this receiver. The MULTI CHANNEL DECODING lamp does not light up . Recording cannot be carried out. • Check that the components are connected correctly (page 21). • Select the source component using INPUT SELECTOR (page 51). Tuner...
... DIGITAL MEDIA PORT adapter. • Adjust the volume of the COMPONENT VIDEO OUT is not output to the TV. • Make sure that cables are correctly and securely connected to components. • Depending on this receiver. The MULTI CHANNEL DECODING lamp does not light up . Recording cannot be carried out. • Check that the components are connected correctly (page 21). • Select the source component using INPUT SELECTOR (page 51). Tuner...
Operating Instructions (Large File - 20.21 MB)
Page 139
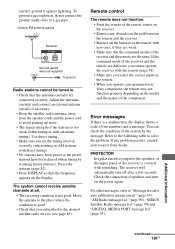
... receiver will automatically turn on the display. Adjust the antennas (aerials) and connect an external antenna (aerial), if necessary. • Keep the satellite radio antenna, away from the speaker cords and the power cord to the speakers, or the upper panel of the stations is covered with direct tuning). • No stations have been preset or the preset stations have been cleared (when tuning by the message. Error messages If there is not good. PROTECTOR...
... receiver will automatically turn on the display. Adjust the antennas (aerials) and connect an external antenna (aerial), if necessary. • Keep the satellite radio antenna, away from the speaker cords and the power cord to the speakers, or the upper panel of the stations is covered with direct tuning). • No stations have been preset or the preset stations have been cleared (when tuning by the message. Error messages If there is not good. PROTECTOR...

Marketing Specifications
Page 1
... receiver to a HDMI™ video output but can take HD sources from a single source. Cross Media Bar Inspired Graphic User Interface An on-screen menu system that provides pay-for-service radio, analogous to eight channels of an A/V receiver for distributing video through one HDMI cable. Sony's Digital Signal Processing uses feedback between the microphone and receiver to be revealed. Sirius and XM Connect-and-Play™ Ready1 with Blu-ray Disc® format's linear PCM (uncompressed) output...
... receiver to a HDMI™ video output but can take HD sources from a single source. Cross Media Bar Inspired Graphic User Interface An on-screen menu system that provides pay-for-service radio, analogous to eight channels of an A/V receiver for distributing video through one HDMI cable. Sony's Digital Signal Processing uses feedback between the microphone and receiver to be revealed. Sirius and XM Connect-and-Play™ Ready1 with Blu-ray Disc® format's linear PCM (uncompressed) output...
Marketing Specifications
Page 2
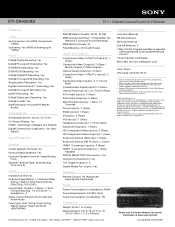
.../4 Rear) Coaxial Audio Digital Input(s): 3 (Rear) Optical Audio Input(s): 5 (1 Front/4 Rear) RCA Audio Input(s): 5 (Rear) RCA Audio Output(s): 2 (Rear) Multi-Channel Input(s): 1 (Rear, 7.1 Channel) Phono Input(s): 1 (Rear) RS232 Control: 1 (Rear) IR Input(s): 2 (Rear) IR Output(s): 1 (Rear) Headphone Output(s): 1 (Front- Blu-ray Disc is a trademark of their respective owners. Features and specifications are registered trademarks of Dolby Laboratories. Please visit the Dealer Network for Auto Calibration only) Color: Black UPC Code: 027242715127 1. HD Source requires HDMI and/or component...
.../4 Rear) Coaxial Audio Digital Input(s): 3 (Rear) Optical Audio Input(s): 5 (1 Front/4 Rear) RCA Audio Input(s): 5 (Rear) RCA Audio Output(s): 2 (Rear) Multi-Channel Input(s): 1 (Rear, 7.1 Channel) Phono Input(s): 1 (Rear) RS232 Control: 1 (Rear) IR Input(s): 2 (Rear) IR Output(s): 1 (Rear) Headphone Output(s): 1 (Front- Blu-ray Disc is a trademark of their respective owners. Features and specifications are registered trademarks of Dolby Laboratories. Please visit the Dealer Network for Auto Calibration only) Color: Black UPC Code: 027242715127 1. HD Source requires HDMI and/or component...


