

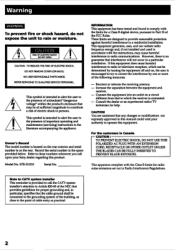
Limited Warranty (U.S. Only)
Page 1
... factory applied serial number has been altered or removed from the date of purchase, if this Product (including any part of sale, the limitation on how long an implied warranty lasts, so the above limitations or exclusions may have other than a facility authorized by Sony to service the Product. 4-557-173-02 General Stereo/Hifi Components/Tape Decks ® CD Players/Mini Disc Players/Audio Systems Hifi Audio...
... factory applied serial number has been altered or removed from the date of purchase, if this Product (including any part of sale, the limitation on how long an implied warranty lasts, so the above limitations or exclusions may have other than a facility authorized by Sony to service the Product. 4-557-173-02 General Stereo/Hifi Components/Tape Decks ® CD Players/Mini Disc Players/Audio Systems Hifi Audio...
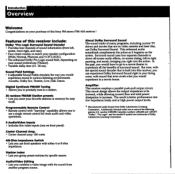
Operating Instructions
Page 2
... radio frequency energy and, if not installed and used in accordance with the instructions, may be determined by turning the equipment off and on the rear exterior and serial number is intended to alert the user to operate this product. Record the serial number in Canada r CAUTION . STR-D1015 Serial No. TO PREVENT ELECTRIC SHOCK, DO NOT USE THIS POLARIZED AC PLUG WITH AN EXTENSION CORD...
... radio frequency energy and, if not installed and used in accordance with the instructions, may be determined by turning the equipment off and on the rear exterior and serial number is intended to alert the user to operate this product. Record the serial number in Canada r CAUTION . STR-D1015 Serial No. TO PREVENT ELECTRIC SHOCK, DO NOT USE THIS POLARIZED AC PLUG WITH AN EXTENSION CORD...

Operating Instructions
Page 3
...Hookups 6 Selecting the Sound Field Setting 32 Connecting an FM Antenna 6 Connecting an AM Antenna 6 Connecting Audio Components 7 Chapter 5 Other Information Connecting Video Components 8 Troubleshooting 33 Connecting Speaker Systems 9 Specifications 35 Connecting the AC Power 10 Identifying the Parts and Controls 36 Front Panel 36 Chapter 2 Basic Operations Remote Control 37 Listening to/Watching a Program Source 10 Selecting a Program Source 10 Selecting the Speaker System 11 Adjusting the Audio 11 Index 38 Using the Remote Control 12 Changing the Settings...
...Hookups 6 Selecting the Sound Field Setting 32 Connecting an FM Antenna 6 Connecting an AM Antenna 6 Connecting Audio Components 7 Chapter 5 Other Information Connecting Video Components 8 Troubleshooting 33 Connecting Speaker Systems 9 Specifications 35 Connecting the AC Power 10 Identifying the Parts and Controls 36 Front Panel 36 Chapter 2 Basic Operations Remote Control 37 Listening to/Watching a Program Source 10 Selecting a Program Source 10 Selecting the Speaker System 11 Adjusting the Audio 11 Index 38 Using the Remote Control 12 Changing the Settings...
Operating Instructions
Page 4
... many programs, including current TV shows and movies that are on video cassette and laser disc, use Dolby Surround Sound. Digital Synthesis FM/AM Tuning • Allows you to right panning, and music, bringing you right into low impedance loads, and at high power output levels. * Manufactured under one on front panel). Surround sound uses four separate channels to direct off-screen audio effects, on-screen dialog, left , center, front right, and rear). • Four center modes, to...
... many programs, including current TV shows and movies that are on video cassette and laser disc, use Dolby Surround Sound. Digital Synthesis FM/AM Tuning • Allows you to right panning, and music, bringing you right into low impedance loads, and at high power output levels. * Manufactured under one on front panel). Surround sound uses four separate channels to direct off-screen audio effects, on-screen dialog, left , center, front right, and rear). • Four center modes, to...
Operating Instructions
Page 6
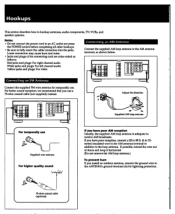
Adjust the direction. If possible, extend the wire out of the connecting cord are color-coded as follows: Red jacks and plugs: For right channel audio White jacks and plugs: For left channel audio Yellow jacks and plugs: For video Connecting an AM Antenna Connect the supplied AM loop antenna to the ANTENNA ground terminal (A) for temporally use. If you have poor AM reception Usually, the supplied AM loop antenna is adequate to receive AM broadcasts. M.1 0 00...
Adjust the direction. If possible, extend the wire out of the connecting cord are color-coded as follows: Red jacks and plugs: For right channel audio White jacks and plugs: For left channel audio Yellow jacks and plugs: For video Connecting an AM Antenna Connect the supplied AM loop antenna to the ANTENNA ground terminal (A) for temporally use. If you have poor AM reception Usually, the supplied AM loop antenna is adequate to receive AM broadcasts. M.1 0 00...

Operating Instructions
Page 10
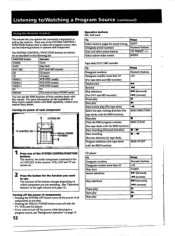
... a Program Source Connecting the AC Power Connect the power cord from this receiver and the selected equipment connected to the AC outlets on the receiver are turned on. 2 Start playback of components connected to the connected components only when the receiver is pressed, the indicator of the function you have selected appears on the display. To select Phono record Radio Broadcast Compact disc DAT or MD program Taped program Video program Set to PHONO TUNER CD DAT/MD TAPE MONITOR TV, LD, VIDEO 1, VIDEO 2, VIDEO 3 Select the function with the remote...
... a Program Source Connecting the AC Power Connect the power cord from this receiver and the selected equipment connected to the AC outlets on the receiver are turned on. 2 Start playback of components connected to the connected components only when the receiver is pressed, the indicator of the function you have selected appears on the display. To select Phono record Radio Broadcast Compact disc DAT or MD program Taped program Video program Set to PHONO TUNER CD DAT/MD TAPE MONITOR TV, LD, VIDEO 1, VIDEO 2, VIDEO 3 Select the function with the remote...
Operating Instructions
Page 12
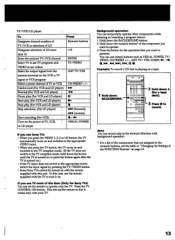
... /Watching a Program Source (continued) Using the Remote Control The remote lets you operate the connected components as well as described in the right column and page 13.) Turning off the power of components • Pressing the SYSTEM OFF button turns off the power of Sony cassette decks with this remote. Listening to a program source, see "Background operation" on page 13. 12 Operative buttons FM/AM tuner To Select memory pages for preset tuning Designate preset numbers Scan and select preset stations Select station index...
... /Watching a Program Source (continued) Using the Remote Control The remote lets you operate the connected components as well as described in the right column and page 13.) Turning off the power of components • Pressing the SYSTEM OFF button turns off the power of Sony cassette decks with this remote. Listening to a program source, see "Background operation" on page 13. 12 Operative buttons FM/AM tuner To Select memory pages for preset tuning Designate preset numbers Scan and select preset stations Select station index...
Operating Instructions
Page 13
... not switch to the TV reception mode, hold down the button until the TV is turned on or press the button again after the TV is playing on a tape: 1 Hold down BACKGROUND. Note You can set the remote to turn it works only with your TV. TV/VCR/LD player To Designate channel numbers of TV/VCR or selections of LD Designate selections of the components that...
... not switch to the TV reception mode, hold down the button until the TV is turned on or press the button again after the TV is playing on a tape: 1 Hold down BACKGROUND. Note You can set the remote to turn it works only with your TV. TV/VCR/LD player To Designate channel numbers of TV/VCR or selections of LD Designate selections of the components that...
Operating Instructions
Page 18
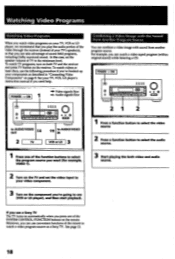
...'s speakers), so that you play the audio portion of the video through the receiver (instead of sound field programs, including Dolby surround sound. For example, you can watch videos or laser discs, use (VCR or LD player), and then start playback. In this case, set the video input to your video component 3 Turn on the receiver. Audio signals flow Combining a Video Image with sound from another program source. POWER ON 0 0 0 0 0 120 6 6 41- I Press one of the function buttons to select the program source...
...'s speakers), so that you play the audio portion of the video through the receiver (instead of sound field programs, including Dolby surround sound. For example, you can watch videos or laser discs, use (VCR or LD player), and then start playback. In this case, set the video input to your video component 3 Turn on the receiver. Audio signals flow Combining a Video Image with sound from another program source. POWER ON 0 0 0 0 0 120 6 6 41- I Press one of the function buttons to select the program source...

Operating Instructions
Page 19
.... AUDIO VIDEO SOUND FIELD Applications DOLBY SUR For Dolby surround encoded video programs THEATER For movie programs on video tapes or laser discs LIVE For music programs on video tapes or laser discs HALL For orchestral music, chamber music or an instrumental solo DANCE For dance music ACOUSTIC The surround effect is 0 • 66 1 Press SOUND FIELD ON/OFF to these pre-programmed sound fields, you can use these sound fields ) simulate the sound you want lights up on the display...
.... AUDIO VIDEO SOUND FIELD Applications DOLBY SUR For Dolby surround encoded video programs THEATER For movie programs on video tapes or laser discs LIVE For music programs on video tapes or laser discs HALL For orchestral music, chamber music or an instrumental solo DANCE For dance music ACOUSTIC The surround effect is 0 • 66 1 Press SOUND FIELD ON/OFF to these pre-programmed sound fields, you can use these sound fields ) simulate the sound you want lights up on the display...
Operating Instructions
Page 20
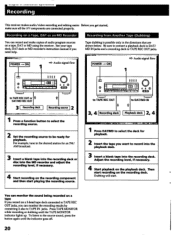
...; MP Recording OOP This receiver makes audio/video recording and editing easier. Be sure to connect a playback deck to DAT/ MD IN jacks and a recording deck to the source sound, press the button again until the TAPE MONITOR indicator lights up. POWER -. Then start . Before you need help. See your tape deck, DAT deck or MD recorder's instruction manual if you get started, make copies of audio program sources on a Tape, DAT or an...
...; MP Recording OOP This receiver makes audio/video recording and editing easier. Be sure to connect a playback deck to DAT/ MD IN jacks and a recording deck to the source sound, press the button again until the TAPE MONITOR indicator lights up. POWER -. Then start . Before you need help. See your tape deck, DAT deck or MD recorder's instruction manual if you get started, make copies of audio program sources on a Tape, DAT or an...
Operating Instructions
Page 21
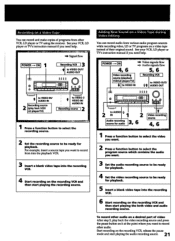
... player or TV using the receiver. Recording on a Video Tape You can record audio from various audio program sources while recording video, LD or TV programs on the recording VCR, release the pause 21 mode and start playing the audio recording source. See your VCR, LD player or TV's instruction manual if you want to be ready for playback. I to AUDIO 0 2 IN Audio recording source for audio 3i 6 * Video recording source 4, 6 1 Press a function button to select the video...
... player or TV using the receiver. Recording on a Video Tape You can record audio from various audio program sources while recording video, LD or TV programs on the recording VCR, release the pause 21 mode and start playing the audio recording source. See your VCR, LD player or TV's instruction manual if you want to be ready for playback. I to AUDIO 0 2 IN Audio recording source for audio 3i 6 * Video recording source 4, 6 1 Press a function button to select the video...

Operating Instructions
Page 27
... Dolby Surround Sound Many video tapes and laser discs available today are different, the receiver offers you four types of the center channel is output from the front speakers, because a small speaker cannot produce enough bass. Also, if you have a medium to your speaker system, you can adjust the timing of the sound that you select the center mode and adjust the speaker volume based on your speaker system. Front speaker (L) Front speaker (R) 4- Selecting the Center Mode Since all speakers...
... Dolby Surround Sound Many video tapes and laser discs available today are different, the receiver offers you four types of the center channel is output from the front speakers, because a small speaker cannot produce enough bass. Also, if you have a medium to your speaker system, you can adjust the timing of the sound that you select the center mode and adjust the speaker volume based on your speaker system. Front speaker (L) Front speaker (R) 4- Selecting the Center Mode Since all speakers...
Operating Instructions
Page 28
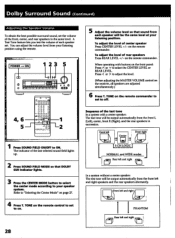
... L (Left), center, front R (Right), and the rear speakers in succession. on the remote commander. Dolby Surround Sound (Continued) Adjusting the Speaker Volume To obtain the best possible surround sound, set the volume of the front, center, and rear speakers to select the CENTER LEVEL or REAR LEVEL. on the remote commander. A Test Tone feature lets you test the volume of each speaker will be the same level at your listening position using the remote. When operating with a center speaker: The test tone will be output automatically from each speaker set.
... L (Left), center, front R (Right), and the rear speakers in succession. on the remote commander. Dolby Surround Sound (Continued) Adjusting the Speaker Volume To obtain the best possible surround sound, set the volume of the front, center, and rear speakers to select the CENTER LEVEL or REAR LEVEL. on the remote commander. A Test Tone feature lets you test the volume of each speaker will be the same level at your listening position using the remote. When operating with a center speaker: The test tone will be output automatically from each speaker set.

Operating Instructions
Page 29
... MODE so that the SUR (surround) indicator lights. 4 Press A or V to select the delay time mode. 5 Press < or > to adjust the delay time. 29 The indicator of the Rear Speakers - You can make the delay time longer or shorter within the range of the center and rear level and the delay time remain until you can make the surround sound best fit your listening environment. By adjusting the time difference between front and rear speakers (delay time), you change the settings...
... MODE so that the SUR (surround) indicator lights. 4 Press A or V to select the delay time mode. 5 Press < or > to adjust the delay time. 29 The indicator of the Rear Speakers - You can make the delay time longer or shorter within the range of the center and rear level and the delay time remain until you can make the surround sound best fit your listening environment. By adjusting the time difference between front and rear speakers (delay time), you change the settings...

Operating Instructions
Page 31
... Dolby surround. 1. 6 1 Play back the program source, for example, a CD. 2 Press SOUND FIELD ON/OFF to ON. 3 Press SOUND FIELD MODE to select the sound field you want to "Available Parameters" on the remote commander. Even if the AC power cord is available. To cancel the tone effect Press TONE ON/DEFEAT on the front panel or EQ/TONE ON/OFF on page 30. Available delay time of the rear speakers THEATER...
... Dolby surround. 1. 6 1 Play back the program source, for example, a CD. 2 Press SOUND FIELD ON/OFF to ON. 3 Press SOUND FIELD MODE to select the sound field you want to "Available Parameters" on the remote commander. Even if the AC power cord is available. To cancel the tone effect Press TONE ON/DEFEAT on the front panel or EQ/TONE ON/OFF on page 30. Available delay time of the rear speakers THEATER...
Operating Instructions
Page 33
... FM antenna. Set it correctly. Cause The signal strength of your nearest Sony dealer. The signal strength of the station is too weak for a program source other than tape deck. (The indicator is heard from one or both of sound from rear speakers. Adjust the BALANCE control. The volume controls on the separate amplifiers are performed For VCR's: The function switch on the power again. Check and properly connect the component. Chapter 5 Other Informatio;n Troubleshooting...
... FM antenna. Set it correctly. Cause The signal strength of your nearest Sony dealer. The signal strength of the station is too weak for a program source other than tape deck. (The indicator is heard from one or both of sound from rear speakers. Adjust the BALANCE control. The volume controls on the separate amplifiers are performed For VCR's: The function switch on the power again. Check and properly connect the component. Chapter 5 Other Informatio;n Troubleshooting...
Operating Instructions
Page 34
... same time, separate the TV from the source of the receiver. Wipe the plugs and jacks with a cloth lightly dampened with new ones. Tone circuit is heard. The remote signal cannot be operated using the remote. Make secure connections. Press DPC MODE so that of the speaker is not grounded. Severe hum or noise is turned off. The unit is reversed. If both remotes apart from the audio components...
... same time, separate the TV from the source of the receiver. Wipe the plugs and jacks with a cloth lightly dampened with new ones. Tone circuit is heard. The remote signal cannot be operated using the remote. Make secure connections. Press DPC MODE so that of the speaker is not grounded. Severe hum or noise is turned off. The unit is reversed. If both remotes apart from the audio components...

Operating Instructions
Page 35
.... Video section Inputs Outputs VIDEO 1,2,3: 1 Vp-p 75 ohms VIDEO 1, 2, MONITOR: 1 Vp-p 75 ohms General System Tuner section: PLL quartz-locked digital synthesizer system Preamplifier section Low-noise NF type equalizer Power amplifier section: Pure- When you change without notice. 35 Other Specifications Amplifier section Continuous RMS power output (8 ohms, at 20 Hz - 20 kHz less than 0.15 % total harmonic distortion) (FRONT) 123 W + 123 W Surround mode Surround mode (8 ohms at I kHz, THD 0.8 %) FRONT: 100 W/ch CENTER*: 100 W REAR...
.... Video section Inputs Outputs VIDEO 1,2,3: 1 Vp-p 75 ohms VIDEO 1, 2, MONITOR: 1 Vp-p 75 ohms General System Tuner section: PLL quartz-locked digital synthesizer system Preamplifier section Low-noise NF type equalizer Power amplifier section: Pure- When you change without notice. 35 Other Specifications Amplifier section Continuous RMS power output (8 ohms, at 20 Hz - 20 kHz less than 0.15 % total harmonic distortion) (FRONT) 123 W + 123 W Surround mode Surround mode (8 ohms at I kHz, THD 0.8 %) FRONT: 100 W/ch CENTER*: 100 W REAR...
Operating Instructions
Page 38
...) Adjusting audio (11) delay time (29) parameters (31) speaker volume (28) tone controls (31) volume (11) Automatic tuning (16) Back ground operation (13) C Center mode (27) Changing the settings of the FUNCTION buttons (14) Checking the supplied accessories (5) Connecting AC power (10) AM antenna (6) audio components (7) FM antenna (6) speaker systems (9) video components (8) Creating an index name (22) custom sound field (30) D Direct tuning (15) Dolby Pro Logic mode (4, 27) Dolby surround sound (4, 27) Dubbing. Q Parameter (30) Phantom mode (27) Pre-programmed sound field (19) Preset number...
...) Adjusting audio (11) delay time (29) parameters (31) speaker volume (28) tone controls (31) volume (11) Automatic tuning (16) Back ground operation (13) C Center mode (27) Changing the settings of the FUNCTION buttons (14) Checking the supplied accessories (5) Connecting AC power (10) AM antenna (6) audio components (7) FM antenna (6) speaker systems (9) video components (8) Creating an index name (22) custom sound field (30) D Direct tuning (15) Dolby Pro Logic mode (4, 27) Dolby surround sound (4, 27) Dubbing. Q Parameter (30) Phantom mode (27) Pre-programmed sound field (19) Preset number...


