
Operating Guide
Page 2
... forcing it in the literature accompanying the appliance. This is intended to alert the user to persons. If you are unable to have a suitable outlet installed.
... forcing it in the literature accompanying the appliance. This is intended to alert the user to persons. If you are unable to have a suitable outlet installed.
Operating Guide
Page 3
... is exposed to direct sunlight. Unauthorized substitutions may expose you to dangerous voltage or other materials. - Use a cloth lightly dampened with a cloth or other hazards. Installation Water and Moisture Do not use liquid cleaners or aerosol cleaners. Ventilation The slots and openings in the cabinet are specified in safe operating condition...
... is exposed to direct sunlight. Unauthorized substitutions may expose you to dangerous voltage or other materials. - Use a cloth lightly dampened with a cloth or other hazards. Installation Water and Moisture Do not use liquid cleaners or aerosol cleaners. Ventilation The slots and openings in the cabinet are specified in safe operating condition...
Operating Guide
Page 5
... an experienced radio/TV technician for a Class B digital device, pursuant to Part 15 of the FCC Rules. For customers in a residential installation. Reorient or relocate the receiving antenna. - Connect the equipment into an outlet on , the user is no guarantee that to which can ... following measures: - Increase the separation between the equipment and receiver. - This equipment generates, uses, and can be used in a particular installation. Battery pack THIS DEVICE COMPLIES WITH PART 15 OF THE FCC RULES.OPERATION IS SUBJECT TO THE FOLLOWING TWO CONDITIONS: (1) THIS DEVICE MAY...
... an experienced radio/TV technician for a Class B digital device, pursuant to Part 15 of the FCC Rules. For customers in a residential installation. Reorient or relocate the receiving antenna. - Connect the equipment into an outlet on , the user is no guarantee that to which can ... following measures: - Increase the separation between the equipment and receiver. - This equipment generates, uses, and can be used in a particular installation. Battery pack THIS DEVICE COMPLIES WITH PART 15 OF THE FCC RULES.OPERATION IS SUBJECT TO THE FOLLOWING TWO CONDITIONS: (1) THIS DEVICE MAY...
Operating Guide
Page 8
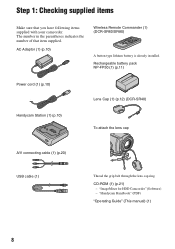
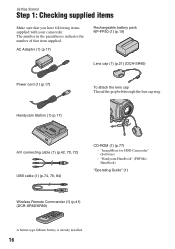
...Guide" (This manual) (1) 8 Step 1: Checking supplied items Make sure that item supplied. Rechargeable battery pack NP-FP50 (1) (p.11) Power cord (1) (p.10) Handycam Station (1) (p.10) Lens Cap (1) (p.12) (DCR-SR40) To attach the lens cap A/V connecting cable (1) (p.20) USB cable (1) Thread the grip belt .... The number in the parentheses indicates the number of that you have following items supplied with your camcorder. "ImageMixer for HDD Camcorder" (Software) - AC Adaptor (1) (p.10) Wireless Remote Commander (1) (DCR-SR60/SR80) A button-type lithium battery is already installed.
...Guide" (This manual) (1) 8 Step 1: Checking supplied items Make sure that item supplied. Rechargeable battery pack NP-FP50 (1) (p.11) Power cord (1) (p.10) Handycam Station (1) (p.10) Lens Cap (1) (p.12) (DCR-SR40) To attach the lens cap A/V connecting cable (1) (p.20) USB cable (1) Thread the grip belt .... The number in the parentheses indicates the number of that you have following items supplied with your camcorder. "ImageMixer for HDD Camcorder" (Software) - AC Adaptor (1) (p.10) Wireless Remote Commander (1) (DCR-SR60/SR80) A button-type lithium battery is already installed.
Operating Guide
Page 21
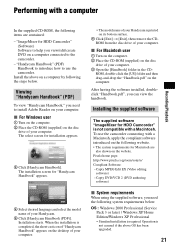
... Camcorder" is printed on its bottom surface. 6 Click [Exit] t [Exit], then remove the CDROM from the disc drive of your computer. Installing the supplied software The supplied software "ImageMixer for installation appears. 3 Click [Handycam Handbook...sony/e/ Compliant Software: - Performing with a Macintosh, apply the compliant software introduced on the following website. • The system requirements for Macintosh are contained: - To use the camcorder. "Handycam Handbook" (PDF) Handbook to introduce how to install Adobe Reader on your computer. When the installation...
... Camcorder" is printed on its bottom surface. 6 Click [Exit] t [Exit], then remove the CDROM from the disc drive of your computer. Installing the supplied software The supplied software "ImageMixer for installation appears. 3 Click [Handycam Handbook...sony/e/ Compliant Software: - Performing with a Macintosh, apply the compliant software introduced on the following website. • The system requirements for Macintosh are contained: - To use the camcorder. "Handycam Handbook" (PDF) Handbook to introduce how to install Adobe Reader on your computer. When the installation...
Operating Guide
Page 22
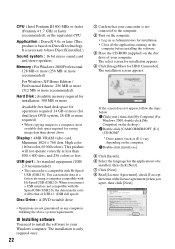
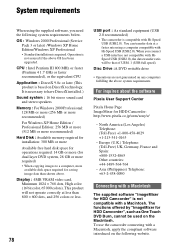
... or more recommended) Hard Disk : Available memory required for installation: 300 MB or more Available free hard disk space for operations required: 14 GB or more (for dual layer DVD system, 28 GB or more required) • When copying images to your camcorder is based on any computers fulfilling the above . Disc Drive : A DVD writable drive • Operations...
... or more recommended) Hard Disk : Available memory required for installation: 300 MB or more Available free hard disk space for operations required: 14 GB or more (for dual layer DVD system, 28 GB or more required) • When copying images to your camcorder is based on any computers fulfilling the above . Disc Drive : A DVD writable drive • Operations...

Operating Guide
Page 23
... click [Finish]. qf Remove the CD-ROM from the disc drive of your computer. 23 The installation for "ImageMixer for HDD Camcorder] and [ImageMixer destination folder] appear on the [Ready to install DirectX 9.0c. When you complete the installation, the shortcut icons for [ImageMixer for HDD Camcorder" starts. 9 Select a folder to step qd. 1Read [License Agreement...
... click [Finish]. qf Remove the CD-ROM from the disc drive of your computer. 23 The installation for "ImageMixer for HDD Camcorder] and [ImageMixer destination folder] appear on the [Ready to install DirectX 9.0c. When you complete the installation, the shortcut icons for [ImageMixer for HDD Camcorder" starts. 9 Select a folder to step qd. 1Read [License Agreement...
Operating Guide
Page 32
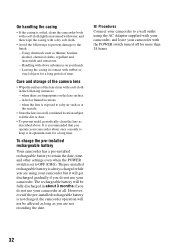
...The rechargeable battery will get discharged gradually if you are using the AC Adaptor supplied with your camcorder, and leave your camcorder with above . However, even if the pre-installed rechargeable battery is exposed to salty air such as thinner, benzine, alcohol, chemical cloths, repellent... and insecticide and sunscreen. - It is set to OFF (CHG). To charge the pre-installed rechargeable battery Your camcorder has a pre-installed rechargeable battery to retain the date, time, and other settings even when the POWER switch is recommended that you ...
...The rechargeable battery will get discharged gradually if you are using the AC Adaptor supplied with your camcorder, and leave your camcorder with above . However, even if the pre-installed rechargeable battery is exposed to salty air such as thinner, benzine, alcohol, chemical cloths, repellent... and insecticide and sunscreen. - It is set to OFF (CHG). To charge the pre-installed rechargeable battery Your camcorder has a pre-installed rechargeable battery to retain the date, time, and other settings even when the POWER switch is recommended that you ...
Handycam Handbook
Page 3
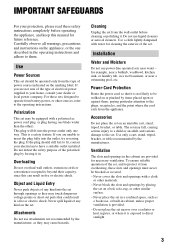
... them , paying particular attention to the set from the type of the set . Do not use power-line operated sets near water - Installation Water and Moisture Do not use liquid cleaners or aerosol cleaners. Never block the slots and openings by the manufacturer. This is a safety ...items placed upon or against them . Polarization This set on a bed, sofa, rug, or other sources, refer to have a suitable outlet installed. Ventilation The slots and openings in fire or electric shock. IMPORTANT SAFEGUARDS For your protection, please read these slots and openings must never be ...
... them , paying particular attention to the set from the type of the set . Do not use power-line operated sets near water - Installation Water and Moisture Do not use liquid cleaners or aerosol cleaners. Never block the slots and openings by the manufacturer. This is a safety ...items placed upon or against them . Polarization This set on a bed, sofa, rug, or other sources, refer to have a suitable outlet installed. Ventilation The slots and openings in fire or electric shock. IMPORTANT SAFEGUARDS For your protection, please read these slots and openings must never be ...

Handycam Handbook
Page 6
...If you set the camcorder onto the Handycam Station or remove the camcorder from the Handycam Station holding both the camcorder and the DC plug. • Be sure to slide the POWER switch up to OFF (CHG), when you insert the connector plug forcibly in a particular installation. However, there is... one or more of the following parts. See "Maintenance and precautions" (p.121). • To prevent the hard disk from being broken or recorded images from the camcorder - Note This equipment has been tested and found to comply with two kinds of operations guides. This equipment generates, ...
...If you set the camcorder onto the Handycam Station or remove the camcorder from the Handycam Station holding both the camcorder and the DC plug. • Be sure to slide the POWER switch up to OFF (CHG), when you insert the connector plug forcibly in a particular installation. However, there is... one or more of the following parts. See "Maintenance and precautions" (p.121). • To prevent the hard disk from being broken or recorded images from the camcorder - Note This equipment has been tested and found to comply with two kinds of operations guides. This equipment generates, ...
Handycam Handbook
Page 11
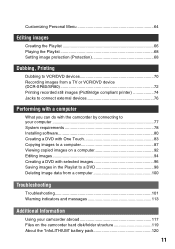
...a TV or VCR/DVD device (DCR-SR60/SR80 72 Printing recorded still images (PictBridge compliant printer 74 Jacks to connect external devices 76 Performing with a computer What you can do with the camcorder by connecting to your computer 77 System requirements 78 Installing software 80 Creating a DVD with One ... to a DVD 98 Deleting image data from a computer 100 Troubleshooting Troubleshooting 101 Warning indicators and messages 113 Additional Information Using your camcorder abroad 117 Files on the camcorder hard disk/folder structure 119 About the "InfoLITHIUM" battery pack 120 11
...a TV or VCR/DVD device (DCR-SR60/SR80 72 Printing recorded still images (PictBridge compliant printer 74 Jacks to connect external devices 76 Performing with a computer What you can do with the camcorder by connecting to your computer 77 System requirements 78 Installing software 80 Creating a DVD with One ... to a DVD 98 Deleting image data from a computer 100 Troubleshooting Troubleshooting 101 Warning indicators and messages 113 Additional Information Using your camcorder abroad 117 Files on the camcorder hard disk/folder structure 119 About the "InfoLITHIUM" battery pack 120 11
Handycam Handbook
Page 16
... Guide" (1) Wireless Remote Commander (1) (p.41) (DCR-SR60/SR80) A button-type lithium battery is already installed. 16 AC Adaptor (1) (p.17) Rechargeable battery pack NP-FP50 (1) (p.19) Lens cap (1) (p.21) (DCR-SR40) Power cord (1) (p.17) To attach the lens cap Thread the grip belt through the lens cap ring. Handycam Station (1) (p.17) A/V connecting cable (1) (p.42...
... Guide" (1) Wireless Remote Commander (1) (p.41) (DCR-SR60/SR80) A button-type lithium battery is already installed. 16 AC Adaptor (1) (p.17) Rechargeable battery pack NP-FP50 (1) (p.19) Lens cap (1) (p.21) (DCR-SR40) Power cord (1) (p.17) To attach the lens cap Thread the grip belt through the lens cap ring. Handycam Station (1) (p.17) A/V connecting cable (1) (p.42...
Handycam Handbook
Page 17
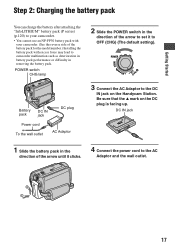
... plug is facing up. Be sure that the v mark on the Handycam Station. DC IN jack 1 Slide the battery pack in the direction of the battery pack for the model number.) Installing the battery pack with excess force may lead to camcorder malfunction such as deterioration in battery pack performance or difficulty in...
... plug is facing up. Be sure that the v mark on the Handycam Station. DC IN jack 1 Slide the battery pack in the direction of the battery pack for the model number.) Installing the battery pack with excess force may lead to camcorder malfunction such as deterioration in battery pack performance or difficulty in...
Handycam Handbook
Page 76
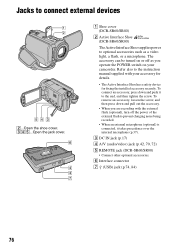
...37). 3 DC IN jack (p.17) 4 A/V (audio/video) jack (p.42, 70, 72) 5 REMOTE jack (DCR-SR60/SR80) • Connect other optional accessories. 6 Interface connector 7 (USB) jack (p.74, 84) 76 To connect an ...your accessory for details. • The Active Interface Shoe has a safety device for fixing the installed accessory securely. The accessory can be turned on or off the power of the external flash to... 345...Open the jack cover. 1 Shoe cover (DCR-SR60/SR80) 2 Active Interface Shoe (DCR-SR60/SR80) The Active Interface Shoe supplies power to optional accessories such as you are...
...37). 3 DC IN jack (p.17) 4 A/V (audio/video) jack (p.42, 70, 72) 5 REMOTE jack (DCR-SR60/SR80) • Connect other optional accessories. 6 Interface connector 7 (USB) jack (p.74, 84) 76 To connect an ...your accessory for details. • The Active Interface Shoe has a safety device for fixing the installed accessory securely. The accessory can be turned on or off the power of the external flash to... 345...Open the jack cover. 1 Shoe cover (DCR-SR60/SR80) 2 Active Interface Shoe (DCR-SR60/SR80) The Active Interface Shoe supplies power to optional accessories such as you are...
Handycam Handbook
Page 77
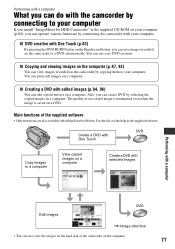
... even when the image is saved on a computer. x DVD creation with One Touch (p.83) By pressing the DVD BURN button on the Handycam Station, you can save images recorded on a computer. x Copying and viewing images on the computer (p.87, 92) You can view images recorded on...You can also view the images on the hard disk of the supplied software • Other functions are also available other than described below. Performing with a computer What you can do with the camcorder by connecting to your computer If you install "ImageMixer for HDD Camcorder" in the supplied software. For details, ...
... even when the image is saved on a computer. x DVD creation with One Touch (p.83) By pressing the DVD BURN button on the Handycam Station, you can save images recorded on a computer. x Copying and viewing images on the computer (p.87, 92) You can view images recorded on...You can also view the images on the hard disk of the supplied software • Other functions are also available other than described below. Performing with a computer What you can do with the camcorder by connecting to your computer If you install "ImageMixer for HDD Camcorder" in the supplied software. For details, ...
Handycam Handbook
Page 78
This product will be used on the following system requirements below. The functions offered by "ImageMixer for HDD Camcorder: http://www.pixela.co.jp/oem/sony/e/ - Display : 4MB VRAM video card, Minimum 1024 × 768 dots, High color (16 bit color, 65 000 colors). ... recommended) Hard Disk : Available memory required for installation: 300 MB or more Available free hard disk space for operations required: 14 GB or more (for dual layer DVD system, 28 GB or more required) • When copying images to a computer, more available disk space required for HDD Camcorder" is ...
This product will be used on the following system requirements below. The functions offered by "ImageMixer for HDD Camcorder: http://www.pixela.co.jp/oem/sony/e/ - Display : 4MB VRAM video card, Minimum 1024 × 768 dots, High color (16 bit color, 65 000 colors). ... recommended) Hard Disk : Available memory required for installation: 300 MB or more Available free hard disk space for operations required: 14 GB or more (for dual layer DVD system, 28 GB or more required) • When copying images to a computer, more available disk space required for HDD Camcorder" is ...
Handycam Handbook
Page 79
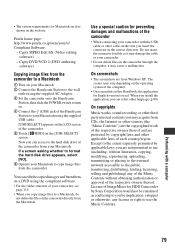
...camcorder onto the Handycam Station, then slide the POWER switch to turn on. 4 Connect the (USB) jack of the Handycam Station to your Macintosh using the compliant software. • For the folder structure of your camcorder...camcorder • When connecting your camcorder with a computer 79 Use a special caution for English version is used. When you install... hard disk drive of the camcorder....camcorder. Pixela home page: http://www.pixela.co.jp/oem/sony/e/ Compliant Software: - Capty MPEG Edit EX (Video editing software) - • The system requirements for HDD Camcorder by Sony...
...camcorder onto the Handycam Station, then slide the POWER switch to turn on. 4 Connect the (USB) jack of the Handycam Station to your Macintosh using the compliant software. • For the folder structure of your camcorder...camcorder • When connecting your camcorder with a computer 79 Use a special caution for English version is used. When you install... hard disk drive of the camcorder....camcorder. Pixela home page: http://www.pixela.co.jp/oem/sony/e/ Compliant Software: - Capty MPEG Edit EX (Video editing software) - • The system requirements for HDD Camcorder by Sony...
Handycam Handbook
Page 80
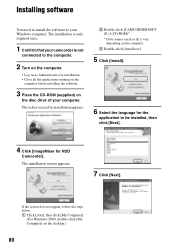
... the screen does not appear, follow the steps below. 1 Click [start], then click [My Computer] (For Windows 2000, double-click [My Computer] on the disc drive of your Windows computer. The select screen for installation appears. 2 Double-click [CAMCORDERSOFT (E:)] (CD-ROM)* * Drive names (such as Administrators for HDD Camcorder].
... the screen does not appear, follow the steps below. 1 Click [start], then click [My Computer] (For Windows 2000, double-click [My Computer] on the disc drive of your Windows computer. The select screen for installation appears. 2 Double-click [CAMCORDERSOFT (E:)] (CD-ROM)* * Drive names (such as Administrators for HDD Camcorder].
Handycam Handbook
Page 81
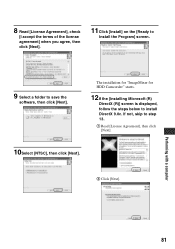
8 Read [License Agreement], check [I accept the terms of the license agreement] when you agree, then click [Next]. 11Click [Install] on the [Ready to Install the Program] screen. 9 Select a folder to step 13. 1 Read [License Agreement], then click [Next]. 10Select [NTSC], then click [Next]. 2 Click [Next]. If not, skip to save the software, then click [Next]. Performing with a computer 81 The installation for "ImageMixer for HDD Camcorder" starts. 12If the [Installing Microsoft (R) DirectX (R)] screen is displayed, follow the steps below to install DirectX 9.0c.
8 Read [License Agreement], check [I accept the terms of the license agreement] when you agree, then click [Next]. 11Click [Install] on the [Ready to Install the Program] screen. 9 Select a folder to step 13. 1 Read [License Agreement], then click [Next]. 10Select [NTSC], then click [Next]. 2 Click [Next]. If not, skip to save the software, then click [Next]. Performing with a computer 81 The installation for "ImageMixer for HDD Camcorder" starts. 12If the [Installing Microsoft (R) DirectX (R)] screen is displayed, follow the steps below to install DirectX 9.0c.
Handycam Handbook
Page 82
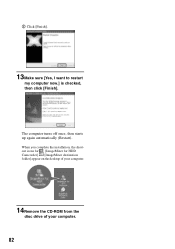
The computer turns off once, then starts up again automatically (Restart). 3 Click [Finish]. 13Make sure [Yes, I want to restart my computer now.] is checked, then click [Finish]. When you complete the installation, the shortcut icons for [ImageMixer for HDD Camcorder] and [ImageMixer destination folder] appear on the desktop of your computer. 14Remove the CD-ROM from the disc drive of your computer. 82
The computer turns off once, then starts up again automatically (Restart). 3 Click [Finish]. 13Make sure [Yes, I want to restart my computer now.] is checked, then click [Finish]. When you complete the installation, the shortcut icons for [ImageMixer for HDD Camcorder] and [ImageMixer destination folder] appear on the desktop of your computer. 14Remove the CD-ROM from the disc drive of your computer. 82


