Operating Guide
Page 8
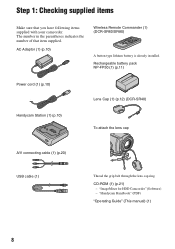
...) Power cord (1) (p.10) Handycam Station (1) (p.10) Lens Cap (1) (p.12) (DCR-SR40) To attach the lens cap A/V connecting cable (1) (p.20) USB cable (1) Thread the grip belt through the lens cap ring. CD-ROM (1) (p.21) - AC Adaptor (1) (p.10) Wireless Remote Commander (1) (DCR-SR60/SR80) A button-type lithium battery is already installed. "ImageMixer for HDD Camcorder" (Software) - "Handycam Handbook" (PDF) "Operating Guide...
...) Power cord (1) (p.10) Handycam Station (1) (p.10) Lens Cap (1) (p.12) (DCR-SR40) To attach the lens cap A/V connecting cable (1) (p.20) USB cable (1) Thread the grip belt through the lens cap ring. CD-ROM (1) (p.21) - AC Adaptor (1) (p.10) Wireless Remote Commander (1) (DCR-SR60/SR80) A button-type lithium battery is already installed. "ImageMixer for HDD Camcorder" (Software) - "Handycam Handbook" (PDF) "Operating Guide...

Operating Guide
Page 17
...for date and time. In this way, you may not use the camcorder with the camcorder and the Handycam Station. wa Interface connector Connect with simple operation (Easy Handycam operation). ws (USB) jack Connect with T (Telephoto). qg DISP/BATT INFO button You ...USB cable. 17 Recording/Playback Open the jack cover. 3 Shoe cover (DCR-SR60/SR80) Open when using Active Interface Shoe. 4 Active Interface Shoe (DCR-SR60/SR80) The Active Interface Shoe supplies power to display .. qs Shoulder belt hook To attach the shoulder belt, attach the shoulder belt (optional) with your camcorder...
...for date and time. In this way, you may not use the camcorder with the camcorder and the Handycam Station. wa Interface connector Connect with simple operation (Easy Handycam operation). ws (USB) jack Connect with T (Telephoto). qg DISP/BATT INFO button You ...USB cable. 17 Recording/Playback Open the jack cover. 3 Shoe cover (DCR-SR60/SR80) Open when using Active Interface Shoe. 4 Active Interface Shoe (DCR-SR60/SR80) The Active Interface Shoe supplies power to display .. qs Shoulder belt hook To attach the shoulder belt, attach the shoulder belt (optional) with your camcorder...
Operating Guide
Page 26
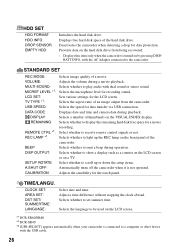
...hard disk drive. LCD SET: TV TYPE *1: Sets various settings for data transfer via USB connection. USB SPEED: Selects the speed for the LCD screen. DISP OUTPUT: Selects whether to show a display such as a counter on the LCD screen or on the LCD screen. *1 DCR-SR60/SR80 *2 DCR-SR40 *3 [USB SELECT] appears automatically when your camcorder... is connected to a computer or other device with the USB cable. 26 CLOCK SET: AREA SET: DST SET/ SUMMERTIME...
...hard disk drive. LCD SET: TV TYPE *1: Sets various settings for data transfer via USB connection. USB SPEED: Selects the speed for the LCD screen. DISP OUTPUT: Selects whether to show a display such as a counter on the LCD screen or on the LCD screen. *1 DCR-SR60/SR80 *2 DCR-SR40 *3 [USB SELECT] appears automatically when your camcorder... is connected to a computer or other device with the USB cable. 26 CLOCK SET: AREA SET: DST SET/ SUMMERTIME...
Handycam Handbook
Page 16
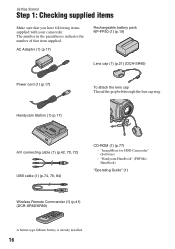
... camcorder. AC Adaptor (1) (p.17) Rechargeable battery pack NP-FP50 (1) (p.19) Lens cap (1) (p.21) (DCR-SR40) Power cord (1) (p.17) To attach the lens cap Thread the grip belt through the lens cap ring. Handycam Station (1) (p.17) A/V connecting cable (1) (p.42, 70, 72) USB cable ...(1) (p.74, 76, 84) CD-ROM (1) (p.77) - Getting Started Step 1: Checking supplied items Make sure that item supplied. "Handycam Handbook" (PDF/this Handbook) "Operating Guide" (1) Wireless Remote Commander (1) (p.41) (DCR-SR60...
... camcorder. AC Adaptor (1) (p.17) Rechargeable battery pack NP-FP50 (1) (p.19) Lens cap (1) (p.21) (DCR-SR40) Power cord (1) (p.17) To attach the lens cap Thread the grip belt through the lens cap ring. Handycam Station (1) (p.17) A/V connecting cable (1) (p.42, 70, 72) USB cable ...(1) (p.74, 76, 84) CD-ROM (1) (p.77) - Getting Started Step 1: Checking supplied items Make sure that item supplied. "Handycam Handbook" (PDF/this Handbook) "Operating Guide" (1) Wireless Remote Commander (1) (p.41) (DCR-SR60...
Handycam Handbook
Page 50
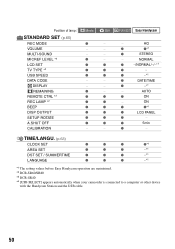
.... (p.63) CLOCK SET z z z z*1 AREA SET z z z -*1 DST SET / SUMMERTIME z z z -*1 LANGUAGE z z z -*1 *1 The setting values before Easy Handycam operation are maintained. *2 DCR-SR60/SR80 *3 DCR-SR40 *4 [USB SELECT] appears automatically when your camcorder is connected to a computer or other device with the Handycam Station and the USB cable. 50 HQ VOLUME - - z STEREO MICREF LEVEL *2 LCD SET z - - A.SHUT OFF z z z 5min CALIBRATION - - z z*1 MULTI-SOUND...
.... (p.63) CLOCK SET z z z z*1 AREA SET z z z -*1 DST SET / SUMMERTIME z z z -*1 LANGUAGE z z z -*1 *1 The setting values before Easy Handycam operation are maintained. *2 DCR-SR60/SR80 *3 DCR-SR40 *4 [USB SELECT] appears automatically when your camcorder is connected to a computer or other device with the Handycam Station and the USB cable. 50 HQ VOLUME - - z STEREO MICREF LEVEL *2 LCD SET z - - A.SHUT OFF z z z 5min CALIBRATION - - z z*1 MULTI-SOUND...
Handycam Handbook
Page 58
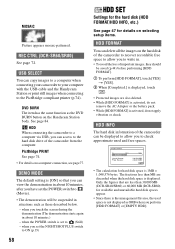
... with the USB cable and the Handycam Station or print still images when connecting to (Still) - MOSAIC Picture appears mosaic-patterned. DEMO MODE The default setting is [ON] so that are discarded when the hard disk space is 1MB = 1,048,576 bytes. HDD When connecting the camcorder to a computer via USB, you to the hard disk drive of the camcorder to...
... with the USB cable and the Handycam Station or print still images when connecting to (Still) - MOSAIC Picture appears mosaic-patterned. DEMO MODE The default setting is [ON] so that are discarded when the hard disk space is 1MB = 1,048,576 bytes. HDD When connecting the camcorder to a computer via USB, you to the hard disk drive of the camcorder to...
Handycam Handbook
Page 110
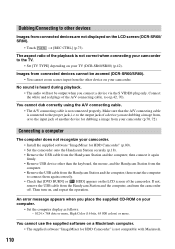
...; Install the supplied software "ImageMixer for HDD Camcorder" (p.80). • Set the camcorder onto the Handycam Station securely (p.18). • Remove the USB cable from the Handycam Station and the computer, then connect it again firmly. • Remove USB device other device on your TV (DCR-SR60/SR80) (p.42). Then turn the camcorder off. An error message appears when you...
...; Install the supplied software "ImageMixer for HDD Camcorder" (p.80). • Set the camcorder onto the Handycam Station securely (p.18). • Remove the USB cable from the Handycam Station and the computer, then connect it again firmly. • Remove USB device other device on your TV (DCR-SR60/SR80) (p.42). Then turn the camcorder off. An error message appears when you...


