Operating Guide
Page 8
... items supplied with your camcorder. AC Adaptor (1) (p.10) Wireless Remote Commander (1) (DCR-SR60/SR80) A button-type lithium battery is already installed. "Handycam Handbook" (PDF) "Operating Guide" (This manual) (1) 8 Rechargeable battery pack NP-FP50 (1) (p.11) Power cord (1) (p.10) Handycam Station (1) (p.10) Lens Cap (1) (p.12) (DCR-SR40) To attach the lens cap A/V connecting cable (1) (p.20) USB cable (1) Thread the grip...
... items supplied with your camcorder. AC Adaptor (1) (p.10) Wireless Remote Commander (1) (DCR-SR60/SR80) A button-type lithium battery is already installed. "Handycam Handbook" (PDF) "Operating Guide" (This manual) (1) 8 Rechargeable battery pack NP-FP50 (1) (p.11) Power cord (1) (p.10) Handycam Station (1) (p.10) Lens Cap (1) (p.12) (DCR-SR40) To attach the lens cap A/V connecting cable (1) (p.20) USB cable (1) Thread the grip...

Operating Guide
Page 17
...). To cancel, touch [END]. qk A/V (audio/video) jack Connect with the camcorder and the Handycam Station. wa Interface connector Connect with the A/V connecting cable. To cancel the back light function, press BACK LIGHT again. qh EASY button By...Handycam operation, you want to display .. A frame appears on your camcorder to other optional accessories. Connecting to the shoulder belt hook. qj DC IN jack Connect to display in "Recording". qs Shoulder belt hook To attach the shoulder belt, attach the shoulder belt (optional) with your camcorder. ql REMOTE jack (DCR-SR60...
...). To cancel, touch [END]. qk A/V (audio/video) jack Connect with the camcorder and the Handycam Station. wa Interface connector Connect with the A/V connecting cable. To cancel the back light function, press BACK LIGHT again. qh EASY button By...Handycam operation, you want to display .. A frame appears on your camcorder to other optional accessories. Connecting to the shoulder belt hook. qj DC IN jack Connect to display in "Recording". qs Shoulder belt hook To attach the shoulder belt, attach the shoulder belt (optional) with your camcorder. ql REMOTE jack (DCR-SR60...
Operating Guide
Page 26
...cable. 26 MICREF LEVEL *1: Selects the microphone level for data protection. Displays this item only when the camcorder is turned on the LCD screen. *1 DCR-SR60/SR80 *2 DCR-SR40 *3 [USB SELECT] appears automatically when your camcorder is not operated. Selects the aspect ratio of the camcorder. Displays free hard disk...output from being recovered. - TIME/LANGU. Deactivates the camcorder when detecting a drop for recording sound. REC LAMP *1: Selects whether to scroll up the REC lamp on the hard disk drive from the camcorder. LCD SET: TV TYPE *1: Sets various settings for...
...cable. 26 MICREF LEVEL *1: Selects the microphone level for data protection. Displays this item only when the camcorder is turned on the LCD screen. *1 DCR-SR60/SR80 *2 DCR-SR40 *3 [USB SELECT] appears automatically when your camcorder is not operated. Selects the aspect ratio of the camcorder. Displays free hard disk...output from being recovered. - TIME/LANGU. Deactivates the camcorder when detecting a drop for recording sound. REC LAMP *1: Selects whether to scroll up the REC lamp on the hard disk drive from the camcorder. LCD SET: TV TYPE *1: Sets various settings for...
Handycam Handbook
Page 16
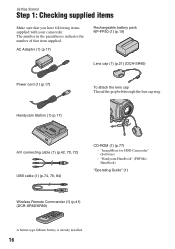
... items Make sure that item supplied. Handycam Station (1) (p.17) A/V connecting cable (1) (p.42, 70, 72) USB cable (1) (p.74, 76, 84) CD-ROM (1) (p.77) - AC Adaptor (1) (p.17) Rechargeable battery pack NP-FP50 (1) (p.19) Lens cap (1) (p.21) (DCR-SR40) Power cord (1) (p.17) ...Handycam Handbook" (PDF/this Handbook) "Operating Guide" (1) Wireless Remote Commander (1) (p.41) (DCR-SR60/SR80) A button-type lithium battery is already installed. 16 The number in the parentheses indicates the number of that you have following items supplied with your camcorder. "ImageMixer for HDD Camcorder...
... items Make sure that item supplied. Handycam Station (1) (p.17) A/V connecting cable (1) (p.42, 70, 72) USB cable (1) (p.74, 76, 84) CD-ROM (1) (p.77) - AC Adaptor (1) (p.17) Rechargeable battery pack NP-FP50 (1) (p.19) Lens cap (1) (p.21) (DCR-SR40) Power cord (1) (p.17) ...Handycam Handbook" (PDF/this Handbook) "Operating Guide" (1) Wireless Remote Commander (1) (p.41) (DCR-SR60/SR80) A button-type lithium battery is already installed. 16 The number in the parentheses indicates the number of that you have following items supplied with your camcorder. "ImageMixer for HDD Camcorder...
Handycam Handbook
Page 42
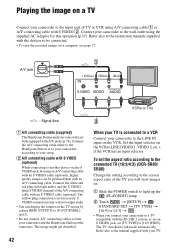
... the wall outlet using A/V connecting cable 1 or A/V connecting cable with S VIDEO 2. Connect the A/V connecting cable either to the Handycam Station or to your camcorder, according to your setup. 2 A/V connecting cable with S VIDEO (optional) When connecting to another device via an S VIDEO jack, set the aspect ratio according to the connected TV (16:9/4:3) (DCR-SR60/ SR80) Change the setting...
... the wall outlet using A/V connecting cable 1 or A/V connecting cable with S VIDEO 2. Connect the A/V connecting cable either to the Handycam Station or to your camcorder, according to your setup. 2 A/V connecting cable with S VIDEO (optional) When connecting to another device via an S VIDEO jack, set the aspect ratio according to the connected TV (16:9/4:3) (DCR-SR60/ SR80) Change the setting...
Handycam Handbook
Page 50
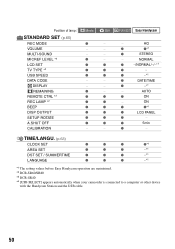
... Still PLAY/EDIT Easy Handycam STANDARD SET (p.60) REC MODE z - - TIME/LANGU. (p.63) CLOCK SET z z z z*1 AREA SET z z z -*1 DST SET / SUMMERTIME z z z -*1 LANGUAGE z z z -*1 *1 The setting values before Easy Handycam operation are maintained. *2 DCR-SR60/SR80 *3 DCR-SR40 *4 [USB SELECT] appears automatically when your camcorder is connected to a computer or other device with the Handycam Station and the USB cable. 50
... Still PLAY/EDIT Easy Handycam STANDARD SET (p.60) REC MODE z - - TIME/LANGU. (p.63) CLOCK SET z z z z*1 AREA SET z z z -*1 DST SET / SUMMERTIME z z z -*1 LANGUAGE z z z -*1 *1 The setting values before Easy Handycam operation are maintained. *2 DCR-SR60/SR80 *3 DCR-SR40 *4 [USB SELECT] appears automatically when your camcorder is connected to a computer or other device with the Handycam Station and the USB cable. 50
Handycam Handbook
Page 58
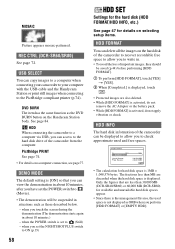
... selecting setup items. HDD FORMAT You can access to the hard disk drive of the camcorder to recover recordable free space to allow you to (Still)... to a computer when connecting your camcorder to your computer with the USB cable and the Handycam Station or print still images when ...hard disk information of the camcorder can view the demonstration in situations such as those described below. - HDD When connecting the camcorder to a computer via USB, you can delete all the images on the Handycam Station body. when the POWER switch is 1MB = 1,048,576 bytes. REC CTRL (DCR-SR60...
... selecting setup items. HDD FORMAT You can access to the hard disk drive of the camcorder to recover recordable free space to allow you to (Still)... to a computer when connecting your camcorder to your computer with the USB cable and the Handycam Station or print still images when ...hard disk information of the camcorder can view the demonstration in situations such as those described below. - HDD When connecting the camcorder to a computer via USB, you can delete all the images on the Handycam Station body. when the POWER switch is 1MB = 1,048,576 bytes. REC CTRL (DCR-SR60...
Handycam Handbook
Page 59
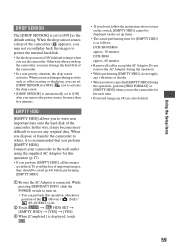
...[EMPTY HDD], do not follow the instructions above to write non important data onto the hard disk of the camcorder ( appears), you may not record/play back the images to protect the internal hard disk. • Set the drop sensor to the wall outlet using the supplied AC Adaptor ...[ON] as follows; DCR-SR40/SR60 approx. 30 minutes DCR-SR80 approx. 60 minutes • Remove all the images are also deleted. 59 Otherwise when you drop the camcorder, you use the camcorder. Connect your camcorder to [ON] (default setting) when you perform [EMPTY HDD], all cables except the AC Adaptor. ...
...[EMPTY HDD], do not follow the instructions above to write non important data onto the hard disk of the camcorder ( appears), you may not record/play back the images to protect the internal hard disk. • Set the drop sensor to the wall outlet using the supplied AC Adaptor ...[ON] as follows; DCR-SR40/SR60 approx. 30 minutes DCR-SR80 approx. 60 minutes • Remove all the images are also deleted. 59 Otherwise when you drop the camcorder, you use the camcorder. Connect your camcorder to [ON] (default setting) when you perform [EMPTY HDD], all cables except the AC Adaptor. ...
Handycam Handbook
Page 72
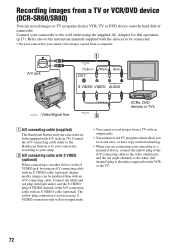
...DVD device onto the hard disk of camcorder. Connect your camcorder to another device via the S VIDEO jack, by using the supplied AC Adaptor for this operation (p.17). Connect the A/V connecting cable either to the Handycam Station or to your camcorder, according to your setup. 2 A/V connecting cable with A/V jacks ...A/V connecting cable (supplied) The Handycam Station and your camcorder are connecting your camcorder to the audio output jack on the VCR or the TV. 72 Recording images from a TV or VCR/DVD device (DCR-SR60/SR80) You can be connected. • On your camcorder, you ...
...DVD device onto the hard disk of camcorder. Connect your camcorder to another device via the S VIDEO jack, by using the supplied AC Adaptor for this operation (p.17). Connect the A/V connecting cable either to the Handycam Station or to your camcorder, according to your setup. 2 A/V connecting cable with A/V jacks ...A/V connecting cable (supplied) The Handycam Station and your camcorder are connecting your camcorder to the audio output jack on the VCR or the TV. 72 Recording images from a TV or VCR/DVD device (DCR-SR60/SR80) You can be connected. • On your camcorder, you ...
Handycam Handbook
Page 110
... Macintosh. 110 If not, remove the USB cable from the Handycam Station and the computer, and turn on the LCD screen (DCR-SR60/ SR80). • Touch t [REC CTRL] (p.73). You cannot dub correctly using the A/V connecting cable. • The A/V connecting cable is connected to the proper jack, i.e. Then turn the camcorder off. Make sure that [DVD BURN...
... Macintosh. 110 If not, remove the USB cable from the Handycam Station and the computer, and turn on the LCD screen (DCR-SR60/ SR80). • Touch t [REC CTRL] (p.73). You cannot dub correctly using the A/V connecting cable. • The A/V connecting cable is connected to the proper jack, i.e. Then turn the camcorder off. Make sure that [DVD BURN...


