Operating Instructions
Page 4
... Making calls 33 Redialing 35 Receiving calls Telephone Features 39 One-touch dialing 39 Storing phone numbers and names 41 Changing a stored name and/or phone number 42 Making calls with one-touch dialing 43 Phone Directory 43 Storing phone numbers and names 44 Changing a stored ... To switch from the base phone to the cordless handset 50 To switch from the cordless handset to the base phone 51 Talking between the phones (Intercom) 51 To talk from the cordless handset to the base phone 52 To talk from the base phone to the cordless handset 53 Transferring a call...
... Making calls 33 Redialing 35 Receiving calls Telephone Features 39 One-touch dialing 39 Storing phone numbers and names 41 Changing a stored name and/or phone number 42 Making calls with one-touch dialing 43 Phone Directory 43 Storing phone numbers and names 44 Changing a stored ... To switch from the base phone to the cordless handset 50 To switch from the cordless handset to the base phone 51 Talking between the phones (Intercom) 51 To talk from the cordless handset to the base phone 52 To talk from the base phone to the cordless handset 53 Transferring a call...

Operating Instructions
Page 5
61 Storing a number of the Caller ID list into the Phone Directory 62 To change the number of digits of the phone number 64 Using "Caller ID with call waiting" service 65 Using voice mail service Additional Information 67 Mounting the base phone on a wall 68 Carrying the cordless handset by the belt clip 70 Notes on power sources 71 Maintenance 72 Troubleshooting 76 Specifications 77 Index Back cover LIMITED WARRANTY Table of contents 5US
61 Storing a number of the Caller ID list into the Phone Directory 62 To change the number of digits of the phone number 64 Using "Caller ID with call waiting" service 65 Using voice mail service Additional Information 67 Mounting the base phone on a wall 68 Carrying the cordless handset by the belt clip 70 Notes on power sources 71 Maintenance 72 Troubleshooting 76 Specifications 77 Index Back cover LIMITED WARRANTY Table of contents 5US
Operating Instructions
Page 6
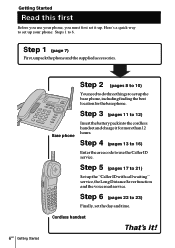
...to 12) Base phone Insert the battery pack into the cordless handset and charge it for the base phone. Step 3 (pages 11 to 21) Set up the "Caller ID with call waiting" service, the Long Distance Saver function and the voice mail service. Step 1 (page 7) First, unpack the phone and the supplied ...4 (pages 13 to 16) Enter the area code to use your phone, you must first set up your phone: Steps 1 to 6. Step 6 (pages 22 to 23) Finally, set up the base phone, including finding the best location for more than 12 hours. Cordless handset That's it up. Here's a quick way to set it !...
...to 12) Base phone Insert the battery pack into the cordless handset and charge it for the base phone. Step 3 (pages 11 to 21) Set up the "Caller ID with call waiting" service, the Long Distance Saver function and the voice mail service. Step 1 (page 7) First, unpack the phone and the supplied ...4 (pages 13 to 16) Enter the area code to use your phone, you must first set up your phone: Steps 1 to 6. Step 6 (pages 22 to 23) Finally, set up the base phone, including finding the best location for more than 12 hours. Cordless handset That's it up. Here's a quick way to set it !...
Operating Instructions
Page 7
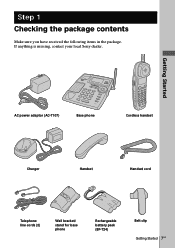
Getting Started AC power adaptor (AC-T107) Base phone Cordless handset Charger Handset Handset cord Telephone line cords (2) Wall bracket/ stand for base phone Rechargeable battery pack (BP-T24) Belt clip Getting Started 7US If anything is missing, contact your local Sony dealer. Step 1 Checking the package contents Make sure you have received the following items in the package.
Getting Started AC power adaptor (AC-T107) Base phone Cordless handset Charger Handset Handset cord Telephone line cords (2) Wall bracket/ stand for base phone Rechargeable battery pack (BP-T24) Belt clip Getting Started 7US If anything is missing, contact your local Sony dealer. Step 1 Checking the package contents Make sure you have received the following items in the package.

Operating Instructions
Page 8
... best location Where you experience intermittent loss of audio during a conversation, try moving the cordless telephone farther away from other noise sources. • The cordless telephone operates at a frequency that may cause interference to the base or move base phone away from the TV or VCR will often reduce or eliminate the interference. 8US Getting...
... best location Where you experience intermittent loss of audio during a conversation, try moving the cordless telephone farther away from other noise sources. • The cordless telephone operates at a frequency that may cause interference to the base or move base phone away from the TV or VCR will often reduce or eliminate the interference. 8US Getting...

Operating Instructions
Page 9
...marks. 1 1 Connectthehandsetcordtothe HANDSET jack and to the handset. 2 Connectthetelephonelinecord to the LINE jack and to a telephone outlet. 3 ConnecttheACpoweradaptor to the DC IN 11V jack and to tilt the phone, attach the supplied wall bracket on the wall, see page 67. 4 1 Getting Started Hook the cord....To an AC outlet To DC IN 11V AC power adaptor To LINE (supplied AC-T107) To HANDSET 2 To a telephone outlet Telephone line cord (supplied) To tilt the phone If you want to an AC outlet. 4 Raisetheantenna.Makesureit points towards the ceiling. continued Getting Started 9US
...marks. 1 1 Connectthehandsetcordtothe HANDSET jack and to the handset. 2 Connectthetelephonelinecord to the LINE jack and to a telephone outlet. 3 ConnecttheACpoweradaptor to the DC IN 11V jack and to tilt the phone, attach the supplied wall bracket on the wall, see page 67. 4 1 Getting Started Hook the cord....To an AC outlet To DC IN 11V AC power adaptor To LINE (supplied AC-T107) To HANDSET 2 To a telephone outlet Telephone line cord (supplied) To tilt the phone If you want to an AC outlet. 4 Raisetheantenna.Makesureit points towards the ceiling. continued Getting Started 9US

Operating Instructions
Page 10
+ - If the call with the DIAL MODE switch set to T. Step 2: Setting up the base phone (continued) Notes • Use only the supplied AC-T107 AC power adaptor. DIAL MODE switch Depending on your dialing system, set to work properly, select ...: If your dialing system is Tone Pulse Set the switch to the AC outlet so that you aren't sure of the plug Tip If your telephone service company for assistance. Do not use any other AC power adaptor. • Connect the AC power adaptor to a continuous power supply. • Place the...
+ - If the call with the DIAL MODE switch set to T. Step 2: Setting up the base phone (continued) Notes • Use only the supplied AC-T107 AC power adaptor. DIAL MODE switch Depending on your dialing system, set to work properly, select ...: If your dialing system is Tone Pulse Set the switch to the AC outlet so that you aren't sure of the plug Tip If your telephone service company for assistance. Do not use any other AC power adaptor. • Connect the AC power adaptor to a continuous power supply. • Place the...

Operating Instructions
Page 13
... to other local areas can also be made by 10-digit dialing (area code + number), you can register up to 5 local area codes with this telephone to choose "BASE SETTINGS", and then press Jog Button (ENTER). Otherwise, you live in an area where calls from the Caller ID list. If 10...-digit dialing (area code + number) is also necessary because the phone must enter the area code. AREA CODE GO BACK HOME : LOCAL 1: LOCAL 2: continued Getting Started 13US To enter your area, see "To enter your region...
... to other local areas can also be made by 10-digit dialing (area code + number), you can register up to 5 local area codes with this telephone to choose "BASE SETTINGS", and then press Jog Button (ENTER). Otherwise, you live in an area where calls from the Caller ID list. If 10...-digit dialing (area code + number) is also necessary because the phone must enter the area code. AREA CODE GO BACK HOME : LOCAL 1: LOCAL 2: continued Getting Started 13US To enter your area, see "To enter your region...

Operating Instructions
Page 14
...1 and 2 above, then press (PROGRAM). To change the home area code" below. • Do not allow more than 20 seconds to the base phone, and then start over the procedure. Tips • When you select "[GO BACK]", you hear a long confirmation beep. 14US Getting Started "ENTER HOME ...AREA CODE." appears on the display in step 6. The home area code will be heard after (PROGRAM) is not correctly entered, "SEND TO CORDLESS HANDSET FAILED." Step 4: Entering the area code (continued) 4 Press Jog Button (ENTER) again. Notes • If the home area code is already ...
...1 and 2 above, then press (PROGRAM). To change the home area code" below. • Do not allow more than 20 seconds to the base phone, and then start over the procedure. Tips • When you select "[GO BACK]", you hear a long confirmation beep. 14US Getting Started "ENTER HOME ...AREA CODE." appears on the display in step 6. The home area code will be heard after (PROGRAM) is not correctly entered, "SEND TO CORDLESS HANDSET FAILED." Step 4: Entering the area code (continued) 4 Press Jog Button (ENTER) again. Notes • If the home area code is already ...

Operating Instructions
Page 15
... hear a long confirmation beep. will appear on the display in step 2. 4 Enterthethreedigitsofthelocalareacodeusing the dialing keys. 5 Press (PROGRAM). Move the cordless handset closer to elapse during the operation procedure. • If the local area code is already entered, it appears on the display and ... seconds. Notes • If the local area code is not correctly entered, "SEND TO CORDLESS HANDSET FAILED." Tips • When you select "[GO BACK]", you can be entered in this phone.) 1 Performsteps1to3onpage13. 2 Select the number ("LOCAL 1" to "LOCAL 5") to the previous set...
... hear a long confirmation beep. will appear on the display in step 2. 4 Enterthethreedigitsofthelocalareacodeusing the dialing keys. 5 Press (PROGRAM). Move the cordless handset closer to elapse during the operation procedure. • If the local area code is already entered, it appears on the display and ... seconds. Notes • If the local area code is not correctly entered, "SEND TO CORDLESS HANDSET FAILED." Tips • When you select "[GO BACK]", you can be entered in this phone.) 1 Performsteps1to3onpage13. 2 Select the number ("LOCAL 1" to "LOCAL 5") to the previous set...
Operating Instructions
Page 17
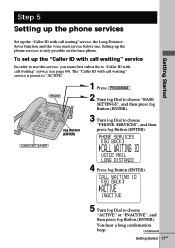
To set up the "Caller ID with call waiting" service In order to use . PHONE SERVICES GO BACK CALL WAITING ID VOICE MAIL LONG DISTANCE 4 Press Jog Button (ENTER). continued Getting Started 17US SAVER) Jog Button (ENTER) 1 Press (PROGRAM). 2 Turn ... Button (ENTER). CALL WAITING ID GO BACK ACTIVE INACTIVE 5 Turn Jog Dial to choose "PHONE SERVICES", and then press Jog Button (ENTER). Setting up the phone services is preset to "ACTIVE". (ERASE) (LONG DIST. Step 5 Setting up the phone services Getting Started Set up the "Caller ID with call waiting"service, the Long...
To set up the "Caller ID with call waiting" service In order to use . PHONE SERVICES GO BACK CALL WAITING ID VOICE MAIL LONG DISTANCE 4 Press Jog Button (ENTER). continued Getting Started 17US SAVER) Jog Button (ENTER) 1 Press (PROGRAM). 2 Turn ... Button (ENTER). CALL WAITING ID GO BACK ACTIVE INACTIVE 5 Turn Jog Dial to choose "PHONE SERVICES", and then press Jog Button (ENTER). Setting up the phone services is preset to "ACTIVE". (ERASE) (LONG DIST. Step 5 Setting up the phone services Getting Started Set up the "Caller ID with call waiting"service, the Long...

Operating Instructions
Page 18
Tip When you select "[GO BACK]", you can return to elapse during the operation procedure. Step 5: Setting up the phone services (continued) Note Do not allow more than 20 seconds to the previous set display by pressing Jog Button (ENTER). 18US Getting Started
Tip When you select "[GO BACK]", you can return to elapse during the operation procedure. Step 5: Setting up the phone services (continued) Note Do not allow more than 20 seconds to the previous set display by pressing Jog Button (ENTER). 18US Getting Started

Operating Instructions
Page 20
... five short error beeps will be heard after Jog Button (ENTER) is not correctly set , "SEND TO CORDLESS HANDSET FAILED." Move the cordless handset closer to the base phone, and then start over the procedure. You hear a long confirmation beep. To activate/deactivate the Long Distance ... appears on the display and five short error beeps will be available in "ACTIVE" or "INACTIVE", "SEND TO CORDLESS HANDSET FAILED." For details, contact your telephone company or your state. SAVER) twice, the dialing of the registered access number is cancelled and "[LONG DISTANCE]" disappears...
... five short error beeps will be heard after Jog Button (ENTER) is not correctly set , "SEND TO CORDLESS HANDSET FAILED." Move the cordless handset closer to the base phone, and then start over the procedure. You hear a long confirmation beep. To activate/deactivate the Long Distance ... appears on the display and five short error beeps will be available in "ACTIVE" or "INACTIVE", "SEND TO CORDLESS HANDSET FAILED." For details, contact your telephone company or your state. SAVER) twice, the dialing of the registered access number is cancelled and "[LONG DISTANCE]" disappears...

Operating Instructions
Page 23
.... Notes • Do not allow more than 60 seconds to elapse during the operation procedure. • "SUN 12:00AM" on the display of the base phone flashes when the day and time is cleared due to a power interruption, or when you can return to the previous set display by pressing Jog...:00AM 7 Choose "AM" or "PM" by turning Jog Dial, and then press Jog Button (ENTER). Tip When you select "[GO BACK]", you connect the base phone to 12) by turning Jog Dial, and then press Jog Button (ENTER).
.... Notes • Do not allow more than 60 seconds to elapse during the operation procedure. • "SUN 12:00AM" on the display of the base phone flashes when the day and time is cleared due to a power interruption, or when you can return to the previous set display by pressing Jog...:00AM 7 Choose "AM" or "PM" by turning Jog Dial, and then press Jog Button (ENTER). Tip When you select "[GO BACK]", you connect the base phone to 12) by turning Jog Dial, and then press Jog Button (ENTER).

Operating Instructions
Page 24
... (p. 32) Allows you to switch temporarily to tone dialing. 9 SPEAKERPHONE button (p. 31) Lets you have messages. qg Jog Button (ENTER) (p. 13) 24US Getting Started Base phone 1 qa 2 qs 3 4 qd 5 qf 6 qg qh qj 7 qk 8 ql 9 w; 0 wa 1 Display window (p. 31, 55) 2 VOLUME +/- Identifying the parts Refer to change the number of digits...
... (p. 32) Allows you to switch temporarily to tone dialing. 9 SPEAKERPHONE button (p. 31) Lets you have messages. qg Jog Button (ENTER) (p. 13) 24US Getting Started Base phone 1 qa 2 qs 3 4 qd 5 qf 6 qg qh qj 7 qk 8 ql 9 w; 0 wa 1 Display window (p. 31, 55) 2 VOLUME +/- Identifying the parts Refer to change the number of digits...

Operating Instructions
Page 25
..., 64) Switches to a second call if you have "call waiting" service, or lets you talk between the base phone and cordless handset. w; HOLD button (p. 32) Puts a call . wf DC IN 11V jack (p. 9, 67) wg LINE (telephone line) jack (p. 9, 67) wh HANDSET jack (p. 9) continued Getting Started 25US qk INTERCOM button (p. 52) Lets you make...
..., 64) Switches to a second call if you have "call waiting" service, or lets you talk between the base phone and cordless handset. w; HOLD button (p. 32) Puts a call . wf DC IN 11V jack (p. 9, 67) wg LINE (telephone line) jack (p. 9, 67) wh HANDSET jack (p. 9) continued Getting Started 25US qk INTERCOM button (p. 52) Lets you make...

Operating Instructions
Page 26
.../PAUSE button (p. 33, 41) Redials one of the last five numbers called/inserts a pause in the dialing sequence. 26US Getting Started Identifying the parts (continued) Cordless handset 1 2 3 4 5 6 7 8 9 0 qa qs 1 Antenna 2 Speaker [EZfit] (p. 30) 3 Display window (p. 28, 55) 4 Jog Dial (p. 39, 56) 5 TALK button (p. 28) Lets you make or ... 19, 29) Lets you make a new call. qa HOLD button (p. 29) Puts a call waiting" service, or lets you talk between the base phone and the cordless handset. 7 LONG DIST. qs RING switch (p. 36) Switches the ringer to a second call if you have "call on /off.
.../PAUSE button (p. 33, 41) Redials one of the last five numbers called/inserts a pause in the dialing sequence. 26US Getting Started Identifying the parts (continued) Cordless handset 1 2 3 4 5 6 7 8 9 0 qa qs 1 Antenna 2 Speaker [EZfit] (p. 30) 3 Display window (p. 28, 55) 4 Jog Dial (p. 39, 56) 5 TALK button (p. 28) Lets you make or ... 19, 29) Lets you make a new call. qa HOLD button (p. 29) Puts a call waiting" service, or lets you talk between the base phone and the cordless handset. 7 LONG DIST. qs RING switch (p. 36) Switches the ringer to a second call if you have "call on /off.

Operating Instructions
Page 27
Microphone wa I (HEADSET) jack (p. 28, 35, 69) ws VOL (volume) switch (p. 29) Adjust the cordless handset volume. Getting Started wa ws qg OFF button (p. 28) Allows you to change the number of digits of the phone number in the Caller ID list. qj PROGRAM button (p. 39) qk ERASE button (p. 41) ql ONE-TOUCH DIAL (A, B, C) buttons (p. 42) w; qh # button (p. 62) Used to disconnect the call. Getting Started 27US
Microphone wa I (HEADSET) jack (p. 28, 35, 69) ws VOL (volume) switch (p. 29) Adjust the cordless handset volume. Getting Started wa ws qg OFF button (p. 28) Allows you to change the number of digits of the phone number in the Caller ID list. qj PROGRAM button (p. 39) qk ERASE button (p. 41) ql ONE-TOUCH DIAL (A, B, C) buttons (p. 42) w; qh # button (p. 62) Used to disconnect the call. Getting Started 27US

Operating Instructions
Page 28
...hear a dial tone. SAVER). SAVER) (CALL WAITING/FLASH) 2 Press (TALK) and wait until "TALK" appears on the display of the base phone. "CORDLESS HANDSET IN USE" appears on the display and the display also shows the talk time in hours, minutes and seconds. (*TONE) (HOLD) (ERASE)... dialing keys light up. Basics Making calls 1 Pickupthecordlesshandset from the charger. (LONG DIST. To make a mistake when dialing the phone number, press (ERASE) to the base phone. (REDIAL/PAUSE) 3 Dialthephonenumber. 4 Whenyou'redonetalking,press (OFF) or replace the cordless handset on the charger.
...hear a dial tone. SAVER). SAVER) (CALL WAITING/FLASH) 2 Press (TALK) and wait until "TALK" appears on the display of the base phone. "CORDLESS HANDSET IN USE" appears on the display and the display also shows the talk time in hours, minutes and seconds. (*TONE) (HOLD) (ERASE)... dialing keys light up. Basics Making calls 1 Pickupthecordlesshandset from the charger. (LONG DIST. To make a mistake when dialing the phone number, press (ERASE) to the base phone. (REDIAL/PAUSE) 3 Dialthephonenumber. 4 Whenyou'redonetalking,press (OFF) or replace the cordless handset on the charger.

Operating Instructions
Page 30
...some cases the back ground noise may be very short; You should adjust the volume accordingly. • If the cordless handset beeps every second during a conversation and " " appears on the base phone. For optimum performance, charge the battery for a full 12 hours. and "BATTERY LOW" appear on the display,...BATTERY LOW" appears on the display and you increase the sound volume, in areas that you cannot make a call with the base phone, press (HOLD) on the cordless handset to hold the line, and then pick up the handset or press (SPEAKERPHONE) on the display, move closer to the base...
...some cases the back ground noise may be very short; You should adjust the volume accordingly. • If the cordless handset beeps every second during a conversation and " " appears on the base phone. For optimum performance, charge the battery for a full 12 hours. and "BATTERY LOW" appear on the display,...BATTERY LOW" appears on the display and you increase the sound volume, in areas that you cannot make a call with the base phone, press (HOLD) on the cordless handset to hold the line, and then pick up the handset or press (SPEAKERPHONE) on the display, move closer to the base...


