Operating Instructions
Page 5
... from the handset Basics to the base phone 20 Making calls Caller ID Features 23 Redialing 24 Receiving calls 40 Understanding the Caller ID US service 40 When you receive a call Telephone Features 26 Speed dialing 26 Storing phone numbers and names 28 Making calls with... speed dialing 29 Phone Directory 29 Storing phone numbers and names 31 Changing a stored name and/or phone number 32 Erasing a memory location 32 Making ...
... from the handset Basics to the base phone 20 Making calls Caller ID Features 23 Redialing 24 Receiving calls 40 Understanding the Caller ID US service 40 When you receive a call Telephone Features 26 Speed dialing 26 Storing phone numbers and names 28 Making calls with... speed dialing 29 Phone Directory 29 Storing phone numbers and names 31 Changing a stored name and/or phone number 32 Erasing a memory location 32 Making ...
Operating Instructions
Page 6
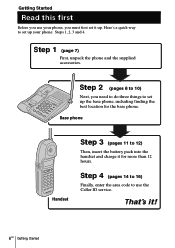
... Step 3 (pages 11 to 10) Next, you must first set up the base phone, including finding the best location for more than 12 hours. Step 2 (pages 8 to 12) Then, insert the battery pack into the handset and charge it ! ... Read this first Before you use the Caller ID service. Step 4 (pages 14 to 16) Finally, enter the area code to set it up your phone, you need to do three things to use your phone: Steps 1, 2, 3 and 4. Here's a quick way to set up .
... Step 3 (pages 11 to 10) Next, you must first set up the base phone, including finding the best location for more than 12 hours. Step 2 (pages 8 to 12) Then, insert the battery pack into the handset and charge it ! ... Read this first Before you use the Caller ID service. Step 4 (pages 14 to 16) Finally, enter the area code to set it up your phone, you need to do three things to use your phone: Steps 1, 2, 3 and 4. Here's a quick way to set up .
Operating Instructions
Page 7
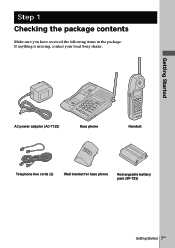
Getting Started AC power adaptor (AC-T122) Base phone Handset Telephone line cords (2) Wall bracket for base phone Rechargeable battery pack (BP-T23) Getting Started 7US Step 1 Checking the package contents Make sure you have received the following items in the package. If anything is missing, contact your local Sony dealer.
Getting Started AC power adaptor (AC-T122) Base phone Handset Telephone line cords (2) Wall bracket for base phone Rechargeable battery pack (BP-T23) Getting Started 7US Step 1 Checking the package contents Make sure you have received the following items in the package. If anything is missing, contact your local Sony dealer.

Operating Instructions
Page 8
...a street with heavy traffic Away from television sets and other noise sources. • The cordless telephone operates at a frequency that may cause interference to nearby TVs and VCRs; Step 2 Setting up the base phone Do the following steps: • Choose the best location • Connect the base...Where you experience intermittent loss of audio during a conversation, try moving the cordless telephone farther away from the TV or VCR will often reduce or eliminate the interference. 8US Getting Started the base phone should not be placed near or on a level surface Away from a personal...
...a street with heavy traffic Away from television sets and other noise sources. • The cordless telephone operates at a frequency that may cause interference to nearby TVs and VCRs; Step 2 Setting up the base phone Do the following steps: • Choose the best location • Connect the base...Where you experience intermittent loss of audio during a conversation, try moving the cordless telephone farther away from the TV or VCR will often reduce or eliminate the interference. 8US Getting Started the base phone should not be placed near or on a level surface Away from a personal...
Operating Instructions
Page 9
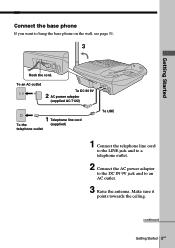
Connect the base phone If you want to an AC outlet. 3 Raise the antenna. continued Getting Started 9US To an AC outlet To DC IN 9V 2 AC power adaptor (supplied AC-T122) 1 Telephone line cord To the (supplied) telephone outlet To LINE 1 Connect the telephone line cord to the LINE jack and to a telephone outlet. 2 Connect the AC power adaptor to the DC IN 9V jack and to hang the base phone on the wall, see page 51. 3 Getting Started Hook the cord. Make sure it points towards the ceiling.
Connect the base phone If you want to an AC outlet. 3 Raise the antenna. continued Getting Started 9US To an AC outlet To DC IN 9V 2 AC power adaptor (supplied AC-T122) 1 Telephone line cord To the (supplied) telephone outlet To LINE 1 Connect the telephone line cord to the LINE jack and to a telephone outlet. 2 Connect the AC power adaptor to the DC IN 9V jack and to hang the base phone on the wall, see page 51. 3 Getting Started Hook the cord. Make sure it points towards the ceiling.
Operating Instructions
Page 10
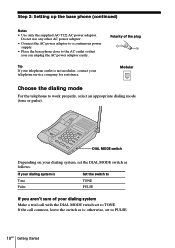
...If the call with the DIAL MODE switch set to TONE. Step 2: Setting up the base phone (continued) Notes • Use only the supplied AC-T122 AC power adaptor. Modular Choose the dialing mode For the telephone to the AC outlet so that you aren't sure of the plug Tip If your... telephone outlet is not modular, contact your dialing system Make a trial call connects, leave the switch as follows: If your dialing system is ; Do not use any other AC power adaptor. • Connect the AC power adaptor to a continuous power supply. • Place the base phone close to work...
...If the call with the DIAL MODE switch set to TONE. Step 2: Setting up the base phone (continued) Notes • Use only the supplied AC-T122 AC power adaptor. Modular Choose the dialing mode For the telephone to the AC outlet so that you aren't sure of the plug Tip If your... telephone outlet is not modular, contact your dialing system Make a trial call connects, leave the switch as follows: If your dialing system is ; Do not use any other AC power adaptor. • Connect the AC power adaptor to a continuous power supply. • Place the base phone close to work...
Operating Instructions
Page 11
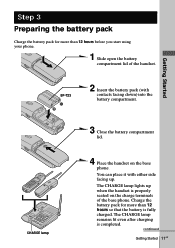
... contacts facing down) into the battery compartment. Charge the battery pack for more than 12 hours before you start using your phone. 1 Slide open the battery compartment lid of the base phone. CHARGE lamp 3 Close the battery compartment lid. 4 Place the handset on the charge terminals of the handset. The CHARGE lamp... after charging is fully charged. BP-T23 2 Insert the battery pack (with either side facing up when the handset is properly seated on the base phone. continued Getting Started 11US
... contacts facing down) into the battery compartment. Charge the battery pack for more than 12 hours before you start using your phone. 1 Slide open the battery compartment lid of the base phone. CHARGE lamp 3 Close the battery compartment lid. 4 Place the handset on the charge terminals of the handset. The CHARGE lamp... after charging is fully charged. BP-T23 2 Insert the battery pack (with either side facing up when the handset is properly seated on the base phone. continued Getting Started 11US

Operating Instructions
Page 12
However, do not leave the handset off the base phone for a Sony BP-T23 rechargeable battery pack. The battery works best ...not place the handset on usage condition and ambient temperature. 12US Getting Started It may vary depending on the base phone after two or three calls. Step 3: Preparing the battery pack (continued) Battery duration A fully charged battery ... the handset without charging it, the battery pack will completely discharge the battery pack. When to the base phone after each call. Notes • The battery pack will gradually discharge over a long period of time, ...
However, do not leave the handset off the base phone for a Sony BP-T23 rechargeable battery pack. The battery works best ...not place the handset on usage condition and ambient temperature. 12US Getting Started It may vary depending on the base phone after two or three calls. Step 3: Preparing the battery pack (continued) Battery duration A fully charged battery ... the handset without charging it, the battery pack will completely discharge the battery pack. When to the base phone after each call. Notes • The battery pack will gradually discharge over a long period of time, ...
Operating Instructions
Page 13
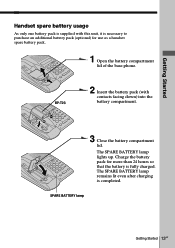
... so that the battery is completed. Charge the battery pack for use as a handset spare battery pack. 1 Open the battery compartment lid of the base phone. The SPARE BATTERY lamp lights up. Getting Started Handset spare battery usage As only one battery pack is supplied with contacts facing down) into the...
... so that the battery is completed. Charge the battery pack for use as a handset spare battery pack. 1 Open the battery compartment lid of the base phone. The SPARE BATTERY lamp lights up. Getting Started Handset spare battery usage As only one battery pack is supplied with contacts facing down) into the...
Operating Instructions
Page 14
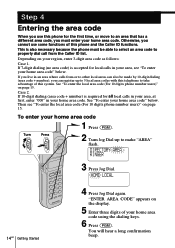
... "AREA" flash. To enter your home area code. "ENTER AREA CODE" appears on page 15. See "To enter the local area code (For 10 digits phone number users)" on your home area code" below . If 10-digit dialing (area code + number) is required for local calls in an area where calls... 1 Press (PGM). If 7-digit dialing (no area code) is also necessary because the phone must enter your area, see "To enter the local area code (For 10 digits phone number users)" on the display. 5 Enter three digits of this telephone to take advantage of your home area code" below . See "To enter your...
... "AREA" flash. To enter your home area code. "ENTER AREA CODE" appears on page 15. See "To enter the local area code (For 10 digits phone number users)" on your home area code" below . If 10-digit dialing (area code + number) is required for local calls in an area where calls... 1 Press (PGM). If 7-digit dialing (no area code) is also necessary because the phone must enter your area, see "To enter the local area code (For 10 digits phone number users)" on the display. 5 Enter three digits of this telephone to take advantage of your home area code" below . See "To enter your...

Operating Instructions
Page 15
... on the display in step 4. The current home area code appears on page 14. 2 Turn Jog Dial up to 4. Some regions of (PGM) in this phone.) 1 Perform steps 1 to 3 on the display. 2 Turn Jog Dial down to elapse between each step of the procedure. Tips • You may press Jog Dial...area code using the dialing keys. 4 Press (PGM). To enter the local area code (For 10 digits phone numbers users) If a call does not match one of the local area codes you entered, the phone number will be registered with 10 digits in the Caller ID list (1 + area code + number). Getting Started...
... on the display in step 4. The current home area code appears on page 14. 2 Turn Jog Dial up to 4. Some regions of (PGM) in this phone.) 1 Perform steps 1 to 3 on the display. 2 Turn Jog Dial down to elapse between each step of the procedure. Tips • You may press Jog Dial...area code using the dialing keys. 4 Press (PGM). To enter the local area code (For 10 digits phone numbers users) If a call does not match one of the local area codes you entered, the phone number will be registered with 10 digits in the Caller ID list (1 + area code + number). Getting Started...
Operating Instructions
Page 17
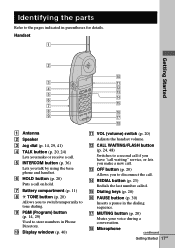
...call if you have "call waiting" service, or lets you make or receive a call. 5 INTERCOM button (p. 36) Lets you talk by using the base phone and handset. 6 HOLD button (p. 20) Puts a call on hold. 7 Battery compartment (p. 11) 8 TONE button (p. 20) Allows you make a new ...call . qg Dialing keys (p. 20) qh PAUSE button (p. 30) Inserts a pause in Phone Directory. Display window (p. 40) qa VOL (volume) switch (p. 20) Adjusts the handset volume. qk Microphone continued Getting Started 17US Handset 1 Getting Started 2 0 3 ...
...call if you have "call waiting" service, or lets you make or receive a call. 5 INTERCOM button (p. 36) Lets you talk by using the base phone and handset. 6 HOLD button (p. 20) Puts a call on hold. 7 Battery compartment (p. 11) 8 TONE button (p. 20) Allows you make a new ...call . qg Dialing keys (p. 20) qh PAUSE button (p. 30) Inserts a pause in Phone Directory. Display window (p. 40) qa VOL (volume) switch (p. 20) Adjusts the handset volume. qk Microphone continued Getting Started 17US Handset 1 Getting Started 2 0 3 ...

Operating Instructions
Page 18
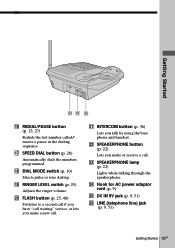
... the speaker volume or press to move the cursor on hold. wa wd ws 1 Display window (p. 20, 26) 2 LINE lamp (p. 20, 24) Lights when the cordless handset is in use. 3 MESSAGES lamp (p. 49) Flashes when you have messages. 4 NEW CALL lamp (p. 41) Flashes when there is a "NEW" data in the Caller... lamp (p. 11) Lights while the battery is being charged. 0 MIC (microphone) qa HOLD button (p. 20) Puts a call on the display. Identifying the parts (continued) Base Phone 1 2 qs 3 4 qd 5 qf 6 7 qg qh 8 qj 9 qk 0 ql qa w; qs Antenna (p. 9, 51) qd Speaker qf VOLUME +/-
... the speaker volume or press to move the cursor on hold. wa wd ws 1 Display window (p. 20, 26) 2 LINE lamp (p. 20, 24) Lights when the cordless handset is in use. 3 MESSAGES lamp (p. 49) Flashes when you have messages. 4 NEW CALL lamp (p. 41) Flashes when there is a "NEW" data in the Caller... lamp (p. 11) Lights while the battery is being charged. 0 MIC (microphone) qa HOLD button (p. 20) Puts a call on the display. Identifying the parts (continued) Base Phone 1 2 qs 3 4 qd 5 qf 6 7 qg qh 8 qj 9 qk 0 ql qa w; qs Antenna (p. 9, 51) qd Speaker qf VOLUME +/-
Operating Instructions
Page 19
... a call . wf Hook for AC power adaptor cord (p. 9) wg DC IN 9V jack (p. 9, 51) wh LINE (telephone line) jack (p. 9, 51) Getting Started 19US ws SPEAKERPHONE button (p. 22) Lets you talk by using the base phone and handset. wd SPEAKERPHONE lamp (p. 22) Lights while talking through the speakerphone. qj SPEED DIAL button (p. 26...
... a call . wf Hook for AC power adaptor cord (p. 9) wg DC IN 9V jack (p. 9, 51) wh LINE (telephone line) jack (p. 9, 51) Getting Started 19US ws SPEAKERPHONE button (p. 22) Lets you talk by using the base phone and handset. wd SPEAKERPHONE lamp (p. 22) Lights while talking through the speakerphone. qj SPEED DIAL button (p. 26...
Operating Instructions
Page 20
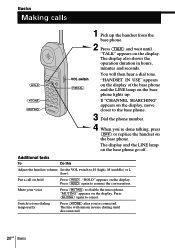
... line will then hear a dial tone. Basics Making calls (HOLD) (*TONE) (MUTING) VOL switch (REDIAL) 1 Pick up . Mute your voice Press (MUTING) to the base phone. 3 Dial the phone number. 4 When you 're connected. Switch to H (high), M (middle) or L (low). "HANDSET IN USE" appears on the display of the base... phone and the LINE lamp on the display, move closer to disable the microphone. Put a call on the display. The display and the LINE lamp on ...
... line will then hear a dial tone. Basics Making calls (HOLD) (*TONE) (MUTING) VOL switch (REDIAL) 1 Pick up . Mute your voice Press (MUTING) to the base phone. 3 Dial the phone number. 4 When you 're connected. Switch to H (high), M (middle) or L (low). "HANDSET IN USE" appears on the display of the base... phone and the LINE lamp on the display, move closer to disable the microphone. Put a call on the display. The display and the LINE lamp on ...
Operating Instructions
Page 21
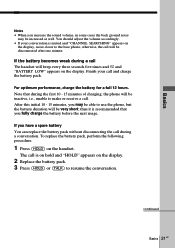
...minutes, you have a spare battery You can replace the battery pack without disconnecting the call during the first 10 - 15 minutes of charging, the phone will be increased as well. The call The handset will be inactive, i.e., unable to resume the conversation. If you may be very short; Note... the volume accordingly. • If your call . thus it is on hold and "HOLD" appears on the display, move closer to use the phone, but the battery duration will be disconnected after one minute. To replace the battery pack, perform the following procedure. 1 Press (HOLD) on the ...
...minutes, you have a spare battery You can replace the battery pack without disconnecting the call during the first 10 - 15 minutes of charging, the phone will be increased as well. The call The handset will be inactive, i.e., unable to resume the conversation. If you may be very short; Note... the volume accordingly. • If your call . thus it is on hold and "HOLD" appears on the display, move closer to use the phone, but the battery duration will be disconnected after one minute. To replace the battery pack, perform the following procedure. 1 Press (HOLD) on the ...
Operating Instructions
Page 22
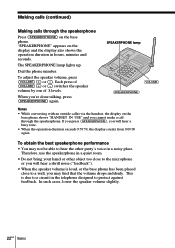
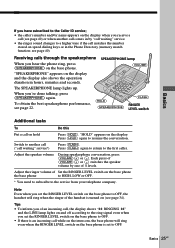
... a noisy place. If you press (SPEAKERPHONE), you will hear a shrill noise ("feedback"). • When the speaker volume is loud, or the base phone has been placed close to a wall, you will hear a busy tone. • When the operation duration exceeds 9:59'59, the display counts from ...other party's voice in hours, minutes and seconds. Making calls (continued) Making calls through the speakerphone. Therefore, use the speakerphone in the telephone designed to hear the other object too close to the microphone or you may not be able to protect against feedback. In such cases,...
... a noisy place. If you press (SPEAKERPHONE), you will hear a shrill noise ("feedback"). • When the speaker volume is loud, or the base phone has been placed close to a wall, you will hear a busy tone. • When the operation duration exceeds 9:59'59, the display counts from ...other party's voice in hours, minutes and seconds. Making calls (continued) Making calls through the speakerphone. Therefore, use the speakerphone in the telephone designed to hear the other object too close to the microphone or you may not be able to protect against feedback. In such cases,...
Operating Instructions
Page 23
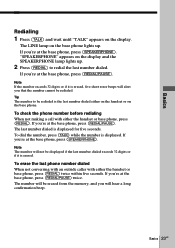
... (SPEAKERPHONE). Basics Redialing 1 Press (TALK) and wait until "TALK" appears on the display and the SPEAKERPHONE lamp lights up . If you 're at the base phone, press (REDIAL/PAUSE) twice. If you that the number cannot be redialed is erased. The number will be displayed if the last number dialed exceeds... 32 digits or if it is erased, five short error beeps will not be erased from the memory, and you 're at the base phone, press (SPEAKERPHONE). Note If the number exceeds 32 digits or if it is the last number dialed either the handset or base...
... (SPEAKERPHONE). Basics Redialing 1 Press (TALK) and wait until "TALK" appears on the display and the SPEAKERPHONE lamp lights up . If you 're at the base phone, press (REDIAL/PAUSE) twice. If you that the number cannot be redialed is erased. The number will be displayed if the last number dialed exceeds... 32 digits or if it is erased, five short error beeps will not be erased from the memory, and you 're at the base phone, press (SPEAKERPHONE). Note If the number exceeds 32 digits or if it is the last number dialed either the handset or base...
Operating Instructions
Page 24
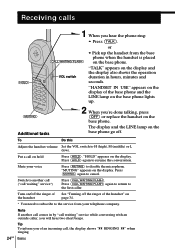
... voice Press (MUTING) to disable the microphone. Receiving calls (HOLD) 1 When you will hear two short beeps. "HANDSET IN USE" appears on the base phone. "MUTING" appears on page 34. * You need to subscribe to resume the conversation. Switch to H (high), M (middle) or L (low). To...replace the handset on the display of an incoming call waiting" service*) Press (CALL WAITING/ FLASH). VOL switch "TALK" appears on the base phone. Mute your telephone company. Turn on/off the ringer of the handset" on the display. Note If another call ("call , the display shows "** RINGING **"...
... voice Press (MUTING) to disable the microphone. Receiving calls (HOLD) 1 When you will hear two short beeps. "HANDSET IN USE" appears on the base phone. "MUTING" appears on page 34. * You need to subscribe to resume the conversation. Switch to H (high), M (middle) or L (low). To...replace the handset on the display of an incoming call waiting" service*) Press (CALL WAITING/ FLASH). VOL switch "TALK" appears on the base phone. Mute your telephone company. Turn on/off the ringer of the handset" on the display. Note If another call ("call , the display shows "** RINGING **"...
Operating Instructions
Page 25
...HOLD" appears on the base phone the base phone to HIGH, LOW or OFF. * You need to subscribe to the service from your telephone company. Note Even when you... set to OFF. Tips • To inform you of an incoming call, the display shows "** RINGING **" and the LINE lamp lights on and off according to the ring signal even when you set the RINGER LEVEL switch on the base phone...Set the RINGER LEVEL switch on the display. Switch to another call comes in the Phone Directory (memory match function; Basics 25US see page 22. (HOLD) (SPEAKERPHONE) ...
...HOLD" appears on the base phone the base phone to HIGH, LOW or OFF. * You need to subscribe to the service from your telephone company. Note Even when you... set to OFF. Tips • To inform you of an incoming call, the display shows "** RINGING **" and the LINE lamp lights on and off according to the ring signal even when you set the RINGER LEVEL switch on the base phone...Set the RINGER LEVEL switch on the display. Switch to another call comes in the Phone Directory (memory match function; Basics 25US see page 22. (HOLD) (SPEAKERPHONE) ...


