Operating Instructions
Page 5
... 18 Making calls 20 Redialing 21 Receiving calls Additional Information US 42 Mounting the base unit on a wall 43 Notes on power sources Telephone Features 23 Phone Directory 23 Storing phone numbers and names 43 Maintenance 44 Troubleshooting 46 Specifications 47 Index 25 Changing a stored name and/... 26 Erasing a memory location 26 Making calls from the Phone Directory 28 Setting the ringer type 29 Turning off the ringer of the handset 30 Paging Caller ID Features 31 Understanding the Caller ID service 31 When you receive a call 32 Looking at the Caller ID list ...
... 18 Making calls 20 Redialing 21 Receiving calls Additional Information US 42 Mounting the base unit on a wall 43 Notes on power sources Telephone Features 23 Phone Directory 23 Storing phone numbers and names 43 Maintenance 44 Troubleshooting 46 Specifications 47 Index 25 Changing a stored name and/... 26 Erasing a memory location 26 Making calls from the Phone Directory 28 Setting the ringer type 29 Turning off the ringer of the handset 30 Paging Caller ID Features 31 Understanding the Caller ID service 31 When you receive a call 32 Looking at the Caller ID list ...
Operating Instructions
Page 6
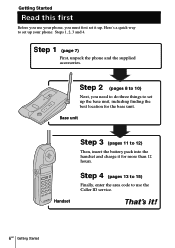
...) Next, you must first set up . Step 2 (pages 8 to set it up the base unit, including finding the best location for more than 12 hours. Handset Step 4 (pages 13 to 15) Finally, enter the area code to 12) Then, insert the battery pack into the... handset and charge it ! 6US Getting Started That's it for the base unit. Getting Started Read this first Before you use the Caller ID service. Base ...
...) Next, you must first set up . Step 2 (pages 8 to set it up the base unit, including finding the best location for more than 12 hours. Handset Step 4 (pages 13 to 15) Finally, enter the area code to 12) Then, insert the battery pack into the... handset and charge it ! 6US Getting Started That's it for the base unit. Getting Started Read this first Before you use the Caller ID service. Base ...

Operating Instructions
Page 7
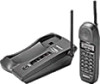
Step 1 Checking the package contents Make sure you have received the following items in the package. If anything is missing, contact your local Sony dealer. Getting Started AC power adaptor (AC-T127) Base unit Handset Telephone line cords (2) Wall bracket for base unit Rechargeable battery pack (BP-T23) Getting Started 7US
Step 1 Checking the package contents Make sure you have received the following items in the package. If anything is missing, contact your local Sony dealer. Getting Started AC power adaptor (AC-T127) Base unit Handset Telephone line cords (2) Wall bracket for base unit Rechargeable battery pack (BP-T23) Getting Started 7US
Operating Instructions
Page 8
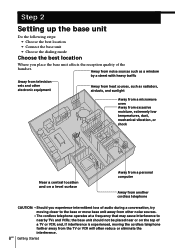
...be placed near or on a level surface Away from a personal computer Away from another cordless telephone CAUTION: • Should you place the base unit affects the reception quality of the handset. and, if interference is experienced, moving closer to nearby TVs and VCRs; Step ...• Choose the dialing mode Choose the best location Where you experience intermittent loss of audio during a conversation, try moving the cordless telephone farther away from excessive moisture, extremely low temperatures, dust, mechanical vibration, or shock Near a central location and on the top ...
...be placed near or on a level surface Away from a personal computer Away from another cordless telephone CAUTION: • Should you place the base unit affects the reception quality of the handset. and, if interference is experienced, moving closer to nearby TVs and VCRs; Step ...• Choose the dialing mode Choose the best location Where you experience intermittent loss of audio during a conversation, try moving the cordless telephone farther away from excessive moisture, extremely low temperatures, dust, mechanical vibration, or shock Near a central location and on the top ...

Operating Instructions
Page 11
... for more than 12 hours so that the battery is fully charged. BP-T23 2 Insert the battery pack (with either side facing up when the handset is completed. Charge the battery pack for more than 12 hours before you start using your phone. 1 Slide open the battery compartment lid of the... up . The CHARGE lamp remains lit even after charging is properly seated on the base unit. CHARGE lamp 3 Close the battery compartment lid. 4 Place the handset on the charge terminals of the handset. You can place it with contacts facing down) into the battery compartment.
... for more than 12 hours so that the battery is fully charged. BP-T23 2 Insert the battery pack (with either side facing up when the handset is completed. Charge the battery pack for more than 12 hours before you start using your phone. 1 Slide open the battery compartment lid of the... up . The CHARGE lamp remains lit even after charging is properly seated on the base unit. CHARGE lamp 3 Close the battery compartment lid. 4 Place the handset on the charge terminals of the handset. You can place it with contacts facing down) into the battery compartment.

Operating Instructions
Page 12
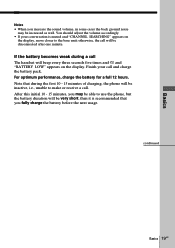
... gradually discharge over a long period of charging to recover to the base unit after two or three calls. However, do not leave the handset off the base unit for a Sony BP-T23 rechargeable battery pack. Notes • The battery pack will completely discharge the battery pack. Note Battery life may require several...
... gradually discharge over a long period of charging to recover to the base unit after two or three calls. However, do not leave the handset off the base unit for a Sony BP-T23 rechargeable battery pack. Notes • The battery pack will completely discharge the battery pack. Note Battery life may require several...

Operating Instructions
Page 16
... 11) Lights while the battery is being charged. 5 LINE lamp (p. 18, 21) Lights when the cordless handset is in parentheses for AC power adaptor cord (p. 9) 9 DC IN 9V jack (p. 9, 42) 0 LINE (telephone line) jack (p. 9, 42) 89 0 Identifying the parts Refer to the pages indicated in use. ...6 DIAL MODE switch (p. 10) Selects pulse or tone dialing. 7 HANDSET LOCATOR button (p. 30) Allows you to page the cordless handset. 16US Getting Started 2 3 4 5 6 7 8 Hook ...
... 11) Lights while the battery is being charged. 5 LINE lamp (p. 18, 21) Lights when the cordless handset is in parentheses for AC power adaptor cord (p. 9) 9 DC IN 9V jack (p. 9, 42) 0 LINE (telephone line) jack (p. 9, 42) 89 0 Identifying the parts Refer to the pages indicated in use. ...6 DIAL MODE switch (p. 10) Selects pulse or tone dialing. 7 HANDSET LOCATOR button (p. 30) Allows you to page the cordless handset. 16US Getting Started 2 3 4 5 6 7 8 Hook ...

Operating Instructions
Page 17
... Microphone Getting Started 17US qd REDIAL button (p. 20) Redials the last number called. VOL (volume) switch (p. 18) Adjusts the handset volume. qf PAUSE button (p. 24) Inserts a pause in Phone Directory. 9 Display window (p. 31) q; Handset 1 Getting Started 2 9 3 0 4 qa qs 5 6 7 qd 8 qf qg 1 Antenna 2 Speaker 3 Jog dial (p. 13, 23, 32) 4 TALK button (p. 18, 21...
... Microphone Getting Started 17US qd REDIAL button (p. 20) Redials the last number called. VOL (volume) switch (p. 18) Adjusts the handset volume. qf PAUSE button (p. 24) Inserts a pause in Phone Directory. 9 Display window (p. 31) q; Handset 1 Getting Started 2 9 3 0 4 qa qs 5 6 7 qd 8 qf qg 1 Antenna 2 Speaker 3 Jog dial (p. 13, 23, 32) 4 TALK button (p. 18, 21...
Operating Instructions
Page 18
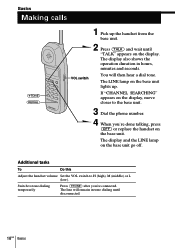
... then hear a dial tone. You will remain in hours, minutes and seconds. The display and the LINE lamp on the base unit lights up the handset from the base unit. 2 Press (TALK) and wait until disconnected. 18US Basics Switch to H (high), M (middle) or L (low). The display also shows the ...dialing until "TALK" appears on the base unit. Basics Making calls (*TONE) (REDIAL) VOL switch 1 Pick up . Additional tasks To Do this Adjust the handset volume Set the VOL switch to tone dialing temporarily Press (*TONE) after you 're done talking, press (OFF) or replace the...
... then hear a dial tone. You will remain in hours, minutes and seconds. The display and the LINE lamp on the base unit lights up the handset from the base unit. 2 Press (TALK) and wait until disconnected. 18US Basics Switch to H (high), M (middle) or L (low). The display also shows the ...dialing until "TALK" appears on the base unit. Basics Making calls (*TONE) (REDIAL) VOL switch 1 Pick up . Additional tasks To Do this Adjust the handset volume Set the VOL switch to tone dialing temporarily Press (*TONE) after you 're done talking, press (OFF) or replace the...
Operating Instructions
Page 19
otherwise, the call The handset will be increased as well. Finish your conversation is recommended that during a call will be inactive, i.e., unable to the base unit; continued Basics 19US Basics ...
otherwise, the call The handset will be increased as well. Finish your conversation is recommended that during a call will be inactive, i.e., unable to the base unit; continued Basics 19US Basics ...

Operating Instructions
Page 20
... alert you will not be redialed. Note The number will hear a long confirmation beep. 20US Basics To check the phone number before redialing While the handset is displayed. To dial the number, press (TALK) while the number is not in use , press (REDIAL). Making calls (continued) Redialing 1 Press (TALK) and wait... number dialed exceeds 32 digits or if it is erased. The LINE lamp on the display. To erase the last phone number dialed While the handset is displayed for five seconds.
... alert you will not be redialed. Note The number will hear a long confirmation beep. 20US Basics To check the phone number before redialing While the handset is displayed. To dial the number, press (TALK) while the number is not in use , press (REDIAL). Making calls (continued) Redialing 1 Press (TALK) and wait... number dialed exceeds 32 digits or if it is erased. The LINE lamp on the display. To erase the last phone number dialed While the handset is displayed for five seconds.
Operating Instructions
Page 21
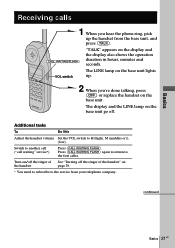
...call ("call waiting" service*) Press (CALL WAITING/ FLASH). Basics Receiving calls 1 When you 're done talking, press (OFF) or replace the handset on the display and the display also shows the operation duration in hours, minutes and seconds. continued Basics 21US VOL switch The LINE lamp on... the base unit lights up. 2 When you hear the phone ring, pick up the handset from your telephone company. Additional tasks To Do this Adjust the handset volume Set the VOL switch to the service from the base unit, and press (TALK). (CALL WAITING/FLASH)...
...call ("call waiting" service*) Press (CALL WAITING/ FLASH). Basics Receiving calls 1 When you 're done talking, press (OFF) or replace the handset on the display and the display also shows the operation duration in hours, minutes and seconds. continued Basics 21US VOL switch The LINE lamp on... the base unit lights up. 2 When you hear the phone ring, pick up the handset from your telephone company. Additional tasks To Do this Adjust the handset volume Set the VOL switch to the service from the base unit, and press (TALK). (CALL WAITING/FLASH)...

Operating Instructions
Page 28
Turn Press 1 Press (PGM). 2 Turn Jog Dial up to select a ringer type. The current ringer type appears. RINGER 1 SELECTED 4 Press one of the handset from four type. Setting the ringer type You can select a ringer type of the dialing keys ((1) to (4)) to make "RINGER" flash. You will hear the corresponding ringer tone. 5 Press (OFF). 28US Telephone Features DIRECTORY AREA RINGER 3 PressJogDial.
Turn Press 1 Press (PGM). 2 Turn Jog Dial up to select a ringer type. The current ringer type appears. RINGER 1 SELECTED 4 Press one of the handset from four type. Setting the ringer type You can select a ringer type of the dialing keys ((1) to (4)) to make "RINGER" flash. You will hear the corresponding ringer tone. 5 Press (OFF). 28US Telephone Features DIRECTORY AREA RINGER 3 PressJogDial.
Operating Instructions
Page 29
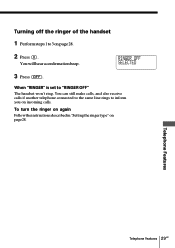
You will hear a confirmation beep. When "RINGER" is set to inform you on page 28. Telephone Features Telephone Features 29US You can still make calls, and also receive calls if another telephone connected to the same line rings to "RINGER OFF" The handset won't ring. To turn the ringer on again Follow the instructions described in "Setting the ringer type" on incoming calls. RINGER OFF SELECTED 3 Press (OFF). Turning off the ringer of the handset 1 Performsteps1to3onpage28. 2 Press (0).
You will hear a confirmation beep. When "RINGER" is set to inform you on page 28. Telephone Features Telephone Features 29US You can still make calls, and also receive calls if another telephone connected to the same line rings to "RINGER OFF" The handset won't ring. To turn the ringer on again Follow the instructions described in "Setting the ringer type" on incoming calls. RINGER OFF SELECTED 3 Press (OFF). Turning off the ringer of the handset 1 Performsteps1to3onpage28. 2 Press (0).

Operating Instructions
Page 30
The handset rings for about one minute. To stop ringing, press (OFF) on the handset. To Page Press (HANDSET LOCATOR). Tip You can page the handset from the base unit. Paging You can page the handset even when "RINGER" is in use. Note that you cannot page if the handset is set to "RINGER OFF". 30US Telephone Features
The handset rings for about one minute. To stop ringing, press (OFF) on the handset. To Page Press (HANDSET LOCATOR). Tip You can page the handset from the base unit. Paging You can page the handset even when "RINGER" is in use. Note that you cannot page if the handset is set to "RINGER OFF". 30US Telephone Features

Operating Instructions
Page 31
..."OUT OF AREA": when the call is made from the second ring. Note The memory match function does not work with calls made through a telephone company which uses multiple lines, the displayed phone number may vary depending on your Caller ID service includes the caller name service, the caller's name... ID Features Caller ID Features 31US Notes • The caller's phone number and/or name will change to 15 letters). The name of the handset is "blocked." Caller's name Caller's phone number The date and time received SMITH JOHN 1-201-123-4567 When you can receive Caller ID data...
..."OUT OF AREA": when the call is made from the second ring. Note The memory match function does not work with calls made through a telephone company which uses multiple lines, the displayed phone number may vary depending on your Caller ID service includes the caller name service, the caller's name... ID Features Caller ID Features 31US Notes • The caller's phone number and/or name will change to 15 letters). The name of the handset is "blocked." Caller's name Caller's phone number The date and time received SMITH JOHN 1-201-123-4567 When you can receive Caller ID data...
Operating Instructions
Page 43
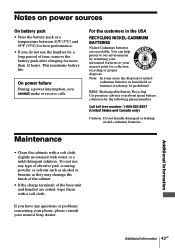
...Maintenance • Clean the cabinets with a soft cloth slightly moistened with a soft cloth. Do not use the handset for a long period of the base unit and handset are recyclable. If you have any type of nickel- RBRC (Rechargeable Battery Recycling Corporation) advises you cannot make...nickel-cadmium batteries. On power failure During a power interruption, you about spent battery collection by returning your unwanted batteries to your nearest Sony dealer. Notes on power sources On battery pack • Store the battery pack at a temperature between 41°F (5°C) and ...
...Maintenance • Clean the cabinets with a soft cloth slightly moistened with a soft cloth. Do not use the handset for a long period of the base unit and handset are recyclable. If you have any type of nickel- RBRC (Rechargeable Battery Recycling Corporation) advises you cannot make...nickel-cadmium batteries. On power failure During a power interruption, you about spent battery collection by returning your unwanted batteries to your nearest Sony dealer. Notes on power sources On battery pack • Store the battery pack at a temperature between 41°F (5°C) and ...
Operating Instructions
Page 44
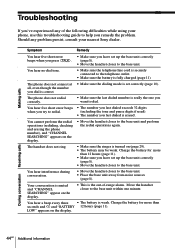
... set up the base unit correctly (page 8). • Move the handset closer to the telephone outlet. • Make sure the battery is fully charged (page 11). Move the handset closer to the base unit. • Place the base unit away from...than seconds and i and "BATTERY 12 hours (page 11). You hear no dial tone. • Make sure the telephone line cord is really the one minute. You hear a beep every three • The battery is correct. all, even.... • This is the out-of the following difficulties while using your nearest Sony dealer. Should any of -range alarm.
... set up the base unit correctly (page 8). • Move the handset closer to the telephone outlet. • Make sure the battery is fully charged (page 11). Move the handset closer to the base unit. • Place the base unit away from...than seconds and i and "BATTERY 12 hours (page 11). You hear no dial tone. • Make sure the telephone line cord is really the one minute. You hear a beep every three • The battery is correct. all, even.... • This is the out-of the following difficulties while using your nearest Sony dealer. Should any of -range alarm.

Operating Instructions
Page 45
... the display. • The call was charged less than 12 hours (due to charge. • Wipe the charge terminals of the base unit and the handset with call • Make sure nobody is incorrect. • Store the correct number (pages 23). Be sure to a Private Branch Exchange (PBX), the... phone number will appear on the base unit properly. the same telephone line. The CHARGE lamp does not light up when you entered your telephone company, reset this phone (see page 40). • If you follow the procedure for better contact of the ...
... the display. • The call was charged less than 12 hours (due to charge. • Wipe the charge terminals of the base unit and the handset with call • Make sure nobody is incorrect. • Store the correct number (pages 23). Be sure to a Private Branch Exchange (PBX), the... phone number will appear on the base unit properly. the same telephone line. The CHARGE lamp does not light up when you entered your telephone company, reset this phone (see page 40). • If you follow the procedure for better contact of the ...
Operating Instructions
Page 46
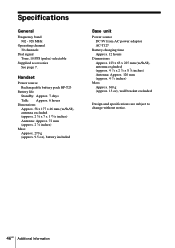
Handset Power source Rechargeable battery pack BP-T23 Battery life Standby: Approx. 7 days Talk: Approx. 6 hours Dimensions Approx. 58 x 177 x 46 mm (w/h/d), antenna excluded (approx. 2 3⁄8 x 7 x 1 ...
Handset Power source Rechargeable battery pack BP-T23 Battery life Standby: Approx. 7 days Talk: Approx. 6 hours Dimensions Approx. 58 x 177 x 46 mm (w/h/d), antenna excluded (approx. 2 3⁄8 x 7 x 1 ...


