
User Guide
Page 1
SNC-RH124/RS46N/RS46P/RS44N/RS44P SNC-RH164/RS86N/RS86P/RS84N/RS84P © 2009 Sony Corporation 4-155-861-11 (1) Network Camera User's Guide Software Version 1.0 Before operating the unit, please read this manual thoroughly and retain it for future reference.
SNC-RH124/RS46N/RS46P/RS44N/RS44P SNC-RH164/RS86N/RS86P/RS84N/RS84P © 2009 Sony Corporation 4-155-861-11 (1) Network Camera User's Guide Software Version 1.0 Before operating the unit, please read this manual thoroughly and retain it for future reference.

User Guide
Page 2
... .....44 Network Tab 44 Wireless Tab - SSL Menu 51 SSL tab 51 CA certificate tab - Table of Contents Overview Features 4 How to Use This User's Guide 5 System Requirements 5 Preparation Assigning the IP Address to the Camera 6 Assigning an IP address using SNC toolbox ..... 6 When using Windows XP ... Panning and tilting by dragging the screen (Vector dragging mode only 22 Moving the camera to a preset position (Common operations in Area zoom and Vector dragging modes 22 Controlling the Camera on a Panorama Image 23 Facing the camera toward a specified point ..... 23 Using the ...
... .....44 Network Tab 44 Wireless Tab - SSL Menu 51 SSL tab 51 CA certificate tab - Table of Contents Overview Features 4 How to Use This User's Guide 5 System Requirements 5 Preparation Assigning the IP Address to the Camera 6 Assigning an IP address using SNC toolbox ..... 6 When using Windows XP ... Panning and tilting by dragging the screen (Vector dragging mode only 22 Moving the camera to a preset position (Common operations in Area zoom and Vector dragging modes 22 Controlling the Camera on a Panorama Image 23 Facing the camera toward a specified point ..... 23 Using the ...
User Guide
Page 3
... 100 Using the Firmware Upgrade 101 Using the Schedule Task 101 Configuring the device setting 103 Device restart and initialization 104 Using the SNC audio upload tool - Setting the periodical recording mode 75 Folder structure of 802.1X authentication function 56 Client certificate Tab 57 CA ... - User Menu 62 Setting the Security - Using the 802.1X Authentication Function - 802.1X Menu 56 System configuration of 802.1X network ....... 56 Common Tab - Saving pan/tilt/zoom position 63 Position Tour Tab - Playing a Video/ Audio File Recorded with External Equipment -
... 100 Using the Firmware Upgrade 101 Using the Schedule Task 101 Configuring the device setting 103 Device restart and initialization 104 Using the SNC audio upload tool - Setting the periodical recording mode 75 Folder structure of 802.1X authentication function 56 Client certificate Tab 57 CA ... - User Menu 62 Setting the Security - Using the 802.1X Authentication Function - 802.1X Menu 56 System configuration of 802.1X network ....... 56 Common Tab - Saving pan/tilt/zoom position 63 Position Tour Tab - Playing a Video/ Audio File Recorded with External Equipment -
User Guide
Page 4
NOTICE TO USERS © 2009 Sony Corporation. This allows 360° panning and 210° tilting operability. • Optical zoom of 10x (SNC-RH124, RH164), 18x (SNC-RS44, RS84), 36x (SNC-RS46, RS86) and a digital zoom of 12x high-magnification zoom functions are provided. • Inserting ... HD (720P) (SNC-RH124/SNC-RH164). • XDNR and Visibility Enhancer enable clearer images for streaming. • Three video compression modes (video codecs) JPEG/MPEG4/H.264 are supported. • Single codec mode, dual codec mode, and triple (SNC-RS46N/P, SNC-RS44N/P, SNC-RS86N/P, SNC-RS84N...
NOTICE TO USERS © 2009 Sony Corporation. This allows 360° panning and 210° tilting operability. • Optical zoom of 10x (SNC-RH124, RH164), 18x (SNC-RS44, RS84), 36x (SNC-RS46, RS86) and a digital zoom of 12x high-magnification zoom functions are provided. • Inserting ... HD (720P) (SNC-RH124/SNC-RH164). • XDNR and Visibility Enhancer enable clearer images for streaming. • Three video compression modes (video codecs) JPEG/MPEG4/H.264 are supported. • Single codec mode, dual codec mode, and triple (SNC-RS46N/P, SNC-RS44N/P, SNC-RS86N/P, SNC-RS84N...
User Guide
Page 5
... computer to display images and the controls of the camera and menu display in actual use. Printing the User's Guide Depending on your screen. SNC-RS46N/RS46P/RS44N/RS44P/ RS86N/RS86P/RS84N/RS84P CPU Intel Core 2 Duo, 1.8 GHz or higher. Memory 1 GB or more . Software display examples Note that..., you operate the camera. Jumping to a related page When you read the Installation Manual before you can click on making the most of the Network Camera, connection examples, and how to set up the camera. This section gives tips on a sentence to jump to a related page. Overview ...
... computer to display images and the controls of the camera and menu display in actual use. Printing the User's Guide Depending on your screen. SNC-RS46N/RS46P/RS44N/RS44P/ RS86N/RS86P/RS84N/RS84P CPU Intel Core 2 Duo, 1.8 GHz or higher. Memory 1 GB or more . Software display examples Note that..., you operate the camera. Jumping to a related page When you read the Installation Manual before you can click on making the most of the Network Camera, connection examples, and how to set up the camera. This section gives tips on a sentence to jump to a related page. Overview ...
User Guide
Page 6
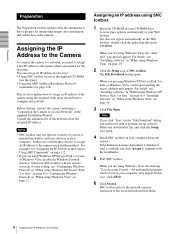
... displayed, read it carefully and click Accept to the Camera SNC toolbox detects the network cameras connected to the local network and lists them. 6 Assigning the IP Address to continue with the installation. 5 Start SNC toolbox. Preparation Preparation The Preparation section explains what the administrator ...page 112) This section explains how to assign an IP address to a Local Network" in your CD-ROM drive. For details, see "Installing software" in your computer. Consult the administrator of SNC toolbox. A cover page appears automatically in the Web browser, double-click the ...
... displayed, read it carefully and click Accept to the Camera SNC toolbox detects the network cameras connected to the local network and lists them. 6 Assigning the IP Address to continue with the installation. 5 Start SNC toolbox. Preparation Preparation The Preparation section explains what the administrator ...page 112) This section explains how to assign an IP address to a Local Network" in your CD-ROM drive. For details, see "Installing software" in your computer. Consult the administrator of SNC toolbox. A cover page appears automatically in the Web browser, double-click the ...

User Guide
Page 8
... If message "Internet Explorer" appears, click Yes. Security Warning" appears, click Run. In this case, operate as SNC toolbox from CD-ROM. If the message "Internet Explorer - Installing ActiveX Control During installation of ActiveX Control, the "Information Bar" or "Security Warning" may appear ... file, and click the Setup icon again. Display sample If the message "File Download - In this case, operate as follows: Example: In case of the network camera is not set the IP address again. Security Warning" appears, click Run.
... If message "Internet Explorer" appears, click Yes. Security Warning" appears, click Run. In this case, operate as SNC toolbox from CD-ROM. If the message "Internet Explorer - Installing ActiveX Control During installation of ActiveX Control, the "Information Bar" or "Security Warning" may appear ... file, and click the Setup icon again. Display sample If the message "File Download - In this case, operate as follows: Example: In case of the network camera is not set the IP address again. Security Warning" appears, click Run.

User Guide
Page 9
... the IP Address to the Camera Security Warning" appears, click Install. Program name The installation of the working field. Configuring Windows Firewall SNC toolbox or SNC audio upload tool may not operate correctly depending on the bar and select Install ActiveX Control.... 3 Select Windows Firewall and select Off in... of Windows Firewall. (No cameras are detected.) In this case, confirm the Windows Firewall configuration as follows: Example: In case of SNC toolbox 1 Select Control Panel from the Start menu of Windows. 2 Select Security Center of ActiveX Control starts.
... the IP Address to the Camera Security Warning" appears, click Install. Program name The installation of the working field. Configuring Windows Firewall SNC toolbox or SNC audio upload tool may not operate correctly depending on the bar and select Install ActiveX Control.... 3 Select Windows Firewall and select Off in... of Windows Firewall. (No cameras are detected.) In this case, confirm the Windows Firewall configuration as follows: Example: In case of SNC toolbox 1 Select Control Panel from the Start menu of Windows. 2 Select Security Center of ActiveX Control starts.

User Guide
Page 10
... If you install software such as SNC toolbox from the CD-ROM. Program name 10 Assigning the IP Address to view files, the Web browser will not open automatically. Program name When the above procedure is completed, the camera connected in the local network are displayed in the CD-ROM.... If the message "Internet Explorer" appears, click Yes. In this case, double-click the "index.htm" file in SNC toolbox. Security Warning" appears, click Run. If the pop-up "AutoPlay" ...
... If you install software such as SNC toolbox from the CD-ROM. Program name 10 Assigning the IP Address to view files, the Web browser will not open automatically. Program name When the above procedure is completed, the camera connected in the local network are displayed in the CD-ROM.... If the message "Internet Explorer" appears, click Yes. In this case, double-click the "index.htm" file in SNC toolbox. Security Warning" appears, click Run. If the pop-up "AutoPlay" ...

User Guide
Page 11
..., click Allow. An unidentified program wants access to your permission to continue" appears, click Continue. In this case, operate as SNC toolbox, the message "User Account Control - Starting the software When you start software such as follows: If the message "Information Bar...of ActiveX Control, the information bar or "Security Warning" may appear. Security Warning" appears, click Install. Configuring Windows Firewall SNC toolbox or SNC audio upload tool may appear. If the information bar appears, click on or off. Security Warning" appears, click Run. ...
..., click Allow. An unidentified program wants access to your permission to continue" appears, click Continue. In this case, operate as SNC toolbox, the message "User Account Control - Starting the software When you start software such as follows: If the message "Information Bar...of ActiveX Control, the information bar or "Security Warning" may appear. Security Warning" appears, click Install. Configuring Windows Firewall SNC toolbox or SNC audio upload tool may appear. If the information bar appears, click on or off. Security Warning" appears, click Run. ...

User Guide
Page 12
When the above procedure is added to the Program or port list. 12 Assigning the IP Address to keep Windows Firewall On, continue with the following steps. 5 Select the "Exceptions" tab. 6 Click Add Program.... 7 If the Add Program dialog appears, select SNC toolbox and click OK. SNC toolbox is completed, the cameras connected in the local network are displayed in SNC toolbox. If you want to the Camera 4 Select Off in the list. Preparation The cameras will be displayed in the "General" tab. 8 Click OK.
When the above procedure is added to the Program or port list. 12 Assigning the IP Address to keep Windows Firewall On, continue with the following steps. 5 Select the "Exceptions" tab. 6 Click Add Program.... 7 If the Add Program dialog appears, select SNC toolbox and click OK. SNC toolbox is completed, the cameras connected in the local network are displayed in SNC toolbox. If you want to the Camera 4 Select Off in the list. Preparation The cameras will be displayed in the "General" tab. 8 Click OK.

User Guide
Page 23
...the camera is moved or when the layout around the camera is moved to face toward a specified point 1 Create a panorama image with SNC toolbox and display it with SNC toolbox. See page 99 for details. Facing the camera toward the clicked point, and the present image at the point is a still ... panorama image can select the desired display format by clicking to the upper right. 2 Click the point you were going to create it . SNC-RH124/RH164 To rotate the panorama image To rotate the panorama image in accordance with the camera's panning direction, set Panorama mode to Rotate in...
...the camera is moved or when the layout around the camera is moved to face toward a specified point 1 Create a panorama image with SNC toolbox and display it with SNC toolbox. See page 99 for details. Facing the camera toward the clicked point, and the present image at the point is a still ... panorama image can select the desired display format by clicking to the upper right. 2 Click the point you were going to create it . SNC-RH124/RH164 To rotate the panorama image To rotate the panorama image in accordance with the camera's panning direction, set Panorama mode to Rotate in...

User Guide
Page 24
...) on the Trigger panel. Tip For the connection of peripheral devices to make e-Mail (SMTP) active and set the address in the camera using the SNC audio upload tool. Playback of the Administrator menu (page 79). 1 Click Image memory on the Trigger panel. To use this function, you click is captured...
...) on the Trigger panel. Tip For the connection of peripheral devices to make e-Mail (SMTP) active and set the address in the camera using the SNC audio upload tool. Playback of the Administrator menu (page 79). 1 Click Image memory on the Trigger panel. To use this function, you click is captured...

User Guide
Page 26
Operating the Camera Using the System Utility You can download system utility from the image operation modes Area zoom and Vector dragging. JPEG framerate You can set the initial state of the viewer. Audio tab You can configure proxy settings by selecting Use proxy. ... sound output. 26 Using the System Utility Image action Select from the tools tab on the main menu. Use the slide bar to begin download. SNC Viewer SNC Viewer is an application which allows you can set the volume for JPEG. Select the start -up connection from: TCP, UDP Unicast, and UDP...
Operating the Camera Using the System Utility You can download system utility from the image operation modes Area zoom and Vector dragging. JPEG framerate You can set the initial state of the viewer. Audio tab You can configure proxy settings by selecting Use proxy. ... sound output. 26 Using the System Utility Image action Select from the tools tab on the main menu. Use the slide bar to begin download. SNC Viewer SNC Viewer is an application which allows you can set the volume for JPEG. Select the start -up connection from: TCP, UDP Unicast, and UDP...

User Guide
Page 27
... slide bar to set the volume for start -up microphone input. Mic Mute: Select this option to mute microphone sound at start -up . Save tab SNC Desktop Viewer This is a gadget that displays the camera image in the side bar of Windows Vista. Frame rate Select the frame rate for the...
... slide bar to set the volume for start -up microphone input. Mic Mute: Select this option to mute microphone sound at start -up . Save tab SNC Desktop Viewer This is a gadget that displays the camera image in the side bar of Windows Vista. Frame rate Select the frame rate for the...

User Guide
Page 35
...of Internal or External. No analog image outputs when IP only is checked, only the current network settings will set as north. Line lock (SNC-RS46N/P, SNC-RS44N/P, SNC-RS86N/P, SNC-RS84N/P only) Select either of the camera. Initialize Tab Reboot Reboots the camera. Click ...the supplied Installation Manual. System Menu SNC-RH124, SNC-RH164 You can perform settings related to reboot the camera. Phase adjustment (SNC-RS46N/P, SNC-RS44N/ P, SNC-RS86N/P, SNC-RS84N/P only) Enter a value. (0 to the direction set that you click OK, the network indicator on page 29. OK/Cancel...
...of Internal or External. No analog image outputs when IP only is checked, only the current network settings will set as north. Line lock (SNC-RS46N/P, SNC-RS44N/P, SNC-RS86N/P, SNC-RS84N/P only) Select either of the camera. Initialize Tab Reboot Reboots the camera. Click ...the supplied Installation Manual. System Menu SNC-RH124, SNC-RH164 You can perform settings related to reboot the camera. Phase adjustment (SNC-RS46N/P, SNC-RS44N/ P, SNC-RS86N/P, SNC-RS84N/P only) Enter a value. (0 to the direction set that you click OK, the network indicator on page 29. OK/Cancel...
User Guide
Page 36
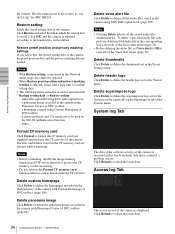
... Loads the stored setting data of the camera is stored. a panorama image recorded in which the setting data is displayed. a homepage created using SNC audio upload tool - The files and folders stored in the Preset Setting menu. Notes • Before formatting, disable the image memory function and...recorded in the corresponding Voice alert tab of the Voice alert menu (page 78). Delete voice alert file Click Delete to Off in the Network menu (page 44) cannot be restored. • When Restore preset position and privacy masking settings is adjusted according to delete the header ...
... Loads the stored setting data of the camera is stored. a panorama image recorded in which the setting data is displayed. a homepage created using SNC audio upload tool - The files and folders stored in the Preset Setting menu. Notes • Before formatting, disable the image memory function and...recorded in the corresponding Voice alert tab of the Voice alert menu (page 78). Delete voice alert file Click Delete to Off in the Network menu (page 44) cannot be restored. • When Restore preset position and privacy masking settings is adjusted according to delete the header ...
User Guide
Page 37
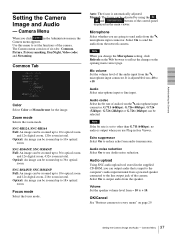
...the m microphone input connector. Camera Menu Common Tab Color Select Color or Monochrome for the image. SNC-RS44N/P, SNC-RS84N/P Full: An image can be selected. Optical: An image can be zoomed up to send the audio from the m microphone input connector. Note If the bit rate is set... input terminal from a powered speaker connected to send audio from the network camera. Audio upload Using SNC audio upload tool stored in the Administrator menu, the Camera menu appears. Select On to 36× optical zoom. Note When you click Camera in the supplied CD-ROM, you are...
...the m microphone input connector. Camera Menu Common Tab Color Select Color or Monochrome for the image. SNC-RS44N/P, SNC-RS84N/P Full: An image can be selected. Optical: An image can be zoomed up to send the audio from the m microphone input connector. Note If the bit rate is set... input terminal from a powered speaker connected to send audio from the network camera. Audio upload Using SNC audio upload tool stored in the Administrator menu, the Camera menu appears. Select On to 36× optical zoom. Note When you click Camera in the supplied CD-ROM, you are...
User Guide
Page 38
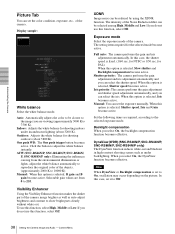
...Tab You can set the color condition, exposure, etc., of the objects. (approximately 2000 K to 10000 K). ATW (SNC-RS46N/P, SNC-RS44N/P, SNC-RS86N/ P, SNC-RS84N/P only): Eliminating the influences causing from 0 to Off. 38 Setting the Camera Image and Audio - XDNR Image ...Outdoor: Adjusts the white balance for shooting indoors under backlighting. To use this case, the shutter speed is selected, Shutter speed becomes active. When this function, select High, Middle or Low. DynaView (WDR) (SNC-RS46N/P, SNC-RS44N/P, SNC-RS86N/P, SNC-RS84N/P only) The DynaView function reduces white...
...Tab You can set the color condition, exposure, etc., of the objects. (approximately 2000 K to 10000 K). ATW (SNC-RS46N/P, SNC-RS44N/P, SNC-RS86N/ P, SNC-RS84N/P only): Eliminating the influences causing from 0 to Off. 38 Setting the Camera Image and Audio - XDNR Image ...Outdoor: Adjusts the white balance for shooting indoors under backlighting. To use this case, the shutter speed is selected, Shutter speed becomes active. When this function, select High, Middle or Low. DynaView (WDR) (SNC-RS46N/P, SNC-RS44N/P, SNC-RS86N/P, SNC-RS84N/P only) The DynaView function reduces white...

User Guide
Page 39
...Selecting +3 provides the highest image saturation. Note The Visibility Enhancer, XDNR, Sharpness brightness, saturation, and contrast settings are as follows: SNC-RS46N/RS44N/RS86N/RS84N: 1/10000, 1/6000, 1/4000, 1/3000, 1/2000, 1/1500, 1/1000, 1/725, 1/500, 1/350, 1/250, 1/180, 1/...follows: SNC-RS46N/P, SNC-RS44N/P, SNC-RS86N/P, SNC-RS84N/P -3, 0, +2, +4, +6, +8, +10, +12, +14, +16, +18, +20, +22, +24, +26, +28 (dB) SNC-RH124/RH164 -3, 0, +3, +6, +8, +9, +12, +15, +18 (dB) Brightness Fine adjust the brightness for the video output. (SNC-RS46N/P, SNC-RS44N/P, SNC-RS86N/P, SNC-RS84N...
...Selecting +3 provides the highest image saturation. Note The Visibility Enhancer, XDNR, Sharpness brightness, saturation, and contrast settings are as follows: SNC-RS46N/RS44N/RS86N/RS84N: 1/10000, 1/6000, 1/4000, 1/3000, 1/2000, 1/1500, 1/1000, 1/725, 1/500, 1/350, 1/250, 1/180, 1/...follows: SNC-RS46N/P, SNC-RS44N/P, SNC-RS86N/P, SNC-RS84N/P -3, 0, +2, +4, +6, +8, +10, +12, +14, +16, +18, +20, +22, +24, +26, +28 (dB) SNC-RH124/RH164 -3, 0, +3, +6, +8, +9, +12, +15, +18 (dB) Brightness Fine adjust the brightness for the video output. (SNC-RS46N/P, SNC-RS44N/P, SNC-RS86N/P, SNC-RS84N...


