Warranty Card
Page 1
... purchase, if this Product is determined to be defective, Sony will replace the Product with refurbished product, at its option, at no charge. 2. For your authorized dealer, call : Sony VCR Customer Information Services Center 1-800-VHS-SONY Or Visit Sony VHS Service Website: www.sony.com/vcrhelp For an accessory or part not available from the date of incidental or consequential damages, or allow limitations on...
... purchase, if this Product is determined to be defective, Sony will replace the Product with refurbished product, at its option, at no charge. 2. For your authorized dealer, call : Sony VCR Customer Information Services Center 1-800-VHS-SONY Or Visit Sony VHS Service Website: www.sony.com/vcrhelp For an accessory or part not available from the date of incidental or consequential damages, or allow limitations on...
Operating Instructions
Page 2
... unit is brought directly from equipment with the limits for the purpose of important operating and maintenance (servicing) instructions in this manual could void your authority to operate this equipment does cause harmful interference to radio or television reception, which the receiver is no guarantee that may condense inside the VCR and cause damage to the video head and tape. However, there is connected...
... unit is brought directly from equipment with the limits for the purpose of important operating and maintenance (servicing) instructions in this manual could void your authority to operate this equipment does cause harmful interference to radio or television reception, which the receiver is no guarantee that may condense inside the VCR and cause damage to the video head and tape. However, there is connected...

Operating Instructions
Page 3
... out parts that it . Do not use power-line operated sets near a swimming pool, etc. Power-Cord Protection Route the power cord so that could result in fire or electric shock. For the set . Use a cloth lightly dampened with a polarized ac power cord plug (a plug having a third pin for cleaning the exterior of the polarized plug by forcing it from overheating, these safety instructions completely before cleaning or...
... out parts that it . Do not use power-line operated sets near a swimming pool, etc. Power-Cord Protection Route the power cord so that could result in fire or electric shock. For the set . Use a cloth lightly dampened with a polarized ac power cord plug (a plug having a third pin for cleaning the exterior of the polarized plug by forcing it from overheating, these safety instructions completely before cleaning or...
Operating Instructions
Page 4
... a need for long periods of any service or repairs to the set, ask the service technician to perform routine safety checks (as specified by the manufacturer) to lightning and power-line surges. Service Damage Requiring Service Unplug the set from the wall outlet and disconnect the antenna or cable system. Section 810 of antennadischarge unit, connection to qualified service personnel under the following the operating instructions...
... a need for long periods of any service or repairs to the set, ask the service technician to perform routine safety checks (as specified by the manufacturer) to lightning and power-line surges. Service Damage Requiring Service Unplug the set from the wall outlet and disconnect the antenna or cable system. Section 810 of antennadischarge unit, connection to qualified service personnel under the following the operating instructions...
Operating Instructions
Page 5
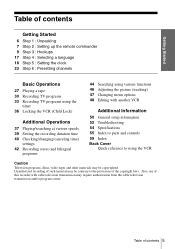
... remote commander 9 Step 3 : Hookups 17 Step 4 : Selecting a language 18 Step 5 : Setting the clock 23 Step 6 : Presetting channels Basic Operations 27 Playing a tape 30 Recording TV programs 33 Recording TV programs using the timer 36 Locking the VCR (Child Lock) Additional Operations 37 Playing/searching at various speeds 39 Setting the recording duration time 40 Checking/changing/canceling timer settings 42 Recording stereo and bilingual programs 44 Searching using various functions 46 Adjusting the picture (tracking) 47 Changing menu options 48 Editing with cable television transmission...
... remote commander 9 Step 3 : Hookups 17 Step 4 : Selecting a language 18 Step 5 : Setting the clock 23 Step 6 : Presetting channels Basic Operations 27 Playing a tape 30 Recording TV programs 33 Recording TV programs using the timer 36 Locking the VCR (Child Lock) Additional Operations 37 Playing/searching at various speeds 39 Setting the recording duration time 40 Checking/changing/canceling timer settings 42 Recording stereo and bilingual programs 44 Searching using various functions 46 Adjusting the picture (tracking) 47 Changing menu options 48 Editing with cable television transmission...
Operating Instructions
Page 9
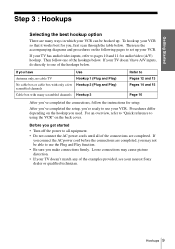
... for audio/video (A/V) hookup. If you connect the AC power cord before the connections are completed, you make connections firmly. Hookups 9 If you 're ready to all equipment. • Do not connect the AC power cords until all of the examples provided, see your VCR so that it works best for setup. After you've completed the setup, you have A/V inputs, do directly to set up your VCR. Then follow the instructions...
... for audio/video (A/V) hookup. If you connect the AC power cord before the connections are completed, you make connections firmly. Hookups 9 If you 're ready to all equipment. • Do not connect the AC power cords until all of the examples provided, see your VCR so that it works best for setup. After you've completed the setup, you have A/V inputs, do directly to set up your VCR. Then follow the instructions...
Operating Instructions
Page 10
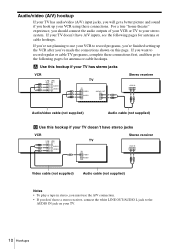
... A/V connection. • If you hook up the VCR after you've made the connections shown on your TV. 10 Hookups If you should connect the audio outputs of your VCR or TV to your stereo system. If your TV doesn't have stereo jacks VCR LINE LINE OUT IN 1 AUDIO VIDEO TV IN VIDEO AUDIO Stereo receiver AUX IN Video cable (not supplied) Audio cable (not supplied) Notes • To play a tape in stereo, you must use your VCR to record programs...
... A/V connection. • If you hook up the VCR after you've made the connections shown on your TV. 10 Hookups If you should connect the audio outputs of your VCR or TV to your stereo system. If your TV doesn't have stereo jacks VCR LINE LINE OUT IN 1 AUDIO VIDEO TV IN VIDEO AUDIO Stereo receiver AUX IN Video cable (not supplied) Audio cable (not supplied) Notes • To play a tape in stereo, you must use your VCR to record programs...
Operating Instructions
Page 13
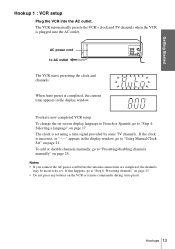
To change the on-screen display language to French or Spanish, go to "Using Manual Clock Set" on the VCR or remote commander during Auto preset. The VCR automatically presets the VCR's clock and TV channels when the VCR is incorrect, or "--:--" appears in the display window. If the clock is plugged into the AC outlet. Hookups 13 You have now completed VCR setup. AC power cord to "Presetting/disabling channels manually" on page 17...
To change the on-screen display language to French or Spanish, go to "Using Manual Clock Set" on the VCR or remote commander during Auto preset. The VCR automatically presets the VCR's clock and TV channels when the VCR is incorrect, or "--:--" appears in the display window. If the clock is plugged into the AC outlet. Hookups 13 You have now completed VCR setup. AC power cord to "Presetting/disabling channels manually" on page 17...

Operating Instructions
Page 15
... power cord before the antenna connections are completed, the channels may be incorrectly set using a time signal provided by some TV channels. When Auto preset is plugged into the AC outlet. You have now completed VCR setup. The clock is incorrect, or "--:--" appears in the display window. To add or disable channels manually, go to "Presetting/disabling channels manually" on the VCR or remote commander during Auto preset. AC power cord to "Using Manual Clock Set...
... power cord before the antenna connections are completed, the channels may be incorrectly set using a time signal provided by some TV channels. When Auto preset is plugged into the AC outlet. You have now completed VCR setup. The clock is incorrect, or "--:--" appears in the display window. To add or disable channels manually, go to "Presetting/disabling channels manually" on the VCR or remote commander during Auto preset. AC power cord to "Using Manual Clock Set...

Operating Instructions
Page 29
... TV screen, press DISPLAY. VCR To display the counter on page 45. Notes • Tapes recorded in the LP mode on other VCRs can be played back on this VCR but the picture quality cannot be guaranteed. • While displaying a menu on the TV screen, you want to find later. The counter in the display window resets to a portion with no recording. Playing a tape 29 Basic Operations To use the time counter...
... TV screen, press DISPLAY. VCR To display the counter on page 45. Notes • Tapes recorded in the LP mode on other VCRs can be played back on this VCR but the picture quality cannot be guaranteed. • While displaying a menu on the TV screen, you want to find later. The counter in the display window resets to a portion with no recording. Playing a tape 29 Basic Operations To use the time counter...
Operating Instructions
Page 31
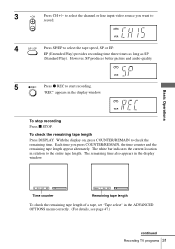
... ADVANCED OPTIONS menu correctly. (For details, see page 47.) continued Recording TV programs 31 Basic Operations 0 : 0 0 : 3 0 SP Time counter Rem 1 : 3 8 SP Remaining tape length To check the remaining tape length of a tape, set "Tape select" in relation to select the channel or line input video source you press COUNTER/REMAIN, the time counter and the remaining tape length appear alternately. However, SP produces better picture and audio quality. Each time...
... ADVANCED OPTIONS menu correctly. (For details, see page 47.) continued Recording TV programs 31 Basic Operations 0 : 0 0 : 3 0 SP Time counter Rem 1 : 3 8 SP Remaining tape length To check the remaining tape length of a tape, set "Tape select" in relation to select the channel or line input video source you press COUNTER/REMAIN, the time counter and the remaining tape length appear alternately. However, SP produces better picture and audio quality. Each time...
Operating Instructions
Page 32
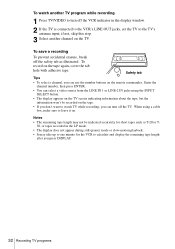
... number buttons on . To record on the TV. When using the INPUT SELECT button. • The display appears on the TV screen indicating information about the tape, but the information won't be indicated accurately for the VCR to calculate and display the remaining tape length after you can select a video source from the LINE IN 1 or LINE-2 IN jacks using a cable box, make sure to leave it on the remote...
... number buttons on . To record on the TV. When using the INPUT SELECT button. • The display appears on the TV screen indicating information about the tape, but the information won't be indicated accurately for the VCR to calculate and display the remaining tape length after you can select a video source from the LINE IN 1 or LINE-2 IN jacks using a cable box, make sure to leave it on the remote...
Operating Instructions
Page 33
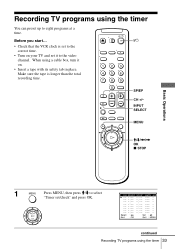
Make sure the tape is set to the correct time. • Turn on your TV and set it on. • Insert a tape with its safety tab in place. INPUT SELECT MENU M/m/ When using the timer You can preset up to the video channel. Before you start... • Check that the VCR clock is longer than the total recording time. ?/1 123 456 789 0 SP/EP CH +/- Recording TV programs using a cable box, turn it to eight programs at a time.
Make sure the tape is set to the correct time. • Turn on your TV and set it on. • Insert a tape with its safety tab in place. INPUT SELECT MENU M/m/ When using the timer You can preset up to the video channel. Before you start... • Check that the VCR clock is longer than the total recording time. ?/1 123 456 789 0 SP/EP CH +/- Recording TV programs using a cable box, turn it to eight programs at a time.
Operating Instructions
Page 35
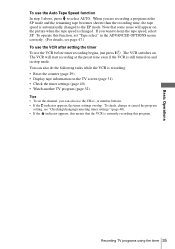
... in stop mode. To check, change or cancel the program setting, see page 47.) To use the VCR after setting the timer To use the CH+/- or number buttons. • If the indicator appears, the timer settings overlap. Basic Operations To use the Auto Tape Speed function In step 3 above, press m to the EP mode. When you are recording a program in the ADVANCED OPTIONS menu correctly. (For details, see "Checking/changing/canceling timer settings" (page 40...
... in stop mode. To check, change or cancel the program setting, see page 47.) To use the VCR after setting the timer To use the CH+/- or number buttons. • If the indicator appears, the timer settings overlap. Basic Operations To use the Auto Tape Speed function In step 3 above, press m to the EP mode. When you are recording a program in the ADVANCED OPTIONS menu correctly. (For details, see "Checking/changing/canceling timer settings" (page 40...

Operating Instructions
Page 43
... recorded onto the main track along the edge of the AUDIO MONITOR setting. Monaural sound is heard in monaural, the sound is recorded onto the normal audio track along with the picture. Additional Operations Recording stereo and bilingual programs 43 Hi-fi audio is recorded on a video tape The VCR records sound onto two separate tracks. Normal audio track Monaural sound Hi-fi audio track (main track) Stereo sound (left/right channels) Notes • To play a tape in stereo, you must use the A/V connections. • When you play a tape recorded...
... recorded onto the main track along the edge of the AUDIO MONITOR setting. Monaural sound is heard in monaural, the sound is recorded onto the normal audio track along with the picture. Additional Operations Recording stereo and bilingual programs 43 Hi-fi audio is recorded on a video tape The VCR records sound onto two separate tracks. Normal audio track Monaural sound Hi-fi audio track (main track) Stereo sound (left/right channels) Notes • To play a tape in stereo, you must use the A/V connections. • When you play a tape recorded...
Operating Instructions
Page 52
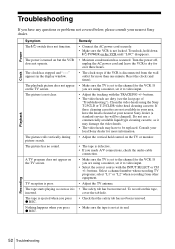
... wall outlet for the VCR. Clean the video heads using a monitor, set it is disconnected from other equipment. • Adjust the TV antenna. • The safety tab has been removed. Select a channel number when recording TV programs; The power is not locked. A TV program does not appear on the TV screen. Recording 52 Troubleshooting Remedy • Connect the AC power cord securely. • Make sure the VCR is turned on the VCR until "LOC" disappears. •...
... wall outlet for the VCR. Clean the video heads using a monitor, set it is disconnected from other equipment. • Adjust the TV antenna. • The safety tab has been removed. Select a channel number when recording TV programs; The power is not locked. A TV program does not appear on the TV screen. Recording 52 Troubleshooting Remedy • Connect the AC power cord securely. • Make sure the VCR is turned on the VCR until "LOC" disappears. •...
Operating Instructions
Page 53
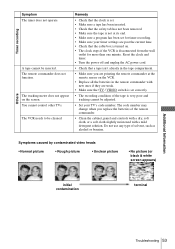
... power off and unplug the AC power cord. • Check that the cable box is turned on. • The clock stops if the VCR is very poor and tracking cannot be adjusted. • Set your timer settings are weak. • Make sure the •TV / VIDEO switch is set for timer recording. • Make sure your TV's code number. Timer recording Others Symptom The timer does not operate. The remote commander does not function. Do not use...
... power off and unplug the AC power cord. • Check that the cable box is turned on. • The clock stops if the VCR is very poor and tracking cannot be adjusted. • Set your timer settings are weak. • Make sure the •TV / VIDEO switch is set for timer recording. • Make sure your TV's code number. Timer recording Others Symptom The timer does not operate. The remote commander does not function. Do not use...
Operating Instructions
Page 54
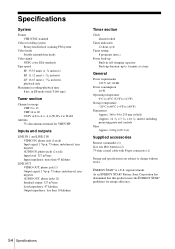
... AUDIO OUT, phono jacks (2) Standard output: 327 mVrms Load impedance: 47 kilohms Output impedance: less than 10 kilohms Timer section Clock Quartz locked Timer indication 12-hour cycle Timer setting 8 programs (max.) Power back-up Built-in EP mode (with F-type connectors (1) Design and specifications are subject to W+84 Antenna 75-ohm antenna terminal for energy efficiency. 54 Specifications registered mark. Specifications System Format VHS NTSC standard Video recording system Rotary head...
... AUDIO OUT, phono jacks (2) Standard output: 327 mVrms Load impedance: 47 kilohms Output impedance: less than 10 kilohms Timer section Clock Quartz locked Timer indication 12-hour cycle Timer setting 8 programs (max.) Power back-up Built-in EP mode (with F-type connectors (1) Design and specifications are subject to W+84 Antenna 75-ohm antenna terminal for energy efficiency. 54 Specifications registered mark. Specifications System Format VHS NTSC standard Video recording system Rotary head...

Operating Instructions
Page 59
Index A Adjusting picture 46 tracking 46 Advanced option 47 Antenna hookup 12 Audio track 43 Audio/video (A/V) hookup 10 Auto Clock Set 18 Auto Tape Speed 35 C Cable hookup 9 Child Lock 36 Cleaning the video heads 52 Clock setting 18 Commercial Skip 28 Connecting Cable TV 16 external antenna connector 51 UHF/VHF band mixer 51 Counter 29 D Disabling channels 25 Dubbing. see Adjusting Tuner presetting 23 Index 59 see Editing E Editing 48 EP mode 31 H Hi-fi audio track 43 L Language selecting...
Index A Adjusting picture 46 tracking 46 Advanced option 47 Antenna hookup 12 Audio track 43 Audio/video (A/V) hookup 10 Auto Clock Set 18 Auto Tape Speed 35 C Cable hookup 9 Child Lock 36 Cleaning the video heads 52 Clock setting 18 Commercial Skip 28 Connecting Cable TV 16 external antenna connector 51 UHF/VHF band mixer 51 Counter 29 D Disabling channels 25 Dubbing. see Adjusting Tuner presetting 23 Index 59 see Editing E Editing 48 EP mode 31 H Hi-fi audio track 43 L Language selecting...
Operating Instructions
Page 60
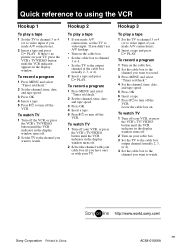
... video input, if you made A/V connections). 2 Insert a tape and press H PLAY. To record a program 1 Press MENU and select "Timer set /check." 2 Set the channel, time, date, and tape speed. 3 Press OK. 4 Insert a tape. 5 Press ?/1 to watch. To record a program 1 Press MENU and select "Timer set /check." 2 Set the channel, time, date, and tape speed. 3 Press OK. 4 Insert a tape. 5 Press ?/1 to turn off . 2 Set the TV to the channel you want to turn off the VCR. If you didn't use A/V hookup: • Turn on the cable box. 2 Set the cable box to the channel...
... video input, if you made A/V connections). 2 Insert a tape and press H PLAY. To record a program 1 Press MENU and select "Timer set /check." 2 Set the channel, time, date, and tape speed. 3 Press OK. 4 Insert a tape. 5 Press ?/1 to watch. To record a program 1 Press MENU and select "Timer set /check." 2 Set the channel, time, date, and tape speed. 3 Press OK. 4 Insert a tape. 5 Press ?/1 to turn off . 2 Set the TV to the channel you want to turn off the VCR. If you didn't use A/V hookup: • Turn on the cable box. 2 Set the cable box to the channel...


