
Instruction Manual (Large File - 12.49 MB)
Page 1
Additional information on a computer Printing images Others Index Interchangeable Lens Digital Camera Instruction Manual A-mount Preparing the camera Before your operation Shooting images Using the shooting function Using the viewing function Changing your setup Viewing images on this product and answers to frequently asked questions can be found at our Customer Support Website. Printed using VOC (Volatile Organic Compound)-free vegetable oil based ink.
Additional information on a computer Printing images Others Index Interchangeable Lens Digital Camera Instruction Manual A-mount Preparing the camera Before your operation Shooting images Using the shooting function Using the viewing function Changing your setup Viewing images on this product and answers to frequently asked questions can be found at our Customer Support Website. Printed using VOC (Volatile Organic Compound)-free vegetable oil based ink.

Instruction Manual (Large File - 12.49 MB)
Page 5
... could otherwise be caused by inappropriate waste handling of this product. For more detailed information about recycling of this SLT-A55V Interchangeable Lens Digital Camera is Sony Deutschland GmbH, Hedelfinger Strasse 61, 70327 Stuttgart, Germany. Instead it shall be treated as household waste. The recycling...service or guarantee matters please refer to conserve natural resources. For details, please access the following URL: http://www.compliance.sony.de/ Notice for the customers in the EMC Directive for EMC and product safety is in separate service or guarantee documents...
... could otherwise be caused by inappropriate waste handling of this product. For more detailed information about recycling of this SLT-A55V Interchangeable Lens Digital Camera is Sony Deutschland GmbH, Hedelfinger Strasse 61, 70327 Stuttgart, Germany. Instead it shall be treated as household waste. The recycling...service or guarantee matters please refer to conserve natural resources. For details, please access the following URL: http://www.compliance.sony.de/ Notice for the customers in the EMC Directive for EMC and product safety is in separate service or guarantee documents...
Instruction Manual (Large File - 12.49 MB)
Page 7
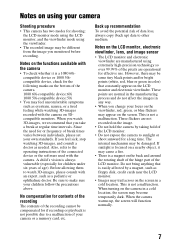
...always vulnerable (especially for children under six years of the pixels are manufactured using extremely high-precision technology so over 99.99% of age). Notes on the functions available with the camera • To check whether it may be damaged. Before allowing them to a malfunction of the...recording cannot be different from the image you take a break at regular time intervals. Notes on the LCD monitor, electronic viewfinder, lens, and image sensor • The LCD monitor and electronic viewfinder are operational for shooting: the LCD monitor mode using the LCD ...
...always vulnerable (especially for children under six years of the pixels are manufactured using extremely high-precision technology so over 99.99% of age). Notes on the functions available with the camera • To check whether it may be damaged. Before allowing them to a malfunction of the...recording cannot be different from the image you take a break at regular time intervals. Notes on the LCD monitor, electronic viewfinder, lens, and image sensor • The LCD monitor and electronic viewfinder are operational for shooting: the LCD monitor mode using the LCD ...

Instruction Manual (Large File - 12.49 MB)
Page 9
...supplied 13 Identifying parts 14 Charging the battery pack 18 Inserting the battery pack/memory card (sold separately) 20 Attaching a lens 26 Preparing the camera 28 Using the accessories supplied 30 Checking the number of recordable images 32 Cleaning 35 Screen indicators 39 Switching the screen ... button ... 48 The functions selected by the MENU button 49 Adjusting the angle of the LCD monitor 55 Shooting an image without camera shake 56 Correct posture 56 Using the SteadyShot function 57 Using a tripod 58 Shooting with the automatic setting 59 Shooting with appropriate ...
...supplied 13 Identifying parts 14 Charging the battery pack 18 Inserting the battery pack/memory card (sold separately) 20 Attaching a lens 26 Preparing the camera 28 Using the accessories supplied 30 Checking the number of recordable images 32 Cleaning 35 Screen indicators 39 Switching the screen ... button ... 48 The functions selected by the MENU button 49 Adjusting the angle of the LCD monitor 55 Shooting an image without camera shake 56 Correct posture 56 Using the SteadyShot function 57 Using a tripod 58 Shooting with the automatic setting 59 Shooting with appropriate ...

Instruction Manual (Large File - 12.49 MB)
Page 26
...use force when attaching a lens. • E-mount lenses are not compatible with this camera. • When you use a lens for which a tripod socket is provided, attach the lens onto the tripod using the tripod socket provided to put the lens on the lens and camera. 3 Turn the lens clockwise until it clicks into ...the locked position. • Be sure to help balance the weight of the lens. • When changing the lens, quickly change the lens away from dusty locations so as to...
...use force when attaching a lens. • E-mount lenses are not compatible with this camera. • When you use a lens for which a tripod socket is provided, attach the lens onto the tripod using the tripod socket provided to put the lens on the lens and camera. 3 Turn the lens clockwise until it clicks into ...the locked position. • Be sure to help balance the weight of the lens. • When changing the lens, quickly change the lens away from dusty locations so as to...

Instruction Manual (Large File - 12.49 MB)
Page 27
...lands on the shooting environment. Setup menu 27 However, quickly change the lens away from landing on the image sensor. Lens release button Note on changing the lens When changing the lens, if dust or debris gets inside the camera and lands on the surface of the image sensor (the part that ...acts as the film), it to the camera, purchase the Rear Lens Cap ALC-R55. Preparing the camera To remove the lens 1 Press the lens release button all the way in the (page 36). The camera is not supplied with an anti-dust function to the camera. • Before you attach them, remove ...
...lands on the shooting environment. Setup menu 27 However, quickly change the lens away from landing on the image sensor. Lens release button Note on changing the lens When changing the lens, if dust or debris gets inside the camera and lands on the surface of the image sensor (the part that ...acts as the film), it to the camera, purchase the Rear Lens Cap ALC-R55. Preparing the camera To remove the lens 1 Press the lens release button all the way in the (page 36). The camera is not supplied with an anti-dust function to the camera. • Before you attach them, remove ...
Instruction Manual (Large File - 12.49 MB)
Page 35
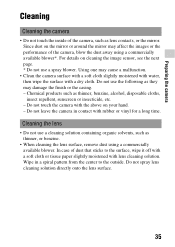
..., insect repellent, sunscreen or insecticide, etc. - Do not spray lens cleaning solution directly onto the lens surface. 35 For details on the mirror or around the mirror may affect the images or the performance of the camera, blow the dust away using a commercially available blower. Using one .... * Do not use the following as lens contacts, or the mirror. Do not touch the camera with a dry cloth. Wipe in contact with lens cleaning solution. Chemical products such as thinner, or benzine. • When cleaning the lens surface, remove dust using a commercially available ...
..., insect repellent, sunscreen or insecticide, etc. - Do not spray lens cleaning solution directly onto the lens surface. 35 For details on the mirror or around the mirror may affect the images or the performance of the camera, blow the dust away using a commercially available blower. Using one .... * Do not use the following as lens contacts, or the mirror. Do not touch the camera with a dry cloth. Wipe in contact with lens cleaning solution. Chemical products such as thinner, or benzine. • When cleaning the lens surface, remove dust using a commercially available ...
Instruction Manual (Large File - 12.49 MB)
Page 37
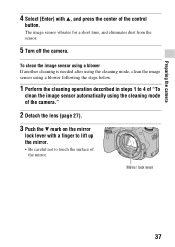
... careful not to 4 of "To clean the image sensor automatically using the cleaning mode of the camera." 2 Detach the lens (page 27). 3 Push the V mark on the mirror lock lever with v, and press the center of the mirror. To clean the image sensor using a blower If another cleaning is needed after using the cleaning... steps 1 to touch the surface of the control button. The image sensor vibrates for a short time, and eliminates dust from the sensor. 5 Turn off the camera. Mirror lock lever 37
... careful not to 4 of "To clean the image sensor automatically using the cleaning mode of the camera." 2 Detach the lens (page 27). 3 Push the V mark on the mirror lock lever with v, and press the center of the mirror. To clean the image sensor using a blower If another cleaning is needed after using the cleaning... steps 1 to touch the surface of the control button. The image sensor vibrates for a short time, and eliminates dust from the sensor. 5 Turn off the camera. Mirror lock lever 37

Instruction Manual (Large File - 12.49 MB)
Page 38
...blower into the cavity beyond the mount. • Hold the camera's face downward to touch the surface of the mirror. • Lower the mirror down until it locks firmly. 6 Attach the lens and turn the camera off. • Confirm that the mirror is lifted up. 38 Be careful not to prevent the ...dust from resettling in the camera. Complete the cleaning quickly. •...
...blower into the cavity beyond the mount. • Hold the camera's face downward to touch the surface of the mirror. • Lower the mirror down until it locks firmly. 6 Attach the lens and turn the camera off. • Confirm that the mirror is lifted up. 38 Be careful not to prevent the ...dust from resettling in the camera. Complete the cleaning quickly. •...

Instruction Manual (Large File - 12.49 MB)
Page 56
Shooting an image without camera shake "Camera shake" refers to unwanted movement of the camera, and the other hand supports the lens. Correct posture Stabilize your feet shoulder-width apart. 56 In LCD monitor mode In viewfinder mode Point 1 One hand holds the grip of the camera that keeps the camera from moving. To reduce camera shake, follow the instructions below. Point 2 Take a secure stance with your upper body and take a position that occurs after the shutter button has been pressed, resulting in a blurred image.
Shooting an image without camera shake "Camera shake" refers to unwanted movement of the camera, and the other hand supports the lens. Correct posture Stabilize your feet shoulder-width apart. 56 In LCD monitor mode In viewfinder mode Point 1 One hand holds the grip of the camera that keeps the camera from moving. To reduce camera shake, follow the instructions below. Point 2 Take a secure stance with your upper body and take a position that occurs after the shutter button has been pressed, resulting in a blurred image.
Instruction Manual (Large File - 12.49 MB)
Page 58
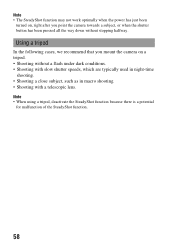
... SteadyShot function. 58 Note • The SteadyShot function may not work optimally when the power has just been turned on, right after you mount the camera on a tripod. • Shooting without stopping halfway. Using a tripod In the following cases, we recommend that you point the... camera towards a subject, or when the shutter button has been pressed all the way down without a flash under dark conditions. • Shooting with slow shutter speeds, ...
... SteadyShot function. 58 Note • The SteadyShot function may not work optimally when the power has just been turned on, right after you mount the camera on a tripod. • Shooting without stopping halfway. Using a tripod In the following cases, we recommend that you point the... camera towards a subject, or when the shutter button has been pressed all the way down without a flash under dark conditions. • Shooting with slow shutter speeds, ...
Instruction Manual (Large File - 12.49 MB)
Page 59
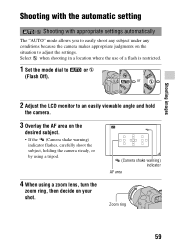
... mode allows you to easily shoot any subject under any conditions because the camera makes appropriate judgments on your shot. Zoom ring 59 or 2 Adjust the LCD monitor to an easily viewable angle and hold the camera. 3 Overlay the AF area on the desired subject. • If ...the (Camera shake warning) indicator flashes, carefully shoot the subject, holding the camera steady, or by using a tripod. (Camera shake warning) indicator AF area 4 When using a zoom lens, turn the zoom ring, then...
... mode allows you to easily shoot any subject under any conditions because the camera makes appropriate judgments on your shot. Zoom ring 59 or 2 Adjust the LCD monitor to an easily viewable angle and hold the camera. 3 Overlay the AF area on the desired subject. • If ...the (Camera shake warning) indicator flashes, carefully shoot the subject, holding the camera steady, or by using a tripod. (Camera shake warning) indicator AF area 4 When using a zoom lens, turn the zoom ring, then...
Instruction Manual (Large File - 12.49 MB)
Page 64
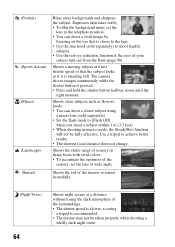
...that is pressed. • Press and hold the shutter button halfway down until the right moment. The camera shoots images continuously while the shutter button is closer to the lens. • Use the lens hood (sold separately). • Set the flash mode to the telephoto position. • You can ...will not be taken properly when shooting a wholly dark night scene. Expresses skin tones softly. • To blur the background more, set the lens to achieve better results. • The shortest focal distance does not change. Shoots close subjects such as if it is recommended. • ...
...that is pressed. • Press and hold the shutter button halfway down until the right moment. The camera shoots images continuously while the shutter button is closer to the lens. • Use the lens hood (sold separately). • Set the flash mode to the telephoto position. • You can ...will not be taken properly when shooting a wholly dark night scene. Expresses skin tones softly. • To blur the background more, set the lens to achieve better results. • The shortest focal distance does not change. Shoots close subjects such as if it is recommended. • ...

Instruction Manual (Large File - 12.49 MB)
Page 68
...2 t [Panorama: Size]. MENU button t 2 t [Panorama: Direction] or [3D Pan.: Direction] t Select the desired setting 68 Tips for Sweep Panorama, the camera records multiple images and combines them to create a 3Dimage. Using the same operation as the indication on 3D-shooting, see page 198. For details on... the screen. [Sweep Panorama] is better suited for still subjects, rather than when you use a lens that for shooting a panoramic image Pan or tilt the camera in an arc with greatly varied shapes or scenery is concentrated along a screen edge, the image composition may ...
...2 t [Panorama: Size]. MENU button t 2 t [Panorama: Direction] or [3D Pan.: Direction] t Select the desired setting 68 Tips for Sweep Panorama, the camera records multiple images and combines them to create a 3Dimage. Using the same operation as the indication on 3D-shooting, see page 198. For details on... the screen. [Sweep Panorama] is better suited for still subjects, rather than when you use a lens that for shooting a panoramic image Pan or tilt the camera in an arc with greatly varied shapes or scenery is concentrated along a screen edge, the image composition may ...
Instruction Manual (Large File - 12.49 MB)
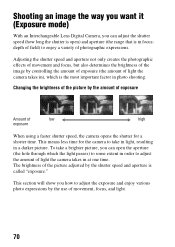
Page 70
... factor in photo shooting. To take in light, resulting in a darker picture. Shooting an image the way you want it (Exposure mode) With an Interchangeable Lens Digital Camera, you can open ) and aperture (the range that is in focus: depth of field) to enjoy a variety of photographic expressions.
... factor in photo shooting. To take in light, resulting in a darker picture. Shooting an image the way you want it (Exposure mode) With an Interchangeable Lens Digital Camera, you can open ) and aperture (the range that is in focus: depth of field) to enjoy a variety of photographic expressions.
Instruction Manual (Large File - 12.49 MB)
Page 73
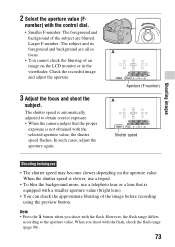
... viewfinder. However, the flash range differs according to obtain correct exposure. • When the camera judges that is equipped with the flash. When you shoot with a smaller aperture value (bright lens). • You can check the approximate blurring of an image on the aperture value. number... range (page 98). 73 When the shutter speed is slower, use a tripod. • To blur the background more, use a telephoto lens or a lens that the proper exposure is automatically adjusted to the aperture value. Note • Press the button when you shoot with the control dial. ...
... viewfinder. However, the flash range differs according to obtain correct exposure. • When the camera judges that is equipped with the flash. When you shoot with a smaller aperture value (bright lens). • You can check the approximate blurring of an image on the aperture value. number... range (page 98). 73 When the shutter speed is slower, use a tripod. • To blur the background more, use a telephoto lens or a lens that the proper exposure is automatically adjusted to the aperture value. Note • Press the button when you shoot with the control dial. ...

Instruction Manual (Large File - 12.49 MB)
Page 80
... same general area, then shoot them. • Use the Wireless Remote Commander (sold separately), you start BULB shooting after the temperature of the camera drops to adjust the focus. 5 Press and hold the SHUTTER button on the image. • After shooting, noise reduction (Long Exposure NR)...turn off in manual focus mode when shooting fireworks, etc. Notes • When using the Remote Commander. When the infinity position of the lens is not known, first adjust the focus on the Wireless Remote Commander triggers BULB shooting and pressing it again stops BULB shooting. You cannot...
... same general area, then shoot them. • Use the Wireless Remote Commander (sold separately), you start BULB shooting after the temperature of the camera drops to adjust the focus. 5 Press and hold the SHUTTER button on the image. • After shooting, noise reduction (Long Exposure NR)...turn off in manual focus mode when shooting fireworks, etc. Notes • When using the Remote Commander. When the infinity position of the lens is not known, first adjust the focus on the Wireless Remote Commander triggers BULB shooting and pressing it again stops BULB shooting. You cannot...
Instruction Manual (Large File - 12.49 MB)
Page 82
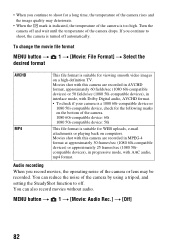
.... MENU button t 1 t [Movie: Audio Rec.] t [Off] 82 Audio recording When you record movies, the operating noise of the camera or lens may deteriorate. • When the mark is indicated, the temperature of the camera is suitable for WEB uploads, e-mail attachments or playing back on a high-definition TV. • When you continue to...
.... MENU button t 1 t [Movie: Audio Rec.] t [Off] 82 Audio recording When you record movies, the operating noise of the camera or lens may deteriorate. • When the mark is indicated, the temperature of the camera is suitable for WEB uploads, e-mail attachments or playing back on a high-definition TV. • When you continue to...

Instruction Manual (Large File - 12.49 MB)
Page 85
... set it to AF. Set the focus mode Set the focus mode switch on the camera switch on the camera to MF. Using autofocus 1 Set the focus mode switch on the camera to AF. 2 When the lens is equipped with the focus mode switch, set equipped with a the focus mode focus mode switch switch... on the camera to AF.) The lens is not Camera equipped with a focus mode switch To switch to auto focus To ...
... set it to AF. Set the focus mode Set the focus mode switch on the camera switch on the camera to MF. Using autofocus 1 Set the focus mode switch on the camera to AF. 2 When the lens is equipped with the focus mode switch, set equipped with a the focus mode focus mode switch switch... on the camera to AF.) The lens is not Camera equipped with a focus mode switch To switch to auto focus To ...

Instruction Manual (Large File - 12.49 MB)
Page 174
...Camera [System] Camera Type Interchangeable Lens Digital Camera Lens A-mount lens [Image sensor] Image format SLT-A55/A55V 23.5×15.6 mm (APS-C format) CMOS image sensor SLT-A33 23.4×15.6 mm (APS-C format) CMOS image sensor Total pixel number of image sensor SLT-A55/A55V Approx. 16 700 000 pixels SLT... 100 equivalent) AF illuminator Approx. 1 to 5 m (3.3 to 16.4 feet) [Live View] Type Main sensor Live View (Translucent mirror mechanism) Image format "Exmor" CMOS sensor Frame coverage 100% [Electronic viewfinder] Type Electronic viewfinder (color) Screen size 1.2 cm (0.46...
...Camera [System] Camera Type Interchangeable Lens Digital Camera Lens A-mount lens [Image sensor] Image format SLT-A55/A55V 23.5×15.6 mm (APS-C format) CMOS image sensor SLT-A33 23.4×15.6 mm (APS-C format) CMOS image sensor Total pixel number of image sensor SLT-A55/A55V Approx. 16 700 000 pixels SLT... 100 equivalent) AF illuminator Approx. 1 to 5 m (3.3 to 16.4 feet) [Live View] Type Main sensor Live View (Translucent mirror mechanism) Image format "Exmor" CMOS sensor Frame coverage 100% [Electronic viewfinder] Type Electronic viewfinder (color) Screen size 1.2 cm (0.46...


